


Missing shims and hardware diagnosis is the fastest way to explain “mysterious” brake noise, pad movement, or uneven wear after a brake job—especially when everything looks “new” from the outside.
Beyond noise, the same missing pieces can change how the pads sit in the bracket, how the caliper slides, and how heat and vibration travel through the assembly—so the symptoms can escalate from annoying to safety-relevant.
In this guide, you’ll learn how to identify what’s missing, where it should have been, and how to prove the root cause with simple checks before you buy parts or tear everything apart.
Giới thiệu ý mới: the key is to treat shims and “little clips” as functional brake components, not optional leftovers—so you can diagnose with confidence instead of guessing.
What counts as “shims and hardware” in a disc brake, and what is the synonym trap?
Shims and hardware are the small damping and retention parts (often called anti-squeal shims, abutment clips, or anti-rattle springs) that control pad vibration, pad position, and sliding friction inside the caliper bracket.
To begin, the “synonym trap” is that different brands and techs use different names for the same meronym parts—so a missing piece gets overlooked because you’re searching the wrong term. In practice, you want to map names to functions: damping, retention, and guidance.

Brake pad shims: where damping really happens
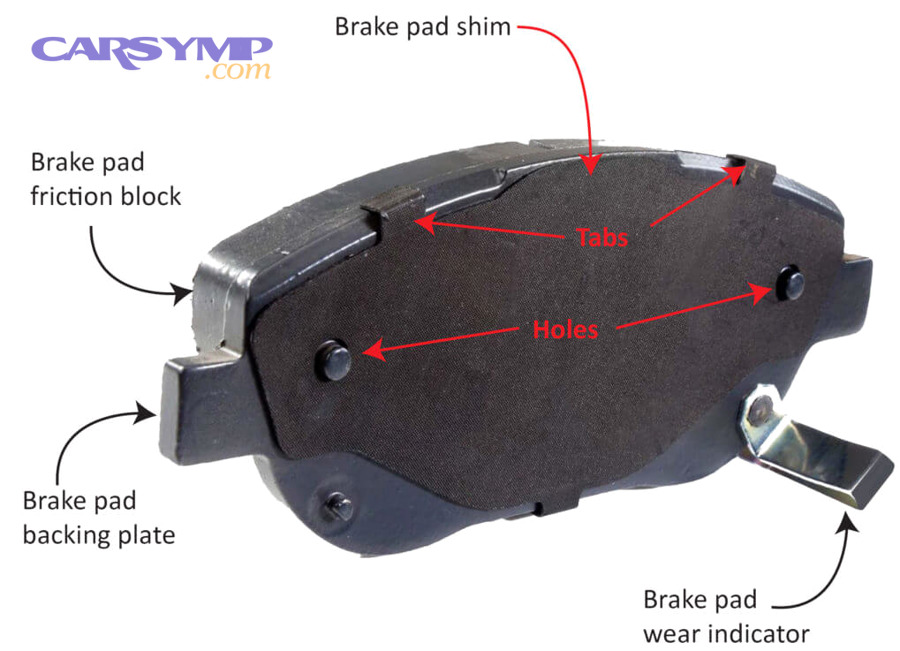
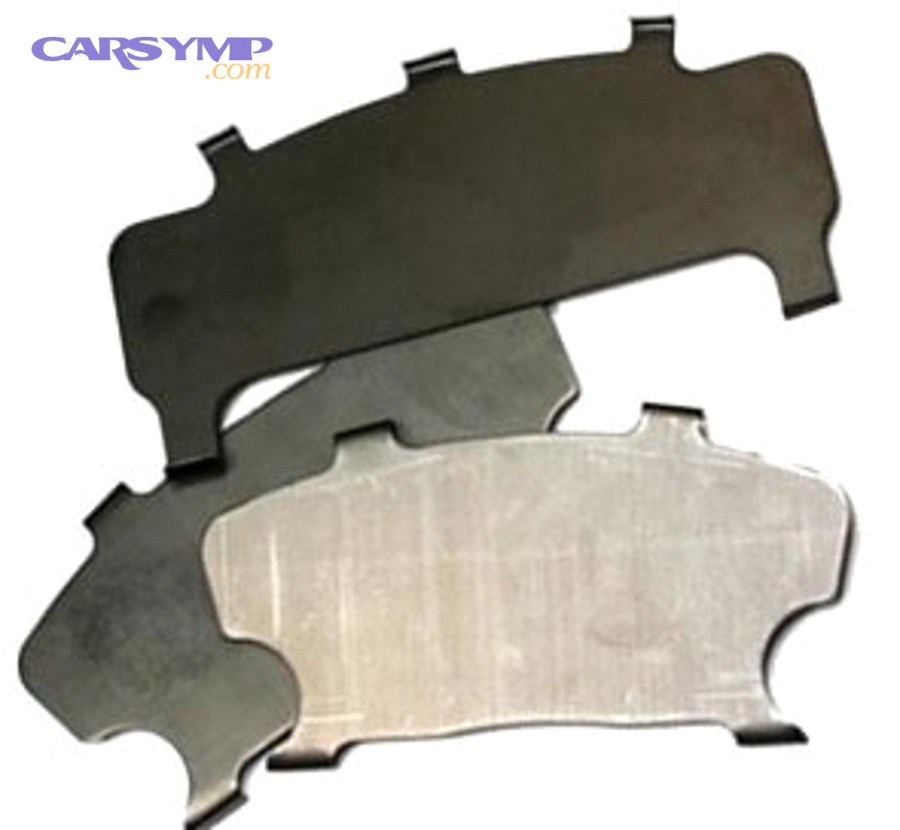
A pad shim is the thin layered plate that sits on the back of the pad (between backing plate and piston or caliper fingers) to decouple vibration and reduce squeal. In many designs it’s multi-layer with a viscoelastic core; heat cycling and corrosion can reduce its damping or cause separation.
To connect the dots, shims are not just about “quiet”—they also influence how evenly the piston load spreads across the pad backing plate when the caliper clamps.
Abutment clips and pad support hardware: where pad motion is controlled
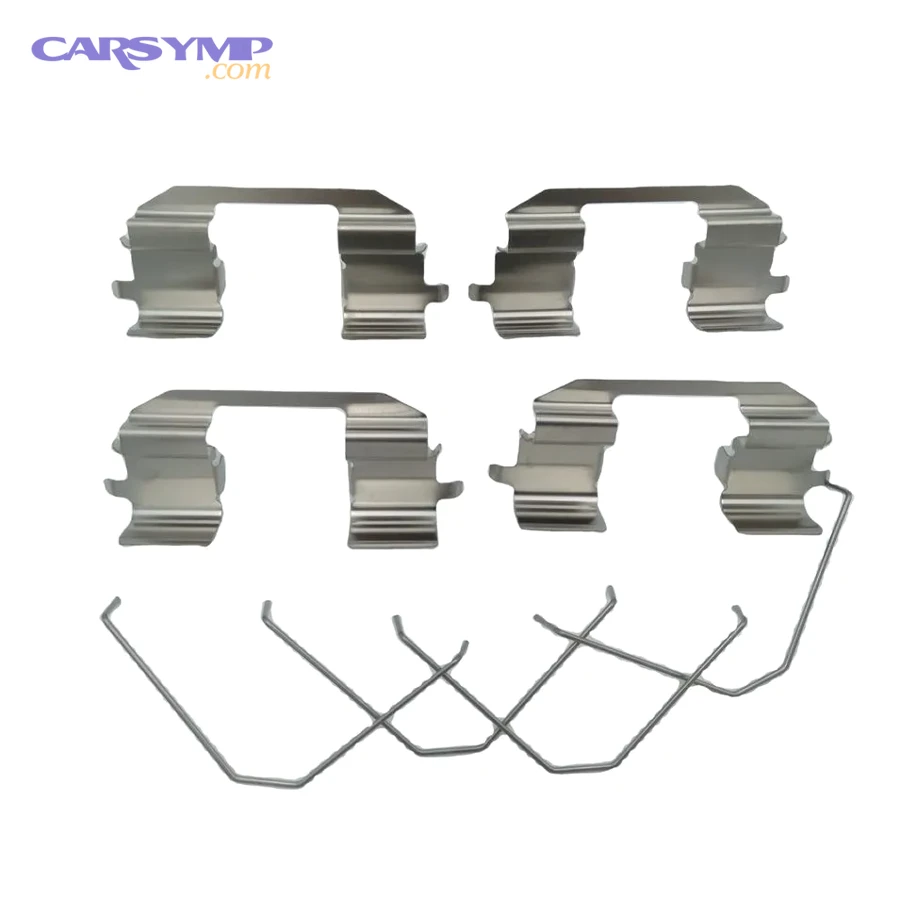
Abutment clips (also called pad support clips) snap onto the caliper bracket “lands” and provide a smooth stainless surface for pad ears to slide on. Without them, pads can bind on rusty bracket lands, sit crooked, or rattle under direction changes.
Next, remember that these clips are wear items: they see heat, salt, and micro-movement. When they’re missing or wrong, you diagnose symptoms that look like “bad pads” even when pads are fine.
Anti-rattle springs, pad retainer clips, and “mystery” springs
Some systems use external anti-rattle springs on the caliper body, internal retainer clips, or pad pins (common on certain performance calipers). If any are missing or installed backward, pads can chatter, click, or squeal even at gentle stops.
More importantly, the wrong spring can preload the pad ears incorrectly—creating constant rotor contact or intermittent squeal that mimics warped rotors or glazed pads.

According to research by SAE International (Technical Papers), in 2016, brake shims are evaluated specifically for damping performance because shim damping is a primary countermeasure used to reduce squeal occurrence rates in disc brakes.
- Entity center: disc brake pad shims and caliper hardware
- Root attributes: damping, retention, sliding surface, alignment, heat cycling
- Unique/Rare attributes: shim delamination, clip geometry mismatch, bracket-land rust jacking
Can missing shims or hardware cause noise, uneven wear, or drag?
Yes—missing shims or hardware can directly cause noise, uneven pad wear, and brake drag because they change vibration damping, pad location, and the friction the pad ears experience as the caliper slides.
To start diagnosing, treat this as a “three-lane” problem: noise (vibration path), wear (pad angle and pressure distribution), and drag (pad not releasing or not sliding freely).
Noise mechanisms when parts are missing
When shims are missing, the pad backing plate couples directly to the piston or caliper fingers, so high-frequency vibration has fewer “lossy” layers to absorb it. When abutment clips are missing, the pad ears can rattle in the bracket or stick-slip on rusty lands, producing chirps, squeaks, or intermittent squeal.
Next, pay attention to when the noise happens: first stop in the morning, only at parking-lot speeds, only in reverse, or only with light pedal pressure. Each timing clue maps to a different vibration regime and contact condition.
Uneven wear patterns that point to missing guidance hardware
Missing or incorrect clips often show up as tapered wear (one end of the pad thinner), “notch” wear at the ears, or shiny rub marks on the pad backing plate where it’s contacting the bracket directly. If the caliper slides are fine but the pad can’t move freely, the pad becomes the “stuck slider.”
More importantly, this uneven wear is not just cosmetic—it can lead to heat spots, rotor discoloration, and a pedal feel that seems inconsistent even with new parts.
Drag and heat: the safety-relevant consequence
If the pad is binding on corroded lands (because clips are missing, deformed, or installed wrong), the pad may not retract. That creates constant light contact, heat buildup, and sometimes a burning smell. In severe cases you’ll see bluing on the rotor hat or edges, or one wheel that’s much hotter than the others after a normal drive.
To connect this to action, drag plus heat is your threshold for “stop and fix now,” because it can damage seals, cook grease, and reduce braking consistency.
According to a technical bulletin resource from Raybestos, low-frequency squeal can be associated with shim migration or pad vibration against the rotor, which aligns with the idea that missing or mispositioned shim/hardware can turn into a repeatable squeal complaint.
Where should each shim, clip, and spring go on a common floating caliper?
On a floating caliper, shims belong on the pad backing plates, abutment clips snap onto the bracket lands where pad ears slide, and anti-rattle devices preload pads so they don’t chatter while still allowing free sliding.
Next, the diagnostic trick is to verify placement by contact marks: every correct piece leaves a predictable rub pattern, and every missing piece leaves a “wrong” shiny witness mark somewhere else.

Inboard pad vs outboard pad: shim orientation and piston contact
The inboard pad is pushed by the piston, so its shim (if used) usually sits between piston and backing plate. The outboard pad is pulled via the caliper body, so its shim often interfaces with caliper fingers or the outer caliper frame. If you swap pads or install shims on the wrong side, you can create localized pressure points and vibration.
To continue, look for a piston “stamp” or circle imprint on the shim/backing plate; if you see the piston imprint directly on bare backing plate when the design calls for a shim, you likely found the missing part or incorrect pad set.
Bracket lands and pad ears: abutment clip fit test
Abutment clips must fully seat on clean bracket lands. The pad ears should slide with controlled resistance—snug but not stuck. If a clip is missing, you’ll often see the pad ear wearing directly into the cast bracket (polished gouge marks) and the pad will feel “notchy” when you move it by hand.
After that, verify the clip isn’t upside down: many clips have a formed “ramp” or spring finger that must face a specific direction to keep the pad centered and quiet.
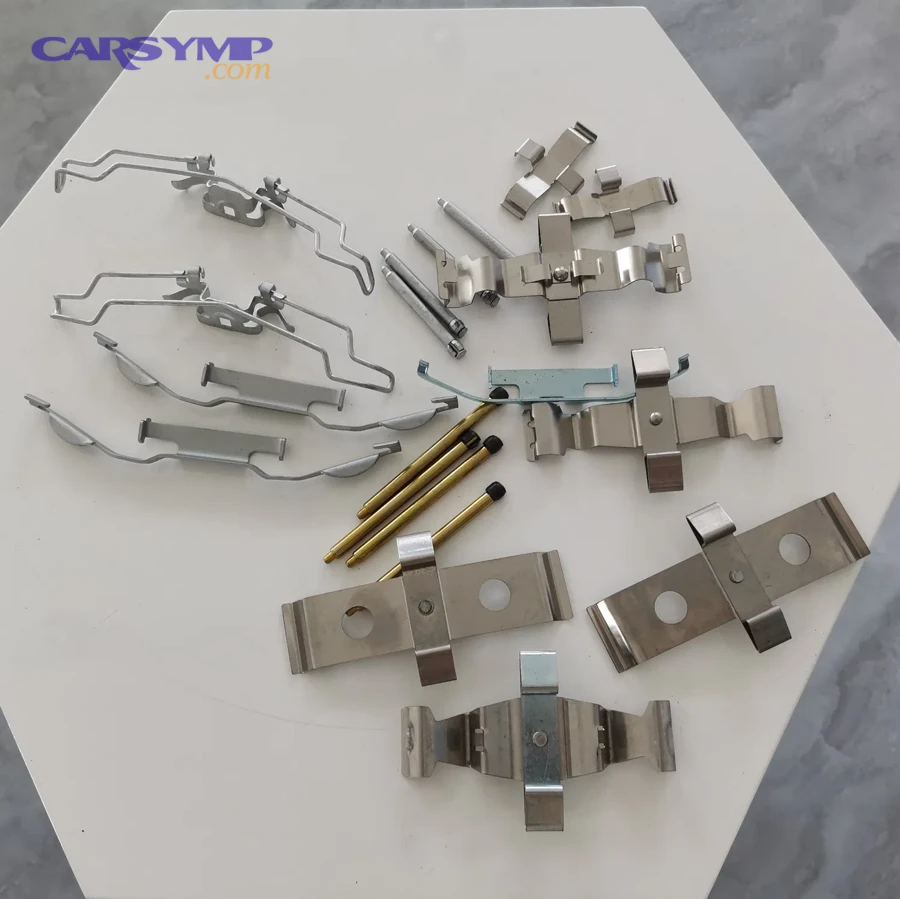
External anti-rattle spring: preload without binding
If your caliper uses an external anti-rattle spring, it should preload the caliper body against the bracket, reducing chatter. A missing spring often produces a light clicking on bumps or direction changes; a misinstalled spring can rub the rotor or interfere with caliper travel.
To connect it to diagnosis, inspect for fresh scrape marks on the spring, caliper face, or rotor edge—those witness marks are strong evidence of wrong positioning rather than “bad pads.”

How do you tell “missing pad shims” apart from “missing bracket hardware” by symptoms?
You can separate missing shims from missing hardware by focusing on (1) when the noise occurs, (2) how the pad wears, and (3) where the witness marks appear on the pad backing plate and bracket lands.
Next, use a comparison mindset: shims mainly change vibration damping, while bracket hardware mainly changes pad guidance and sliding friction.
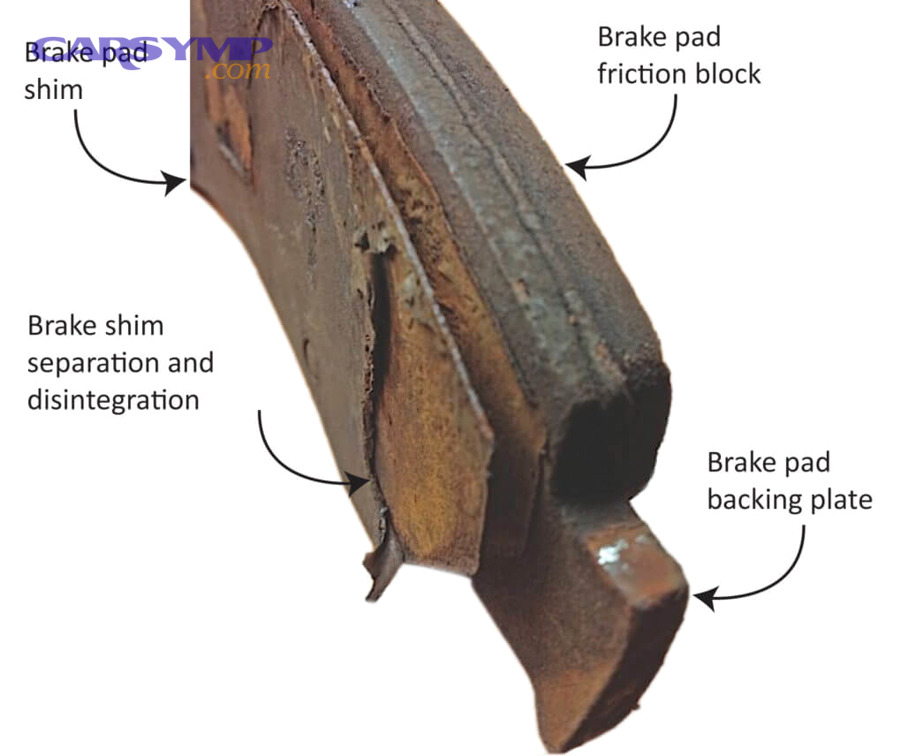
Clue set A: symptoms that lean toward missing or failed shims
Shim-related issues often sound like a higher-pitched squeal or “glass-like” chirp under light pedal pressure, especially after pads have warmed slightly. You may also see a clean piston contact circle directly on the backing plate, or evidence of shim separation/delamination (layers peeling).
To go deeper, shim problems can be intermittent: you’ll get quiet braking after a few harder stops (temporary transfer layer changes), then squeal returns with gentle stops when vibration is least damped.
Clue set B: symptoms that lean toward missing abutment clips or wrong clip geometry
Hardware-related issues often show clicking when changing direction, clunking over bumps, or squeaks that come and go with steering angle. Pad wear may be tapered or “stair-stepped,” and the pad ears may show shiny rub or gouge marks where they should have been sliding on stainless clips.
After that, do the hand-slide test with the caliper removed: if the pad won’t slide smoothly in the bracket with clips installed, you likely have either the wrong clips, rust jacking under the clips, or missing clips that let the pad sit crooked.
Clue set C: when both are missing (or the kit is incomplete)
When both shims and bracket clips are missing or mismatched, the symptoms stack: squeal under light braking, chatter on bumps, and uneven wear—often soon after installation. This is common when pads are swapped without transferring the correct shim set, or when a hardware kit is omitted during a pad slap.
To connect the flow, this is the scenario where people search generic phrases like brake squeal diagnosis and still feel stuck—because the real root cause is missing meronym parts, not the friction material itself.
According to a review paper on disc brake squeal, in 2008, NVH issues in braking systems were described as costly and persistent across the industry, reinforcing why small damping parts like shims and hardware are treated as essential design countermeasures.
What is the fastest inspection routine to confirm missing pieces without guesswork?
The fastest routine is a five-check sequence: visual inventory, witness marks, pad ear slide test, caliper slide check, and post-drive heat comparison across wheels.
To begin, don’t start by buying parts—start by proving what’s missing, because the wrong fix (like swapping rotors) won’t remove the underlying movement and vibration path.

Check 1: visual inventory against the “corner list”
On each wheel corner, confirm you have: (a) pad shims if your pad set uses them, (b) abutment clips on both bracket lands, (c) any anti-rattle/retainer spring(s), (d) intact pad wear indicator (if present), and (e) intact caliper slide pin boots and pins. Missing any one can change the system behavior.
Next, compare left vs right on the same axle. If one corner squeals and the other doesn’t, that side-by-side comparison often reveals the missing clip or shim immediately.
Check 2: witness marks (the “truth serum”)
Look for fresh shiny metal where two parts have been rubbing. Common proof points include: polished gouges on bracket lands (pads rubbing cast iron), shiny rectangles on the caliper piston face (piston rubbing directly), or scrape marks on an external spring. Witness marks are stronger than “symptoms” because they show physical contact.
After that, take note of asymmetry: witness marks only on the leading edge of a pad ear usually indicate pad cocking or binding—often from missing or deformed clips.
Check 3: pad ear slide test in the bracket
With the caliper lifted off (but bracket installed), the pads should slide into the bracket and move with controlled resistance. If they seize, the issue is usually bracket land corrosion under clips, wrong clips, or missing clips that let pads sit at an angle and wedge.
To connect to next steps, this slide test also tells you whether cleaning and file work is needed on the bracket lands before installing new clips.
Check 4: caliper slide pin function
Even with perfect hardware, a stuck slide pin can mimic missing clips because it causes uneven pad loading and noise. Confirm pins move smoothly, boots are intact, and grease is not burnt or contaminated.
Next, if one pin is stiff and the other is free, you’ll often get taper wear—so you should diagnose pin function in parallel with hardware inventory, not after.
Check 5: post-drive heat and drag check
After a normal 10–15 minute drive with a few gentle stops, carefully compare wheel heat left vs right (without touching the rotor). A significantly hotter wheel suggests drag. Drag strongly correlates with pad binding on bracket lands or hardware problems.
To complete the chain, if heat difference exists, prioritize fixing binding first—because that condition can accelerate wear and create persistent noise no matter what shim you add.
How do you confirm the exact missing component using “symptom-to-part” mapping?
You confirm the exact missing component by matching your observations to a small set of high-specificity markers: where the noise is generated, where movement occurs, and which surfaces show abnormal contact.
Next, use a structured mapping so you don’t chase unrelated causes like “bad rotors” when the real issue is pad guidance and damping.
This table contains a quick mapping from observable symptom and witness mark to the most likely missing or incorrect component, plus the fastest confirmation check.
| Observation | Most likely missing/incorrect part | Fast confirmation check | Typical fix direction |
|---|---|---|---|
| High-pitch squeal under light braking; piston circle printed on bare backing plate | Pad shim missing or incompatible pad set | Compare pad backing plate to the quiet side; check for shim tabs/holes or adhesive outline | Install correct shim set or correct pad part number |
| Click/clunk on direction change; pads feel loose in bracket | Abutment clips missing or wrong geometry | Observe pad ear play in bracket; compare clip profile to bracket land shape | Install correct hardware kit; confirm full seating |
| Pad won’t slide; shiny gouges in bracket lands; one wheel hotter | Clips missing or rust jacking under clips | Remove clip; inspect rust scale; test pad slide with/without clip | Clean/true bracket lands; replace clips; apply correct lubricant |
| Intermittent squeal after a recent pad change; shim looks separated or curled | Shim delamination or reused degraded shim | Inspect shim layers; look for peeling edges or corrosion swelling | Replace shims; ensure correct orientation and retention |
| Scrape marks on external spring or caliper face; noise over bumps | Anti-rattle spring misinstalled or missing | Compare to service manual diagram; check spring contact points | Reinstall correctly or replace spring |
Marker 1: pad ear wear tells you where sliding failed
Pad ears should show smooth, even polishing where they contact clips. Deep gouges, sharp edges, or uneven shiny patches point to metal-on-metal contact or wedging from corrosion or missing clips.
After that, check if only one ear shows damage; one-sided ear damage often indicates clip mismatch or a bracket land that’s distorted.
Marker 2: backing plate contact patterns reveal missing damping
If you see the piston imprint directly on bare backing plate but the pad set should have a shim, you’ve found a high-confidence indicator. Likewise, if shim tabs/holes exist but the shim is absent, it’s usually not “optional”—it’s missing.
Next, if you see a shiny rectangle on the outboard pad where it contacts the caliper fingers, that may indicate missing or mispositioned outer shim (depending on design).
Marker 3: rotor scoring and “edge contact” show pad misalignment
Missing guidance hardware can cock pads so they touch the rotor edge differently. You may see scoring on the outer edge, uneven transfer patches, or a wear ridge that forms faster than expected.
To connect it back, misalignment is often the downstream effect; the upstream cause is pad position control—hardware and shims.
According to a dissertation associated with the University of Augsburg, in 2019, composite shim structures are bonded to pad backplates specifically to increase damping and avoid squeal, emphasizing that shim presence and integrity are part of the engineered system, not an afterthought.
How do you fix the problem correctly so it doesn’t come back after a week?
The durable fix is to restore the complete “pad system”: correct shims, correct hardware kit, clean bracket lands, correct lubricant placement, and correct torque—then verify free motion before you put the wheel back on.
Next, prioritize correctness over speed: most repeat squeal complaints happen when clips are reused, bracket lands aren’t cleaned, or shims are missing/mis-seated.
Step 1: use the correct hardware kit for your exact bracket
Hardware kits are not universal. The clip profile must match the bracket land shape, and the spring force must match pad ear thickness. If you force “almost right” clips, you create binding or looseness—both cause noise.
To keep the flow, match by vehicle year/make/model and braking package, then compare old vs new clip geometry before installing.
Step 2: de-rust and true the bracket lands (where clips sit)
Remove clips and clean the lands down to solid metal. Rust scale under a clip can “jack” it upward, tightening pad clearance until the pad binds. Use a wire brush and, if necessary, light filing to restore a flat seat—then test-fit the clip so it sits flush.
After that, re-check pad slide with clips installed; the pad must move smoothly. This is the single most important step for preventing drag and hot-wheel squeal returns.
Step 3: install shims the way they were designed to retain
If the pad uses shims with tabs/holes, ensure tabs are engaged and the shim sits flat. If the pad uses adhesive-backed shims, ensure surfaces are clean and the shim is fully seated, not folded at an edge. Replace shims that are delaminated or corroded.
Next, avoid “stacking” extra layers unless specified; adding random universal shims can change pad thickness and clip preload, causing binding.
Step 4: lubricate only the correct interfaces
Lubrication should be applied where metal slides on metal (pad ears on clips, clip contact points if specified, and slide pins), not on friction surfaces. Over-greasing can fling onto rotors or swell rubber boots if the grease is incompatible.
To connect to verification, once lubricated, re-test pad movement and caliper sliding. If movement is not free and controlled, stop and correct before assembly.
Step 5: torque, re-check, and confirm no drag
Torque the bracket and caliper bolts to specification, confirm the wheel spins freely (with a light, normal pad kiss), and verify the brake hose is not twisted. After a short test drive, compare heat left vs right again to ensure drag is resolved.
After that, if you still get noise, you now have a cleaner diagnostic landscape: with hardware restored, you can evaluate pad material, rotor surface, or driving conditions without the “missing parts” variable.

When is this diagnosis a DIY fix, and when should you stop and involve a shop?
This is usually a DIY fix if the issue is missing clips/shims with no signs of overheating or hydraulic problems; you should stop and involve a shop if you see severe heat damage, seized caliper components, or uncertain braking performance.
Next, use a safety-first threshold: anything that suggests the brake is dragging hard, overheating, or failing to apply/release evenly is beyond “noise only.”
DIY-appropriate conditions
If your symptoms are primarily noise/clicking and you can confirm missing or wrong hardware visually, replacing the hardware kit and restoring shims is typically straightforward. You’ll still need correct tools and safe lifting, but the repair is within normal brake service scope.
To keep it practical, DIY success is highest when you can compare to the other side and when you can verify smooth pad slide before final assembly.
Stop-and-escalate conditions
Stop if: one wheel is dramatically hotter, rotor is blue/purple, pads are smoking, brake pedal feel is inconsistent, caliper piston boot is torn with fluid leakage, or slide pins are seized and won’t free up. These conditions can indicate deeper caliper/bracket damage or hydraulic issues.
More importantly, if the vehicle pulls hard while braking or the pedal goes soft, treat it as a safety-critical problem—do not “test drive and see.”
Communication checklist for the shop
If you involve a shop, provide your evidence: photos of missing clips/shims, witness marks, side-to-side comparison, and a description of when the noise happens. This reduces diagnostic time and keeps the conversation focused on parts and installation integrity.
To connect to expectations, a good shop will also confirm slider function and bracket land condition because those are tightly coupled with hardware-based noise and wear.
According to an NHTSA-hosted technical service document discussing brake noise, brake noise can have multiple causes and is addressed through systematic checks and recommendations, which matches the “prove-by-inspection” approach rather than replacing random parts first.
Contextual Border: Up to this point, you’ve covered the core macro diagnosis—what’s missing, how it causes symptoms, how to prove it, and how to fix it. Next, we move into rare and easily-missed cases that can mimic missing shims/hardware or cause repeat noise after a correct repair.
Rare cases that mimic missing shims and hardware (and how to avoid repeat comebacks)
There are a few rare but real cases where everything is installed correctly, yet the symptoms resemble missing shims or hardware because the system’s tolerances, coatings, or damping layers behave differently under heat, corrosion, and light braking.
Next, the goal is not to complicate your repair; it’s to keep you from reinstalling parts twice because an edge-case was hiding in plain sight.
Tolerance stack and pad backing plate geometry mismatch
Aftermarket pads sometimes have backing plate ear thickness or edge chamfer differences that change how they sit in the bracket and how clips preload them. Even with the correct hardware kit, a slightly different ear geometry can create either excessive tightness (bind/drag) or looseness (rattle/click).
To diagnose, compare the old pad backing plate profile to the new one (ears, chamfers, and any raised features). If the new pad is notably different, the “noise” might be a fitment/tolerance issue rather than missing parts.
Rust jacking under clips that looks like “wrong clip”
Even with clips installed, rust growth under the clip can lift it and choke the pad clearance. The symptom is identical to wrong or missing hardware: pads won’t slide, wheel runs hot, noise returns quickly. The fix is surface restoration—clips alone won’t solve it.
Next, the best prevention is to clean lands to bare solid metal and verify clip seating before you install pads; a clip that rocks or sits high is a repeat-problem waiting to happen.
Shim delamination and heat-aged damping layers
Sometimes the shim is “present” but effectively missing because its layers are separating, corroded, or heat-aged. That makes the damping function collapse, and the noise returns like you forgot the shim. Visually, you may see curling edges, flaking layers, or a shim that no longer sits flat.
After that, replacing the shim (or the pad set if the shim is integrated) is the durable fix; reusing old shims is one of the most common comeback triggers.
Driving condition edge cases: light braking, corrosion film, and cold cycles
Light braking at low speeds, frequent short trips, and wet/cold cycles can allow corrosion films and uneven transfer layers to develop. That can make a properly-installed system produce squeal-like symptoms, which is why people often search phrases like Why brakes squeal at low speed or Brake squeal after pad replacement causes and feel conflicted when hardware looks correct.
To keep the diagnosis grounded, confirm first that the pad slides freely and hardware is correct. If it is, you can then evaluate bedding, rotor surface condition, and pad compound behavior as secondary causes—rather than redoing the hardware again.
According to a SAE-oriented review of disc brake squeal research, in 2008, squeal is described as one of the most troublesome brake noise phenomena and is studied alongside damping countermeasures, supporting why both hardware integrity and damping integrity matter for repeatable noise complaints.
FAQ
Do I always need to replace the hardware kit when changing pads?
In many cases, yes—because clips and springs fatigue, corrode, and lose their designed preload. Reusing worn hardware increases the chance of pad movement and noise, even with premium pads.
To connect to repeat prevention, a fresh hardware kit is often cheaper than repeating the labor and chasing noise afterward.
Is it okay to drive with a missing clip if brakes still stop fine?
It depends: you may still have braking force, but missing clips can lead to pad binding, uneven wear, or drag that overheats the corner. If you have any heat/drag signs, fix it immediately.
Next, if the symptom is only light noise with no heat and you’re driving to a repair location, do it cautiously and minimize hard braking—but treat it as a priority repair, not a “later” item.
What’s the simplest DIY checklist to avoid missing parts during installation?
Use a corner-by-corner parts laydown: old pads/hardware on one side of the workspace, new pads/hardware on the other, and verify each meronym part transfers or replaces before reassembly. This is the essence of a practical DIY squeal troubleshooting checklist.
After that, always confirm pad slide in the bracket before you compress the piston and bolt the caliper down—because once assembled, a binding pad becomes harder to recognize until it overheats.