


Metal-on-metal brake squeal is a yes-or-no safety question: if friction material is gone and steel is contacting the rotor, you should treat the noise as urgent and plan to stop driving as soon as it’s safe.
At the same time, not every high-pitched squeal means you’re already grinding—some noises are caused by moisture, glaze, dust, or pad vibration, and the “right” response depends on what else you notice besides the sound.
To reduce guesswork, this guide walks you through the most reliable clues—sound quality, pedal feel, visible pad thickness, warning lights, and heat—and shows how each clue maps to a likely root cause inside the brake system.
To begin, “Giới thiệu ý mới”: you’ll start with a fast safety triage, then move into the mechanisms that create true metal contact, and finally learn what to do next—whether that means a careful inspection, a short drive to a shop, or a tow.
Does the squeal mean your brakes are metal-on-metal right now?
Sometimes yes: if the squeal is paired with harsh grinding, a scraping that changes with wheel rotation, weak braking, or a burning smell, metal contact is likely; however, a light chirp with normal stopping power is often not true metal-on-metal yet.
To connect this to action, the safest approach is to assume risk until you rule out the big red flags.

Which “sound signatures” are most consistent with grinding?
Metal-on-metal tends to produce a lower, rougher grinding or scraping that follows wheel speed, while non-metal squeal is typically a clean, high-pitched chirp that appears at light pedal pressure and can come and go.
Next, listen for whether the noise changes when you slightly steer left or right—because load transfer can change contact pressure on one corner.
What quick clues can you check in 60 seconds without tools?
Look through the wheel spokes for pad thickness, scan for a brake warning light, and notice any pulsation, pulling, or extra pedal travel. If you smell hot brakes after a short drive, treat that as a serious escalation clue.
After that, shift from guessing to verification by understanding what “metal-on-metal” actually means inside the caliper.
When is it still “squeal,” not “grind,” even if it sounds scary?
Some pads have wear indicators designed to squeal before the backing plate hits the rotor; also, certain pad compounds can squeal loudly at light braking even when material remains. The key is whether the noise is paired with performance loss or visible damage clues.
To illustrate the bigger picture, a structured brake squeal diagnosis uses sound + feel + visual thickness together, not any single clue.
What exactly creates a metal-on-metal squeal in a disc brake system?
Metal-on-metal squeal happens when the pad backing plate, wear indicator, or another steel component contacts the rotor, turning braking friction into a hard contact vibration that can rapidly score the rotor surface.
To understand why this is different from normal squeal, you need a quick map of brake parts and what “should” touch during braking.
Which parts are supposed to touch, and which are not?
The rotor is supposed to touch friction material bonded to the pad; it is not supposed to contact bare steel backing plates, caliper brackets, dust shields, or stones trapped between surfaces. Metal contact is the “wrong interface,” and that’s why it accelerates damage.
Next, connect that interface idea to how pads wear down and what happens when they pass the safe limit.
How wear indicators can sound like metal-on-metal before true grinding
Many pads include a thin metal “tab” that touches the rotor when pad material gets low, producing a warning squeal. That noise can be sharp and persistent, but it’s often an early alert rather than full backing-plate grinding—unless you keep driving past it.
After that, it helps to know what “past it” looks like, so you can categorize warning signs reliably.
Why heat and vibration turn contact into loud noise
As braking heats the rotor and pad, friction characteristics change; vibration can amplify and turn slight contact into a loud squeal. If the pad is worn to steel, heat can also cause glazing and scoring that makes the noise harsher and more constant.
To move from mechanism to confirmation, the next section groups the most trustworthy “proof” signals.
Which warning signs confirm the pad is past the safe limit?
There are four primary confirmation buckets: visible pad thickness near zero, rotor scoring/blueing, braking performance changes, and secondary symptoms like burning smell or smoke—together they strongly indicate metal contact rather than harmless squeal.
To keep your decision clear, treat these as cumulative evidence: the more buckets you see, the higher the certainty.

1) Visual proof: pad thickness and backing plate exposure
If you can see the pad through the wheel and the friction material looks paper-thin—or you can visually identify bare metal where friction material should be—that’s a near-direct confirmation. On many vehicles, 3 mm or less is already “plan service now,” and near 0 mm is “stop driving.”
Next, connect visibility with rotor condition, because rotors often tell the story even when pad view is limited.
2) Rotor surface proof: grooves, lips, and discoloration
Deep circular grooves, a sharp outer “lip,” or bluish discoloration suggest severe wear and heat. While minor grooves can occur with normal use, heavy scoring paired with noise strongly points to hard contact and material loss.
After that, focus on what your foot feels, because performance changes are often the earliest “you can’t ignore this” sign.
3) Performance proof: longer stops, pedal changes, pulling
If the car takes more distance to stop, the pedal feels lower than usual, or the vehicle pulls to one side under braking, you may have uneven pad wear, caliper issues, or rotor damage—conditions that commonly coexist with advanced pad wear and metal contact.
Next, use heat clues to decide whether you should drive at all.
4) Heat proof: burning smell, smoke, one wheel hotter
A sharp burning smell after light driving, visible smoke, or a single wheel that feels significantly hotter than the others (without touching the rotor) suggests overheating, stuck calipers, or severe friction problems. This is a strong “do not continue” signal.
To avoid mislabeling other squeals as grinding, the next step is to separate normal squeal behavior from true damage behavior.
How can you tell normal low-speed squeal apart from true metal contact?
Normal squeal is often high-pitched, intermittent, and sensitive to light braking, while metal contact is more rough, constant, and tied to wheel speed; the difference is clearer when you compare sound, feel, and visual evidence together.
To make that comparison practical, use the table below as a quick “pattern matcher” before you decide to drive farther.

This table contains the most common noise patterns, what they usually indicate, and what to do next so you can respond with the right urgency.
| Noise/Feel Pattern | Most Likely Cause | Risk Level | Best Next Step |
|---|---|---|---|
| High-pitched chirp at light braking, comes/goes | Pad vibration, moisture, light glazing, dust | Low to Medium | Inspect pad thickness; clean/bed-in if appropriate |
| Sharp squeal that becomes constant over days | Wear indicator contacting rotor | Medium to High | Schedule service soon; avoid heavy driving |
| Rough grinding/scraping that follows wheel speed | Backing plate on rotor, severe wear | High | Stop driving; tow or drive only if unavoidable and very short |
| Thump + vibration in pedal while braking | Rotor thickness variation, uneven deposits | Medium | Inspect rotors/pads; measure runout if needed |
| Noise only on first stop in the morning/rain | Surface rust film on rotor | Low | Monitor; should fade after a few stops |
Why some brakes squeal at very low speeds even when healthy
Light braking at parking-lot speeds can excite pad vibration because clamp force is low and the pad can “stick-slip” across the rotor. This is one reason people search Why brakes squeal at low speed even when braking feels normal.
Next, remember that “low-speed squeal” becomes suspicious when it turns into constant scraping or pairs with visible wear.
How weather and surface film can mimic danger sounds
Moisture, overnight rotor rust film, or road salt residue can create brief squeal that fades after a few stops. If the noise disappears as the rotor surface cleans up and braking remains strong, it’s less consistent with metal-on-metal damage.
After that, shift from listening to inspecting—because a safe driveway check can prevent expensive rotor destruction.
When the comparison flips: squeal that is actually the last warning
If the squeal is loud, constant, and you can see near-zero pad material, treat it as the last warning before grinding. This is where a driver’s quick check matters more than debating sound pitch.
To make the next step actionable, the following section shows a safe, tool-light inspection process.
How to do a safe driveway check before driving to a shop
Use a five-step safety check: confirm stopping ability, visually check pad thickness, inspect rotor face, identify the noisy corner, and set a strict driving limit—this reduces risk and prevents turning a pad job into a rotor-and-caliper job.
To keep the process controlled, do it on level ground with the engine off and wheels chocked if possible.

Step 1: Confirm the brake pedal and stopping feel first
With the car in a safe area, press the pedal firmly: it should feel solid and not sink excessively. A sudden change in pedal feel combined with noise suggests you should avoid driving and seek help immediately.
Next, if pedal feel is acceptable, move to a visual pad check without removing the wheel.
Step 2: Check pad thickness through the wheel (front first)
Look through spokes for the outer pad; on many cars you can see the friction layer against the rotor. If you can’t clearly see it, use a flashlight angle. If it looks nearly gone, assume high risk.
After that, compare left vs right—because uneven wear can reveal caliper sticking or guide pin problems.
Step 3: Inspect rotor face for scoring and heat spots
Rotate the wheel slightly (if safe) and look for deep grooves or shiny bands where metal has been cutting. Heavy scoring plus noise is a strong signal that continued driving will rapidly worsen damage.
Next, identify which corner is loudest so you can limit travel and communicate clearly to a technician.
Step 4: Localize the noise and set a hard “do not exceed” plan
Drive at walking speed in a quiet area, lightly apply brakes, and note which side is louder. If you suspect metal contact, plan only the shortest necessary route, avoid highways, and avoid repeated stops that heat the rotor.
To stay systematic, a simple DIY squeal troubleshooting checklist helps you log sound, feel, and visuals without missing key clues.
What damage happens if you keep driving, and how fast can it escalate?
Metal-on-metal can quickly convert a basic pad replacement into rotor replacement, heat-cracked rotors, damaged caliper hardware, and in severe cases compromised braking—because steel contact removes rotor material and overheats surrounding components.
To understand “how fast,” think in terms of heat cycles: each stop adds temperature and wear, and repeated driving multiplies both.
Rotor scoring and thickness loss: the common domino
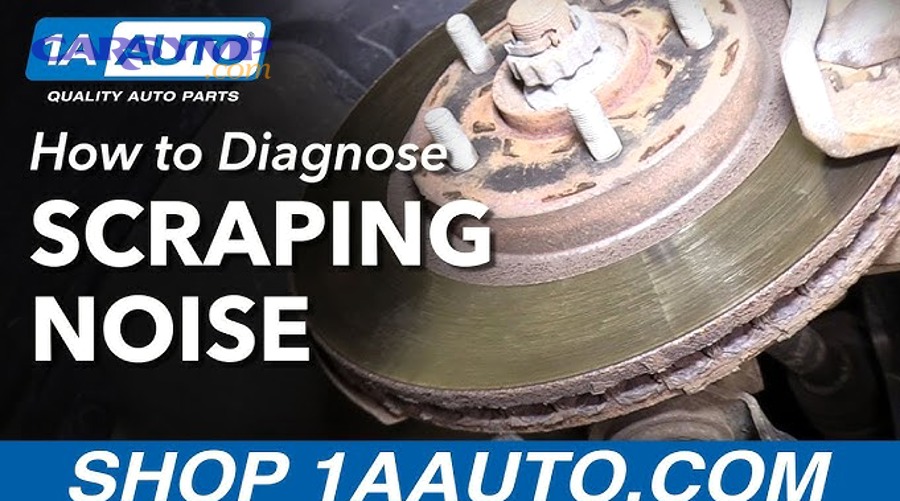
Once the backing plate hits the rotor, it can carve grooves deep enough that resurfacing is no longer possible. Rotor thickness can drop below minimum spec, increasing the risk of vibration, cracking, and brake fade under heavy use.
Next, consider heat damage, because overheating can spread beyond the rotor surface.
Heat damage: glazing, fade, and hardware stress
Overheated braking surfaces can glaze and lose friction consistency, making stopping less predictable. Heat also stresses caliper boots, slide pins, and sometimes wheel bearings, especially if a caliper is sticking and dragging.
After that, connect damage to cost, because a small delay can change the repair scope.
Why “waiting one more week” often costs more
If you replace pads early, you may preserve rotors; if you wait until metal contact, rotors often need replacement and labor can increase. That’s why people asking about Shop fix cost for brake squeal often get widely different estimates—scope changes everything.
To decide the safest next move, you need a clear threshold for when to stop driving immediately.
When should you stop driving immediately and tow instead?
Yes, you should tow if you have grinding plus reduced braking, a brake warning light, smoke/burning smell, severe pulling, or a wheel that is overheating—these conditions suggest safety risk and potential component failure.
To make this decision simple under stress, use the “stop-now” triggers below.
Stop-now trigger 1: braking performance is clearly worse
If you need noticeably more pedal effort, more distance to stop, or the pedal behavior suddenly changes, do not gamble on a longer drive. This can indicate severe wear, fluid issues, or overheating that could worsen quickly.
Next, treat warning lights as non-negotiable signals, especially if they appear alongside noise.
Stop-now trigger 2: warning light plus noise, or ABS/traction anomalies
A brake system warning light can indicate low fluid from worn pads, sensor issues, or other faults. If it appears with grinding noise, treat it as a strong reason to stop and have the system inspected before further driving.
After that, consider temperature and smell—because heat is the fastest path to escalation.
Stop-now trigger 3: smoke, burning smell, or one wheel radiating heat
Smoke or a strong burning odor suggests overheating and possible caliper dragging. Continuing to drive can overheat the rotor, damage seals, and reduce braking reliability, especially in traffic or downhill driving.
To keep your next steps efficient, the following section explains what a shop will typically check and replace.
What will a shop inspect and replace when metal-on-metal is suspected?
A shop will typically confirm pad thickness, inspect rotor scoring and thickness, check caliper slide function, examine hardware and shims, and verify fluid condition—then recommend a repair plan that matches the actual wear and heat damage.
To help you communicate clearly and avoid misunderstandings, bring your observations and ask targeted questions.
Core checks: pads, rotors, calipers, and hardware
Technicians will look for pad material remaining, rotor minimum thickness, and whether the caliper slides freely. They’ll also check for seized guide pins, torn boots, uneven wear, and any metal-to-metal marks on the bracket or backing plates.
Next, they’ll decide whether rotors can be resurfaced, must be replaced, or whether additional parts are required.
Common repair outcomes: “pads only” vs “pads + rotors” vs “plus caliper work”
If the noise was only a wear indicator and rotors are in good shape, pads and hardware may be enough. If there’s scoring or thickness loss, rotors are typically replaced. If the caliper is sticking, you may need slide service or caliper replacement to prevent repeat damage.
After that, it helps to frame the visit around a single, complete brake squeal diagnosis so the root cause is actually solved, not temporarily quieted.
Questions that protect you from repeat squeal
Ask whether the shop will clean and lubricate contact points properly, replace worn hardware, and verify caliper slide movement. Also ask to see the old pads and rotors—visual proof makes the decision easier and builds trust.
To deepen your understanding, a good DIY squeal troubleshooting checklist can also help you verify what changed after the repair.
This embedded video can help you recognize the difference between squeal and grinding by ear and by visual inspection patterns.
Contextual Border: From here, you’ll move beyond the common “pads worn out” story into less obvious edge cases—uncommon metal contacts, rare wear patterns, and diagnostic traps that can sound identical at first.
Extra edge cases and uncommon sources of metal contact
Beyond worn pads, metal contact can come from adjacent components (a meronym of the brake assembly) like dust shields, brackets, or trapped debris; these cases can mimic grinding yet require different fixes than a normal pad-and-rotor job.
To keep your troubleshooting accurate, treat these as “look-alike” scenarios and confirm with inspection rather than assumptions.

Dust shield scraping: the “false metal-on-metal” that changes with bumps
A bent dust shield can lightly touch the rotor, creating a scrape that varies with bumps or steering input. Unlike true pad grinding, braking performance may remain normal, and the noise may occur even when you are not pressing the pedal.
Next, check for debris, because small stones can create dramatic noise with minimal actual damage.
Small stone trapped between rotor and shield: loud sound, simple fix
A pebble lodged near the rotor can cause sharp scraping. The noise often appears suddenly after gravel or construction zones and may disappear after reversing or after the stone shifts. Still, confirm rotor condition afterward to ensure no deep scoring occurred.
After that, consider bracket contact, which can occur if hardware is missing or installed incorrectly.
Caliper bracket or pad hardware contact: installation-related metal noise
If anti-rattle clips are missing or pads are not seated correctly, metal parts can touch where they shouldn’t. This can produce squeal or scrape that seems like “grinding,” especially after recent brake work, even when pad thickness is adequate.
Next, include rare rear-brake issues, because some parking brake designs can create metal contact sounds that confuse diagnosis.
Parking brake hardware and rear rotor hats: uncommon but real
On vehicles with drum-in-hat parking brakes, worn or loose parking brake shoes and hardware can scrape inside the rotor hat area. This can sound like rotor grinding while the disc pads are still usable, so inspection of the parking brake assembly matters.
To summarize, you now have both the common and uncommon pathways to metal contact, which lets you decide on safe next steps with far more confidence.
Entities: brake pads, brake rotors, caliper, caliper bracket, wear indicator, backing plate, brake fluid, slide pins, dust shield, parking brake hardware
Relations: squeal vs grind (antonym/comparison), brake assembly meronyms (rotor, pad, caliper), squeal synonyms (chirp/whine) in context, grinding hyponyms (scrape/growl)
FAQ
Can brand-new pads make a metal-on-metal sound?
It’s uncommon for new pads to be truly metal-on-metal, but misinstalled hardware, a bent dust shield, or debris can create metal scraping sounds. If the noise started immediately after a brake job, inspect installation points before assuming pad wear.
Is a wear-indicator squeal the same as grinding?
No. A wear indicator is a warning squeal designed to alert you before backing-plate contact. Grinding usually indicates the pad material is already gone and metal is actively cutting the rotor.
If the noise stops when I press harder, does that mean it’s safe?
Not necessarily. Some vibration squeals reduce with higher clamp force, but true grinding can also change as surfaces heat and shift. Always confirm pad thickness and rotor condition before deciding it’s safe to continue driving.
What should I tell a mechanic to speed up diagnosis?
Share when the noise happens (light vs heavy braking, cold vs warm), whether it follows wheel speed, any pulling or pedal changes, and what you observed visually. Mention that you want a complete brake squeal diagnosis so the underlying contact or wear pattern is corrected.
How do I avoid repeat squeal after repair?
Ensure the shop cleans and lubricates pad contact points correctly, replaces worn hardware, verifies caliper slide movement, and beds pads appropriately if recommended. Keeping a simple DIY squeal troubleshooting checklist also helps you confirm the fix and notice early changes.