


Cloudy headlights are usually fixable, but the “best” choice depends on what’s actually damaged: restore when the haze is mostly surface oxidation, and replace when the lens is cracked, delaminated, leaking, or hazy on the inside—because sanding can’t repair structural or internal failure.
Next, cost and convenience matter just as much as clarity: restoration is typically the faster, lower-cost route for most daily drivers, while replacement tends to cost more but can deliver like-new optics and sealing—especially when internal components or mounting points are compromised.
Then, durability is the deciding factor many people miss: a restore that ends without a true UV-protective finish can look great and still haze again sooner than you expect, while new assemblies can last longer but vary wildly by OEM vs aftermarket quality.
Introduce a new idea: the safest way to decide is to treat cloudy headlights as a diagnosis problem first, not a shopping problem—because the right fix improves night visibility and avoids avoidable rework.
Should you restore or replace cloudy headlights?
Yes—most cloudy headlight lenses can be restored, but you should replace them when damage is structural or internal, because (1) surface oxidation responds to sanding and UV protection, (2) internal haze and cracks do not, and (3) replacement restores sealing, mounting integrity, and optical performance in one move.
To begin, that restore-versus-replace decision gets easier when you separate what you see (cloudiness) from where it lives (outside the lens vs inside the assembly).

Is restoration enough for light-to-moderate haze and yellowing?
Yes—restoration is usually enough for light-to-moderate cloudy headlight lenses because (1) the oxidation is typically on the outer surface, (2) sanding removes damaged material, and (3) a UV protectant can slow the return of haze.
Specifically, most “cloudy” headlights start as UV damage to the lens hardcoat. Over time, the surface becomes micro-rough, which scatters light and makes the lens look milky or yellow.
You can treat this like a simple headlight repair decision:
- Good restoration candidates usually look cloudy from most angles, but the plastic feels smooth with only shallow roughness.
- Yellowing with no deep cracks is usually oxidation, not structural failure.
- Clarity returns when wet (for example, after washing) often suggests surface issues, because water temporarily reduces scattering.
A practical way to think about it: if the lens is “dirty-looking” but intact, you’re usually paying to remove a thin damaged layer and re-seal it with protection.
Hook chain connection: because restoration targets surface damage, the next question is whether your haze is truly on the surface—or trapped inside.
Do you need replacement when lenses are cracked, leaking, or hazy inside?
Yes—replace cloudy headlights when they’re cracked, leaking, or hazy inside because (1) internal haze and delamination can’t be sanded off, (2) moisture intrusion often returns without fixing seals/vents, and (3) cracks and broken mounts create safety and aiming problems that polishing can’t solve.
However, many drivers mistake internal moisture for “surface cloudiness,” so you need a couple of quick checks before spending money.
Replacement is the smarter move when you see:
- Cracks, spider-web crazing, or chips you can catch with a fingernail
- Water droplets or fogging inside that reappears after drying
- A distinct “film” line inside the lens (possible delamination)
- Broken mounting tabs or a headlight assembly that doesn’t sit square
This is where Safety inspection implications of headlight faults show up in real life. A lens that scatters light can reduce your usable beam, while a damaged assembly can change aim and glare other drivers. Even if your area doesn’t fail vehicles for lens haze alone, a mis-aimed or malfunctioning headlamp often triggers inspection or roadside attention.
Hook chain connection: once you know whether you’re restoring or replacing, the next concern is whether mixing fixes creates uneven performance.
Can you restore one headlight and replace the other?
Yes, you can, but you usually shouldn’t because (1) mismatch in lens clarity changes perceived brightness, (2) different optics can alter beam shape and glare, and (3) cosmetic mismatch hurts resale and makes the car look poorly maintained.
Meanwhile, there are exceptions that make it reasonable—like when one side is physically broken from impact and the other is merely oxidized.
If you must mix, reduce the downsides:
- Choose a replacement that matches the other side’s style (reflector vs projector) and color temperature (especially on LED/HID systems).
- Restore the other lens fully, then re-aim both headlights after the work.
- Drive-test at night on a flat wall to compare beam cutoff and hotspot symmetry.
In short, the best practice is to treat headlights as a pair—because your eyes interpret beam balance, not just raw brightness.
What does “cloudy headlight” mean and what causes it?
A cloudy headlight lens is a polycarbonate optical cover that has lost transparency—usually from UV-driven oxidation, abrasion, or coating breakdown—causing light scatter, yellowing, and reduced beam clarity.
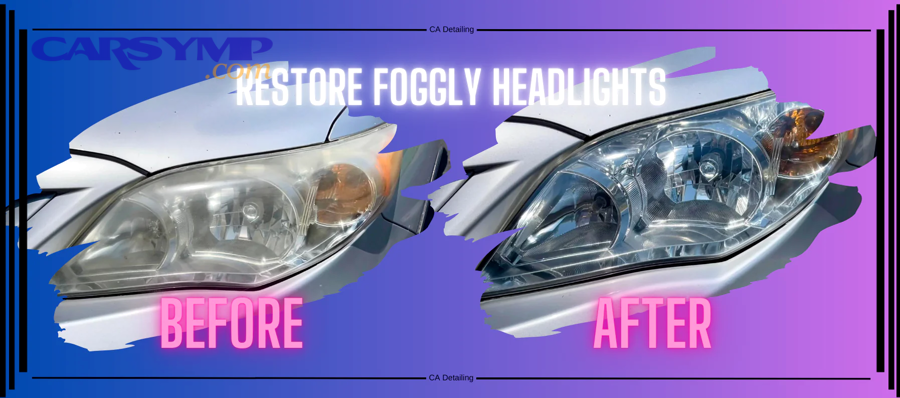
Next, understanding the cause matters because the correct fix depends on whether the problem is on the lens, in the lens, or behind the lens.
What is UV oxidation on a polycarbonate lens?
UV oxidation on a polycarbonate headlight lens is a surface degradation process where sunlight breaks down the protective hardcoat and the top layer of plastic, creating micro-pitting and chemical changes that turn the lens hazy or yellow.
For example, the lens can still be physically intact but optically “frosted,” like sanded plastic.
Here’s what’s happening in simple terms:
- UV light stresses the factory coating (the clear hardcoat that protects polycarbonate).
- The coating thins and becomes porous, especially in high-UV regions.
- Oxidized plastic scatters light, so the lens looks cloudy even when clean.
A key takeaway for restoration: sanding works because it removes the degraded top layer, but the result lasts longer only when you replace the missing UV protection with a proper finish (clear coat, coating, or film).
According to a study presented in RADTECH proceedings on polycarbonate headlamp weathering and coatings, protective coatings are required because deterioration from haze/yellowing reduces light transmitted and can become hazardous if degradation is significant. (radtech.org)
What’s the difference between surface haze and internal haze?
Surface haze is best fixed by restoration, while internal haze usually requires replacement—because surface haze sits on the outside of the lens and can be removed, but internal haze comes from delamination, internal deposits, or moisture patterns that sanding cannot reach.
On the other hand, the two can look similar in daylight, so you need observational cues.
Use this quick comparison:
This table helps you classify haze by location, which is the biggest predictor of whether restoration works.
| What you notice | More likely surface haze | More likely internal haze |
|---|---|---|
| Cloudiness changes when wet | Yes | No |
| Cloudiness feels rough | Often | Usually not (outside feels smoother) |
| Fogging appears after rain/wash | Sometimes | Often |
| “Milkiness” seems behind the plastic | Rare | Common |
| Visible droplets or streaks inside | No | Yes |
Which problems look like cloudy lenses but aren’t?
There are 5 common “not-the-lens” problems that mimic cloudy headlights: weak bulbs, voltage drop, failing ballasts/drivers, mis-aim, and dirty internal reflectors—each based on a different failure point inside the headlight system.
Besides, if you restore a lens that isn’t the real bottleneck, you may spend money and still feel disappointed at night.
Here are the look-alikes:
- Weak halogen bulbs (aging filament, wrong bulb type, cheap replacements)
- Voltage drop from corroded connectors or a failing headlight switch
- Failing HID ballast or LED driver (intermittent dimming, flicker, one side out)
- Headlight aim drift after suspension work or impact
- Dull internal reflector/projector issues (heat damage, internal contamination)
A reliable rule: if the lens is cloudy and output is poor, restore/replace may help. But if the lens looks decent and output is still weak, focus your headlight repair on electrical and aiming diagnostics first.
How do restoration and replacement compare on cost, time, and results?
Restoration wins on cost and speed, replacement wins on structural completeness, and professional work often wins on consistency—so the best choice depends on whether your priority is (1) budget, (2) time, or (3) long-term “like-new” performance.
More specifically, you should compare them on the same three criteria every time: total cost, time/effort, and result durability.

Is a DIY headlight restoration kit cheaper—and what do you trade off?
DIY restoration is cheaper, but you trade off precision and longevity because (1) results depend on sanding technique, (2) incomplete UV protection returns haze sooner, and (3) uneven sanding can distort optics and create patchy clarity.
For example, the material cost might be low, but your “cost” includes time, risk, and rework.
Typical DIY trade-offs:
- Pros: low cash cost, immediate improvement, no parts sourcing
- Cons: learning curve, risk of swirls/patchiness, shorter lifespan if you skip a real protectant
The common DIY failure pattern is simple: people polish without fully removing oxidation, or they sand but don’t seal the finish with durable UV protection.
According to testing reported by Consumer Reports in 2023, headlight restoration kits can make a noticeable difference and offer better value than replacing headlights, though they are not a permanent solution. (consumerreports.org)
Is professional restoration more durable than DIY?
Yes—professional restoration is often more durable because (1) pros use consistent multi-stage abrasion, (2) they typically apply stronger UV coatings, and (3) many shops back results with warranties or redo policies.
Especially, a professional process tends to be less “cosmetic polish” and more “controlled resurfacing.”
A typical pro workflow (varies by shop) includes:
- Masking and controlled wet sanding through multiple grits
- Machine polish to restore optical clarity
- Application of a UV-cured clear coat or durable sealant layer
- Final inspection and, ideally, headlight aim verification
This matters because durability is mostly about the last step: the protectant. Without that, your restored lens may regress faster in sunny climates.
Is replacing the headlight assembly worth the higher price?
Replacement is worth the higher price when you need structural integrity, internal clarity, or long-term certainty because (1) you get a new lens and seals, (2) you eliminate internal haze and moisture problems, and (3) you restore factory optical geometry and mounting stability.
However, replacement isn’t automatically “better” if the only issue is surface oxidation.
Replacement tends to make sense when:
- The assembly has cracks, broken tabs, or poor sealing
- Internal haze or reflector damage limits output even with a clear lens
- Your vehicle uses complex sealed LED modules and the assembly is the designed service unit
For cost planning, build a simple Repair cost estimate for common headlight problems:
- Restoration (DIY) = materials + your time
- Restoration (pro) = service fee + any warranty value
- Replacement = part price (OEM/aftermarket) + labor + possible calibration/aiming
The point isn’t the exact number—it’s capturing all the hidden costs so you don’t choose a “cheap” fix that becomes expensive after repetition.
Which option lasts longer: refurbish (restore) or new lenses?
New lenses usually last longer, but restoration can last a long time too if you restore correctly because (1) UV protection determines recurrence, (2) climate and parking exposure drive degradation speed, and (3) lens quality varies widely across replacement parts.

In addition, “lasting longer” should mean two things: staying clear and maintaining beam quality.
How long does restoration last with and without UV protection?
Restoration lasts much longer with real UV protection because (1) UV is the main driver of repeat oxidation, (2) an unprotected polished lens re-degrades, and (3) coatings/films slow micro-pitting and yellowing.
To illustrate, a restoration that ends with “polish only” often looks great initially, then fades as the surface re-oxidizes.
Think in scenarios instead of promises:
- Polish-only / weak sealant: tends to degrade sooner in strong sun
- Proper UV clear coat / durable coating: typically holds clarity longer
- UV-protective film (PPF): can extend clarity and adds stone-chip protection
The key is the same regardless of product: you must replace the missing UV barrier you removed (or that failed in the first place).
What maintenance keeps restored headlights clear longer?
Headlight maintenance keeps restored lenses clear longer when you (1) clean gently, (2) renew protection periodically, and (3) reduce UV exposure—because each step lowers abrasion and slows oxidation.
More importantly, maintenance is what turns restoration from a one-off cosmetic fix into a predictable, long-term headlight repair plan.
Practical maintenance that works:
- Wash lenses with pH-balanced soap, not harsh solvents
- Avoid aggressive dry wiping that grinds grit into the lens
- Apply a compatible sealant/coating maintenance product on a schedule
- Park in shade/garage when possible
- Consider UV film if you live in high-UV areas or drive highways often
These habits matter because clear lenses don’t just look better—they support a cleaner beam pattern and reduce scatter that can feel like “dim headlights.”
When do new headlights still cloud up again?
Yes—new headlights can still cloud up again because (1) some aftermarket lenses use weaker coatings, (2) UV and abrasion still act on polycarbonate, and (3) harsh chemicals and road grit can prematurely wear the surface.
Meanwhile, OEM assemblies often have more consistent coatings, but they are still not immune to environment and maintenance.
If longevity is your top priority, treat replacement as a quality decision, not just a parts decision:
- Verify the replacement part’s reputation for lens coating durability
- Avoid unknown “bargain” assemblies if you rely on night driving
- Protect new lenses early (film or coating) so you’re not restoring again later
According to an NHTSA-commissioned haze performance comparison test report (Calcoast-ITL), lens haze in aged headlamps was evaluated against a brand new headlamp to quantify performance differences, reinforcing that haze meaningfully changes headlamp performance compared with clear lenses. (lindseyresearch.com)
What’s the safest “decision checklist” to choose correctly?
There are 6 decision checkpoints to choose safely: haze location, crack depth, moisture presence, beam pattern quality, mounting integrity, and total cost—because these factors determine whether restoration will succeed, whether replacement is mandatory, and whether your fix will stay reliable.

Let’s explore the checklist in a “start cheap, avoid regret” order that protects both visibility and your wallet.
What 5-minute checks can you do at home before spending money?
You can do 5 quick checks at home—scratch test, wet-look test, flashlight depth check, condensation check, and wall-beam check—because each one isolates surface oxidation from internal or structural failure.
To better understand what you’re seeing, do these in daylight and again at night:
- Fingernail scratch test: if you catch a deep crack, restoration won’t remove it.
- Wet-look test: mist water on the lens; if it looks dramatically clearer, the issue is likely surface scatter.
- Flashlight depth check: shine a light through the side; internal haze looks “behind” the plastic.
- Condensation check: after rain or a car wash, look for recurring moisture inside.
- Wall-beam check: park 20–25 feet from a wall on level ground and compare beam shape and cutoff.
These checks give you evidence-based confidence so you don’t buy parts prematurely or restore a lens that can’t be saved.
What signs mean “replace now” for safety and visibility?
Replace now when you see (1) deep cracking/crazing, (2) persistent internal moisture or delamination, or (3) unstable mounting/aim—because each one can reduce usable light, create glare, and undermine safe driving.
Especially, these signs often correlate with broader headlight faults that show up during inspections or after minor impacts.
Immediate replacement indicators:
- Standing water inside the assembly
- Cracked lens edges or broken seals
- Broken tabs causing a loose or tilted headlamp
- Severe crazing that looks like a spider web
- A beam pattern that is chaotic even when the lens is cleaned
This is where Safety inspection implications of headlight faults become practical: the risk isn’t only “not seeing,” but also producing uncontrolled glare due to poor aim or distorted optics.
How do you choose OEM vs aftermarket if you replace?
OEM is best for fit and optical consistency, aftermarket is best for price, and “premium aftermarket” is optimal when you want value without gambling on coatings—so choose based on fitment risk, night-driving needs, and total replacement cost.
However, not all aftermarket is equal, so evaluate before you buy.
Use these criteria:
- Fitment and mounting: OEM usually fits with fewer gaps and fewer aiming issues.
- Optical quality: better lens coatings and better internal reflectors matter at night.
- Warranty and support: you want an easy path if moisture appears.
- Compatibility: sealed LEDs/adaptive systems can be expensive and model-specific.
If your vehicle has advanced headlights, replacement can become a major line item in your Repair cost estimate for common headlight problems, so factor in possible calibration, aiming, and module considerations rather than just the part price.
What uncommon issues can make headlight restoration fail—or make replacement the only fix?
Rare failure modes—like internal delamination, repeated condensation from vent failure, and complex sealed LED assemblies—can make restoration ineffective because they originate inside the headlight system, not on the lens surface.
Below, these edge cases deepen the decision so you don’t waste time restoring a lens that can’t hold clarity or performance.

Can internal lens delamination be repaired, or is replacement mandatory?
Replacement is usually mandatory for internal lens delamination because (1) the separation occurs within the lens layers or coating interface, (2) sanding only affects the outermost surface, and (3) delamination often spreads or creates permanent optical distortion.
Specifically, delamination can look like a cloudy “sheet” or a wavy boundary that doesn’t change much when the outer surface is cleaned or wetted.
If you suspect delamination:
- Look for a distinct boundary line that appears beneath the surface
- Notice whether the “cloud” stays even after cleaning and wetting
- Watch for haze that appears uniformly deep, not textured like oxidation
In practice, you can’t reliably “sand your way” into a layered failure without creating a misshapen optic. That’s why replacement becomes the durable choice.
Do sealed LED or adaptive headlight assemblies change the restore-vs-replace decision?
Yes—sealed LED and adaptive assemblies change the decision because (1) they’re often serviced as complete units, (2) internal failures can’t be cheaply repaired, and (3) replacement may require extra steps like aiming procedures or calibration depending on the vehicle.
On the other hand, if the only problem is surface oxidation on the lens, restoration can still be a high-value headlight repair even on advanced systems.
What changes with these assemblies:
- Part cost is higher, so restoration becomes more attractive when appropriate
- Internal moisture or module faults make “cheap fixes” less likely to stick
- Fit and aim matter more because beam cutoffs are sharper
If you drive often at night, your priority should be controlled beam shape and stable aiming, not just “clear-looking plastic.”
Can repeated condensation come back after restoration, and what causes it?
Yes—condensation can come back after restoration because (1) vent systems clog or fail, (2) seals degrade, and (3) housing cracks allow humidity cycles that re-fog the inside even if the lens surface is perfectly clear.
More importantly, condensation is not just cosmetic: it can corrode internals and reduce light output.
Common causes of recurring moisture:
- Blocked or damaged vents
- Compromised perimeter seals
- Hairline housing cracks
- Poorly sealed bulb access covers
- Aftermarket assemblies with inconsistent sealing
If moisture is persistent, replacement often becomes the simplest and most reliable headlight repair—because it resets the sealing system and prevents repeated internal damage.
Is UV film (PPF) a better “preventive alternative” to repeated restorations?
Yes—UV film can be a better preventive alternative because (1) it blocks UV and reduces oxidation recurrence, (2) it protects against sandblasting and chips, and (3) it preserves optical clarity with less repeated abrasion than frequent sanding.
Especially, UV film makes sense when you’ve restored once and want to avoid “restore again” a year later.
Where film shines:
- High-UV climates or outdoor parking
- Highway commuters exposed to debris
- Owners who want consistent clarity with minimal maintenance
Where film is less ideal:
- Extremely complex lens shapes (harder installation)
- Severely degraded lenses (restore first, then film)
According to Consumer Reports’ restoration kit testing and guidance, kits can dramatically improve light output in many cases, but results vary and are not necessarily permanent without proper protection—supporting the idea that prevention (like durable coatings or films) can reduce repeat work. (consumerreports.org)
Evidence (summary where it matters most)
- According to a study presented in RADTECH proceedings on polycarbonate headlamp weathering, protective coatings are required because polycarbonate deterioration (haze/yellowing) reduces transmitted light and can become hazardous if degradation is significant. (radtech.org)
- According to Consumer Reports testing (2023), headlight restoration kits can produce noticeable improvements and can be better value than replacing headlights, but they are not a permanent solution. (consumerreports.org)
- According to an NHTSA-commissioned headlamp haze comparison test report (Calcoast-ITL), performance from aged headlamps with lens haze was compared against a brand new headlamp with no haze, reinforcing that haze is tied to measurable performance differences. (lindseyresearch.com)