Complete Guide to Starter Replacement: Cost Breakdown + DIY Steps for Car Owners
Starter replacement costs range from $700 to $1,200 when performed by a professional mechanic, while DIY replacement requires only $80 to $400 for parts, potentially saving you hundreds of dollars in labor expenses. The total cost varies significantly based on your vehicle’s make and model, the accessibility of the starter location, and whether you choose original equipment manufacturer (OEM) or aftermarket parts. Understanding these cost factors empowers car owners to make informed decisions about whether to tackle this repair themselves or hire a professional.
Recognizing Starter failure symptoms early can prevent you from being stranded with a non-starting vehicle and allows you to budget appropriately for the repair. Common signs include clicking noises when turning the ignition key, grinding sounds during startup, slow engine cranking despite a fully charged battery, and in severe cases, complete failure to start. These symptoms often worsen gradually, giving you time to research replacement options and gather the necessary tools if you plan to perform the work yourself.
The DIY starter replacement process is achievable for mechanically inclined car owners with basic automotive knowledge and proper tools. The job typically requires one to two hours for easily accessible starters, though some vehicles with starters buried deep in the engine compartment may take three to four hours or longer. Success depends on having the right socket sets, jack stands for safe vehicle lifting, and understanding the proper disconnection sequence for electrical components to avoid damaging your vehicle’s electrical system.
Beyond immediate replacement needs, understanding the decision between rebuilding versus replacing your starter, choosing between new and remanufactured units, and learning preventive maintenance techniques can extend your vehicle’s reliability and minimize future repair costs. Next, let’s explore the detailed cost breakdown to help you budget effectively for this essential repair.
How Much Does Starter Replacement Cost?
Starter replacement costs between $700 and $1,200 for professional installation, with parts typically costing $80 to $400 and labor rates ranging from $100 to $250 per hour depending on your location and vehicle complexity. This price variance reflects differences in starter accessibility, vehicle make and model, and whether you select OEM or aftermarket components.
Understanding the complete Starter replacement cost estimate requires breaking down both parts and labor expenses. The starter motor itself represents a significant portion of your total investment, but labor costs often exceed parts prices when the starter sits in a difficult-to-reach location beneath other engine components. Additionally, supplementary costs may include diagnostic fees to confirm the starter as the failure point, especially since starter failure symptoms can sometimes mimic battery or alternator problems.

What Do Replacement Starter Parts Cost?
Replacement starter parts range from $80 for basic aftermarket units on common vehicles to over $1,000 for luxury vehicle OEM starters, with most car owners paying between $150 and $350 for quality replacement units. The price depends heavily on your vehicle’s specifications, the starter type required, and your choice between new, remanufactured, or OEM components.
Aftermarket starters typically cost 20% to 40% less than OEM equivalents but may vary in fitment precision and longevity. These third-party manufactured units work well for many applications and often come with warranties ranging from one to three years. For instance, a Honda Accord aftermarket starter might cost $90 to $150, while the OEM equivalent ranges from $180 to $250. However, some vehicle owners report that aftermarket starters occasionally require minor adjustments during installation or may not last as long as factory parts.
New versus remanufactured starters present another cost consideration. Remanufactured starters, which are used units rebuilt to factory specifications with new internal components, typically cost 30% to 50% less than brand-new units. A remanufactured starter for a Toyota Camry might cost $110, while a new unit runs $200 to $280. Remanufactured starters often perform comparably to new units when sourced from reputable rebuilders and usually include warranties, making them an economical choice for budget-conscious car owners.
Vehicle make and model dramatically impact parts pricing. Economy vehicles like Honda Civics, Toyota Corollas, and Ford Focus models use widely available starters costing $90 to $200. Mid-range vehicles such as Chevrolet Silverados and Ford F-150 trucks require starters in the $150 to $300 range. Luxury brands command premium prices—Mercedes-Benz starters range from $250 to $1,000, BMW starters cost $300 to $800, and Audi starters fall between $350 and $900. These higher prices reflect more complex electrical systems, specialized engineering, and lower production volumes for luxury vehicle components.
Starter type also affects pricing. Direct drive starters use larger, lower-speed motors and typically cost less—ranging from $80 to $250 for most applications. Gear reduction starters employ smaller, high-speed motors with gear sets to multiply torque, resulting in more efficient operation and higher prices from $150 to $450. Modern vehicles increasingly use gear reduction starters for their superior efficiency and reduced battery drain, though they command higher replacement costs.
What Are the Labor Costs for Professional Installation?
Professional starter replacement labor costs range from $100 to $800, calculated at hourly rates between $100 and $250 per hour for one to four hours of work depending on starter accessibility and vehicle complexity. Labor expenses often exceed parts costs when mechanics must remove intake manifolds, exhaust components, or other engine parts to access the starter.
Hourly labor rates vary significantly by region and service provider type. Independent repair shops in rural areas may charge $80 to $120 per hour, suburban mechanics typically bill $100 to $150 per hour, and urban dealerships often command $150 to $250 per hour. Dealerships charge premium rates but provide manufacturer-trained technicians and OEM parts, while independent shops offer competitive pricing with comparable expertise for routine repairs like starter replacement.
Installation time varies dramatically based on starter location. Vehicles with easily accessible starters visible from underneath or quickly reached from the engine bay require only one to one-and-a-half hours of labor, resulting in $100 to $225 in labor charges at typical shop rates. Many Honda Accords, Toyota Camrys, and older domestic vehicles fall into this category, making them ideal candidates for DIY starter replacement to maximize savings.
Conversely, vehicles requiring extensive disassembly to reach the starter can incur three to five hours of labor, translating to $300 to $800 in labor costs alone. Toyota and Lexus V8 engines often require intake manifold removal, adding two to three hours of labor. Some BMW and Audi models position starters beneath the intake or behind other components, similarly extending labor time. Subaru boxer engines sometimes necessitate removing portions of the exhaust system to access starter mounting bolts, increasing complexity and cost.
Additional labor charges may apply when mechanics discover related problems during starter replacement. If the flywheel ring gear shows significant wear with chewed or missing teeth, replacement becomes necessary to prevent premature failure of the new starter. Flywheel or flexplate replacement adds $200 to $600 in additional labor plus parts costs. Similarly, corroded battery cables or degraded electrical connections identified during starter removal should be addressed simultaneously, adding $50 to $150 in labor and materials.
How Do DIY Costs Compare to Mechanic Costs?
DIY starter replacement costs only $80 to $400 for parts while professional installation totals $700 to $1,200, potentially saving $400 to $900 in labor expenses for mechanically capable car owners willing to invest two to four hours of their time. However, DIY approaches require upfront tool investments and accept the risk of installation errors that could damage electrical systems or result in improper starter alignment.
Direct cost comparison reveals substantial savings potential. Consider a common scenario: replacing a starter on a 2015 Honda Accord. A professional repair shop charges approximately $750 total—$180 for an OEM starter and $570 for three hours of labor at $190 per hour. The DIY approach requires purchasing the same $180 OEM starter (or a $120 quality aftermarket unit), investing perhaps $50 in additional tools if you lack proper sockets, and dedicating two hours of your weekend. Your total DIY cost reaches $170 to $230, saving $520 to $580 compared to professional installation.
However, hidden costs and considerations affect this calculation. First-time DIY mechanics may need to purchase or rent tools including a quality floor jack ($80-$150), jack stands ($40-$80), and potentially specialty sockets ($20-$60) if they lack a comprehensive tool set. These investments pay dividends across multiple future repairs but increase initial project costs. Additionally, your time holds value—two to four hours of labor that could be spent on income-generating activities or leisure represents an opportunity cost that professionals complete in often half the time due to experience and specialized equipment.
Installation error risks represent another DIY consideration. Improperly torqued starter bolts can loosen during operation, causing catastrophic engine damage when the starter shifts and its gears clash with the flywheel. Incorrectly connected electrical wiring may result in starter failure to engage, continuous starter operation after the engine starts (potentially destroying the starter motor), or even electrical fires in extreme cases. Cross-threading mounting bolts into aluminum engine blocks or transmission housings creates expensive damage requiring professional thread repair. These risks decrease significantly with careful attention to torque specifications, proper electrical connection verification, and methodical installation procedures.
Break-even analysis favors DIY for car owners who perform their own automotive maintenance regularly. If you already own basic automotive tools and have successfully completed similar repairs like brake pad replacement or alternator installation, starter replacement presents comparable difficulty and high cost savings. However, if you lack mechanical experience, tools, and workspace, the $400-$600 labor cost for professional installation provides peace of mind, warranty protection, and eliminates the risk of costly mistakes.

What Are the Signs You Need a Starter Replacement?
Seven primary signs indicate starter failure: clicking sounds when turning the ignition, grinding noises during startup, slow engine cranking with a good battery, complete failure to start despite electrical power, smoke from the engine bay, starter continuing to run after the engine starts, and intermittent starting problems. Recognizing these starter failure symptoms early prevents roadside breakdowns and allows you to plan replacement timing rather than facing emergency repair situations.
Starter failure symptoms often develop gradually, providing warning signs before complete failure strands you with a non-starting vehicle. Understanding the distinction between starter-related symptoms and other starting system problems prevents misdiagnosis and unnecessary part replacement. Many starter failure symptoms overlap with battery failure, alternator issues, or auto electrical repair problems, making systematic diagnosis critical for identifying the true cause of starting difficulties.
What Noises Indicate a Bad Starter?
Four distinct noises indicate starter problems: rapid clicking (10+ clicks per second) suggests insufficient current to engage the starter, slow clicking (1-3 clicks per second) indicates a seized starter motor or damaged solenoid, grinding sounds point to flywheel ring gear or starter drive gear damage, and whirring without cranking reveals a failed starter drive mechanism. Each sound provides diagnostic clues about the specific starter component that has failed.
Rapid clicking noises represent the most common starter failure symptom, occurring when the starter solenoid activates but cannot deliver sufficient electrical current to spin the motor. This distinctive “click-click-click-click” sound results from the solenoid plunger repeatedly engaging and disengaging as it attempts to complete the electrical circuit between the battery and starter motor. While this symptom often indicates a weak battery rather than starter failure, it can also signal corroded electrical connections, a failing starter solenoid, or internal starter motor problems. Proper diagnosis requires testing battery voltage (should read 12.4-12.6 volts when off, 13.5-14.5 volts when running) and checking for voltage drop across starter connections.
Grinding noises during startup indicate mechanical interference between the starter drive gear and the flywheel ring gear. This harsh grinding occurs when the starter gear hits the edge of the flywheel teeth rather than meshing smoothly, typically resulting from worn starter drive components, damaged flywheel teeth, or improper starter mounting. The grinding often accompanies successful engine starting in early failure stages but progressively worsens as gear teeth deteriorate. Ignoring grinding noises accelerates damage to both the starter and flywheel, potentially transforming a $200 starter replacement into an $800 repair including flywheel replacement.
Whirring or spinning sounds without engine cranking reveal that the starter motor spins freely but fails to engage the flywheel. This symptom indicates a failed starter drive assembly—specifically the Bendix drive or solenoid-actuated drive mechanism that extends the starter gear to mesh with the flywheel. The starter motor operates normally, producing its characteristic spinning sound, but mechanical failure prevents power transmission to the engine. This failure mode requires complete starter replacement, as the drive assembly is integrated into the starter unit on most modern vehicles.
Continuous starter operation after the engine starts produces a distinctive high-pitched whirring sound as the starter motor attempts to spin faster than the running engine allows. This dangerous condition, caused by a stuck starter solenoid or failed ignition switch, can destroy the starter motor within seconds as the engine drives the starter at excessive speeds. If you experience this symptom, immediately turn off the engine and disconnect the battery to prevent starter destruction and potential fire hazard. This electrical problem requires urgent attention and may involve starter replacement plus ignition switch or wiring repairs.
What Are the Non-Sound Symptoms of Starter Failure?
Five non-audible symptoms indicate starter problems: complete starting failure with dashboard lights functioning, slow cranking despite a fully charged battery, visible smoke from the engine compartment, interior lights dimming excessively during cranking attempts, and intermittent starting requiring multiple attempts. These symptoms often prove more challenging to diagnose than audible failures, particularly when they mimic battery or alternator problems.
Complete starting failure while dashboard lights, radio, and other electrical accessories function normally strongly suggests starter failure rather than a dead battery. This symptom occurs when the starter motor or solenoid fails completely, preventing any electrical current from reaching the motor despite adequate battery voltage. When you turn the ignition key, you may hear a single click (solenoid engaging) or complete silence, but the engine remains motionless. This failure pattern differs from battery failure, which typically prevents all electrical systems from operating or produces rapid clicking as described earlier. Confirming this diagnosis requires testing for voltage at the starter motor during cranking attempts—12+ volts at the starter with no cranking definitively indicates starter failure.
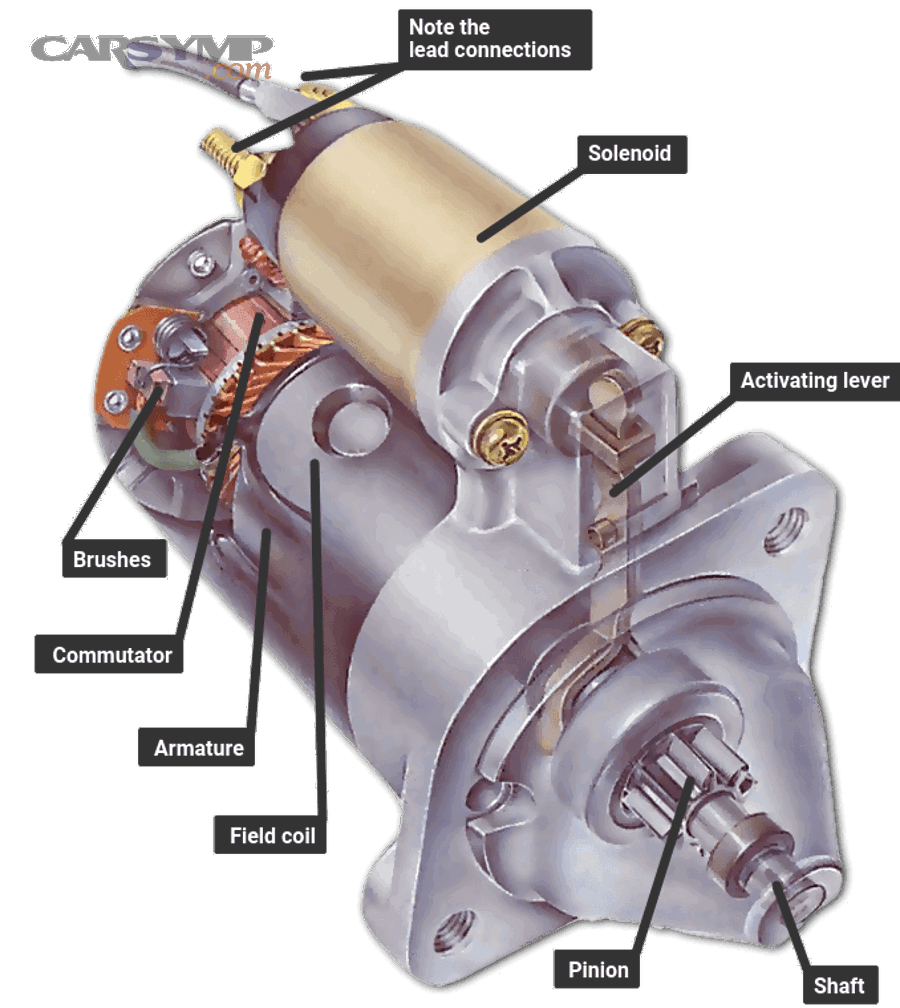
Slow cranking manifests as labored, sluggish engine rotation during startup, often described as the engine “turning over slowly” or “struggling to start.” While this symptom commonly results from a weak battery or corroded connections in cold weather, it can also indicate internal starter motor problems such as worn brushes, damaged armature, or failing field coils. The distinction lies in battery testing—if your battery measures 12.4+ volts at rest and maintains 10+ volts during cranking attempts, yet the engine still cranks slowly, the starter likely has internal damage reducing its power output. Many auto parts stores offer free starter and battery testing to differentiate between these components.
Smoke emerging from the engine bay during starting attempts signals severe electrical problems, often indicating a starter motor drawing excessive current due to internal short circuits or seized bearings. This dangerous condition results from electrical resistance generating extreme heat within the starter motor, potentially melting insulation and creating fire hazards. Heat soak no-start issues, where the vehicle fails to start immediately after shutting off a hot engine, can sometimes precede smoking failures as heat-induced electrical resistance stresses starter components. If you observe smoke, immediately discontinue starting attempts, disconnect the battery, and have the vehicle towed to prevent potential fire and electrical system damage beyond the starter.
Excessive dimming of interior lights during cranking indicates the starter draws more current than normal, often signaling increased internal resistance from worn brushes, damaged commutator segments, or failing field coils. In a healthy starting system, interior lights dim slightly during cranking as the starter draws 150-200 amperes from the battery, but they should not fade to near darkness. Extreme dimming while the engine cranks slowly or not at all suggests the starter motor has developed internal problems that increase current draw while reducing mechanical output. This symptom requires measuring starter current draw with an ammeter—readings exceeding 250-300 amperes typically indicate internal starter damage necessitating replacement.
Intermittent starting failures, where the vehicle sometimes starts normally but other times refuses to crank or exhibits starter symptoms, present challenging diagnostic situations. This pattern often results from worn starter motor brushes making inconsistent contact with the commutator, loose electrical connections that sometimes conduct properly, or failing starter solenoid contacts that occasionally stick. The intermittent nature makes diagnosis difficult, as the starter may test normally when brought to a parts store but fail the next time you attempt to start your vehicle. Documenting the frequency and conditions of failures (temperature, recent driving duration, weather conditions) helps mechanics identify patterns that point toward specific starter components.
How Do You Replace a Car Starter Yourself?
Starter replacement requires disconnecting the battery, raising the vehicle on jack stands, locating and accessing the starter motor, disconnecting electrical connections, removing two to four mounting bolts, installing the new starter with proper alignment, reconnecting electrical components, and performing a Post-installation start test checklist to verify correct operation—typically completing in one to four hours depending on accessibility. Following proper DIY starter replacement safety tips and methodical procedures ensures successful installation while avoiding electrical system damage or personal injury.
Successful DIY starter replacement begins with thorough preparation and understanding your specific vehicle’s starter location and mounting configuration. Some vehicles position starters underneath, requiring safe vehicle lifting and secure support on jack stands. Others locate starters topside, accessible from the engine bay with minimal disassembly. Consulting your vehicle’s repair manual or online resources specific to your make and model reveals the exact starter location, identifies any components requiring removal for access, and provides torque specifications for proper installation.
What Tools and Parts Do You Need for Starter Replacement?
Essential starter replacement tools include a compatible replacement starter motor, metric or standard socket set with ratchet and extensions, combination wrench set, floor jack rated for your vehicle weight, two or more jack stands with appropriate weight capacity, wheel chocks, battery terminal wrench or pliers, shop rags, safety glasses, and work gloves—with optional items including penetrating oil for seized bolts, a second person to assist with the heavy starter, and a headlamp for improved visibility.
The replacement starter represents your primary parts purchase. Ensure you obtain the correct starter for your specific vehicle year, make, model, and engine size, as incompatible starters may use different bolt patterns, gear ratios, or electrical connections. Most auto parts stores offer computerized lookup systems requiring your Vehicle Identification Number (VIN) to ensure proper parts matching. Consider purchasing from retailers offering free starter testing services and generous return policies, allowing you to test your old starter to confirm failure before installing the replacement.
Socket and wrench requirements vary by vehicle but typically include 10mm, 12mm, 13mm, 14mm, and 17mm sockets for most domestic and Asian vehicles, while European vehicles may require 11mm, 15mm, or 16mm sizes. A 3/8-inch drive ratchet with 6-inch and 12-inch extensions provides the reach necessary for accessing recessed starter bolts. Swivel or wobble extensions prove invaluable for reaching bolts at awkward angles, particularly the upper mounting bolts on some installations. A complete metric socket set covering 8mm through 19mm ensures you have the correct size for both starter mounting bolts and electrical connection nuts.
Safe vehicle lifting equipment prevents potentially fatal accidents. A quality floor jack rated for at least 1.5 times your vehicle’s weight provides stability during lifting, while jack stands rated similarly must support the vehicle while you work underneath. Never rely solely on a floor jack to support a vehicle during starter replacement, as hydraulic failure can cause the vehicle to collapse, causing severe injury or death. Position jack stands under frame rails, axles, or designated jack points specified in your owner’s manual, and shake the vehicle vigorously before working underneath to verify stable support.
Additional tools enhance safety and efficiency. Battery terminal wrenches or pliers facilitate quick battery disconnection to prevent electrical shorts during starter removal. Penetrating oil applied to rusty or corroded bolts 15-20 minutes before removal reduces bolt breakage risk, particularly important for vehicles in rust-prone climates. A parts tray or magnetic bowl prevents losing small bolts, washers, or spacers during disassembly. Work gloves protect hands from sharp edges and hot surfaces if working on a recently driven vehicle, while safety glasses prevent debris from falling into your eyes when working underneath the vehicle.
The importance of having an assistant cannot be overstated when removing and installing starters. Quality starters weigh 15 to 25 pounds, and you must support this weight while simultaneously manipulating bolts in tight spaces, often from awkward positions underneath the vehicle. An assistant can support the starter weight while you remove the final mounting bolt, preventing the unit from falling and potentially causing injury or damage. Similarly, during installation, an assistant can hold the starter in position while you thread in mounting bolts, ensuring proper alignment and preventing cross-threading expensive engine block or transmission housing threads.
What Are the Step-by-Step Instructions to Replace a Starter?
The starter replacement process follows nine critical steps: disconnect the negative battery terminal, safely lift and support the vehicle, locate the starter motor, photograph electrical connections, disconnect the battery cable and trigger wire, remove mounting bolts while supporting the starter weight, inspect the flywheel ring gear for damage, install the new starter with proper bolt torque, reconnect electrical components with correct routing, and perform comprehensive testing before driving. Each step requires attention to detail to prevent installation errors that could damage your vehicle’s electrical system or starting components.
Step 1: Disconnect the battery negative terminal. Begin every electrical repair by disconnecting the battery ground to eliminate the risk of electrical shorts, component damage, and personal injury from accidental contact between tools and live electrical connections. Locate the battery—typically under the hood but sometimes in the trunk or under rear seats in certain vehicles—and identify the negative terminal marked with a minus (-) sign and usually covered with a black cable. Using an appropriately sized wrench or battery terminal pliers, loosen the negative terminal clamp nut, rotate the clamp to break any corrosion bond, and lift the cable completely away from the battery post. Secure the cable away from the battery and any metal surfaces to prevent accidental reconnection during your work. Never disconnect the positive terminal first, as this creates shock and short circuit risks.
Step 2: Safely raise and support the vehicle. Most vehicles require lifting to access starter mounting from underneath, though some allow topside access through the engine bay. Position your vehicle on level, solid ground and apply the parking brake firmly. Place wheel chocks behind the rear wheels (or front wheels if lifting the rear) to prevent rolling. Locate your vehicle’s designated jacking points per the owner’s manual and position your floor jack accordingly. Raise the vehicle until you can comfortably position jack stands under the frame rails or other support points, then carefully lower the vehicle onto the stands. Before crawling underneath, vigorously shake the vehicle to verify stable support and ensure no movement on the jack stands. Leave the floor jack in position under the vehicle as backup support but not bearing weight.
Step 3: Locate the starter motor and assess access requirements. The starter motor typically mounts where the engine and transmission join, secured to the engine block or transmission bell housing. From underneath the vehicle, look for a cylindrical component roughly 6-8 inches long and 4-5 inches in diameter, with electrical connections on one end and a nose gear protruding from the opposite end toward the engine. Note any obstacles blocking access—heat shields, exhaust components, brackets, or wiring harnesses may require removal to reach starter mounting bolts. Some vehicles provide relatively clear access requiring only bolt removal, while others necessitate removing intake manifolds, exhaust pipes, or other components for acceptable working clearance.
Step 4: Document electrical connections with photographs. Before disconnecting any wiring, use your smartphone to photograph the starter’s electrical connections from multiple angles. These reference images prove invaluable during reassembly, particularly when Starter wiring and ground inspection reveals multiple wires or complex routing. Identify the two main electrical connections: the large battery cable typically secured with a nut to a prominent terminal post, and the smaller trigger wire (also called the S-terminal or signal wire) often connecting via a push-on connector or smaller nut. Some starters feature additional connections for gear reduction circuitry or upgraded systems—photograph everything to ensure correct reinstallation.
Step 5: Disconnect electrical connections. Beginning with the large battery cable, use an appropriate socket or wrench to remove the retaining nut securing the cable terminal to the starter post. Support the cable to prevent it from falling and making contact with metal components. Carefully pull the cable terminal straight away from the post, avoiding bending that could damage the connection. Next, disconnect the smaller trigger wire—if it uses a push-on connector, pull firmly while rocking slightly side to side; if secured with a nut, remove it with the appropriate wrench. On some vehicles, a protective rubber boot covers electrical connections—slide this boot away from the starter before disconnecting wires. Inspect all wire terminals and connections for corrosion, damage, or loose strands that could cause future problems.
Step 6: Remove mounting bolts and extract the starter. Starters typically mount with two to four bolts threaded into the engine block or transmission housing. Identify all mounting bolts—some may hide behind wiring or heat shields. Note whether the installation uses shims (thin metal spacers) between the starter and mounting surface, as these ensure proper gear alignment with the flywheel and must be reinstalled in the same configuration. Apply penetrating oil to rusty bolts and wait 10-15 minutes for penetration before attempting removal. As you remove the final bolt, support the starter’s weight with one hand or have an assistant hold it to prevent it dropping and potentially damaging you, the starter, or surrounding components. Carefully maneuver the starter free from its mounting location, which may require tilting, rotating, or moving other components slightly to clear tight spaces.
Step 7: Inspect the flywheel ring gear. With the starter removed, you have rare access to inspect the flywheel or flexplate ring gear that the starter engages during engine starting. Use a flashlight to examine the gear teeth visible through the starter mounting opening. Healthy teeth appear smooth, evenly spaced, and uniformly shaped without chips, cracks, or excessive wear. If you observe damaged teeth—particularly chewed, flattened, or missing teeth—the flywheel or flexplate likely requires replacement to prevent premature failure of your new starter. Rotating the engine by hand (using a breaker bar on the crankshaft pulley bolt) allows inspection of the entire ring gear circumference. Severe ring gear damage necessitates additional repair, as installing a new starter against damaged flywheel teeth will quickly destroy the new unit.
Step 8: Install the new starter with proper alignment and torque. Position the new starter into the mounting location, ensuring any shims used on the original installation are placed identically. The starter nose and gear should align naturally with the flywheel opening—forcing or cocking the starter indicates misalignment that will cause premature wear or starting problems. Thread mounting bolts by hand initially to prevent cross-threading, particularly important because engine blocks often use aluminum threads that strip easily under excessive force. Once all bolts thread smoothly by hand, gradually tighten them in a crisscross pattern to ensure even seating. Final torque specifications vary by vehicle but typically range from 30 to 50 foot-pounds—consult your repair manual for exact specifications and use a torque wrench for precise tightening. Over-torquing strips threads or cracks starter housings, while under-torquing allows movement that destroys both starter and flywheel.
Step 9: Reconnect electrical components and perform testing. Refer to your photographs taken during disassembly to ensure correct electrical reconnection. Attach the large battery cable terminal to the starter post, ensuring the terminal seats completely against the mounting surface before tightening the retaining nut firmly. Connect the smaller trigger wire, verifying secure engagement of push-on connectors or proper tightening of terminal nuts. Verify all wires route away from hot exhaust components, moving parts, and sharp edges that could damage insulation over time. Reconnect the battery negative terminal, tightening it firmly to ensure good electrical contact. Before lowering the vehicle from jack stands, perform a post-installation start test checklist: turn the ignition key and verify the starter engages smoothly without grinding or unusual noises, the engine cranks normally and starts without hesitation, and the starter disengages immediately when you release the key to the run position. Listen carefully during the first several start cycles for any abnormal sounds suggesting misalignment or incomplete starter engagement.

How Long Does DIY Starter Replacement Take?
DIY starter replacement requires one to two hours for easily accessible starters on common vehicles, while difficult installations with limited access can extend to three to five hours for first-time DIYers, with experienced mechanics completing even complex installations in half those timeframes due to familiarity with efficient techniques and proper tool usage. The Starter replacement labor time depends primarily on starter location accessibility, your mechanical skill level, and whether you encounter complications like seized bolts or discovering additional problems during the repair.
Easily accessible starters characterize many Honda, Toyota, and domestic vehicles where the starter mounts on the lower engine block with clear access from underneath. These installations typically require 60 to 90 minutes for first-time DIYers following methodical procedures: 15 minutes for vehicle lifting and safety setup, 10 minutes for battery disconnection and workspace preparation, 20 minutes for electrical disconnection and photography, 15 minutes for mounting bolt removal and starter extraction, 5 minutes for flywheel inspection, 15 minutes for new starter installation and bolt torquing, 10 minutes for electrical reconnection, and 10 minutes for testing and vehicle lowering. Experienced DIYers familiar with their specific vehicle often complete these straightforward installations in 45 to 60 minutes.
Difficult starter installations significantly extend completion time due to access restrictions requiring partial disassembly of other components. Toyota and Lexus V8 engines requiring intake manifold removal add 90 to 120 minutes just for manifold access, while the starter replacement itself adds another 45 to 60 minutes, totaling three to four hours for first-time DIYers. Similarly, some Subaru boxer engines position starters near exhaust components, requiring careful heat shield and exhaust pipe manipulation that adds substantial time. European vehicles like certain BMW and Audi models bury starters beneath intake components or behind accessory drives, extending total project time to four to six hours when including time for unfamiliar component removal and reinstallation.
First-time DIYers should budget additional time for unexpected challenges and learning. Seized or corroded bolts may require 30 to 60 minutes of penetrating oil application, careful extraction to prevent breakage, or in worst cases, drilling out broken bolt remnants. Discovering additional problems like corroded battery cables, damaged flywheel teeth, or worn starter wiring adds both diagnostic time and potential additional repair work. Electrical troubleshooting after installation, if the starter fails to operate correctly, can consume another 30 to 90 minutes while you verify connections, test for voltage, and ensure proper installation. Planning for these contingencies prevents frustration and allows you to complete the repair methodically rather than rushing.
Tool familiarity and workspace organization dramatically affect completion time. Mechanics experienced with their tool sets locate correct socket sizes immediately, efficiently maneuver ratchets and extensions in tight spaces, and recognize when wobble extensions or alternative approaches will save time. First-time DIYers often spend 20 to 30 minutes trying different socket and extension combinations before finding the configuration that accesses recessed bolts. Organizing your workspace with parts trays for hardware, designated locations for removed components, and proper lighting eliminates time wasted searching for dropped bolts or determining which components you’ve already removed versus those remaining for reinstallation.
Should You Rebuild or Replace Your Starter?
Starter replacement proves more cost-effective and reliable than rebuilding in most situations, costing $80 to $400 for a quality new or remanufactured unit compared to $50 to $350 for rebuild parts plus significant labor time, while delivering superior longevity and often including warranties that rebuilds rarely offer. However, rebuilding becomes economical for rare, expensive, or vintage vehicle starters where replacement units cost $500 to $1,500 or are unavailable.
The rebuild versus replace decision hinges on multiple factors including parts availability, cost comparison, your mechanical skill level, and the vehicle’s long-term ownership plans. Modern vehicles benefit from readily available replacement starters at competitive prices, making replacement the obvious choice for most car owners. Conversely, classic vehicles, rare imports, or specialized applications sometimes necessitate rebuilding as the only viable option when replacement starters prove unavailable or prohibitively expensive.
What Are the Costs of Rebuilding vs Replacing?
Rebuilding a starter requires $50 to $350 in replacement parts including brushes, solenoid contacts, bearings, and bushings, plus three to six hours of skilled labor for disassembly, inspection, parts replacement, reassembly, and testing, while replacement starters range from $80 for aftermarket units to $400 for OEM components, installed in one to four hours. The total cost comparison typically favors replacement for common vehicles but shifts toward rebuilding for rare or expensive applications.
Starter rebuild kits contain the components most commonly requiring replacement: carbon brushes that wear from repeated electrical contact with the commutator ($15-$40 for quality brush sets), solenoid contact points that pit and erode from high-current switching ($20-$60 for contact kits), bushings and bearings supporting the armature shaft ($10-$30), and sometimes replacement solenoid assemblies ($40-$80). Complete rebuild kits bundling all these components range from $50 for basic economy kits to $200 for premium kits with upgraded components. However, these kits cannot address all potential failures—damaged armatures, shorted field coils, cracked housings, or worn drive mechanisms require individual component replacement at significantly higher costs or render rebuilding uneconomical.
The labor investment for rebuilding substantially exceeds replacement time. Disassembling a starter requires removing through-bolts, separating the housing sections, extracting the armature, and cataloging numerous small components—consuming 45 to 90 minutes even for experienced rebuilders. Testing the armature for shorts, grounds, and opens requires specialized equipment unavailable to most DIYers, necessitating either professional testing services ($30-$60) or educated guessing about armature condition. Installing new brushes, replacing worn bushings, resurfacing the commutator, and reassembling the unit consumes another 60 to 90 minutes. Finally, bench testing the rebuilt starter before reinstalling it in the vehicle adds 15 to 30 minutes. Total rebuild time reaches three to five hours for typical rebuilds, six to eight hours for complex units or when complications arise.
By comparison, purchasing a remanufactured starter from a reputable supplier provides a professionally rebuilt unit for $100 to $250 depending on application—often less than the combined cost of rebuild parts and testing services, and including a warranty typically ranging from one to three years. These professionally remanufactured units undergo complete disassembly, testing of all components with specialized equipment, replacement of all wear items, and comprehensive bench testing before sale. The cost-effectiveness of professionally remanufactured starters makes DIY rebuilding economically questionable for most common vehicles.
New versus remanufactured starter pros and cons reveal trade-offs beyond initial cost. New starters offer maximum longevity with no previous wear history, pristine internal components, and typically longer warranties (three years to lifetime), but command premium prices 40% to 60% higher than remanufactured equivalents. Remanufactured starters provide proven reliability at 30% to 50% cost savings, extensive availability for most applications, and respectable warranties, though they contain cores with unknown previous usage and wear patterns. For vehicles you plan to own long-term, new starters justify their higher cost through extended service life. For vehicles nearing the end of their useful life or those you plan to sell within a few years, remanufactured units offer adequate performance at minimized investment.
When Should You Choose Rebuilding Over Replacement?
Choose starter rebuilding over replacement when dealing with rare vehicles where replacement starters cost $500 or more, classic or vintage vehicles requiring original appearance preservation, high-performance applications using specialized starters unavailable in remanufactured form, or when you possess the specialized skills and equipment making rebuilding economically viable—otherwise, replacement delivers superior value and reliability. Rebuilding makes sense in approximately 5% to 10% of starter replacement situations, primarily involving unusual or specialized applications.
Classic and vintage vehicles represent the primary scenario favoring rebuilding. A 1965 Ford Mustang owner seeking to maintain originality might find replacement starters costing $400 to $600, while their original starter can be rebuilt for $200 to $300 in parts and labor while preserving the correct appearance and part numbers that matter to purists and judges at car shows. Similarly, rare imported vehicles from manufacturers no longer operating in the United States sometimes lack available replacement starters, making rebuilding the only option short of importing expensive international components with extended lead times and customs complications.
High-performance and racing applications occasionally justify rebuilding to maintain specific performance characteristics. Some performance starters feature upgraded internal components, higher-torque motors, or specialized gear ratios unavailable in standard replacement units. For instance, a drag racing starter designed for high-compression engines might cost $600 new but can be rebuilt for $250 when brushes wear out, preserving the high-performance characteristics at reasonable cost. These specialized applications represent niche scenarios where component performance outweighs typical economic considerations.
Professional rebuilders and mechanic shops with specialized equipment can economically rebuild starters as a profit-generating service. Shops equipped with starter testing benches, armature testing equipment, and experienced technicians achieve rebuild costs of $80 to $150 (parts plus labor at shop rates) for units they can subsequently sell for $200 to $300 as rebuilt cores. This business model works for shops building inventory of common starters they can rebuild in batches, but it doesn’t translate to individual car owners lacking equipment and specialized knowledge.
Conversely, avoid rebuilding when replacement starters cost less than $200, when you lack experience disassembling and testing electrical motors, when specialized testing equipment is unavailable, or when time constraints make the three to six hour rebuild process impractical. Additionally, never attempt rebuilding starters with damaged armatures, shorted field coils, cracked housings, or severely worn drive mechanisms, as these problems require component replacement exceeding complete replacement unit costs. If your primary goal is returning your vehicle to service quickly and reliably, replacement almost always provides the better solution.

How Does Starter Location Affect Replacement Difficulty?
Starter location determines replacement difficulty more than any other factor, with easily accessible starters requiring 45 to 90 minutes and $100 to $200 in labor while difficult locations demanding three to five hours and $400 to $800 in professional installation costs due to extensive component removal for access. Vehicle manufacturers position starters based on engine design constraints and packaging requirements, often prioritizing manufacturing efficiency over maintenance accessibility.
Understanding your specific vehicle’s starter location before beginning replacement helps you assess whether DIY installation is realistic or whether professional service proves more practical. Starter accessibility varies dramatically even among similar vehicles—a 2015 Honda Accord features an easily accessible starter requiring minimal effort, while a 2015 Toyota Highlander V6 requires substantial disassembly for access. This variability means generic starter replacement time estimates often prove wildly inaccurate for your specific application.
Which Vehicles Have the Most Accessible Starters?
Vehicles with the most accessible starters include most Honda models (Accord, Civic, CR-V), Toyota four-cylinder engines (Camry, Corolla, RAV4), older domestic vehicles (pre-2000 Ford F-150, Chevrolet Silverado), many Nissan models (Altima, Sentra), and Mazda vehicles (Mazda3, Mazda6), typically featuring starters visible from underneath with no component removal required beyond electrical disconnections and mounting bolts. These vehicles make ideal candidates for DIY starter replacement, allowing even novice mechanics to complete the job successfully.
Honda vehicles consistently rank among the easiest for starter replacement across their entire lineup. The 2003-2015 Honda Accord, for example, positions its starter on the lower rear of the engine block, easily accessible from underneath with the vehicle raised on jack stands. Mechanics can see the starter clearly, reach all mounting bolts with standard extensions, and access electrical connections without contortion or removing other components. Total replacement time for a Honda Accord starter averages 45 to 60 minutes for DIYers, with professional shops completing the job in 30 to 40 minutes. Similar accessibility characterizes Honda Civic, CR-V, and Pilot models across most model years.
Toyota four-cylinder engines provide comparable accessibility, though specific model years vary. The 2007-2011 Toyota Camry with the 2.4L four-cylinder engine features a starter mounted on the lower engine block with clear access from underneath, requiring only 60 to 75 minutes for typical DIY replacement. Similarly, Toyota Corolla, Matrix, and RAV4 four-cylinder models generally position starters accessibly. However, Toyota V6 engines present substantially different accessibility challenges discussed in the next section, demonstrating why engine configuration significantly impacts replacement difficulty even within the same vehicle brand.
Older domestic trucks and SUVs often feature straightforward starter access. Pre-2000 Ford F-150 trucks with V8 engines typically mount starters on the passenger side of the engine block, easily visible and accessible from underneath with basic hand tools. Chevrolet Silverado and GMC Sierra trucks of similar vintage provide comparable access. These vehicles’ generous engine bay space and less complex packaging allow mechanics to reach starter mounting bolts and electrical connections comfortably, making them excellent learning platforms for first-time starter replacements.
Nissan and Mazda vehicles generally prioritize maintenance accessibility, positioning starters where they can be serviced without extensive disassembly. The Nissan Altima and Sentra typically feature starters accessible from underneath with minimal obstruction, while Mazda3 and Mazda6 models similarly provide reasonable access. These vehicles balance performance and packaging efficiency with serviceability, resulting in starter replacement times averaging 75 to 120 minutes for DIY work—not the fastest but still manageable for home mechanics.
Which Vehicles Require Complex Starter Replacement?
Vehicles requiring complex starter replacement include Toyota and Lexus V6/V8 engines (requiring intake manifold removal), many BMW models (starters positioned under intake or behind accessories), Audi V6 engines (limited access requiring special tools), some Subaru boxer engines (exhaust component removal needed), and certain modern turbocharged engines with starters buried beneath turbocharger plumbing, often demanding three to six hours of professional labor costing $400 to $900. These vehicles challenge even experienced mechanics and strongly favor professional service over DIY attempts.
Toyota and Lexus V6 and V8 engines present some of the automotive industry’s most difficult starter replacements. The 2007-2019 Toyota Tundra with the 5.7L V8 engine positions its starter beneath the intake manifold on the valley between cylinder banks, requiring complete intake manifold removal to access the starter mounting area. This process involves disconnecting fuel lines, removing the throttle body, detaching numerous vacuum lines and electrical connectors, removing intake plenum bolts, and carefully lifting the heavy manifold assembly—consuming two to three hours before even beginning starter removal. Total professional labor for this repair commonly reaches four to five hours, with labor costs of $500 to $750 not uncommon at dealership rates. Similarly challenging installations affect the Toyota Highlander V6, Lexus RX350, and Lexus GX460 models.
BMW vehicles frequently bury starters beneath intake manifolds, behind alternators, or among other components requiring substantial disassembly. The BMW E90 3-Series with the N52 inline six-cylinder engine positions its starter on the back of the engine near the transmission, requiring removal of the intake manifold and potentially exhaust components for adequate access. BMW’s use of aluminum engine blocks and specialized fasteners adds complexity, as over-torqued or cross-threaded bolts can destroy expensive engine components. The labor-intensive nature of these repairs explains why BMW dealerships charge $800 to $1,200 for starter replacement on many models—prices that seem outrageous until you understand the work involved.
Audi vehicles with V6 engines often require removing the entire front of the vehicle’s front clip (bumper, grille, headlight assemblies, and crash bar) to access starters positioned at the back of the engine bay. This design prioritizes manufacturing assembly efficiency over field service accessibility, resulting in five to seven hour professional labor times for what should be a routine repair. The specialized tools, careful reassembly requirements for proper airbag sensor positioning and crash structure integrity, and substantial disassembly make these repairs particularly expensive and unsuitable for DIY attempts.
Subaru boxer engines, while generally reliable, sometimes position starters where exhaust components obstruct access. Certain Subaru Forester, Outback, and WRX models require removing exhaust heat shields, disconnecting portions of the exhaust system, or maneuvering around exhaust pipes to reach starter mounting bolts. The horizontally opposed engine configuration places the starter on the engine’s bottom side, accessible primarily from underneath, but exhaust routing sometimes interferes. Additionally, Subaru’s use of multiple engine-to-transmission braces and supports in the starter mounting area complicates removal and installation. While not as challenging as Toyota V8 or BMW installations, Subaru starter replacements typically require two to three hours and benefit from professional experience.
Modern turbocharged engines increasingly create starter accessibility challenges as manufacturers pack turbochargers, intercoolers, complex exhaust manifolds, and emissions equipment into limited engine bay space. Some Ford EcoBoost engines, for instance, require removal of intercooler piping or turbocharger heat shields to access starter mounting areas. These engines’ compact packaging and numerous fragile plastic and aluminum components increase the risk of breaking unrelated parts during starter replacement, particularly for inexperienced mechanics unfamiliar with proper disassembly sequences.
What Are the Special Considerations for Starter Bolt Replacement?
Starter bolts require specialized designs featuring knurled sections beneath the bolt head that precisely align the starter gear with the flywheel ring gear, and these knurled bolts cannot be substituted with standard grade 8 bolts without risking starter misalignment, premature gear wear, and catastrophic engagement failures. Always reuse existing starter bolts if threads remain undamaged, or purchase exact OEM-specification replacement bolts when wear or damage necessitates replacement.
Knurled starter bolts feature a cross-hatched pattern machined into the bolt shank just below the head, creating a slightly oversized diameter that fits tightly into the starter mounting holes. This knurling serves a critical function: it precisely positions the starter in three-dimensional space relative to the flywheel, ensuring the starter drive gear meshes perfectly with the flywheel ring gear teeth. The tight fit created by knurling prevents the starter from shifting during operation, which would cause the gear teeth to clash, grind, and rapidly destroy both the starter and flywheel.
Standard grade 8 bolts, despite having adequate tensile strength to hold the starter securely, lack this precision positioning knurling and measure slightly smaller in diameter. Installing standard bolts allows microscopic starter movement during engagement—seemingly insignificant movement of just 0.5mm to 1mm can prevent proper gear mesh, causing grinding noises during startup or preventing engagement entirely. Over time, this movement elongates the mounting holes in the starter housing and engine block, creating permanent damage that prevents even proper starter bolts from achieving correct alignment. This damage transforms a $200 starter replacement into an $800 to $1,500 repair requiring flywheel replacement and potentially engine block thread repair.
Proper starter bolt torque specifications typically range from 30 to 50 foot-pounds depending on the specific vehicle, engine block material (cast iron versus aluminum), and bolt diameter. Under-torquing allows starter movement even with proper knurled bolts, while over-torquing strips threads in aluminum engine blocks or cracks starter housings. Consult your vehicle’s service manual for exact torque specifications and always use a calibrated torque wrench for final tightening. Experienced mechanics often tighten mounting bolts incrementally in a crisscross pattern, gradually approaching final torque rather than immediately applying full specification, which helps seat the starter evenly and prevents cocking that could cause misalignment.
Shim washers sometimes accompany starter installations, particularly on vehicles where manufacturing tolerances create slight variations in starter-to-flywheel spacing. These thin metal spacers (typically 0.015 to 0.030 inches thick) install between the starter mounting surface and the engine block to precisely adjust the depth at which the starter gear engages the flywheel. When removing your old starter, carefully note whether shims are present, their exact thickness, and which mounting bolt(s) they accompany. These shims must be reinstalled identically during new starter installation—omitting them or installing them incorrectly causes the same meshing problems as using incorrect bolts. If unsure about shim requirements, consult installation instructions included with quality replacement starters or reference vehicle-specific service procedures.
When Should You Inspect the Flywheel Ring Gear?
Inspect the flywheel ring gear every time you remove a starter to identify tooth damage that could destroy your new starter within days or weeks, focusing on teeth in the engagement zone where the starter drive typically meshes during normal starting. This inspection requires only five to ten minutes but can prevent premature starter failure and expensive flywheel replacement performed urgently when your new starter fails unexpectedly.
The flywheel ring gear, which the starter engages to rotate the engine during starting, experiences significant mechanical stress with each startup. Over time, improper starter engagement, worn starter drive components, or misaligned starters can damage ring gear teeth, creating chewed, flattened, or missing teeth that prevent proper meshing. A damaged ring gear will quickly destroy a new starter’s drive gear through the same clashing and grinding that damaged the ring gear originally, creating a cycle of failures unless the underlying damage is addressed.
Performing a visual inspection requires only a flashlight and the ability to recognize damaged teeth. With the starter removed, shine a flashlight through the starter mounting opening to illuminate the flywheel ring gear. Healthy teeth appear evenly spaced with smooth, consistent shape across all visible teeth—like precise gear teeth on quality machinery. Look specifically for: chewed or rounded tooth tips indicating repeated grinding contact, flat spots on tooth faces suggesting misalignment wear, chips or cracks in individual teeth, and missing teeth leaving gaps in the ring gear. Compare multiple teeth across different sections of visible ring gear to distinguish normal wear from damage requiring replacement.
Rotating the engine by hand allows inspection of the entire ring gear circumference rather than just the section visible through the starter opening. Use a large breaker bar with the appropriate socket on the crankshaft pulley center bolt to slowly rotate the engine clockwise (or counterclockwise for certain engines—consult your manual). Ensure the transmission is in park or neutral and the parking brake is released to allow engine rotation. As you rotate, inspect newly exposed ring gear sections with your flashlight, looking for the same damage indicators. Complete at least one full 360-degree rotation to examine all teeth, as damage often concentrates in the specific engagement zone where the starter typically meshes.
Damage severity determines whether replacement becomes necessary. Minor wear—slight tooth rounding or surface roughness affecting one to three teeth—often proves acceptable, particularly if planning to sell the vehicle soon or if replacement costs prove prohibitive. However, severe damage including flat-topped teeth, deep gouges, cracks, or more than three heavily damaged teeth necessitates flywheel or flexplate replacement to prevent rapid new starter destruction. Flywheel replacement requires transmission removal in manual transmission vehicles or torque converter detachment in automatics, adding substantial labor costs of $400 to $800 beyond the flywheel component itself ($150 to $400). This significant additional expense explains why preventive inspection proves valuable—identifying the need for flywheel replacement before installing your new starter prevents wasting the $150 to $400 starter cost on a unit that will fail within weeks.
Some vehicles use pressed-on ring gears that can be replaced separately from the flywheel, reducing repair costs. A machine shop can remove the damaged ring gear and press on a new one for $150 to $250 total, compared to $500 to $1,200 for complete flywheel replacement including labor. However, this option requires removing the flywheel for machine shop service, still necessitating transmission removal and the associated labor costs. Consult an experienced mechanic or machine shop to determine whether ring gear replacement proves feasible for your specific application.
Conclusion
Successfully replacing your car starter requires understanding the cost components, recognizing failure symptoms early, gathering appropriate tools, following methodical installation procedures, and making informed decisions about rebuild versus replacement. Whether you choose professional installation for complex vehicles with difficult starter access or tackle the repair yourself on more accessible applications, thorough preparation and attention to detail ensure reliable results that restore your vehicle’s starting capability for years to come. By implementing Preventing premature starter failure practices like addressing battery and charging system issues promptly, avoiding water contamination during engine cleaning, and performing proper Starter vs battery vs alternator diagnosis when problems arise, you extend component life and minimize unexpected repair expenses.