How to Replace a Serpentine Belt: Complete DIY Guide for Car Owners
Replacing a serpentine belt yourself involves five essential steps: preparing your vehicle safely, locating and photographing the belt routing diagram, relieving tension from the belt tensioner, removing the old belt while inspecting pulleys, and installing the new belt correctly—a process that typically takes 20-60 minutes and saves $80-150 in labor costs compared to professional service.
Understanding when your serpentine belt needs replacement prevents costly breakdowns and engine damage. The belt powers critical systems including your alternator, power steering pump, air conditioning compressor, and often the water pump. Warning signs like squealing noises during startup, visible cracks in the belt ribs, glazed or shiny surfaces, and frayed edges indicate immediate replacement needs. Most serpentine belts last between 60,000 to 100,000 miles, though harsh driving conditions and extreme temperatures can accelerate wear.
Successful serpentine belt replacement requires the right tools and preparation. You’ll need a 3/8″ or 1/2″ drive ratchet or breaker bar to manipulate the belt tensioner, a smartphone or camera to document the belt routing pattern, and the correct replacement belt for your specific vehicle make, model, and engine type. Optional but highly recommended tools include a serpentine belt tool designed specifically for tension release and a flashlight for better visibility in tight engine compartments.
Beyond the basic replacement procedure, inspecting related components while the belt is off prevents premature failure of your new belt. Below, we’ll walk through each step of the replacement process, explain what to look for during inspections, and help you decide whether DIY replacement makes sense for your situation.
What Is a Serpentine Belt and Why Does It Need Replacement?
A serpentine belt is a single continuous rubber belt with longitudinal V-shaped grooves that transfers rotational power from the engine’s crankshaft to multiple accessory components simultaneously, typically lasting 60,000-100,000 miles before requiring replacement due to heat degradation, friction wear, and material fatigue.
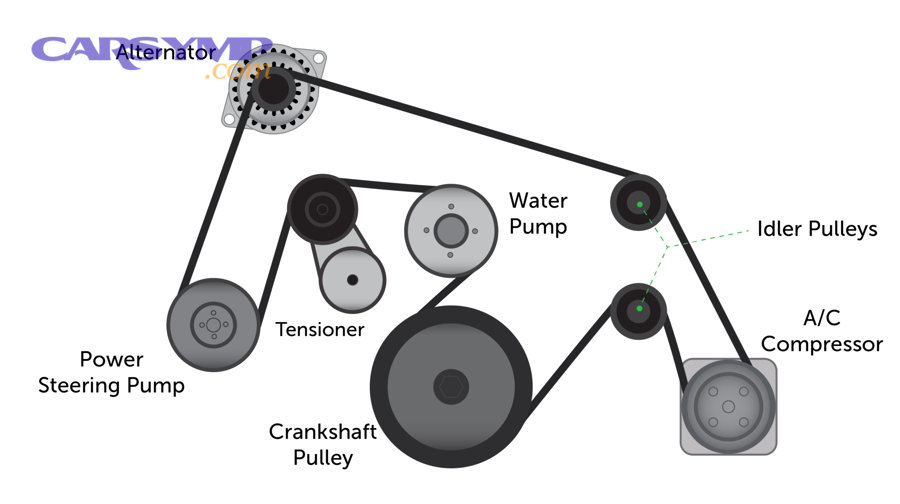
The serpentine belt’s name comes from how it snakes around multiple pulleys in your engine bay, creating an efficient power distribution system. Let’s explore exactly what this critical component does and why it eventually fails.
What Does a Serpentine Belt Do in Your Vehicle?
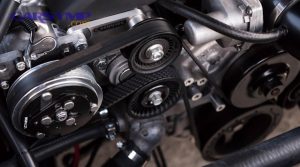
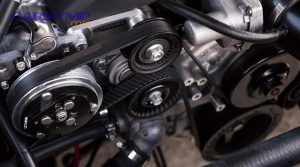
The serpentine belt serves as your engine’s power distribution system, connecting the crankshaft to essential accessories that keep your vehicle operational. When your engine runs, the crankshaft pulley rotates and drives the belt, which in turn spins several component pulleys.
The belt typically powers four to six critical systems:
- Alternator: Generates electrical power to charge the battery and run all electrical systems while the engine operates
- Power steering pump: Provides hydraulic assistance for easy steering, especially at low speeds and when parking
- Air conditioning compressor: Pressurizes refrigerant to cool the cabin interior
- Water pump: Circulates coolant through the engine block and radiator to prevent overheating (in most vehicles; some use timing belt-driven water pumps)
- Engine cooling fan: Draws air through the radiator on some vehicles (though many modern cars use electric fans)
- Air injection pump: Reduces emissions by pumping air into the exhaust system (on equipped vehicles)
The serpentine belt replaced older multi-belt systems that used separate V-belts for each accessory. This single-belt design reduces weight, takes up less space, eliminates individual belt adjustments, and uses an automatic tensioner to maintain proper tension throughout the belt’s service life.
How Long Does a Serpentine Belt Last?
Serpentine belts are engineered to last between 60,000 and 100,000 miles under normal driving conditions, with most manufacturers recommending inspection at 50,000 miles and replacement between 60,000-90,000 miles regardless of visible condition.
However, several factors affect actual belt longevity beyond simple mileage. Climate plays a significant role—extreme heat accelerates rubber degradation while freezing temperatures make belts brittle and prone to cracking. Vehicles operated in desert environments or those with high underhood temperatures may require replacement as early as 50,000 miles.
Driving patterns also matter. Short trips prevent the engine from reaching optimal operating temperature, creating more thermal cycling that stresses the belt material. Stop-and-go city driving with frequent accessory engagement (air conditioning, power steering at low speeds) creates more load variations than highway cruising.
Modern serpentine belts use EPDM (Ethylene Propylene Diene Monomer) rubber instead of older Neoprene compounds. EPDM belts resist cracking better and can appear serviceable even when dangerously worn. The material wears gradually from the inside ribs rather than showing obvious surface cracks, making age-based replacement more important than visual-only assessments.
Belt quality varies significantly between manufacturers. OEM (Original Equipment Manufacturer) belts and premium aftermarket brands like Gates, Dayco, and Continental typically outlast economy brands. According to automotive maintenance data, premium belts average 15-20% longer service life than budget alternatives, justifying their higher initial cost through extended replacement intervals and reduced failure risk.
What Are the Signs That Your Serpentine Belt Needs Replacement?
Your serpentine belt needs replacement when you observe six primary warning signs: audible squealing or chirping during engine startup or acceleration, visible cracks spanning more than three inches, glazed or shiny belt surfaces, frayed or separated ribs, missing rubber chunks, or the belt sitting noticeably lower in pulley grooves than when new.
Recognizing these symptoms early prevents sudden belt failure that can leave you stranded or cause engine damage. Let’s examine the visual and audible indicators that signal replacement time.
What Do Cracks and Wear Patterns Look Like?
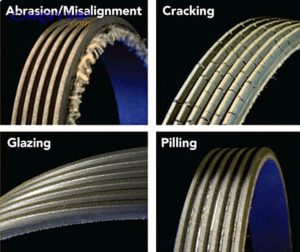
Visual inspection reveals several distinct wear patterns that indicate replacement necessity. Cracks are the most obvious indicator, but their significance depends on pattern and severity.
Surface cracking appears as fine lines running across the belt’s ribbed surface. Small, isolated cracks less than one inch long are normal aging but require monitoring. However, when cracks form a spiderweb pattern covering large sections or when individual cracks exceed three inches, the belt has reached failure threshold. The old “three cracks in three inches” rule applied to Neoprene belts; modern EPDM belts resist surface cracking but fail through different mechanisms.
Rib wear is critical but harder to spot. The V-shaped ribs that fit into pulley grooves should come to sharp points when new. As belts age, these ribs wear down and become rounded, similar to tire tread wearing smooth. Hold a new belt next to your installed belt for comparison—if the ribs appear significantly flatter or the belt sits visibly lower in the pulleys, the belt has lost material and tension capacity. Just 5% material loss causes the ribs to bottom out in pulleys, triggering slippage.
Glazing creates a shiny, glossy appearance on the rib surfaces that should normally look matte. This occurs when the belt slips against pulleys, generating friction heat that melts and smooths the rubber surface. Glazed belts cannot grip pulleys effectively, leading to accessory performance problems like weak power steering, dim lights, or inadequate air conditioning.
Fraying appears as loose rubber strands or fuzzy edges along the belt sides. This indicates misalignment between pulleys or contact with engine components. Frayed belts will soon shed material and potentially fail catastrophically.
Missing chunks or separated ribs are emergency-level damage requiring immediate replacement. Once the belt structure begins delaminating, complete failure is imminent.
Edge damage including rounded belt edges or uneven wear on one side signals pulley misalignment. The belt should track centered on all pulleys with square, defined edges.
What Sounds Indicate a Failing Serpentine Belt?
Serpentine belt noise manifests as squealing, chirping, or screeching sounds that typically occur during specific operating conditions, providing diagnostic clues about the failure type and urgency.
Squealing at startup is the most common symptom. If you hear a high-pitched squeal for 2-5 seconds immediately after starting the engine, especially on cold mornings, the belt is likely glazed or losing tension. The sound occurs because the cold, stiff belt struggles to grip pulleys as the engine instantly demands power for accessories. As the belt warms and becomes more pliable, the noise stops. This pattern indicates the belt is approaching end-of-life but may still have weeks or months of service remaining.
Squealing during acceleration suggests the belt cannot maintain grip when engine speed increases rapidly. This indicates severe glazing, insufficient tension from a worn tensioner, or oil contamination on the belt surface. When you press the accelerator and hear squealing that increases with engine RPM, replacement should occur within days.
Chirping with accessory engagement occurs when turning the steering wheel hard, switching on the air conditioning, or engaging the defroster. Each accessory adds load to its respective pulley, and a worn belt slips momentarily before regaining grip, creating a chirping sound. This indicates the belt has lost material thickness and can no longer maintain friction under varying loads.
Continuous screeching while driving represents critical failure. The belt is actively slipping across pulleys, generating intense friction and heat. Pull over safely and shut off the engine—continued operation risks complete belt disintegration and potential engine damage from overheating.
Belt noise differs from other engine sounds. Serpentine belt squeals are high-pitched and rhythmic, changing with engine speed. Exhaust leaks produce lower, rougher sounds. Bearing failures create grinding or humming noises that don’t change pitch as dramatically with RPM.
Environmental factors influence belt noise. Cold temperatures make belts harder and more prone to slipping. Moisture from rain, car washing, or driving through puddles can cause temporary squealing even on good belts—this noise should disappear within minutes as the belt dries. Persistent noise after the belt dries indicates wear problems.
What Tools and Materials Do You Need to Replace a Serpentine Belt?
Serpentine belt replacement requires four essential items: a 3/8″ or 1/2″ drive ratchet or breaker bar for tensioner manipulation, a smartphone or camera for documenting belt routing, the correct replacement belt matching your vehicle specifications, and basic safety equipment including gloves and eye protection.
Proper tool selection significantly affects both the difficulty and success of your replacement job. Let’s examine each tool category and how to choose the right replacement belt.
What Are the Essential Tools for the Job?
The tool requirements for serpentine belt replacement are minimal compared to most auto maintenance tasks, making this an accessible DIY project for beginners.
Ratchet or breaker bar is your primary tool for releasing belt tension. Most vehicles use either a 3/8″ or 1/2″ drive tensioner bolt, though some require a specific-size box-end wrench (commonly 15mm, 16mm, or 5/8″). The key specification is getting a ratchet with a narrow head profile—standard ratchets often don’t fit in the confined space around the tensioner pulley. Before purchasing, check your vehicle’s service manual or online forums for the specific tool size and whether a narrow-profile ratchet is necessary.
Serpentine belt tool is optional but highly recommended, especially for vehicles with limited access to the tensioner. These specialized tools (costing $15-40) feature a long handle for leverage and a swivel head designed to fit tensioner bolts in awkward positions. The extended handle reduces the physical force required and provides better control when holding tension while routing the belt. For first-time belt changers or vehicles with difficult access, this tool often makes the difference between a 20-minute job and a frustrating hour-long struggle.
Flashlight or work light is essential for visibility in dark engine compartments. LED headlamps (costing $15-30) are particularly useful because they keep both hands free while providing directed light exactly where you’re looking. Belt routing diagrams are often located in shadowed areas, and installing the belt correctly requires seeing pulley grooves clearly.
Smartphone or digital camera serves a critical function: photographing the belt routing before removal. Even with a factory diagram, having your own reference photo showing exactly how the belt runs on your specific vehicle provides confidence during installation. Take multiple photos from different angles, ensuring every pulley interaction is clearly visible.
Jack stands and wheel chocks are necessary if accessing the belt through the wheel well (common on many front-wheel-drive vehicles). Never work under a vehicle supported only by a jack—jack stands provide essential safety. Wheel chocks prevent the vehicle from rolling.
Gloves and safety glasses protect against cuts, burns, and debris. Engine compartments contain sharp edges, hot surfaces (even after cooling), and accumulated grime. Chemical-resistant gloves prevent skin irritation from belt material and engine fluids.
Belt wear gauge (optional) helps assess remaining belt life during routine inspections. These inexpensive tools measure rib depth to determine if the belt has lost enough material to warrant replacement, even if cracks aren’t obvious.
How Do You Select the Correct Replacement Belt?
Choosing the correct serpentine belt requires matching three critical specifications: length, width, and rib count for your exact vehicle make, model, year, and engine type.
Length is the most critical specification. Belts are measured in inches or millimeters, typically ranging from 60-120 inches (1500-3000mm) for passenger vehicles. Installing a belt that’s even one inch wrong prevents proper tensioner operation—too short and the tensioner bottoms out unable to maintain proper pressure; too long and the tensioner can’t apply sufficient tension, causing slippage.
Width and rib count must match your pulley system. Common configurations include 4-rib, 5-rib, 6-rib, 7-rib, and 8-rib belts, with widths varying accordingly. The ribs must align precisely with pulley grooves—using a 6-rib belt on a 7-rib pulley system won’t work.
Finding your belt specifications requires your vehicle’s VIN (Vehicle Identification Number) or at minimum the year, make, model, and engine size. Auto parts retailers like AutoZone, O’Reilly, and Advance Auto Parts have online tools where you enter this information to receive the correct part number. Alternatively, check your owner’s manual maintenance section or the vehicle service manual.
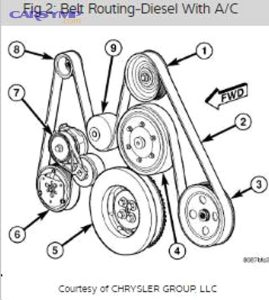
Belt routing diagrams are typically found on a sticker under your hood, often on the radiator shroud, inner fender, or underside of the hood itself. These diagrams show the serpentine belt’s path around all pulleys. If your vehicle’s sticker is missing or illegible, search online using your vehicle’s year, make, model, and engine—numerous websites and YouTube videos provide routing diagrams.
OEM vs. aftermarket quality tiers offer different value propositions:
- OEM belts from your vehicle manufacturer ensure exact specifications and proven compatibility but cost 20-40% more than aftermarket options
- Premium aftermarket brands (Gates, Dayco, Continental, Goodyear) match or exceed OEM quality at moderate prices, typically $25-50
- Economy brands cost $15-25 but may use inferior rubber compounds that degrade faster
Material matters: Modern belts use EPDM rubber, which resists cracking and lasts longer than older Neoprene formulations. Verify your replacement belt specifies EPDM construction. Some premium belts feature aramid fiber reinforcement for additional strength and heat resistance.
When to buy a belt kit: Some retailers offer serpentine belt kits that include the belt plus the tensioner and idler pulleys. These kits cost $80-150 but make sense if your tensioner shows wear or if you’re approaching 100,000 miles where all components are due for replacement. Replacing everything simultaneously prevents having to repeat the labor when individual components fail separately.
According to data from automotive parts retailers, approximately 30% of serpentine belt failures occur within the first year of replacement when drivers install the wrong length belt or reuse worn tensioners with new belts, emphasizing the importance of correct specification matching and comprehensive component assessment.
How Do You Replace a Serpentine Belt Step-by-Step?
Replacing a serpentine belt follows a four-phase process: preparing your vehicle with proper safety measures and documentation, removing the old belt by relieving tensioner pressure, inspecting pulleys and related components while the belt is off, and installing the new belt following the correct routing pattern—typically requiring 20-60 minutes depending on vehicle accessibility.
Successful serpentine belt replacement depends on careful preparation and methodical execution. Let’s walk through each phase of the procedure with specific techniques for common challenges.
How Do You Prepare for Serpentine Belt Replacement?
Preparation prevents the most common DIY mistakes and ensures you have everything needed before starting work.
Allow the engine to cool completely before beginning work. Even an engine that’s been off for 30 minutes retains significant heat in the pulleys, tensioner, and surrounding components. Touch the valve cover or exhaust manifold to verify temperature—if it’s uncomfortable to keep your hand there for several seconds, wait longer. Working on a hot engine risks burns and makes the job unnecessarily uncomfortable.
Locate and document the belt routing diagram. Find the factory diagram sticker under your hood—it’s typically placed on the radiator shroud, hood underside, or inner fender. If the diagram is faded or missing, search online for “[your vehicle year/make/model/engine] serpentine belt diagram” before removing the old belt. Take clear photos of both the diagram and the actual belt installation from multiple angles. Capture close-up shots showing exactly how the belt wraps around each pulley, noting whether it rides on the smooth back side or the ribbed side for each pulley.
Determine your access point. Some vehicles allow belt access from above by simply opening the hood. Others require removing the right front wheel and accessing the belt through the wheel well opening. Front-wheel-drive vehicles and cars with transversely-mounted engines often use wheel-well access. Check a forum or video specific to your vehicle model to determine the best access route.
If wheel removal is necessary:
- Park on level ground and engage the parking brake
- Place wheel chocks behind the rear wheels
- Loosen the lug nuts one full turn before raising the vehicle
- Jack up the front right corner using the manufacturer’s designated jack point
- Support the vehicle with a jack stand—never work under a car supported only by a jack
- Remove the lug nuts and wheel
- Set the wheel aside safely where it won’t roll
Remove any necessary splash shields or guards. Many vehicles have plastic undertray panels or fender liners partially blocking belt access. These typically secure with plastic clips or small bolts. Keep these fasteners organized in a container so you don’t lose them during reinstallation.
Clean the work area if your engine bay is excessively dirty. Removing accumulated grime from around the pulleys prevents contaminating your new belt with oil, dirt, or debris that would reduce its service life.
How Do You Remove the Old Serpentine Belt?
Removing the serpentine belt requires locating the tensioner, relieving spring tension, and carefully sliding the belt off the pulleys while noting its routing pattern.
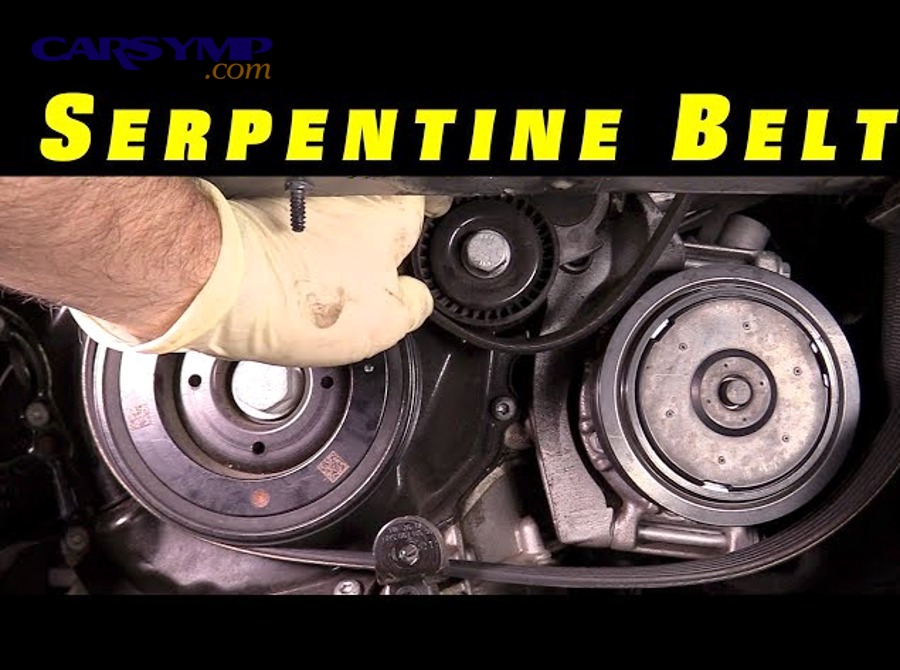
Locate the belt tensioner pulley. The tensioner is a spring-loaded pulley assembly, typically positioned on the smooth backside of the belt path. It usually sits near the top or side of the accessory drive system and features a square or hexagonal socket in the center of the arm for tool insertion. The tensioner pulley itself is smooth (no grooves) unlike the ribbed pulleys that grip the belt ribs.
Identify the tensioner rotation direction. Most tensioners rotate clockwise to release tension, but some rotate counterclockwise. Your belt routing diagram often shows an arrow indicating rotation direction. If uncertain, the tensioner arm should rotate in the direction that moves the pulley away from the belt path, creating slack.
Insert your ratchet or serpentine belt tool into the tensioner’s square socket. Common sizes are 3/8″, 1/2″, 15mm, or 16mm depending on your vehicle. Ensure the tool seats fully in the socket.
Apply steady, firm pressure to rotate the tensioner. This requires moderate force—you should feel spring resistance but shouldn’t need to strain excessively. Rotate the tensioner until the belt develops enough slack to slip off one pulley. The tensioner typically needs to rotate 15-30 degrees.
While holding tension, have a helper slip the belt off the nearest accessible pulley, or if working alone, slip the belt off a pulley with your free hand. Most technicians remove the belt from the smooth tensioner pulley itself or from an easily accessible pulley at the top of the engine. Once the belt is off one pulley, you can slowly release tensioner pressure and the belt will slacken completely.
Slowly release the tensioner back to its resting position. Control the release—don’t let the tensioner snap back suddenly as this can damage the tensioner mechanism.
Route the belt out of the engine bay. Serpentine belts often weave through tight spaces between components. Carefully thread it out without forcing it past sharp edges that could have damaged it during service.
Inspect the old belt before discarding it. Look for edge wear patterns indicating misalignment, missing chunks suggesting pulley damage, or oil saturation pointing to leaks. These conditions require correction before installing the new belt. Also check if the belt shows more wear on one edge versus the other—this confirms misalignment.
Mark the belt’s rotation direction if you’re keeping the old belt as an emergency spare. Belts develop a wear pattern matching their rotation direction and shouldn’t be reversed.
How Do You Install the New Serpentine Belt?
Installing the new serpentine belt requires following the routing diagram precisely, ensuring proper rib engagement in each pulley, and verifying correct tensioner operation.
Verify you have the correct belt before installation by comparing its length to the old belt. They should be nearly identical—new belts may be slightly shorter due to the old belt’s stretch over time, but shouldn’t differ by more than an inch.
Route the belt around all pulleys except the tensioner pulley or except one easily accessible pulley near the tensioner. Most technicians find it easiest to thread the belt around all the hard-to-reach pulleys first, saving the tensioner area for last. Follow your reference photos and the routing diagram exactly, ensuring:
- The ribbed side faces toward grooved pulleys (alternator, power steering, A/C compressor, water pump)
- The smooth back side rides against smooth idler pulleys and the tensioner pulley
- The belt seats completely in each pulley groove, not riding on the pulley edges
Check routing carefully before proceeding. A common mistake is routing the belt on the wrong side of an idler pulley or missing a pulley entirely. Triple-check against your diagram that every pulley the belt should contact is engaged.
Rotate the tensioner again to create slack, using the same ratchet or belt tool and rotation direction as removal.
Slip the belt over the final pulley (typically the tensioner pulley or an adjacent accessible pulley). This requires holding tensioner tension with one hand while guiding the belt with the other—this is where a serpentine belt tool’s extra length and leverage help significantly.
Ensure the belt seats properly in all pulley grooves before releasing tension. Run your finger along the belt’s length, feeling that it’s centered on each pulley and fully engaged in the grooves. The ribs should sit deep in the pulley valleys, not perched on top.
Slowly release the tensioner to apply pressure to the belt. You should feel the spring resistance loading onto the belt. The tensioner arm should return to a position that maintains the belt under proper tension—typically a specific angle shown in your service manual.
Inspect belt alignment on all pulleys. From multiple viewing angles, verify the belt runs straight and centered on each pulley. There should be no evidence of the belt riding on pulley edges or appearing twisted between pulleys.
How Do You Verify Proper Installation?
Installation verification prevents immediate failure and ensures your new belt will deliver its full service life.
Perform a visual inspection of the entire belt path. Check that:
- The belt sits centered on every pulley
- All ribs engage their respective pulley grooves
- No portion of the belt appears twisted
- The tensioner arm is positioned within its normal operating range (not fully extended or compressed)
- No tools, rags, or other items remain in the belt path
Manually rotate the belt by turning one of the accessible pulleys by hand. The belt should move smoothly without binding, jumping, or riding over pulley edges. Rotate it through at least two complete revolutions to ensure it tracks correctly through its entire circuit.
Check tensioner movement. The tensioner arm should show slight movement as you rotate the belt, indicating proper spring function. If the arm doesn’t move or moves excessively, the tensioner may be faulty.
Start the engine and let it idle. Listen carefully for any unusual noises:
- Squealing indicates the belt is slipping (wrong tension, glazed pulley, or contamination)
- Chirping suggests misalignment or a belt edge rubbing against a pulley edge
- Flapping or slapping sounds indicate the belt is too loose or damaged
Let the engine idle for 60 seconds minimum while observing the belt operation. Watch for vibration, jumping, or irregular movement. The belt should run smoothly without visible wobbling or flutter.
Rev the engine gently to approximately 2000 RPM and observe belt behavior under increased speed. Release the throttle and observe deceleration. The belt should handle both speed increases and decreases without slipping or noise.
Turn on accessories one at a time—first the power steering (turn the steering wheel), then the air conditioning, then the defroster. Each accessory adds load to its pulley. Listen for any squealing or unusual sounds as each engages, which would indicate the belt can’t handle load properly.
Perform a post-installation inspection after the first test run:
- Shut off the engine and let it cool briefly
- Recheck belt alignment on all pulleys
- Inspect for any rubber dust or debris indicating the belt is rubbing
- Look for any spots where the belt appears shinier (glazing from slipping)
Take a short test drive of 5-10 minutes, operating the vehicle under normal conditions. Use accessories, accelerate moderately, and vary driving conditions. After the test drive, perform another visual inspection. Belt issues often emerge only after heat cycling.
Reinstall any removed components including splash shields, fender liners, wheels, and any covers you removed for access. Torque wheel lug nuts to manufacturer specifications in a star pattern.
According to automotive service data, approximately 85% of serpentine belt failures within the first 1,000 miles result from installation errors including incorrect routing, missed pulleys, or failure to address worn tensioners or misaligned pulleys, emphasizing the importance of thorough verification procedures.
What Should You Inspect While the Belt Is Off?
While the serpentine belt is removed, you should inspect four critical components: pulley bearings for smooth rotation and noise, tensioner spring operation and arm movement, pulley alignment using a straightedge, and belt contact surfaces for oil contamination, damage, or unusual wear patterns.
With the belt removed, you have rare access to components that are otherwise difficult to examine. This opportunity prevents future belt failures and identifies problems before they leave you stranded.
How Do You Check Pulley and Tensioner Condition?
Pulley and tensioner inspection reveals worn components that will destroy your new belt prematurely if left unaddressed.
Spin each pulley by hand and assess bearing condition. Each pulley should rotate smoothly and quietly with minimal resistance. Grab each pulley and spin it—a healthy pulley continues spinning for several seconds before friction stops it. Warning signs include:
- Grinding or growling sounds indicate worn bearings that need immediate replacement
- Excessive drag or stiff rotation suggests bearing failure in progress
- Squeaking or squealing while rotating points to dry or damaged bearings
- Complete seizure where the pulley won’t rotate freely means catastrophic bearing failure
Check for lateral movement in each pulley. Grasp each pulley firmly and attempt to move it side-to-side (perpendicular to its rotation axis) and in-and-out (along its rotation axis). There should be virtually no perceptible movement—any noticeable play indicates worn bearings or loose mounting hardware. Even 1-2mm of play accelerates belt wear.
Inspect the tensioner pulley with particular care since it rotates constantly and experiences continuous spring pressure. Test its bearing by spinning as described above, then:
- Examine the tensioner arm pivot point for wear or looseness
- Check that the spring provides consistent resistance throughout its range
- Verify the tensioner arm moves smoothly through its full range without binding
- Look for oil leaks from the tensioner pivot mechanism
- Check for cracks in the tensioner arm or mounting bracket
Evaluate tensioner spring strength. Even if the tensioner rotates freely, weak spring tension causes belt slippage. Push the tensioner arm through its range of motion—you should feel strong, consistent spring resistance. If the arm moves too easily or feels weak, the internal spring has fatigued and requires tensioner replacement.
Inspect idler pulleys (smooth pulleys that don’t drive accessories). These serve only to route the belt and are often overlooked during maintenance, yet their failure causes immediate belt ejection. Spin each idler pulley and check for bearing noise or resistance.
Examine pulley surfaces for wear:
- Grooved pulleys should have clean, sharp V-grooves without rounding or wear
- Smooth pulley surfaces should be uniform without grooves worn in by belt contact
- Look for rust, pitting, or damage that could abrade the belt
- Check for rubber residue buildup in pulley grooves indicating previous belt slippage
Test the water pump pulley (if belt-driven on your vehicle). A failing water pump bearing creates noise and wobble that destroys belts. Spin the water pump pulley and push-pull it to check for play. Listen for bearing noise. Look for coolant seepage around the pump shaft indicating seal failure—if coolant leaks onto the belt, it causes rapid deterioration.
Recommended replacement schedule for tensioners and pulleys: Most manufacturers recommend tensioner replacement every 100,000 miles regardless of condition. If your vehicle exceeds 80,000 miles, replacing the tensioner preventively during belt replacement makes economic sense—you’re already doing the labor, and the tensioner will likely fail before your next belt replacement interval.
How Do You Check for Pulley Misalignment?
Pulley misalignment causes rapid belt wear, premature failure, and noise, making alignment verification essential during belt replacement.
Understand alignment basics. All pulleys the serpentine belt contacts should sit in the same vertical plane—imagine a straight line connecting their centers. Misalignment occurs when one or more pulleys sit forward or rearward relative to this plane, causing the belt to run at an angle and contact pulley edges.
Use a straightedge for alignment checking. A 3-4 foot level, straight piece of metal, or even a tightly stretched string works. Position your straightedge across the outermost pulleys on each end of the belt path, spanning the entire accessory drive system. The straightedge should touch the outer edge of all pulleys if they’re properly aligned.
Measure alignment gaps. If any pulley doesn’t touch the straightedge, measure the gap with feeler gauges or a ruler. Pulley misalignment exceeding 1/16″ (1.5mm) causes accelerated belt wear. Misalignment of 1/8″ (3mm) or more causes rapid belt failure.
Check belt edge wear patterns on your old belt. Even wear across the entire belt width indicates good alignment. Wear concentrated on one edge confirms misalignment—the belt has been running at an angle, contacting pulley edges instead of centering in the grooves.
Common causes of misalignment include:
- Bent crankshaft pulley from impact damage (hitting road debris, curbs)
- Incorrectly installed accessories after previous repairs
- Worn engine mounts allowing the engine to tilt
- Damaged accessory brackets from accidents or improper servicing
- Manufacturing defects (rare but possible on new vehicles)
Address misalignment before installing the new belt. Installing a belt on misaligned pulleys guarantees premature failure. Corrective actions depend on the cause:
- Replace bent or damaged pulleys
- Verify accessory mounting bolts are tight and components properly positioned
- Replace worn engine mounts allowing excessive movement
- Consult a professional mechanic if alignment issues persist—some require specialized tools or shimming techniques
Special considerations for aftermarket accessories. If your vehicle has aftermarket accessories (different alternator, power steering pump, A/C compressor), their mounting brackets may not position pulleys correctly. Verify aftermarket components use proper brackets designed specifically for your vehicle.
According to research from automotive bearing manufacturers, pulley bearing failure accounts for approximately 40% of premature serpentine belt replacements, while misalignment causes another 25% of early failures, demonstrating why thorough inspection during belt service prevents repeated problems.
What Is the Difference Between Serpentine Belt and Timing Belt Replacement?
Serpentine belt replacement differs from timing belt replacement in four fundamental ways: serpentine belts drive external accessories (alternator, power steering, A/C) while timing belts synchronize internal engine components (camshaft and crankshaft), serpentine belts are externally visible and accessible while timing belts are hidden inside engine covers, serpentine belt failure causes accessory loss and possible overheating while timing belt failure can destroy the engine, and serpentine belt replacement costs $100-200 compared to $500-1,000 for timing belt service.

These two belts serve completely different functions despite similar names, making it essential to understand their distinctions. Let’s examine their functional differences and what happens when each fails.
How Do Serpentine Belts and Timing Belts Differ in Function?
The functional differences between serpentine and timing belts determine their criticality and replacement urgency.
Serpentine belt function centers on accessory power distribution. The serpentine belt runs on the outside of the engine, visible when you open the hood. It connects to accessories mounted on the engine’s exterior. When the crankshaft rotates, it spins the serpentine belt, which transfers that rotational energy to:
- The alternator (electrical power generation)
- Power steering pump (hydraulic steering assist)
- A/C compressor (cabin cooling)
- Water pump (engine cooling on most vehicles)
- Air pump (emissions control on some vehicles)
The serpentine belt operates continuously whenever the engine runs, maintaining these supporting systems. However, these accessories don’t affect the engine’s internal operation—the engine continues running (briefly) even if the serpentine belt fails completely.
Timing belt function controls the engine’s internal valve timing. The timing belt lives inside the engine, hidden behind timing covers on the front of the engine block. It synchronizes the rotation of the crankshaft (which moves the pistons) with the camshaft(s) (which open and close the valves). This synchronization is absolutely critical—it ensures valves open and close at precisely the correct moments in each piston’s four-stroke cycle.
On interference engines (most modern engines), the valves extend into the space the pistons occupy. Precise timing prevents collision. The timing belt maintains this precision through toothed construction that locks into corresponding gears on the crankshaft and camshaft, preventing any slippage.
Visual identification helps distinguish these belts:
- Serpentine belts have longitudinal V-shaped grooves running the length of the belt, creating ribs that fit into grooved pulleys
- Timing belts have transverse teeth running across the belt width, designed to mesh with toothed gears like a conveyor belt
Replacement intervals reflect their different stress levels and failure consequences:
- Serpentine belts: 60,000-100,000 miles, can be inspected visually
- Timing belts: 60,000-105,000 miles depending on manufacturer, often must be replaced on schedule regardless of condition since internal wear isn’t visible
Failure consequences vary dramatically:
- Serpentine belt failure: Loss of power steering makes steering difficult but possible; alternator stops charging the battery (vehicle runs briefly on battery power alone); A/C stops working; water pump may stop (causing overheating within minutes on most vehicles). You’ll notice symptoms immediately but can usually pull over safely.
- Timing belt failure: On interference engines, the camshaft stops rotating while the crankshaft continues spinning, causing pistons to collide with open valves. This destroys valves, damages pistons, and can crack cylinder heads or engine blocks—repairs often exceed $3,000-5,000, frequently totaling older vehicles.
Can You Replace Both Belts at the Same Time?
Replacing serpentine and timing belts simultaneously makes practical and economic sense in specific circumstances, particularly when service intervals align.
When simultaneous replacement is logical:
Many vehicles reach timing belt replacement intervals (typically 90,000-105,000 miles) around the same time serpentine belts need service (60,000-100,000 miles). If both belts are due within 20,000 miles of each other, replacing them together during a single service appointment provides several advantages:
Labor cost savings represent the primary benefit. Timing belt replacement requires removing multiple engine components including accessory drive belts, pulleys, covers, and sometimes engine mounts. Since the serpentine belt must come off to access the timing belt, you’re already paying for most of the serpentine belt replacement labor. Adding serpentine belt replacement to a timing belt service typically costs only the belt itself ($25-50) rather than the full serpentine belt service fee ($100-200 including labor).
Comprehensive service during timing belt replacement should include several related components:
- Water pump (often timing belt-driven; replacement adds only marginal cost since it’s already exposed)
- Timing belt tensioner and idler pulleys (wear at the same rate as the belt)
- Crankshaft and camshaft seals (prevent oil leaks; accessible only with timing cover removed)
- Serpentine belt tensioner and pulleys (preventive replacement)
- Spark plugs (easy access with timing covers removed)
Bundling these items into a comprehensive service package prevents having to pay full labor costs for separate repairs when individual components fail 10,000-20,000 miles later.
Cost comparison example:
- Timing belt service alone: $600-800
- Serpentine belt service alone: $100-200
- Both services separately: $700-1,000
- Combined timing belt package with serpentine belt: $650-850
- Savings: $50-150 plus preventing future service appointments
When separate replacement makes sense:
If your serpentine belt fails at 65,000 miles but your timing belt isn’t due until 100,000 miles, replace only the serpentine belt. There’s no reason to perform timing belt service early unless:
- You plan to keep the vehicle past 100,000 miles and want all major services completed
- The vehicle history is unknown and timing belt replacement can’t be verified
- The vehicle will be sold before the timing belt interval and completing service increases resale value
Not all vehicles have timing belts. Approximately 50% of modern vehicles use timing chains instead of timing belts. Timing chains are metal, last the engine’s lifetime, and don’t require scheduled replacement. These vehicles still have serpentine belts that require regular service. Check your owner’s manual—if it doesn’t mention timing belt replacement, your engine uses a chain.
What Happens If You Replace the Wrong Belt?
Confusing serpentine and timing belts leads to catastrophic consequences if a timing belt failure goes unaddressed because a serpentine belt was replaced instead.
The confusion scenario occurs when drivers experience symptoms like squealing, notice a worn belt, or reach mileage milestones. Without understanding which belt needs service, they may:
- Tell a shop “I need a belt” without specifying which one
- Attempt DIY replacement on the visible (serpentine) belt while ignoring the hidden timing belt
- Misinterpret maintenance reminders about timing belt intervals
Diagnostic differences between belt types:
Serpentine belt symptoms:
- Audible squealing, chirping, or screeching
- Visible wear, cracks, or damage (belt is external)
- Battery warning light (alternator not charging)
- Heavy steering (power steering loss)
- Engine overheating (water pump failure)
- A/C not working
Timing belt symptoms:
- Often no symptoms before catastrophic failure
- Engine won’t start (if belt has broken)
- Rough running or misfiring (if belt jumped teeth but hasn’t broken)
- Check engine light with timing-related codes
- Unusual ticking or rattling from timing cover area (worn tensioner)
Timing belt replacement is preventive. Unlike serpentine belts where you can monitor visible wear, timing belts must be replaced on schedule because you can’t see internal degradation. Many timing belts appear perfect visually right before catastrophic failure.
Consequences of replacement mistakes:
If you replace a serpentine belt when you actually needed a timing belt:
- The serpentine belt problem (if any) is solved
- The timing belt continues aging toward failure
- You’ve wasted money if the serpentine belt didn’t actually need replacement
- The timing belt may fail unexpectedly, potentially destroying your engine
- You’ve created a false sense of security
If a shop replaces the wrong belt due to miscommunication:
- Request a refund or insist they correct the error
- Document the conversation for potential dispute resolution
- Consider finding a more competent shop
Preventing confusion:
- Consult your owner’s manual maintenance schedule—it lists both belts separately with different intervals
- When requesting service, specify “serpentine belt” or “timing belt” explicitly
- If a shop recommends “belt replacement,” ask specifically which belt
- Understand that timing belt replacement costs significantly more ($500-1,000) than serpentine belt service ($100-200)—if quoted prices seem inconsistent with the service described, ask for clarification
According to automotive service industry data, approximately 15% of customers requesting “belt service” aren’t clear whether they need serpentine or timing belt replacement, leading to service delays, incorrect parts ordering, and occasionally wrong belt replacement, emphasizing the importance of specific communication.
When Should You Choose Professional Replacement Over DIY?
You should choose professional serpentine belt replacement over DIY when your vehicle requires component removal for belt access (coolant draining, fan shroud removal, engine mount loosening), when you lack the specific tools needed (narrow-profile ratchets, specialized tensioner tools), when your physical capabilities limit the force or dexterity required, when belt routing complexity exceeds your comfort level, or when the time value of professional service ($100-200 completed in 30-60 minutes) outweighs DIY savings of $80-150 requiring 2-4 hours for inexperienced technicians.

The DIY versus professional decision depends on multiple factors beyond just saving money. Let’s analyze the cost comparison and situations where professional service makes better sense.
What Is the Cost Comparison Between DIY and Professional Replacement?
Understanding the complete cost structure of both approaches reveals the true value proposition and break-even point for DIY serpentine belt replacement.
DIY cost breakdown:
- Serpentine belt: $25-50 for quality aftermarket brands (Gates, Dayco, Continental), $40-80 for OEM belts
- Tools (if you don’t already own them):
- Basic ratchet set: $30-60
- Serpentine belt tool (optional): $15-40
- Jack and jack stands (if needed): $80-150
- Work light: $15-30
- Miscellaneous supplies: Gloves, rags, degreaser: $10-20
- Total DIY cost (first time): $75-350 depending on tool purchases
- Total DIY cost (subsequent replacements): $25-50 (belt only)
Time investment for DIY:
- Experienced DIYer with proper tools: 20-45 minutes
- First-time DIYer: 1-3 hours (including research, preparation, potential mistakes)
- Difficult access vehicles: Add 30-60 minutes
Professional service cost breakdown:
- Parts (serpentine belt): $30-60 (shops markup parts 40-80%)
- Labor: $70-150 depending on location, shop type, and vehicle
- Shop supplies/fees: $10-25
- Total professional cost: $110-235 for basic serpentine belt replacement
- Premium shop or dealership: $150-300
Service time:
- Drop-off time: 30-60 minutes (driving, paperwork, waiting or arranging transportation)
- Actual repair time: 15-45 minutes at the shop
- Total time commitment: 45-120 minutes including logistics
Break-even analysis:
If you already own basic tools, DIY saves $85-185 per belt replacement. If you need to purchase tools, your first replacement costs roughly the same as professional service, but you’ll own the tools for future maintenance.
Hidden DIY costs to consider:
- Mistakes requiring repeat attempts or additional parts
- Injury risk if safety procedures aren’t followed
- Potential for causing additional problems (damaging components, incorrect installation)
- Opportunity cost of your time (what else could you accomplish in those 2-4 hours?)
Hidden professional service benefits:
- Warranty on parts and labor (typically 12-24 months)
- Professional inspection of related components
- Proper disposal of old belt
- Expertise identifying additional problems
- Liability protection if something goes wrong
Value of your time creates the critical decision point. If you value your personal time at $25/hour and a DIY job takes 3 hours versus 1 hour for professional service, the time difference (2 hours = $50 value) plus the service cost ($150) totals $200. Compare this to DIY material cost ($40) plus your 3 hours at $75 = $115. The $85 savings represents your DIY benefit.
However, if you value your time at $50/hour (typical for professionals), the calculation shifts: Professional service total value = $150 + $50 (1 hour) = $200. DIY total value = $40 + $150 (3 hours at $50/hour) = $190. The savings shrink to just $10, making professional service more attractive.
When DIY provides maximum value:
- You already own the necessary tools
- Your vehicle has easy belt access
- You’re mechanically inclined and comfortable with automotive work
- You value the learning experience and skill development
- You have time flexibility (no urgent need for vehicle availability)
- You plan to maintain the vehicle long-term (tools pay for themselves)
When professional service provides maximum value:
- Your vehicle requires extensive disassembly for belt access
- You lack proper tools and workspace
- You’re uncertain about your mechanical abilities
- You need the vehicle operational quickly
- Your time has high opportunity cost
- You value the warranty and professional inspection
What Vehicle Types Are Too Complex for DIY Replacement?
Certain vehicle configurations elevate serpentine belt replacement from a straightforward task to a complex procedure requiring professional expertise, specialized tools, or significant component removal.
Vehicles requiring major component removal:
Some vehicles position the serpentine belt behind components that must be removed for access:
- Full-size pickup trucks and SUVs (Ford F-150, Chevy Silverado, Dodge Ram): Often require removing the fan shroud, electric cooling fan, or radiator hose to access the belt. This involves draining coolant, disconnecting electrical connectors, and potentially removing the radiator itself. These jobs expand from 30 minutes to 2-3 hours.
- Transverse V6 and V8 engines: Many front-wheel-drive vehicles with V6 or V8 engines (Honda Accord V6, Toyota Camry V6, Chevrolet Impala) cram the engine sideways into the compartment. Belt access often requires removing the right engine mount and jacking the engine slightly to create clearance—this requires an engine support bar and expertise to avoid damage.
- European luxury vehicles: Mercedes-Benz, BMW, Audi, and Volkswagen often design belt systems with minimal clearance. Some models require removing the front bumper cover, headlights, or grille assembly to access the belt area. Others need specialized tools specific to the manufacturer.
Vehicles with multiple belts or complex routing:
While most modern vehicles use a single serpentine belt, some models use multiple belts or have extraordinarily complex routing:
- Supercharged engines: Often use a separate belt for the supercharger in addition to the main accessory belt. The supercharger belt may require special procedures or tools.
- Diesel engines: Many diesel engines have multiple belts or complex tensioner systems. Some require precise timing procedures during installation.
- Hybrid vehicles: The belt system on hybrids may interact with the electric motor system, requiring special precautions about high-voltage systems. DIY work on hybrids demands understanding of hybrid-specific safety procedures.
Vehicles requiring specialized tools:
Certain vehicles need tools most home mechanics don’t own:
- European models with special tensioner designs: Some BMW, Mercedes, and Audi models require proprietary tensioner release tools costing $50-200. While you could purchase these, the investment only makes sense if you’ll maintain the vehicle long-term.
- Vehicles with stretch-fit belts: Some newer vehicles use belts without tensioners—the belt stretches over pulleys and must be replaced using a special installation tool. These require professional installation.
- Vehicles requiring computer interfaces: A few modern vehicles require scan tool procedures to release motorized tensioners or must have the new belt “registered” in the vehicle computer system.
Determining your vehicle’s complexity:
Before attempting DIY replacement, research your specific vehicle:
- Search “[your year/make/model] serpentine belt replacement video” on YouTube
- Watch at least two complete replacement procedures
- Assess whether the process matches your skill level and tool inventory
- Check online forums for owner experiences—difficulty ratings and common problems
- Review the official service manual procedure (available from manufacturers or services like AllData)
Red flags indicating professional service is appropriate:
- Replacement videos show extensive component removal
- Forums discuss “special procedures” or “tricks” required
- Multiple people comment that “this job is difficult” or “I gave up and went to a shop”
- The belt isn’t visible even with the wheel removed
- Service manual lists 2+ hours as expected repair time
- Special tools are frequently mentioned
How Do You Find a Reliable Serpentine Belt Replacement Service?
Selecting a competent service provider ensures quality work at fair prices while avoiding unnecessary repairs or substandard parts.
Types of service providers:
National chain repair shops (Firestone, Meineke, Jiffy Lube, Pep Boys):
- Pros: Convenient locations, extended hours, often no appointment needed, standardized pricing, national warranty coverage
- Cons: Variable technician quality, pressure to buy additional services, higher prices than independent shops
- Best for: Quick service when traveling, straightforward repairs, warranty portability
- Average cost: $120-200 for serpentine belt replacement
Independent local mechanics:
- Pros: Often lower prices, build long-term relationships, personalized service, less pressure for unnecessary repairs
- Cons: Limited hours, may require appointments, warranty only valid at that location
- Best for: Regular maintenance, building trust, lower costs
- Average cost: $100-160 for serpentine belt replacement
Dealership service departments:
- Pros: Manufacturer-trained technicians, OEM parts, expertise on specific makes, latest technical service bulletins
- Cons: Highest prices, may push unnecessary services, often busy requiring appointments
- Best for: Complex problems, warranty work, specialty vehicles, when OEM parts are essential
- Average cost: $150-250 for serpentine belt replacement
Specialty shops (import specialists, performance shops):
- Pros: Deep expertise in specific vehicle types, quality work, enthusiast knowledge
- Cons: May cost more than general shops, limited to their specialty
- Best for: European imports, modified vehicles, performance cars
- Average cost: $130-220
Evaluating shop quality:
Check online reviews on Google, Yelp, and Facebook. Look for:
- Overall rating above 4.0 stars
- Consistent positive feedback about honesty and fair pricing
- How the shop responds to negative reviews (defensive or professional?)
- Specific mentions of serpentine belt or general maintenance quality
Ask for recommendations from friends, family, coworkers, and online local groups. Personal referrals from people you trust carry more weight than anonymous reviews.
Verify certifications:
- ASE (Automotive Service Excellence) certification for technicians
- AAA Approved Auto Repair designation
- Better Business Bureau accreditation and rating
- Manufacturer certifications for dealerships
Get written estimates before authorizing work:
- Request itemized quotes showing parts and labor separately
- Compare prices from 2-3 shops
- Beware of quotes significantly lower than others (quality concerns) or much higher (price gouging)
- Ask what parts brand they’ll use (OEM, premium aftermarket, or economy)
Ask about warranties:
- Standard warranty should cover parts and labor for 12-24 months or 12,000-24,000 miles
- Verify warranty coverage details (what’s included/excluded)
- Understand warranty transfer if you move or change shops
- Premium shops may offer longer warranties on their work
Questions to ask the service advisor:
- “What brand serpentine belt do you install?” (Gates, Dayco, or Continental indicate quality)
- “Will you inspect the tensioner and pulleys during replacement?” (they should)
- “What’s your labor rate and how long does serpentine belt replacement take on my vehicle?”
- “Do you offer any additional inspection or services during belt replacement?”
- “What does your warranty cover?”
Red flags to avoid:
- Pressure to approve work immediately without opportunity to get competing quotes
- Refusal to provide written estimates
- “While you’re here” upsells for services unrelated to your visit
- Inability to specify parts brands or warranty terms
- Negative online reviews mentioning dishonesty or unnecessary repairs
- Estimates that include multiple unrelated services you didn’t request
Serpentine belt replacement labor time varies by vehicle but typically ranges from 0.3 to 1.5 hours in professional shop time (most jobs: 0.5-0.8 hours). Labor rates vary by region from $80-150 per hour. Calculate expected labor cost by multiplying the estimated hours by the shop’s hourly rate, then add parts cost and shop fees.
According to consumer automotive research, customers who obtain written estimates from multiple shops before authorizing major repairs save an average of 15-25% compared to accepting the first quote, while warranty coverage prevents approximately 8% of customers from paying for repeat repairs within the first year after service.
This comprehensive guide equips you with everything needed to successfully replace your serpentine belt or make an informed decision about professional service. Remember that regular inspections every 20,000-30,000 miles help catch wear before failure occurs, and preventive replacement at manufacturer-recommended intervals prevents the inconvenience and potential danger of roadside belt failure. Whether you choose DIY or professional replacement, maintaining your serpentine belt ensures reliable vehicle operation and protects the expensive engine components that depend on proper accessory function.