


DIY timing belt replacement is genuinely dangerous for the average car owner — not because the job is impossible, but because a single mistake can destroy an engine worth thousands of dollars. Unlike swapping brake pads or changing a serpentine belt, timing belt replacement demands exact mechanical precision, vehicle-specific tools, and a deep understanding of how your engine’s internal components interact. When that precision is missing, the consequences are not a minor inconvenience — they are bent valves, seized pistons, and repair bills that dwarf the original cost of professional service.
Understanding why the risks are so severe starts with the timing belt’s role inside the engine. This single rubber component controls the synchronized movement of the crankshaft and camshaft — meaning it dictates when intake and exhaust valves open and close in relation to where the pistons are at any given moment. On interference engines, which make up the majority of modern passenger vehicles, there is no physical clearance buffer between the valves and pistons. If the belt slips, breaks, or is installed even one tooth off alignment, metal collides with metal at high speed.
For DIYers weighing whether to attempt this job themselves, the decision hinges on more than enthusiasm and a YouTube tutorial. The specific type of engine in your vehicle, the availability of manufacturer-specific locking tools, your prior experience with engine-adjacent work, and the realistic cost comparison between DIY and professional service all factor into whether this is a prudent project or a financially reckless gamble.
Beyond the immediate mechanical risks, there are broader consequences that most DIY guides fail to mention — including potential warranty implications, insurance complications, and the dramatically higher complexity of multi-camshaft engines found in newer vehicles. To better understand every dimension of risk before opening the timing cover, the following sections break down each danger in precise, actionable detail.
What Is a Timing Belt and Why Is It So Critical to Your Engine?
The timing belt is a toothed rubber belt — reinforced with nylon cords — that synchronizes the rotation of the crankshaft and one or more camshafts, ensuring valves and pistons move in precise coordination without collision. It is located at the front of the engine beneath a protective timing cover, operating under constant tension as the engine runs. Without it functioning correctly, the engine cannot run at all — and if it fails mid-operation, the damage is immediate and severe.
To better understand why this component carries such high stakes, it helps to examine both what it does mechanically and what it means for the type of engine in your vehicle.
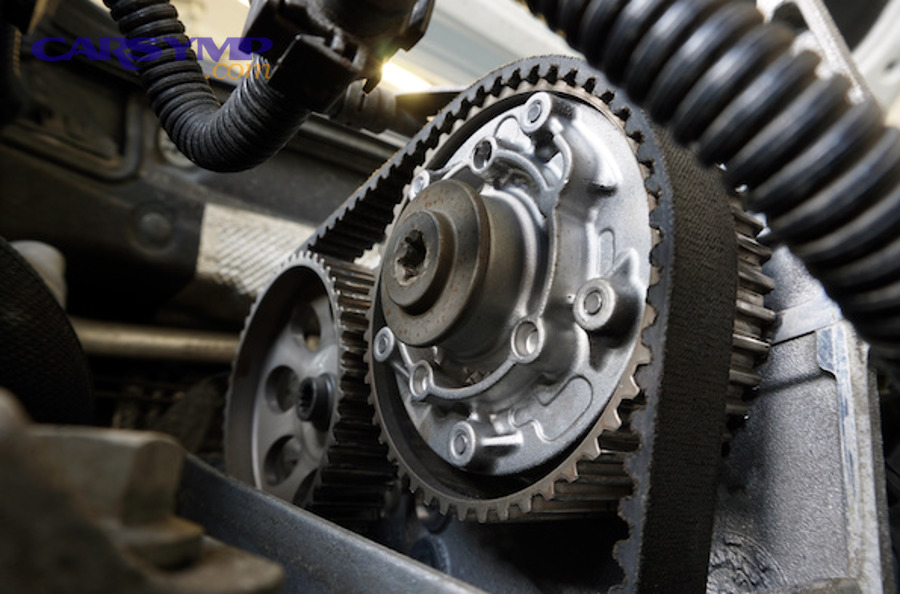
What Happens to Your Engine When a Timing Belt Fails?
When a timing belt fails — whether it snaps suddenly or jumps teeth due to improper tension — the crankshaft and camshaft immediately lose synchronization. On an interference engine, this means the pistons continue moving upward while the valves remain open, causing direct metal-to-metal collision at engine speed. The resulting damage typically includes bent or broken valves, damaged valve seats, cracked pistons, and in severe cases, a destroyed cylinder head or complete engine seizure requiring full replacement.
What makes this particularly treacherous for DIYers is that timing belts rarely announce their impending failure. Unlike a worn brake pad that squeals or a failing alternator that dims your lights, a degrading timing belt can look visually intact — no cracking, no visible fraying — yet be within miles of catastrophic failure. Factors that accelerate belt decay include age (time degrades rubber independently of mileage), oil contamination from a leaking cam seal, coolant intrusion from a failing water pump, and heat cycles over years of engine operation. A vehicle with 40,000 miles but a belt that is over 15 years old is at serious risk regardless of how low the odometer reads.
The financial consequence of this failure in a DIY context is compounding. If you install the belt incorrectly and it jumps a tooth on the first start, you may immediately bend valves — adding a $1,500–$4,000 cylinder head rebuild on top of the parts you already purchased. In a worst-case scenario involving a four-cylinder interference engine, the total repair cost can exceed $5,000 to $8,000, far beyond what professional timing belt replacement would have cost.
What Is the Difference Between an Interference and Non-Interference Engine in DIY Risk?
On interference engines, the designed path of the piston overlaps with the open position of the valves — meaning correct timing is the only thing preventing collision. On non-interference engines, the piston and valve paths never overlap, so a belt failure stops the engine without internal damage. This single distinction defines whether a DIY mistake is recoverable or catastrophic.
The table below summarizes the key differences in DIY risk between the two engine types:
| Factor | Interference Engine | Non-Interference Engine |
|---|---|---|
| Valve/piston clearance | No physical clearance gap | Clearance exists at all times |
| Belt failure consequence | Bent valves, piston damage, engine seizure | Engine stops; no internal damage |
| One-tooth misalignment risk | Immediate engine damage on startup | May run rough or not start; no metal collision |
| DIY recommended for beginners? | No — professional service strongly advised | Manageable with thorough preparation |
| Common examples | Most Honda, Subaru, VW, Audi, BMW, Toyota | Some older Jeep, Chrysler, and select Mitsubishi engines |
Most modern passenger vehicles — particularly Japanese and European models from the past two decades — use interference designs. Before attempting any DIY timing belt replacement, confirming your engine type via your owner’s manual or a manufacturer database is not optional; it is the foundational risk assessment step.
Is DIY Timing Belt Replacement Actually Dangerous for the Average Car Owner?
Yes — DIY timing belt replacement is genuinely dangerous for the average car owner for at least three concrete reasons: the precision required exceeds typical DIY mechanical work, the consequences of error on interference engines are financially catastrophic, and the job demands vehicle-specific tools that most home mechanics do not own.

This is not a matter of discouraging capable people from working on their own vehicles. Rather, it is a recognition that the timing belt sits in a different risk category than the jobs most experienced DIYers have tackled before.
What Tools Are Absolutely Required for a Safe DIY Timing Belt Replacement?
A safe DIY timing belt replacement requires, at minimum, a camshaft locking tool, a crankshaft holding tool, a calibrated torque wrench, a harmonic balancer puller, and vehicle-specific timing marks reference — typically five to seven specialized tools beyond a standard socket set. Without these, the job cannot be completed correctly regardless of the technician’s skill level.
Specifically, here is what the tool requirement looks like in practice:
- Camshaft locking tools: Hold the camshaft(s) at Top Dead Center (TDC) while the belt is removed. On dual-overhead-cam engines, two separate locking tools are required — one per cam. These are vehicle-specific; a Honda tool does not fit a Subaru, and a Subaru tool will not work on a VW TDI.
- Crankshaft holding tool: Prevents the crankshaft from rotating when loosening the large central crank pulley bolt, which is typically torqued to 130–200 ft-lbs. Without this tool, the crank will rotate on any attempt to break the bolt loose, making removal impossible without risking engine damage.
- Calibrated torque wrench: Required for the tensioner pulley bolt, idler pulley bolts, and especially the crankshaft bolt on reinstallation — each with precise torque specifications that directly affect belt tension and bearing longevity.
- Harmonic balancer/pulley puller: On many vehicles, the crankshaft pulley cannot be removed by hand and requires a proper puller to extract without damaging the front main seal or pulley itself.
- Paint marker or correction fluid: For marking the belt teeth, cam positions, and crank position before belt removal — a step experienced technicians describe as non-negotiable on any multi-cam engine.
The cost of acquiring these tools can range from $80 to $300+ depending on the vehicle, and many are not reusable across different makes. For a one-time DIY project, this tool cost must be factored into the actual savings calculation.
How Much Mechanical Experience Do You Really Need to Replace a Timing Belt Yourself?
Replacing a timing belt safely requires a minimum skill level equivalent to having successfully completed prior engine-adjacent work — including tasks such as removing and reinstalling engine mounts, working with coolant systems, and handling torque-sensitive fasteners. Someone whose experience is limited to oil changes, air filters, and brake pads is not mechanically prepared for this job.
The experience gap becomes most dangerous not during the routine steps, but during unexpected complications — and this job reliably produces them. A seized crank bolt that resists even a breaker bar. An electrical connector that releases in a non-obvious direction and snaps if forced. A rear camshaft on a Honda or Subaru that rotates independently the moment belt tension is released, placing the engine out of TDC synchronization before the new belt is installed. An inexperienced technician encountering any of these scenarios mid-job, with the engine partially disassembled and the old belt removed, faces the highest-risk moment of the entire procedure with no margin for error.
Watching step-by-step tutorial videos is valuable preparation, but videos consistently cover the clean version of the procedure on well-maintained engines with all correct tools present. Real-world DIY timing belt replacement frequently diverges from the tutorial within the first hour.
What Are the Most Common DIY Timing Belt Replacement Mistakes That Cause Engine Damage?
There are four primary categories of DIY timing belt replacement mistakes that cause engine damage: timing misalignment during installation, incorrect belt tension, failure to replace related components, and inadequate engine preparation before belt removal. Each one carries a direct path to mechanical failure.

Understanding these mistakes in detail is the difference between a successful job and a destroyed engine — and even experienced DIYers report making at least one of them on a first attempt.
What Causes Timing Misalignment During a DIY Belt Replacement?
Timing misalignment during DIY belt replacement most commonly occurs when the rear camshaft moves off Top Dead Center after belt tension is released, causing the new belt to be installed one or more teeth off on reinstallation — a mistake that results in immediate valve damage on interference engines upon first startup.
This is not a hypothetical risk. On dual-overhead-cam engines, the rear camshaft is particularly prone to rotating independently once belt tension is released because it is no longer constrained by the belt’s mechanical connection to the crankshaft. Without a proper cam locking tool holding it precisely at TDC, reinstalling the belt to the correct tooth position becomes extremely difficult to verify.
The single most effective prevention technique — consistently recommended by experienced technicians — is marking the belt before removal with a paint marker or correction fluid. Specifically:
- Draw a line across the belt at each camshaft sprocket, marking the exact tooth position relative to the cam’s timing mark
- Mark the belt at the crankshaft sprocket at the 6 o’clock position
- On dual-cam engines, use a different number of marks for each cam (e.g., one mark for the front cam, three for the rear) so they cannot be confused during reinstallation
- After installing the new belt, verify that timing marks align before releasing the tensioner
This process adds approximately 15 minutes to the job and is the most reliable safeguard against a one-tooth misalignment error.
What Happens If the Timing Belt Tension Is Set Incorrectly?
Incorrect timing belt tension — either too tight or too loose — causes accelerated component failure and, in severe cases, immediate engine damage. A belt tensioned too tightly places excessive load on the tensioner bearing, idler pulley bearings, and camshaft bearing surfaces, causing premature wear that can lead to tensioner seizure within tens of thousands of miles. A belt installed too loosely will vibrate under load, jump teeth on the sprockets during acceleration, and can slide off entirely at higher RPMs.
The standard field test — using thumb and index finger to attempt a quarter-turn twist of the belt — provides a rough indication of tension, but it is not a substitute for following the manufacturer’s specified tensioner torque and deflection values. Most modern engines use a spring-loaded automatic tensioner that self-adjusts once properly installed and released; the error most DIYers make is not allowing the tensioner to fully seat before locking it, resulting in a belt that appears correctly tensioned at rest but runs loose under load.
Which Components Should Always Be Replaced Alongside the Timing Belt?
There are five components that should always be replaced during a timing belt service: the tensioner pulley, all idler pulleys, the water pump (if belt-driven), the camshaft seal(s), and the crankshaft front seal. Replacing these components together is not optional redundancy — it is standard preventive practice that avoids a complete redo of the same labor within a short timeframe.
The logic is straightforward: all of these components are accessible only when the timing cover is removed and the belt is off. A water pump that is not replaced during a timing belt job and then fails 18 months later requires the exact same disassembly, the same labor hours, and a new belt — because the old one will be contaminated with coolant and must be discarded. The additional cost of a water pump at the time of a timing belt service is typically $80–$150 in parts and less than one additional hour of labor. The cost of returning for a water pump failure after a fresh timing belt job is the full service cost repeated.
The table below outlines which components to replace and why:
| Component | Why Replace Now | Consequence of Skipping |
|---|---|---|
| Tensioner pulley | Same age as the belt; bearing failure causes belt slip | Belt jumps or snaps; engine damage |
| Idler pulleys | Bearings wear at same rate as tensioner | Belt misalignment or derailment |
| Water pump (if belt-driven) | Accessible only with belt removed | Coolant leak contaminates new belt; full redo required |
| Camshaft seal(s) | Oil leak will destroy the new belt within months | Premature belt failure; engine damage |
| Crankshaft front seal | Inspect and replace if weeping | Oil contamination shortens belt life significantly |
How Much Can a DIY Timing Belt Mistake Actually Cost You?
A DIY timing belt mistake on an interference engine can cost between $3,000 and $8,000 or more to correct — compared to a professional timing belt replacement cost of $400 to $1,000 including all recommended components and labor. The financial case for DIY collapses entirely the moment a single alignment or tension error occurs.

The math is worth examining directly. A complete timing belt kit — including belt, tensioner, idler pulleys, and water pump — typically costs $150 to $350 in parts depending on the vehicle. Professional labor for a Timing belt replacement labor time runs three to five hours at shop rates of $100–$150 per hour, bringing total professional service to $450–$1,100 for most vehicles. The theoretical DIY saving is therefore $300–$800 in labor.
Against that saving, the risk exposure on an interference engine includes:
- Bent valves (most common outcome): Cylinder head removal, valve replacement, resurfacing, and reinstallation — typically $1,500–$3,500 depending on the number of affected cylinders
- Piston damage: If valves strike pistons hard enough, piston replacement or engine rebuild — $3,000–$6,000
- Complete engine replacement: In worst-case multi-cylinder interference scenarios — $4,000–$10,000+ including installation
Is the Money Saved by DIY Timing Belt Replacement Worth the Financial Risk?
No — for a first-time DIYer working on an interference engine, the money saved by DIY timing belt replacement is not worth the financial risk, because the probability-weighted cost of a single installation error far exceeds the labor savings. The math only favors DIY when the person performing the job has prior timing belt experience on the same or closely related engine family, owns or can borrow the required special tools, and is working on a non-interference engine.
A practical decision framework:
| Scenario | DIY Recommended? | Reason |
|---|---|---|
| Non-interference engine + experienced DIYer | Yes, with preparation | Lower consequence of minor errors; recoverable |
| Non-interference engine + first-time DIYer | Proceed with caution | Risk is lower but tool investment still required |
| Interference engine + experienced DIYer | Possible with proper tools | Requires cam locking tools and marking discipline |
| Interference engine + first-time DIYer | No — professional recommended | One-tooth error = immediate engine damage |
| Any engine + missing special tools | No | Cannot complete job correctly without them |
After replacement, timing verification and test procedures — including rotating the engine by hand through two full crankshaft revolutions and verifying all timing marks align before startup — are mandatory regardless of who performs the job. Skipping the post-installation verification is one of the most common ways even experienced DIYers confirm a misalignment error only after the engine has already been damaged.
According to data compiled by AAA’s automotive repair research, engine-related repairs resulting from improper timing component installation are among the costliest non-collision repair categories for passenger vehicles, with average claim values exceeding $3,200 per incident.
When Does DIY Timing Belt Replacement Make Sense — And When Does It Absolutely Not?
DIY timing belt replacement makes sense when the engine is non-interference, the DIYer has prior engine-adjacent experience, the correct vehicle-specific tools are available, and all associated components are included in the service. It absolutely does not make sense for a first-time DIYer on any interference engine, on modern multi-camshaft engines, or when manufacturer-specific locking tools cannot be sourced.

This is where the distinction shifts from “what are the risks” to “who should and should not attempt this job” — and the answer varies significantly based on the specific vehicle involved.
How Does DIY Timing Belt Risk Compare Between a Non-Interference and Interference Engine?
Non-interference engines present a manageable DIY risk profile because belt failure or misalignment stops the engine without internal damage, whereas interference engines make any installation error immediately catastrophic, giving first-time DIYers essentially no margin for mistake.
On a non-interference engine, if the belt slips one tooth during installation and the timing is slightly off, the engine will run roughly, idle poorly, or fail to start — all recoverable outcomes that allow the installer to open the timing cover again, correct the alignment, and try again. The cost of that error is time and frustration, not destroyed hardware.
On an interference engine, the same one-tooth error produces bent valves on the first key turn. There is no rough idle warning. There is no second chance. The engine either starts correctly and runs smoothly, or it sustains immediate internal damage upon the first compression stroke. This binary outcome is the defining characteristic of interference engine DIY risk.
Common interference engine platforms that DIYers frequently work on — including Honda B/K/J series, Subaru EJ and FA series, Volkswagen and Audi 1.8T and 2.0T, Toyota 4-cylinder and V6 — all require full cam locking procedures, precise tensioner seating, and verified timing mark alignment before startup.
Is DIY Timing Belt Replacement on a Modern Multi-Camshaft Engine Riskier Than on Older Engines?
Yes — DIY timing belt replacement on a modern multi-camshaft (DOHC) engine is significantly riskier than on older single-cam (SOHC) or pushrod engines because each additional camshaft introduces an independent alignment variable, and the penalty for getting any one of them wrong on an interference engine is immediate valve damage.
On an older single-overhead-cam engine, there is one camshaft to align at TDC, one timing mark to verify, and one locking tool required. The procedure is still precise, but the alignment verification is straightforward.
On a modern DOHC engine — which includes most current Honda, Toyota, Subaru, BMW, and Audi four- and six-cylinder engines — the procedure involves two camshafts per cylinder bank, each requiring independent locking at TDC before belt removal. On a V6 DOHC layout, that means up to four camshafts that must all be held simultaneously in their correct positions. Additionally, model-year variation within the same nameplate is significant: a 2014 and a 2019 version of the same vehicle model may require different locking tool sets, different tensioner procedures, and different torque specifications for the same basic job. A DIYer who successfully completed the job on an older model of the same car cannot assume that prior experience transfers completely to a newer version.
Can DIY Timing Belt Replacement Void Your Car’s Warranty or Affect an Insurance Claim?
Yes — DIY timing belt replacement can affect both your vehicle warranty and an insurance claim under specific conditions, even though federal law provides some consumer protection on the warranty side. Understanding exactly where the protection applies and where it ends is critical before proceeding.
Under the Magnuson-Moss Warranty Act, a vehicle manufacturer or dealer cannot void your powertrain warranty solely because you performed your own maintenance — provided that maintenance was performed correctly and with appropriate-quality parts. However, this protection evaporates the moment the DIY work causes damage. If an engine failure can be attributed to improper timing belt installation — misalignment, wrong tension, incorrect component sequence — the manufacturer’s warranty claim for that engine damage will almost certainly be denied.
On the insurance side, standard auto insurance policies (collision and comprehensive) do not cover mechanical breakdown. Extended warranty products vary widely in their DIY clauses. Many third-party extended warranties explicitly exclude coverage for failures caused by owner-performed engine internal work, which timing belt replacement falls under. If a DIY timing belt installation error causes engine failure and the vehicle owner files a mechanical breakdown claim under an extended warranty, the insurer may deny the claim upon inspection — particularly if the repair shop documents evidence of prior non-professional disassembly.
How Does Replacing a Timing Belt Yourself Compare to Replacing a Timing Chain?
Timing belts require scheduled DIY replacement at defined mileage intervals with high alignment precision and moderate tool investment, while timing chains are longer-lasting metal components with no scheduled replacement interval but present a distinct and often greater DIY complexity when they do require service.
The surface-level assumption many car owners make is that timing chains are simply “better” and require no attention. In practice, timing chains do last significantly longer — typically the lifetime of the engine under proper maintenance — but they are not maintenance-free. When a timing chain stretches, develops slack, or when its hydraulic tensioner fails, the symptoms include rattling on cold start, timing retard codes, and rough idle. Diagnosing and repairing a worn timing chain requires the same engine disassembly access as a belt job, plus the added complexity of hydraulic tensioner diagnosis, chain guide inspection, and stretch measurement — none of which have simple visual indicators.
For a DIYer comparing the two:
- Timing belt replacement: Scheduled, predictable, parts readily available in kits, procedure well-documented for most popular engines, rubber component that can be inspected visually during replacement
- Timing chain service: Unscheduled (symptom-driven), metal components require stretch measurement tools, hydraulic tensioner failure diagnosis adds complexity, and the consequences of error on modern interference chain engines are identical to those of a belt engine — immediate valve damage upon misalignment
The bottom line is that neither job is forgiving of installation errors on an interference engine, and both require the same foundational level of mechanical preparation, tool availability, and procedural discipline that separates a successful DIY outcome from an expensive engine repair.