


A coolant leak diagnosis is about one thing: identifying the exact component that’s losing coolant—radiator, hose, or water pump—before you replace parts or risk overheating. You can usually narrow the source quickly by combining leak location, residue patterns, and when the leak appears (cold, hot, or under pressure).
Then, the most reliable shortcut is learning the “signature clues” each part leaves behind—radiator seams and end tanks, hose ends and clamps, or water pump trails around the pulley area. Those patterns matter because coolant often runs along brackets and splash shields, making the drip point misleading.
Next, a simple step-by-step process (from safe visual checks to pressure-based confirmation) helps you confirm the culprit without guesswork. The goal is not just to “find wet stuff,” but to prove which part leaks first and why it leaks.
Introduce a new idea: once you can separate radiator vs hose vs water pump leaks, you can decide whether it’s safe to drive, what a realistic repair path looks like, and how to prevent the same leak from coming back.
What does “coolant leak diagnosis” mean for radiator vs hose vs water pump?
Coolant leak diagnosis is a systematic check of cooling-system parts to identify the original leak source (radiator, hose, or water pump) using location, residue, and pressure/temperature behavior—so the fix targets the right component the first time.
To better understand why this matters, start by recognizing that “coolant under the car” is an outcome, not a cause; coolant can travel, evaporate on hot surfaces, or drip from a different point than where it started.

A good diagnostic mindset uses three anchors that stay consistent across vehicles:
- Where coolant is escaping first (highest wet point, not lowest drip point)
- When it escapes (cold soak, hot idle, after driving, under pressure)
- What it leaves behind (fresh wetness vs dried crust vs misting near belts)
Most misdiagnoses happen when you skip the “first wet point” rule. Coolant can follow the frame rail, pool on a skid plate, then drip far from the leak. That’s why you always look upward for stains and tracks before you blame the part directly above the puddle.
What symptoms confirm you’re dealing with coolant (not oil or A/C water)?
Yes, you can confirm it’s coolant by checking at least three things: odor, feel, and repeatability—coolant typically has a sweet-ish smell, feels slick (but not oily-thick), and reappears after topping up and running the engine.
Next, tie those clues back to the cooling system instead of guessing from color alone. Coolant can be green, orange, pink, blue, or even purple depending on the formula, and old coolant can look brownish if contaminated.
Use this quick reality check (engine cold, safely):
- A/C condensation: clear water, no smell, usually only after A/C use, often drips near the firewall or under the passenger side.
- Engine oil: darker, thicker, more persistent slick feel, often near the oil pan area.
- Coolant: can be colored, often leaves a chalky film when it dries, may smell sweet, and the coolant reservoir level may drop.
If you see steam from the engine bay or the temperature gauge rises abnormally, treat it as coolant-related until proven otherwise. Coolant loss reduces heat transfer, and heat is what turns a small leak into a big engine problem.
Where do coolant leaks usually appear under the car and why does location matter?
There are three main leak-location zones you’ll see under the car—front-center, along hose routes, and belt/pulley side—based on where the radiator, hoses, and water pump sit and how coolant runs downhill.
Then, use location as a starting clue, not the final answer. A puddle is a map marker; it tells you where coolant ended up, not where it began.
Typical zones to interpret:
- Front-center under the bumper/radiator support: often points toward radiator core/end tank seams, drain area, or radiator cap/neck overflow path.
- Along the hose path (upper/lower radiator hoses, heater hoses): often points to clamps, cracked rubber, abrasion, or a fitting/neck issue.
- Belt/pulley side of the engine: often points to water pump weep/shaft seal, thermostat housing nearby, or coolant splashing from a pressurized pinhole.
A practical trick: place a clean piece of cardboard under the engine overnight, then compare drip position with stain trails above it the next morning. The drip spot helps you pick where to inspect first; the stain trail helps you find the true source.
Is it more likely a radiator leak, a hose leak, or a water pump leak based on what you see?
Radiator leaks win for seam/crust patterns, hose leaks are best identified by clamp-end wetness and rubber condition, and water pump leaks are most strongly indicated by coolant trails near the pulley/weep area—so the “best guess” depends on the specific clue you observe first.
However, the smartest approach is to compare the three parts using the same criteria: fresh wetness location, dried residue signature, and pressure/heat behavior.
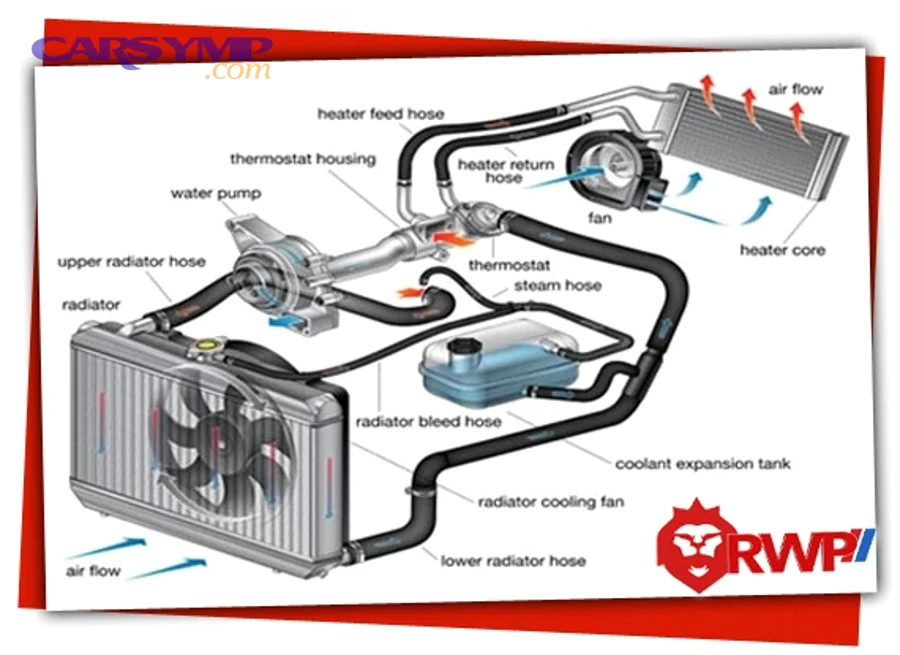
Here’s what you’re really looking for: not “a wet thing,” but the pattern of wetness.
- Radiator: wetness and crust often appear on seams, corners, and fin area.
- Hose: wetness often appears at the ends (where clamps bite) or where the hose rubs.
- Pump: wetness often appears around the pulley area, below the pump, or as “sling” spots from belt rotation.
What visual clues point to a radiator leak specifically?
There are four common radiator leak points—end tank seams, core/fins, drain area, and the filler/neck region—based on where radiators experience vibration, heat cycling, and material transitions.
Specifically, a radiator leak often leaves dried crust lines on the radiator itself because hot airflow and heat help coolant evaporate quickly, leaving deposits behind.
Look for these radiator-specific clues:
- Crusty residue on end tank seams (especially where plastic tanks crimp to the core)
- Wet corners near radiator mounts or lower corners (coolant can pool there)
- Staining on fins or a damp-looking patch on the core face
- Drips near the drain/petcock area or lower radiator edge
- Overflow signs around the cap/neck region (coolant tracks, residue near the fill area)
A key distinction: if you can wipe a seam area with a paper towel and it quickly becomes wet again after a short run (or pressure test), you likely have an active radiator leak rather than old residue.
What visual clues point to a radiator hose or clamp leak?
There are three main hose-leak types—clamp seepage, pinhole/split leaks, and abrasion rub-through—based on whether the failure starts at the connection, in the rubber body, or from external contact.
Moreover, hose leaks often look “messier” than radiator leaks because the hose can spray or mist under pressure, leaving splatter on nearby parts.
Check these hose-and-clamp clues:
- Wetness at hose ends (right behind the clamp)
- Crust rings where the hose meets a neck/fitting (coolant dries around the joint)
- Swelling, soft spots, or cracking in the rubber—especially near bends and heat sources
- Abrasion marks where a hose touches a bracket or another component
- Mist patterns on nearby plastic covers (pinhole leaks can atomize coolant)
If the leak is clamp-related, you may see seepage that only appears after driving when pressure rises. If the leak is a split, you may see a clear drip pattern even at idle once the system warms.
What visual clues point to a water pump leak?
There are three classic water pump leak indicators—weep-area trails, pulley-side wetness, and belt “sling” spotting—based on how pump seals fail and how rotation moves coolant.
Meanwhile, water pump leaks can be deceptive because coolant may drip from the lowest nearby point, not from the pump itself, especially if it lands on a timing cover or splash shield first.
Look for water-pump-specific clues:
- Coolant tracks below the pump (often centered under the pulley)
- Wetness or crust near the pump body where it mates to the engine
- Spatter on nearby components from belt rotation (fine dots rather than a single drip line)
- Bearing symptoms supporting the leak: unusual noise near the pump area, wobble at the pulley (supporting evidence, not proof)
If you suspect the water pump, focus your inspection around the pump body and the area directly beneath it, because the pump is one of the few parts where rotation can turn a slow seep into a wide spray pattern.
Can a simple step-by-step test confirm which part is leaking?
Yes, a simple diagnostic method can confirm the leak source because it uses at least three proof steps—cold inspection, controlled warm inspection, and pressure-based confirmation—to force the leak to reveal itself where it starts.
Then, you connect each test result back to the same goal: find the first fresh wet spot, not just the puddle.
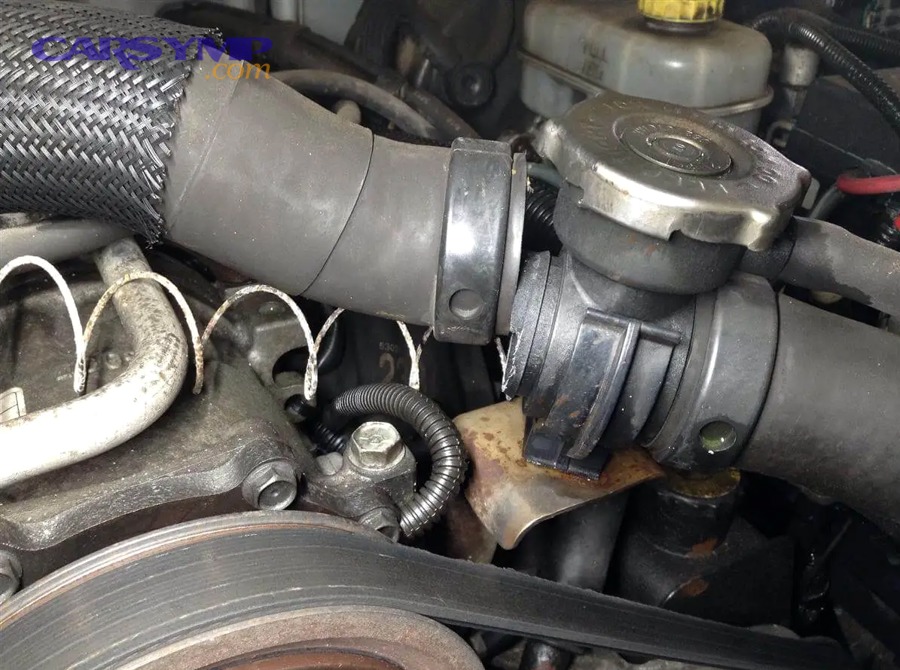
A reliable step sequence looks like this:
- Cold, safe visual inspection (best for cracks, crust, and clamp seep)
- Clean and baseline (remove old residue so new seepage stands out)
- Warm-up observation (pressure rises; leaks that hide cold can show)
- Pressure confirmation (recreates operating pressure without guessing)
To keep your process safe, never open a hot cap. If you need to access the cap area, let the system cool completely first.
Should you inspect cold first or hot first to avoid false clues?
Cold-first inspection is best for safety and clear visual evidence, while warm/after-driving inspection is best for pressure-dependent leaks—so cold wins for the first pass, and warm wins for confirmation when needed.
However, the biggest diagnostic advantage is pairing them: cold shows you “where it has been leaking,” warm shows you “where it is leaking now.”
Cold-first gives you:
- Clear visibility of dried crust and old tracks
- Safer access to hose connections and radiator areas
- Better chance to spot cracks or swelling without steam obscuring the view
Warm confirmation helps you catch:
- Clamp seepage that only appears under pressure
- Pinhole sprays that don’t show as a puddle cold
- Weep-area seepage that increases as seals expand and pressure rises
If your cold inspection shows nothing but your coolant level drops over days, warm confirmation is usually the missing link.
Does a cooling-system pressure test help differentiate radiator vs hose vs pump?
A cooling-system pressure test is a controlled method that pressurizes the cooling system (engine off) so small leaks appear as fresh seepage at the radiator, hose connections, or water pump area—making it one of the quickest ways to confirm the leak source.
To illustrate why it works, pressure exposes weaknesses that might not leak at idle, especially when coolant is warm and viscosity changes.
What to watch during a pressure test:
- Immediate seep at a hose end → hose/clamp/fitting issue is likely
- Wet seam or corner on radiator → radiator seam/core/drain issue is likely
- Fresh wetness near pump body/pulley area → pump seal/gasket issue is likely
If pressure drops but you still can’t see an external leak, that’s a signal to widen your search to less obvious areas (like heater hoses, thermostat housing, or under covers) rather than randomly replacing a radiator or pump.
Should you clean the area and re-check to avoid chasing old residue?
Yes, you should clean and re-check because (1) old crust can mislead you, (2) grime can hide the first wet spot, and (3) fresh seepage stands out dramatically on a clean surface—making your diagnosis more accurate.
Next, connect cleaning to your proof standard: you’re trying to spot new coolant movement, not the history of months of seepage.
A practical cleaning-and-recheck approach:
- Wipe obvious wet spots and crust with a towel (engine cold).
- Use a mild degreaser where oil film may mask coolant tracks.
- Rinse lightly and dry (avoid soaking electrical connectors).
- Recheck after a short drive or after a controlled pressure test.
If you need a low-tech reveal, a light dusting of powder on suspected areas can make new wet tracks stand out—especially around hose ends and radiator seams.
Once you’ve confirmed the source, you’re ready for the decision most people care about: what typically causes each leak and what a sensible coolant leak repair plan looks like.
What are the most common causes of leaks in each part?
There are three main leak-cause categories—material aging, corrosion/contamination, and seal/clamp failure—based on how radiators, hoses, and water pumps degrade under heat cycling and pressure.
In addition, causes matter because they tell you whether a “tighten it” approach is realistic or whether the part is already structurally compromised.

A useful way to think about causes is: where the part is weak by design. Radiators often fail at seams and tanks, hoses at ends and rub points, pumps at seals and bearings.
What causes radiator leaks (tanks, seams, core) most often?
There are four common radiator leak causes—seam fatigue, corrosion, impact damage, and pressure-related stress—based on where the radiator experiences vibration, mixed materials, and heat transfer.
More specifically, radiators combine thin metal and joints that must survive constant expansion and contraction, which makes seams and corners predictable failure points.
Common radiator leak triggers:
- Seam fatigue (especially where tanks join the core)
- External fin/core damage from debris or minor impacts
- Internal corrosion when coolant chemistry is neglected or mixed improperly
- Weak caps/overpressure events that push stress onto seams and joints
If you see a recurring wet corner and crust lines forming at the same seam, you’re usually past the point of “monitor it.” Radiator seam leaks tend to grow as the joint flexes.
What causes hose leaks (hose material vs clamps) most often?
There are three dominant hose leak causes—clamp-area seepage, rubber degradation, and abrasion—based on how rubber ages, how clamps concentrate stress, and how engine movement creates rubbing contact.
Besides, hoses are often blamed as “just old,” but many hose failures begin at the interface where rubber is compressed against a metal neck.
Common hose leak triggers:
- Clamp compression set (rubber relaxes over time, clamp tension becomes insufficient)
- Thermo-oxidative aging (heat cycles harden rubber and reduce elasticity)
- Electro-chemical effects (coolant interaction and localized conditions weaken material)
- Oil contamination (softens rubber and makes it swell)
- Abrasion rub-through (hose contacts bracket, belt cover, or another hose)
According to a study by Hanyang University from the Department of Mechanical Engineering, in 2007, radiator-hose EPDM rubber showed measurable degradation under thermo-oxidative and electro-chemical stresses, including increased hardness and reduced failure strain—mechanisms that can lead to leakage under normal pressure.
What causes water pump leaks most often?
There are three main water pump leak causes—seal wear, bearing degradation, and gasket/interface issues—based on how pumps rotate under load while holding pressurized coolant behind a shaft seal.
Especially important, a water pump is both a fluid component and a rotating mechanical component, so a small mechanical issue can quickly become a fluid leak.
Common water pump leak triggers:
- Shaft seal wear (the most common leak pathway)
- Bearing play that destabilizes the seal (often accompanied by noise)
- Gasket or housing surface issues where the pump meets the engine
- Coolant contamination that accelerates seal wear (debris or corrosion products)
If your leak pattern is concentrated near the pulley side and you see evidence of sling, the pump moves higher on the suspect list—because hoses rarely create that fine-dot spray pattern unless they’re actively pinholing under pressure.
At this point, you can usually identify the culprit and plan a fix. The next decision is higher-stakes: whether it’s safe to drive until you schedule the repair and how to interpret warning signs.
Is it safe to drive with a suspected radiator, hose, or water pump leak?
No, it’s not safe to keep driving with an active coolant leak because (1) coolant loss can trigger overheating quickly, (2) overheating can warp or crack engine components, and (3) a minor leak can suddenly become a major rupture—especially with hoses and pump seals.
Then, anchor the decision to observable thresholds: your goal is to avoid overheating events, not to “make it home” at any cost.
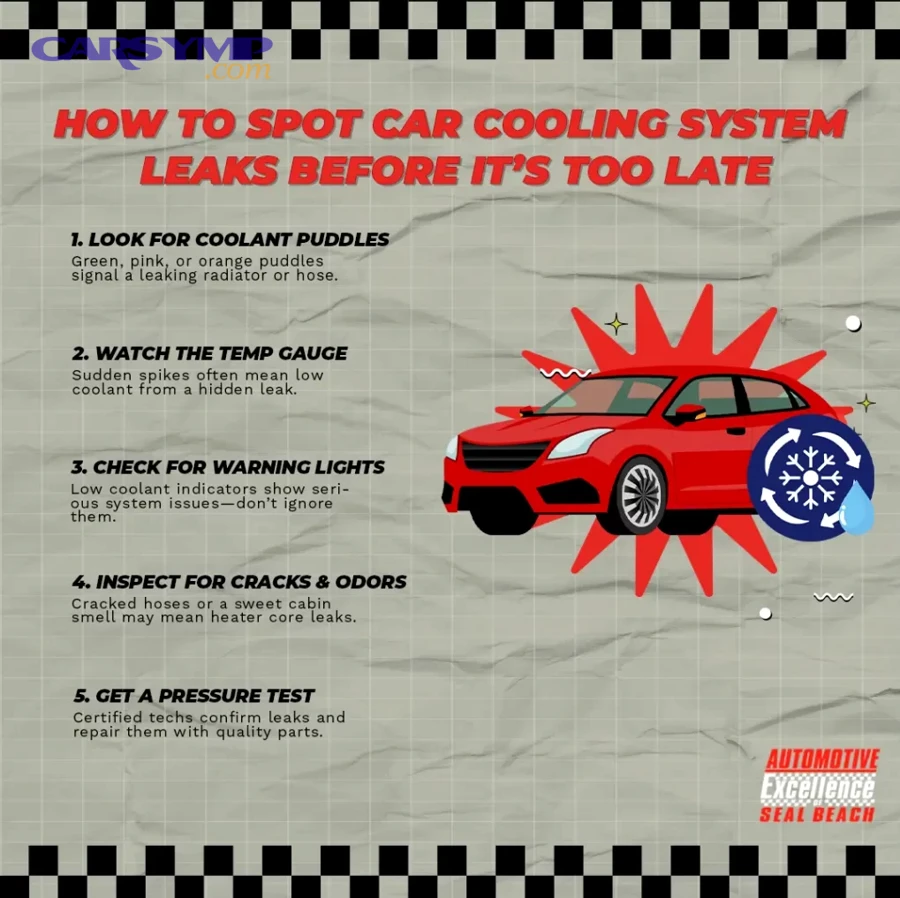
A realistic safety rule: if coolant is dripping steadily, if the reservoir is repeatedly low, or if temperature behavior changes, treat it as a tow-or-repair-now situation.
Should you stop driving immediately if the temperature rises or you see steam?
Yes, you should stop driving immediately because rising temperature or steam signals that (1) heat removal is failing, (2) coolant may be dangerously low, and (3) continued operation can damage the cylinder head, gaskets, and cooling passages.
Next, connect that urgency to what you can control: stopping early prevents the heat spike from escalating into permanent damage.
Safer steps when you notice overheating signs:
- Pull over as soon as it’s safe.
- Turn off the engine and let it cool.
- Do not open the radiator cap while hot.
- After full cooldown, check reservoir level and look for obvious leaks before deciding on next steps.
According to a study by Kharkiv National Automobile and Highway University, in 2021, rapid coolant loss can lead to thermal damage to the cylinder head within roughly 10–15 seconds after a cooling failure—showing how quickly severe damage can begin once coolant is gone.
Is a slow seep ever “okay” temporarily, and what’s the risk?
A slow seep is sometimes the “least risky” leak type compared with an active drip or spray, but it still carries three major risks: the seep can accelerate without warning, air can enter the system and create hot spots, and you can underestimate how quickly the coolant level drops during real driving.
However, “slow” is not the same as “safe.” A seep that looks minor on your driveway can become significant on the highway because pressure and temperature rise.
If you’re weighing next steps, this is where people often look for a Coolant leak repair cost estimate to decide between DIY and a shop. As a planning tool, cost is useful—but your first filter should still be safety:
- If the temperature gauge is stable, the leak is truly minimal, and you can monitor coolant closely, you may be able to drive a short distance to a repair facility.
- If the leak is active, the gauge climbs, or you see steam, do not gamble—overheating is the expensive part.
A good rule of thumb: if you must top up more than once in a short period, the leak isn’t “slow enough” to ignore. Even if you’re only “making it work,” prioritize repair scheduling and move toward a verified fix rather than constant top-offs.
What advanced checks prevent misdiagnosis when the leak isn’t clearly radiator, hose, or water pump?
Advanced checks reduce misdiagnosis by adding visibility and ruling out look-alike leak sources, including small intermittent leaks, hidden heater-circuit leaks, and corrosion-related pinholes—so you don’t replace the radiator when the real issue is elsewhere.
Moreover, these checks matter most when you have one of the frustrating scenarios: pressure drops but you can’t see seepage, the leak appears only sometimes, or the drip point is far from the true source.
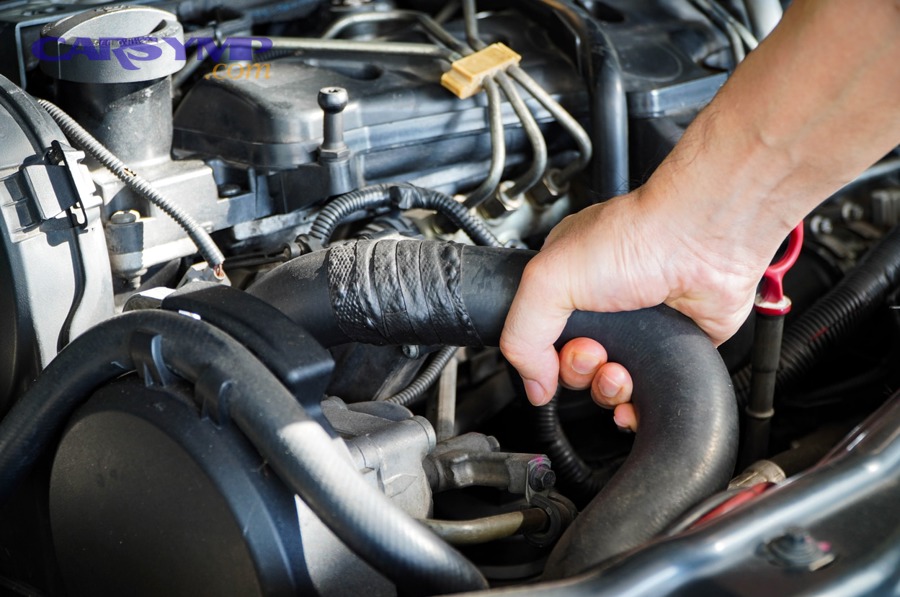
This is also the point where you expand beyond the big three parts without losing focus. You’re not changing the topic—you’re protecting your diagnosis from the most common traps.
When should you use UV dye to trace a small leak, and how does it compare to pressure testing?
UV dye is best for tiny, intermittent, or evaporating leaks, while pressure testing is best for forcing an active external leak to show itself immediately—so dye wins when you need visibility, and pressure wins when you need fast confirmation.
To illustrate the difference, pressure testing creates the condition for leakage; dye makes the leakage easier to see after the fact.
Use UV dye when:
- The leak appears only after long drives, not during short warmups
- Coolant evaporates on hot parts before it can drip
- You suspect misting near belts or behind covers
Use pressure testing when:
- You need quick proof before ordering parts
- You suspect a clamp or seam seep that should show under pressure
- You want to verify a repair before returning the car to daily use
Many DIYers combine them: clean → add dye → drive briefly → pressure test if needed → inspect with UV light. That combination often turns a “maybe” into a clear answer.
What other parts commonly mimic a radiator/hose/pump leak ?
There are five common mimics—thermostat housing, heater hoses, reservoir cracks, crossover pipes, and the heater core circuit—based on where coolant flows beyond the radiator/pump loop.
In addition, these mimics create confusion because coolant often runs down the same paths and drips in the same zones as the big three parts.
Key mimics to rule out:
- Thermostat housing leaks: wetness at the housing seam, residue below it
- Heater hoses: wet at firewall connections or along the hose route
- Reservoir cracks: wetness on the bottle itself, level drops without obvious radiator seep
- Crossover pipes/fittings: wetness at junctions, especially on V engines
- Heater core leak symptoms: sweet smell inside the cabin, fogging windows, damp carpet near the passenger footwell
If cabin symptoms exist, don’t keep chasing the radiator. Heater-circuit leaks can hide externally while leaving very obvious interior clues—especially odors and window fogging that return after each warmup.
Could it be an internal coolant loss instead of an external leak?
Yes, it could be internal if (1) coolant drops without an external puddle, (2) you see persistent white exhaust smoke or sweet odor from exhaust, and (3) you find contamination signs like milky oil—though you should confirm with proper diagnostic testing rather than assumptions.
However, keep the boundary clear: the title’s focus is external source diagnosis (radiator, hose, pump). Internal loss is a “rule-out” path when external checks fail to show a leak.
Signals that justify shifting to internal testing:
- Repeated coolant loss with no visible seepage after cleaning and pressure checks
- Overheating episodes without external leak evidence
- Exhaust behavior changes that persist after warmup
If you reach this stage, professional testing can save money because internal leaks can mimic external symptoms while requiring a completely different repair decision.
Can the wrong coolant or electrolysis accelerate leaks and radiator corrosion?
Yes—coolant chemistry problems and stray-current corrosion can accelerate leaks because they (1) weaken metals through corrosion, (2) degrade inhibitors over time, and (3) create pinhole failures that look like “mystery leaks,” especially in radiators and heater-related components.
More importantly, this connects directly to Preventing future coolant leaks: preventing corrosion and electrical issues reduces the chance your “new radiator” develops new pinholes later.
According to a degree project by KTH Royal Institute of Technology from the School of Industrial Engineering and Management, in 2016, the authors found that galvanic corrosion likely accelerated by stray current was a probable contributor to coolant-circuit corrosion, and that properly grounding components decreases stray current and helps avoid corrosion.
Practical prevention moves that don’t require guesswork:
- Use the correct coolant specification and avoid mixing incompatible types unless you fully flush.
- Use appropriate water (many manufacturers recommend deionized/distilled when mixing concentrate).
- Maintain clean electrical grounds; poor grounding can contribute to stray-current pathways.
- After any coolant leak repair, recheck for seepage after a few heat cycles and confirm the reservoir level stabilizes.
If you want a quick symptom-and-checklist reference while you diagnose (especially for “which leak matches which symptom”), you can cross-check your observations against a symptom library like carsymp.com—but still rely on your first-wet-point inspection and pressure-based confirmation as your proof standard.