


Choosing the proper solder vs crimp vs heat-shrink method for reliable wire repairs comes down to one core rule: crimping usually works best for moving, vibration-prone, and field-serviceable wiring, soldering works best for controlled and low-movement precision work, and heat-shrink works best as the protection layer that seals, insulates, and supports the finished joint. That direct answer matters because most failed wire joints do not fail from conductivity alone; they fail from movement, moisture, heat, or poor execution. (faa.gov)
The first issue readers need to solve is definition. Many people compare three items as if they perform the same job, yet they do not. Solder and crimp are electrical joining methods, while heat-shrink is usually the outer protection that improves insulation, moisture resistance, and strain relief after the conductor has already been joined. (haisstronica.com)
The second issue is selection. The right method changes with wire size, vibration level, water exposure, repair access, and future service needs. A repair inside a calm electronics enclosure does not face the same stresses as a repair in an engine bay, trailer harness, bilge area, or outdoor equipment loom. (faa.gov)
The third issue is technique. A poor crimp, an overheated solder joint, or unsealed insulation can all create the same outcome: a repair that tests fine once and then fails later under load, flex, or corrosion. Next, the main content breaks down the differences, the decision process, the tradeoffs, and the edge cases so you can choose the method that fits the repair instead of following a one-size-fits-all rule. (standards.nasa.gov)
What Is the Difference Between Solder, Crimp, and Heat-Shrink in Wire Repairs?
Solder joins conductors with melted alloy, crimp joins them by controlled compression, and heat-shrink protects the finished splice by insulating, sealing, and supporting it.
To better understand the issue, separate the electrical bond from the protective layer before comparing performance.

Is Heat-Shrink a Joining Method or a Protection Method?
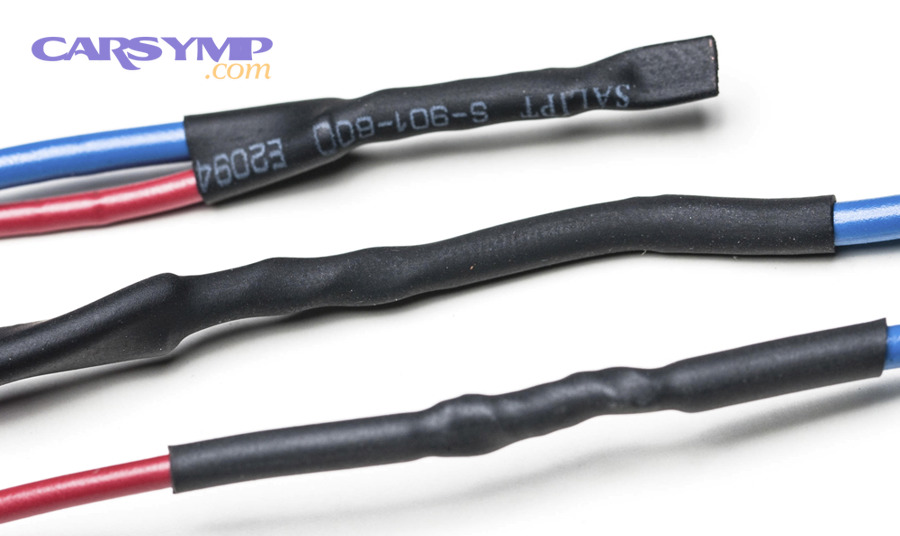
No, heat-shrink is usually a protection method, not the primary conductor-to-conductor joining method, because its main roles are insulation, sealing, abrasion protection, and strain relief.
More specifically, standard heat-shrink tubing shrinks around the outside of a repair to cover exposed metal and reduce mechanical stress at the splice edges. Adhesive-lined heat-shrink adds a meltable inner lining that improves sealing against moisture and contamination. That is why heat-shrink appears in both soldered and crimped repair systems: it supports the joint, but it normally does not replace the joint. (haisstronica.com)
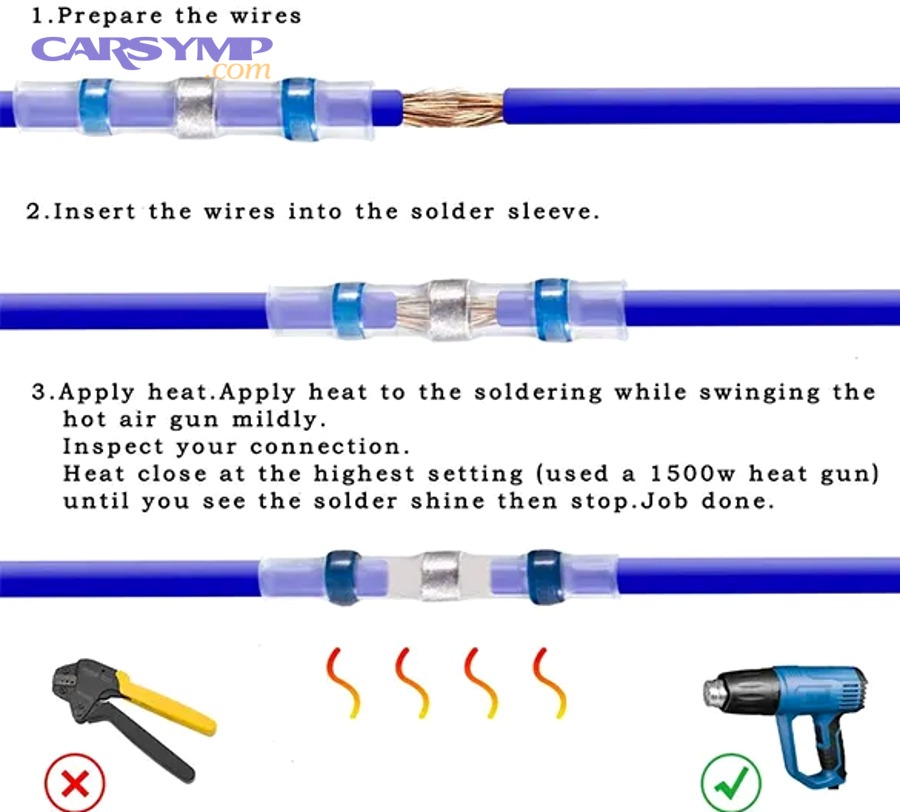
This distinction matters in practical work. When someone says they used “heat-shrink connectors,” the connector may actually be a crimp barrel with a shrink sleeve around it, or a solder-seal sleeve that melts solder and shrink material together. In either case, the tubing still acts as the environmental barrier and support layer. Treating heat-shrink as its own standalone category can mislead beginners into skipping the more important decision about how the conductor itself should be joined. (haisstronica.com)
What Does a Proper Soldered Connection Actually Look Like?
A proper soldered connection is a clean, electrically continuous joint with controlled solder flow, visible strand definition near the insulation, and full insulation restoration after the splice.
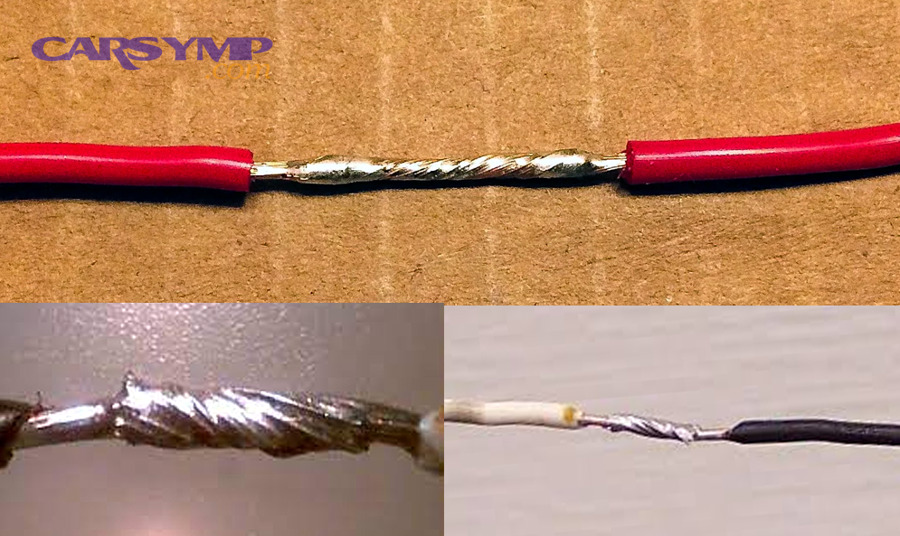
Specifically, good soldering starts with clean copper, correct stripping length, stable wire positioning, proper heat at the joint instead of the iron tip alone, and enough solder to wet the strands without turning the flexible section into a rigid metal rod. NASA workmanship materials note that solder wicking is permitted, but the strands should remain discernable; related NASA training material also warns that solder wicking must not extend into the region intended to remain flexible. (nepp.nasa.gov)
That practical detail explains why solder joints can be excellent in controlled settings but problematic in moving harnesses. When solder travels too far up stranded wire, it stiffens the conductor and creates a stress riser where flexible wire meets rigid wire. In real service, that transition point is where repeated flex can concentrate damage. A soldered splice is therefore not “bad” by default; it simply requires tighter control over heat, wicking, support, and where the repair will live. (nepp.nasa.gov)
What Does a Proper Crimped Connection Actually Look Like?
A proper crimped connection is a matched wire-and-terminal joint compressed with the correct die so the conductor is held securely, electrically connected, and mechanically supported.
For example, the wire gauge must match the barrel size, the terminal type must match the application, and the tool profile must match the connector design. NASA’s crimping standard states that stranded wire shall be used for crimping and that crimping of solder-tinned stranded wire is prohibited, which shows how strongly proper crimp quality depends on the correct materials and process. (standards.nasa.gov)
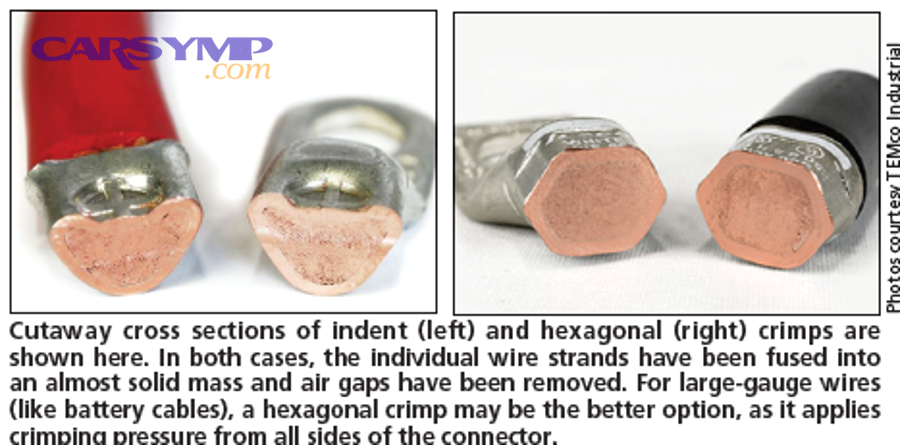
A real crimp is not just a connector that has been crushed until it feels tight. In a good repair, the barrel compresses the strands evenly, the insulation support is appropriate, and the finished joint resists pull-out and vibration. That repeatability is one reason crimping is favored in many harness environments. The method depends less on thermal technique and more on matched tooling, connector quality, and consistent compression. (standards.nasa.gov)
According to NASA’s Workmanship Standard for Crimping, Interconnecting Cables, Harnesses, and Wiring, updated in 2022, crimping requires stranded wire and prohibits solder-tinned stranded wire in the crimp zone, underscoring that a reliable crimp depends on a controlled mechanical interface rather than added solder. (standards.nasa.gov)
Which Method Is Best for Reliable Wire Repairs?
Crimp wins in vibration and service work, solder is best for controlled precision joints, and heat-shrink is optimal for sealing and strain relief after either method.
However, the best method depends on where the repair operates and what type of stress the wire will face.
Is Crimp Better Than Solder for High-Vibration Repairs?
Yes, crimp is usually better than solder for high-vibration repairs because it preserves strand flexibility, avoids extended solder wicking, and supports repeatable mechanical retention.
In moving systems such as automotive harnesses, trailers, off-road equipment, motorcycles, and machinery, the wire joint does not live in a quiet environment. It experiences engine vibration, thermal cycling, and repeated movement near connectors and branch points. A proper crimped splice performs well in that environment because the conductor remains stranded and flexible outside the compressed zone. By contrast, poor solder technique can create a brittle transition from rigid to flexible material. (nepp.nasa.gov)
This is also why many technicians treat crimping as the default for harness repair rather than as a shortcut. It is not merely faster. It is better suited to motion. FAA aircraft repair guidance and NASA crimping standards both reflect process-heavy expectations for wire terminations and splices, reinforcing that high-reliability wiring often favors controlled crimps over improvised thermal joins in moving assemblies. (faa.gov)
Is Solder Better Than Crimp for Small or Precision Wiring?
Yes, solder is often better than crimp for small or precision wiring when the joint is stable, access is tight, and the work requires fine conductive control rather than harness-style field service.
For example, electronics repair, PCB-related leads, sensor pigtails inside protected enclosures, and delicate bench work often suit soldering better because the technician can place and shape the joint exactly where needed. In those situations, the mechanical load on the wire is lower and the environment is more controlled, so the risk created by stiffness is reduced. (nepp.nasa.gov)
The important distinction is not whether solder is “stronger” in the abstract. It is whether the whole system benefits from solder’s precision. If the wire will not flex repeatedly, the repair is supported, and the technician can manage heat correctly, soldering remains an effective and often elegant solution. That is why professional electronics assembly still depends on it even while vehicle harness work often leans toward crimping. (nepp.nasa.gov)
Can Solder and Heat-Shrink Be Better Than Crimp Alone?
Yes, solder and heat-shrink can be better than crimp alone in some protected low-movement repairs, but they still may not beat a sealed crimp in harsh vibration and moisture.
On the other hand, many DIY repairs compare a carefully soldered-and-sealed splice with a poor unsealed crimp. That is not a fair comparison. The stronger comparison is solder plus proper support vs a proper sealed crimp using the correct connector and tool. In that matchup, adhesive-lined crimp butt splices often remain the safer default for outdoor and harness work because the crimp provides the conductor joint and the shrink sleeve provides the seal. (haisstronica.com)
That point matters for wiring repair choices in real garages and workshops. If you only have cheap connectors and a non-ratcheting crimper, a careful solder-and-seal repair may outperform a sloppy crimp. But when materials and tooling are correct, the sealed crimp usually offers the more repeatable field result for moving systems. (customconnectorkits.com)
How Do You Choose the Right Method for Your Specific Repair Situation?
You choose the right method by checking five factors: movement, moisture, wire size, service access, and tool quality, then matching the joint to the environment.
Below, the decision becomes easier once you stop asking which method is “best” in general and start asking which method fits the actual repair.
What Factors Should You Check Before Choosing Solder, Crimp, or Heat-Shrink?
There are five main factors to check before choosing solder, crimp, or heat-shrink: wire construction, movement, environment, current path, and available tools.
Specifically, start with the wire itself. Stranded wire behaves differently from solid wire, and fine-gauge signal wire behaves differently from a heavy accessory feed. Then look at movement. A fixed bench wire can tolerate solutions that a swinging harness near a firewall cannot. After that, check the environment: water, oil, salt, heat, and abrasion change the repair choice fast. Finally, consider whether you can execute the method correctly with the tools you actually own. (standards.nasa.gov)
This is also where Diagnosing shorts and open circuits basics connects to method choice. Before replacing a splice, you need to know whether the original failure came from a broken conductor, a rubbed-through short, a corroded terminal, or voltage drop across a poor joint. Using a multimeter for wiring diagnosis helps confirm whether the problem is continuity loss, resistance increase, or intermittent contact instead of guessing and rebuilding the wrong section. Fluke’s continuity guidance notes that a de-energized continuity test gives a beep when a complete path exists and no beep when the path is open.
Which Method Should You Use for Automotive, Marine, Household, and Electronics Repairs?
Crimp is usually best for automotive and marine harnesses, solder suits many protected electronics repairs, and the best household approach depends on the connector system and code-appropriate repair method.
For automotive work, sealed crimp connectors generally fit the environment because vibration and contamination are common. For marine work, moisture sealing becomes even more important, so adhesive-lined marine-grade crimps are often favored. For electronics inside protected devices, solder remains practical because size control and precision matter more than constant flex resistance. Household mains wiring follows different safety and code requirements, so the correct repair often depends on approved connectors and enclosure practices rather than copying automotive habits. (thehulltruth.com)
This use-case grouping helps with Intermittent electrical issues troubleshooting too. A flickering accessory in a car often points toward vibration-sensitive connectors, while a bench circuit that fails after prior rework may point toward poor wetting, heat damage, or a lifted pad. The repair method should match the likely failure mechanism, not just the wire size. (media.distributordatasolutions.com)
Do Tool Quality and Connector Quality Change the Best Choice?
Yes, tool quality and connector quality can completely change the best choice because both methods depend on process control, and poor tools distort the result.
More specifically, a cheap crimper can under-compress or deform the wrong part of the terminal, while an incorrect soldering setup can overheat insulation, create a cold joint, or drive solder too far into stranded wire. That is why method debates online often sound contradictory: people are comparing different execution levels, not just different joining principles. (standards.nasa.gov)
In practice, reliable selection starts with honesty. If you can make repeatable, tested crimps with matched connectors, crimping becomes a strong default for harness work. If you have precise soldering skill and the repair is low-movement and well-supported, solder can be the better answer. The “best” method is the one you can execute correctly in the real environment the wire will face. (customconnectorkits.com)
What Are the Pros and Cons of Solder vs Crimp vs Heat-Shrink?
Solder offers precision, crimp offers repeatability and vibration tolerance, and heat-shrink adds insulation and sealing but depends on a sound underlying joint.
Meanwhile, the practical tradeoffs become clearer when you compare the methods by speed, strength, sealing, and rework.
The table below compares the three methods by the criteria that matter most during real repairs.
| Criterion | Solder | Crimp | Heat-Shrink |
|---|---|---|---|
| Primary role | Electrical joining | Electrical joining | Insulation and sealing |
| Best environment | Stable, protected, precision work | Vibration-prone, field-serviceable harness work | Added protection for either method |
| Main strength | Fine control and compact joints | Repeatable mechanical retention | Moisture barrier and strain relief |
| Main risk | Wicking, stiffness, heat damage | Bad tool or wrong connector fit | False confidence if used over a bad joint |
| Speed in field repair | Moderate | Fast | Fast as a finishing step |
| Reworkability | Moderate to low | Moderate | Depends on underlying splice |
Which Method Is Stronger, Faster, and Easier to Inspect?
Crimp is usually faster and easier to inspect in field work, solder can be compact and strong in controlled builds, and heat-shrink is strongest as a finishing layer rather than as a standalone answer.
For example, a good crimp is often faster because it uses a defined terminal and a defined tool stroke. Inspection is also more straightforward because the wire gauge, insertion depth, and compression area can be checked visually and mechanically. Solder can be very strong electrically, but its quality is more technique-sensitive, so beginners often think a shiny joint is enough even when the support and wick control are poor. (standards.nasa.gov)
Heat-shrink changes the conversation because it improves a joint’s survivability, not its core electrical bond. A sealed finish can reduce abrasion, water entry, and flex concentration at the splice ends. However, it cannot rescue a loose crimp or a cold solder joint underneath. That is why the strongest repair sequence begins with the correct conductor join and only then adds the protective sleeve. (haisstronica.com)
Which Method Seals Better Against Moisture and Corrosion?
Adhesive-lined heat-shrink over a correct joint seals best against moisture, while a bare crimp or bare solder joint remains vulnerable unless it is finished properly.
Specifically, moisture control is not only about keeping water out on day one. It is also about preventing long-term corrosion at the copper and terminal interface. Sealed crimp connectors combine the joint and the environmental layer in one repair system, which is why they are popular in vehicle and marine repairs. A soldered splice with quality adhesive-lined heat-shrink can also seal well, but only when the tubing fully shrinks, the adhesive flows properly, and the wire was clean to begin with. (haisstronica.com)
This matters whenever a circuit shows voltage drop instead of a complete failure. Corrosion can leave enough continuity for a quick test while still causing weak performance under load. Fluke’s automotive troubleshooting guidance recommends voltage-drop testing in key circuits because it can reveal resistive problems before they become obvious failures. Using a multimeter for wiring diagnosis therefore supports both method selection and repair verification. (fluke.com)
Which Method Is Easier to Rework or Repair Later?
Crimp is often easier to service in harness work, solder can be harder to undo cleanly, and heat-shrink affects access depending on how the repair was built.
In harness service, field rework matters because the next failure may happen nearby. Crimped terminals and splices often fit modular repair habits better, especially when connector systems can be depinned or replaced section by section. Solder joints can be compact, but later rework may require cutting back the wire, removing hardened sections, and rebuilding insulation. Heat-shrink improves durability, yet it also hides the joint until the tubing is cut away. (faa.gov)
That tradeoff is not a reason to avoid sealing. It is a reason to think ahead. If the circuit lives in a harsh environment, durability usually outweighs rework convenience. If the circuit is experimental, frequently modified, or inside a serviceable enclosure, you may value future access more highly. Good selection always ties back to the repair’s full life cycle. (haltech.com)
What Mistakes Make Wire Repairs Fail Even When the Method Is Correct?
Wire repairs fail when the method is executed poorly, sealed badly, or used in the wrong environment even if the chosen method itself is appropriate.
In addition, most “method failures” are really process failures, which is why technique matters as much as theory.

Can a Bad Crimp Fail Faster Than a Good Solder Joint?
Yes, a bad crimp can fail faster than a good solder joint because loose compression, wrong gauge matching, and poor insertion depth create resistance and pull-out risk immediately.
For example, an under-crimped splice may pass a casual tug test but still generate heat or open intermittently when the harness moves. That is one reason intermittent electrical issues troubleshooting should include gentle movement testing, continuity checks, and voltage-drop checks after the repair. Fluke notes that electrical intermittents are among the hardest faults to catch because the symptom may disappear while you are observing it. (media.distributordatasolutions.com)
This principle also keeps the solder-vs-crimp debate honest. A neat, well-supported solder joint can outperform a lazy crimp. The conclusion is not that solder is always better. The conclusion is that correct execution decides whether the chosen method actually delivers its theoretical advantage. (haltech.com)
Can Too Much Solder Make a Wire Repair Less Reliable?
Yes, too much solder can make a wire repair less reliable because excess wicking stiffens stranded wire, shifts flex stress, and can damage insulation during installation.
More specifically, solder should create electrical continuity without extending stiffness deep into the wire section that needs to remain flexible. NASA solder workmanship material permits wicking only within controlled limits and emphasizes that strands should remain discernable; NASA-related guidance also states that solder wicking should not extend into the stranded region intended to stay flexible. (nepp.nasa.gov)
That technical point explains why some soldered repairs break a short distance away from the visible joint. The break does not always occur in the solder itself. It often occurs at the transition from rigid to flexible conductor after repeated movement. A repair can therefore look perfect and still be poorly matched to a dynamic harness environment. (nepp.nasa.gov)
Does Skipping Heat-Shrink or Strain Relief Cause Early Failure?
Yes, skipping heat-shrink or strain relief can cause early failure because exposed conductors corrode faster and unsupported joints concentrate bending at the weakest point.
Besides electrical contact, every repair needs environmental and mechanical protection. Heat-shrink limits moisture entry, insulates exposed metal, and spreads movement over a slightly longer section instead of allowing all flex to occur right at the splice edge. That support is especially important where wires pass through panels, loom exits, or engine-bay branches. (haisstronica.com)
This is where many DIY fixes go wrong. The joint may carry current today, but it has no protection against tomorrow’s vibration, splash, or abrasion. In short, a durable repair is not only a good electrical joint; it is a supported and sealed system. (haisstronica.com)
What Is the Best Simple Rule for Choosing Between Solder, Crimp, and Heat-Shrink?
Use sealed crimp for most moving harness repairs, use solder for stable precision work, and use heat-shrink to protect whichever correct joint you choose.

Thus, the simplest reliable rule is to default to the environment first, not the method you personally prefer.
Should Most DIY Wire Repairs Use Sealed Crimp Connections First?
Yes, most DIY wire repairs should start with sealed crimp connections because they are repeatable, vibration-friendly, and easy to finish with proper insulation and moisture control.
That guideline works especially well for vehicle accessories, trailer lights, outdoor equipment, battery-adjacent wiring, and repairs where future movement is unavoidable. A sealed crimp system gives the DIY user a strong margin for durability without requiring bench-level solder control. It also scales well when multiple similar repairs must be made consistently across a harness. (haisstronica.com)
The key condition is still quality. Buy connectors that match the wire gauge, use the right crimper, and confirm the circuit after the repair. Using a multimeter for wiring diagnosis before and after the splice helps confirm that the problem is gone rather than hidden. Continuity, resistance, and voltage-drop checks make the repair decision measurable instead of emotional.
When Should You Still Choose Solder on Purpose?
Choose solder on purpose when the repair is small, stable, protected, precision-sensitive, and supported well enough that flex at the joint is minimal.
For example, solder makes sense inside protected electronic assemblies, on short lead repairs within a housing, or when a fine connection must fit where a crimp barrel would be impractical. It also makes sense when the repair can be tied down and relieved properly so the conductor does not bend at the hardened section. (nepp.nasa.gov)
Solder is also a deliberate choice when the technician has better soldering skill than crimp tooling. That point should not be ignored. Method advice that assumes perfect tools and perfect supplies does not always reflect real repair benches. The best choice in the field is still the method you can execute correctly, test properly, and protect completely. (youtube.com)
What Is the Safest Best-Practice Setup for Long-Lasting Wire Repairs?
The safest best-practice setup is a correctly matched joint, full insulation restoration, moisture protection where needed, strain relief, and electrical verification after assembly.
To sum up, the process looks like this: identify the failure, cut back to sound wire, choose the method that fits the environment, execute the joint with matched materials, protect it with proper shrink or other approved insulation, secure the wire so the joint does not flex excessively, and test the circuit under realistic conditions. That final step is where diagnosing shorts and open circuits basics and intermittent electrical issues troubleshooting connect back to the repair itself. If the circuit still shows voltage drop, unstable continuity, or heat under load, the job is not finished.
What Special Cases Change the Best Solder vs Crimp vs Heat-Shrink Choice?
Marine exposure, OEM-style harness repair, solder wicking risk, and hybrid connector designs can change the best method because they shift the balance between sealing, flexibility, and inspection.
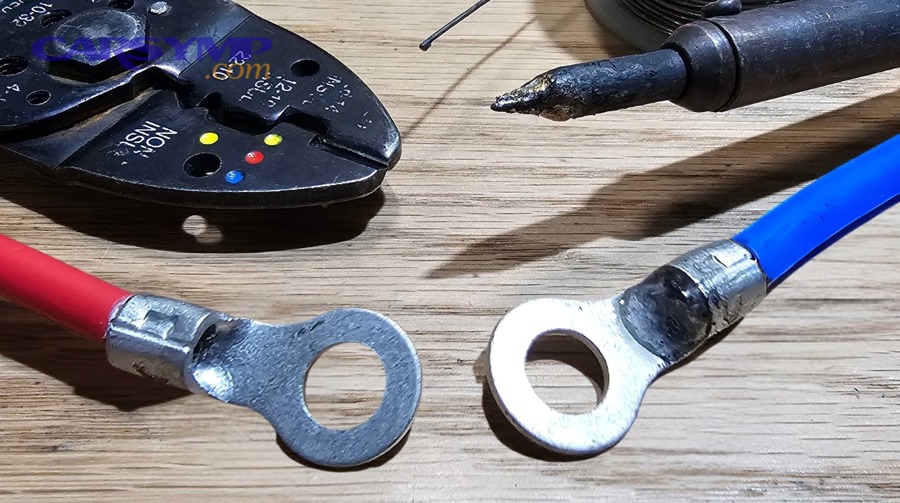
Let’s explore the special cases that push the decision beyond the basic “crimp for cars, solder for electronics” rule.
Are Adhesive-Lined Heat-Shrink Connectors Better for Outdoor or Marine Repairs?
Yes, adhesive-lined heat-shrink connectors are usually better for outdoor or marine repairs because they improve sealing, reduce corrosion exposure, and add strain relief around the joint.
In marine and outdoor environments, salt, humidity, spray, and wash-down conditions attack copper and terminals relentlessly. Adhesive-lined systems help block that exposure by bonding around the insulation when heated correctly. That is why marine discussions and aerospace-adjacent shrink-splice guidance repeatedly emphasize sealed repair systems rather than bare joints covered loosely afterward. (buyheatshrink.com)
Even so, sealing does not excuse poor preparation. Corroded copper, incomplete shrink, or the wrong connector size will still undermine the repair. The connector is better only when the installation is also better. (haisstronica.com)
Why Do OEM-Style Automotive Harness Repairs Usually Favor Crimped Terminals?
OEM-style automotive harness repairs usually favor crimped terminals because crimping supports repeatable assembly, vibration tolerance, and service-friendly connector systems.
More importantly, production harnesses need a method that can be applied consistently across thousands of terminations. Crimping fits that requirement because terminal barrels, applicators, and inspection criteria can be standardized. In service work, that philosophy carries over to repair pigtails, replacement pins, and sealed butt splices that mimic the harness’s original mechanical logic. (standards.nasa.gov)
That is why many automotive professionals prefer crimping even when they are capable of excellent soldering. They are optimizing for the harness, not for the bench. The joint must survive movement, temperature swings, and years of use while remaining understandable to the next technician. (haltech.com)
What Is Solder Wicking, and Why Does It Matter in Flexible Wiring?
Solder wicking is the capillary flow of solder up stranded wire, and it matters because it can turn a flexible conductor section into a rigid stress point.
Specifically, when solder travels beyond the intended splice area, it binds the strands together and reduces the wire’s ability to flex naturally. NASA workmanship documents permit controlled wicking but also warn against allowing solder to extend into the region that is meant to remain flexible. That balance is critical: enough wetting for continuity, but not so much that the repair becomes mechanically fragile under repeated motion. (nepp.nasa.gov)
This is one of the rare but decisive attributes that separates acceptable solder work from long-term failure in harnesses. The issue is not visible only by looking for shine. It is a mechanical behavior problem that appears later, after the repair has already passed an initial continuity check. (media.distributordatasolutions.com)
Is Crimp Then Solder Then Heat-Shrink Actually Best, or Just Overkill?
No, crimp then solder then heat-shrink is not automatically best, because combining methods can mask a poor crimp, add stiffness, and create complexity without improving the repair outcome.
However, people reach for this hybrid approach because it feels safer. In reality, if the crimp is correct, added solder is usually unnecessary and may even undermine the flex behavior that made crimping attractive in the first place. If the crimp is incorrect, solder should not be used as a shortcut to rescue it. The better solution is to redo the joint correctly and then apply the right protective shrink. (standards.nasa.gov)
In short, the most reliable wiring repair is usually the simplest correct system, not the most layered one. Choose the method that fits the environment, execute it well, protect it properly, and verify it with tests instead of myths. That approach produces better results than stacking techniques just to feel extra secure.