


A heater core replacement cost estimate is usually a parts + labor price range that reflects how much work it takes to access the heater core—often deep behind the dashboard—so you can budget realistically before authorizing the repair. Typical totals can swing widely because labor time and vehicle design do most of the price moving. (repairpal.com)
Next, you’ll see exactly what an estimate should include (line items, fees, and what’s commonly excluded), so you can spot missing items and avoid surprise add-ons after teardown.
Then, you’ll learn why heater core replacement is expensive on many cars, and how to get a quote that actually matches your vehicle (not a generic average), including what information to provide and what to compare between shops.
Introduce a new idea: cost only matters if you’re solving the right problem—so you’ll also get a practical “safe to drive or stop now?” framework tied to symptoms and the Coolant loss and overheating link, which is the real risk behind delaying a leaking core.
What is a heater core replacement cost estimate and what does it include?
A heater core replacement cost estimate is a priced forecast for parts, labor hours, and related supplies needed to replace the heater core, based on your vehicle’s access complexity and the shop’s labor rate.
To better understand what you’re paying for, you need to read the estimate the same way a shop writes it: as a list of tasks, parts, and risk buffers.
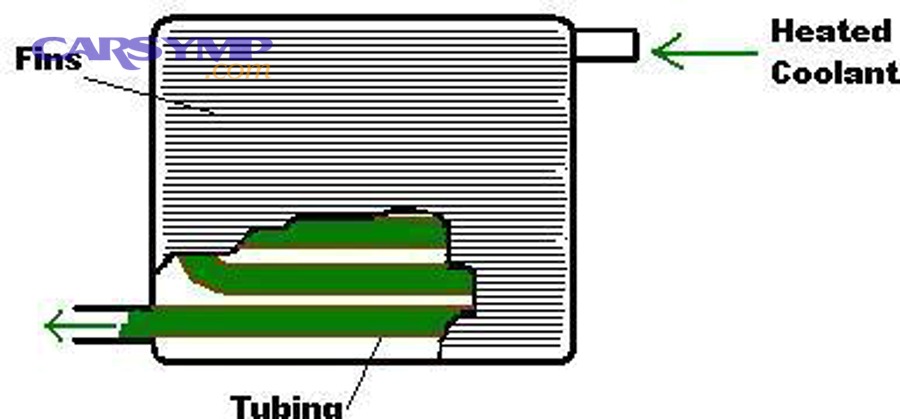
In plain terms, the heater core is a small radiator inside the HVAC box. Engine coolant flows through it; the blower pushes air across it; warm air enters the cabin. That “small radiator” may be cheap compared with the work required to reach it—so the estimate is rarely “just the part.”
Most credible estimates include:
- Core part price (OEM or aftermarket)
- Labor time (often the largest portion)
- Coolant-related work (drain/refill, bleeding air, sometimes a partial flush)
- Shop supplies and disposal fees
- Taxes/fees, depending on location and shop policy
Repair cost guides often show that labor can dominate the total because of access time. (autozone.com)
What line items should appear on a heater core replacement estimate?
There are 7 main line items you should expect on a heater core replacement estimate: diagnosis, parts, labor, coolant, seals/consumables, shop fees, and taxes—based on how the job is actually performed.
Specifically, those line items tell you what’s included before the dash comes apart, which is where pricing can change.
1) Diagnostic charge (sometimes separate)
Some shops charge a diagnostic fee to confirm the heater core is leaking vs. a hose, blend door issue, or coolant odor from an engine-bay leak. If the shop waives diagnosis with approved heater core replacement, the estimate should state that clearly.
2) Heater core (the part)
You may see:
- OEM part line (usually higher price, sometimes better fit)
- Aftermarket line (wide price range)
3) Labor (hours × labor rate)
This is usually written as:
- “Heater core R&R” (remove and replace)
- Or “instrument panel removal” + “heater core replacement” as separate labor operations
4) Coolant and system bleeding
Even if the shop doesn’t perform a full flush, you need coolant drain/refill and proper bleeding to prevent air pockets, overheating, and weak heat.
5) Seals/consumables
Common small items:
- O-rings, foam seals, hose clamps
- Adhesives/tape/fasteners (depending on vehicle design)
6) Shop supplies and disposal
Coolant disposal and shop supply fees are common; the estimate should list them rather than bury them.
7) Taxes and fees
Not optional—just make sure they’re not “mystery fees” that double count supplies.
If you want a quick “is this estimate complete?” check, the cleanest estimates separate parts vs labor and disclose that taxes/fees and related repairs may change the final total. (repairpal.com)
Does a heater core estimate usually include coolant flush, AC service, or dashboard removal?
No—most heater core estimates do not automatically include a full coolant flush or AC service, but yes, dashboard removal is often included implicitly in labor because access typically requires it.
More specifically, the estimate should make the job scope visible so you’re not guessing what’s included.
Coolant flush:
- Many estimates include drain/refill + bleed, not a full chemical flush.
- A full flush may be recommended if coolant is contaminated or the system has mixed coolant types, but it should be optional and justified.
AC service:
- Heater core replacement is part of the cabin HVAC assembly, but AC service is only necessary if the procedure requires disconnecting AC components or if “while you’re in there” work is added.
- If the estimate includes AC evac/recharge, ask why.
Dashboard removal:
- If the vehicle is a dash-out design, dash removal is baked into labor time.
- If the estimate doesn’t mention access complexity at all, it’s a red flag that it may be a generic template.
Many consumer repair guides explicitly point out that labor is a major driver because the dash often needs to come out. (autozone.com)
How much does heater core replacement cost for most cars and trucks?
Heater core replacement cost for most vehicles typically say in a broad range because labor time varies by design, but many mainstream estimates cluster around the high hundreds to low thousands for total parts-and-labor.
Next, you’ll see how to interpret common ranges without treating them as a guaranteed quote.
A helpful way to think about pricing is to break it into three “budget bands”:
- Lower band: vehicles with easier access or lower labor rates
- Middle band: typical passenger cars with moderate dash work
- Upper band: trucks/SUVs/luxury models or designs requiring extensive teardown
For example, some repair pricing resources publish national “average ranges” and note that location and related repairs can shift the final number. (repairpal.com)
What this means for you:
If you only remember one rule, remember this: the estimate is mostly about labor hours, not the heater core itself. That’s why the same symptom—coolant smell or wet carpet—can produce wildly different quotes across different vehicles.
What is the typical parts cost vs labor cost for a heater core job?
Labor usually wins in time and cost, while the heater core part is often a smaller slice—because removing interior panels and accessing the HVAC box takes hours.
To illustrate, published estimates commonly separate labor and parts and show labor as the larger component on average. (repairpal.com)
Here’s a practical breakdown you can use to sanity-check a quote (this is a framework, not a guarantee for your exact car):
- Parts: heater core + small seals/clamps
- Often hundreds, sometimes less, sometimes more (OEM vs aftermarket)
- Labor: dashboard/HVAC box access + replace + reassemble + test
- Often the majority because it’s time-intensive
- Supplies/fees: coolant, shop supplies, disposal, taxes
If a quote shows very low labor but a very high total, ask for line-item detail. If a quote shows very high labor but the shop can’t explain access steps, ask how they determined hours (book time vs experience).
Evidence (cost split): Public estimate breakdowns commonly show labor exceeding parts in typical cases, reinforcing why labor hours are the main cost driver. (repairpal.com)
Which vehicles tend to be cheaper or more expensive for heater core replacement?
There are 3 main cost tiers for heater core replacement—lower-cost compacts, mid-cost mainstream sedans/crossovers, and higher-cost trucks/luxury models—based on the criterion of HVAC access complexity and interior teardown.
More specifically, what you drive determines how many components must be removed before the heater core is even visible.
Lower-cost tendency (not always):
- Some smaller vehicles with more direct access paths
- Simpler dashboards and fewer integrated modules
Mid-cost tendency:
- Mainstream sedans and crossovers with partial dash removal
- Moderate HVAC case access
Higher-cost tendency:
- Larger trucks/SUVs with complex packaging
- Luxury cars with more electronics, trim complexity, and added HVAC features (dual-zone, rear HVAC, etc.)
The key point is not the badge—it’s how the HVAC box is buried. Even within the same brand, two models can differ significantly.
Why is heater core replacement so expensive in many vehicles?
Heater core replacement is expensive mainly because the heater core sits inside the HVAC housing under the dashboard, so the job requires hours of disassembly, careful reassembly, and testing—not because the part itself is exotic.
Besides cost, the same access difficulty is also why you want the repair done correctly the first time.

In many vehicles, the heater core is behind:
- Dash panels and trim
- Center console components
- Air ducts, brackets, wiring connectors
- Sometimes steering column supports or cross-car beams
Every removed component adds time and introduces breakage risk, especially with older plastics. That risk is reflected in labor estimates and “shop supplies” buffers.
Consumer repair references frequently explain that labor can account for a large portion of total cost due to dashboard removal needs. (autozone.com)
Is heater core replacement a “dash-out” job and how does that affect labor hours?
Yes, heater core replacement is a dash-out job on many vehicles, and that increases labor hours because technicians must remove and reinstall major interior assemblies before they can open the HVAC case.
Meanwhile, the more integrated your dashboard design is, the more time the estimate will carry.
A dash-out job impacts hours in three ways:
- Access time: removing trim, console, dash structure
- HVAC housing time: splitting the case and swapping the core
- Reassembly + verification: squeak/rattle prevention, electrical checks, heat output testing
This is why two quotes can differ: one shop may use conservative hours to cover real-world complications; another may quote book time but add extras later.
What hidden factors increase cost (broken clips, seized fasteners, leaks found mid-job)?
There are 6 common hidden factors that raise a heater core replacement estimate: brittle trim, seized fasteners, extra leak sources, HVAC foam degradation, coolant contamination, and change-order labor—based on the criterion of “what is discovered during teardown.”
More importantly, these factors explain why the best estimates include “related repairs may be needed.”
- 1) Brittle plastic clips and trim
Older dashboards crack; clips snap; trim can require replacement. - 2) Seized fasteners and corrosion
Hidden bolts near the firewall or heater tubes can be stubborn. - 3) Leaks found beyond the heater core
Sometimes the core is wet, but the real leak is:- Heater hoses at the firewall
- Hose clamps
- Thermostat housing seepage
- 4) Foam seals and duct leakage
Deteriorated foam can cause poor airflow or new noises after reassembly—shops may recommend replacement while it’s open. - 5) Coolant contamination or wrong coolant mix
If coolant is sludged or mixed incorrectly, the shop may recommend corrective service to prevent repeat problems. - 6) Change orders
If additional failures appear mid-job, a shop may request authorization—so it’s smart to ask upfront what their change-order process looks like.
How can you get an accurate heater core replacement estimate for your specific car?
You can get an accurate heater core replacement estimate by providing exact vehicle details, confirming the failure mode, and comparing written quotes line-by-line, which typically takes 3 steps: prepare info, request scope, and compare inclusions.
Let’s explore how to turn a vague “it smells sweet” complaint into a quote you can trust.
Step 1: Prepare vehicle identifiers
Year, make, model, engine, and ideally the VIN. HVAC options matter too (dual-zone, rear heat).
Step 2: Request a written estimate with scope
Ask for:
- Labor hours
- Parts brand (OEM vs aftermarket)
- Coolant work included (drain/refill vs flush)
- Warranty terms
Step 3: Compare quotes on the same assumptions
The cheapest quote isn’t the lowest total if it excludes necessary steps like bleeding the cooling system or replacing critical seals.
Some widely used estimators explicitly note that their ranges don’t include taxes/fees and don’t reflect your unique location, which is exactly why you still need local written quotes. (repairpal.com)
What information should you give a shop to get a reliable quote?
There are 8 key pieces of information to give a shop for a reliable heater core quote: vehicle ID, HVAC configuration, symptoms, leak evidence, coolant history, prior repairs, temperature behavior, and urgency, based on the criterion of “what changes labor scope.”
For example, “no heat” alone can be a thermostat or blend door issue—while “wet passenger carpet + coolant smell” points more strongly toward a leaking core.
- Year / make / model / engine
- VIN (best for parts accuracy)
- HVAC features: dual-zone, rear heat, automatic climate control
- Symptoms: foggy windows, sweet smell, oily film, weak heat
- Leak evidence: wet carpet, damp HVAC drain, coolant level dropping
- Coolant history: last service, any mixing, contamination
- Overheating behavior: temp spikes, warning lights
- Timeline: when it started and whether it worsens under load
Using this information helps the shop choose the right labor operation and reduces the odds of a “we found something else” change order.
How many quotes should you get and what should you compare apples-to-apples?
Two quotes are a minimum, but three quotes is ideal, because it reveals whether a high number is justified by scope or inflated by padding; compare labor hours, parts quality, included coolant service, and warranty for an apples-to-apples decision.
However, comparing totals alone is the fastest way to pick the wrong repair.
Before the table below, note what it does: it helps you compare quotes on the same scope, so you can see why one shop is higher.
| Quote element | What to look for | Why it matters |
|---|---|---|
| Labor hours | Stated hours, not vague “labor” | Hours drive most of the total |
| Parts type | OEM vs aftermarket brand | Fit/quality differences affect redo risk |
| Coolant work | Drain/refill + bleed vs full flush | Prevents air pockets and repeat issues |
| Fees | Supplies/disposal/taxes shown clearly | Avoid surprise totals |
| Warranty | Parts + labor warranty terms | Protects you if it leaks again |
Many guides recommend getting multiple quotes and understanding labor and extra fees before approving the repair.
Is it safe to drive with a leaking heater core until you schedule the repair?
No, it is generally not safe to drive with a leaking heater core, because it can fog your windshield, drain coolant and trigger overheating, and leak coolant into the cabin, creating visibility and mechanical risk.
More importantly, the decision isn’t “drive or don’t drive”—it’s “how quickly does this failure escalate on my car?”
Here’s the practical safety logic:
- Visibility risk (immediate safety)
A leaking heater core can put moisture and film on the windshield. If your defroster can’t keep up or windows haze rapidly, that’s a stop-now condition. - Mechanical risk (coolant loss and overheating link)
A heater core is part of the cooling loop. If coolant level drops enough, the engine can overheat—sometimes quickly under load or at idle. - Cabin contamination (comfort and health)
Coolant in the HVAC case can create persistent odor and residue and can soak carpet padding, which is difficult to fully dry.
If the leak is active (wet carpet + dropping coolant level), the safest move is to limit driving and fix the root cause rather than topping off repeatedly.
What symptoms suggest the heater core is failing and the estimate is worth getting now?
There are 7 common failure signs that indicate the heater core replacement estimate is worth getting now: sweet coolant smell, foggy windows, oily windshield film, wet passenger carpet, unexplained coolant loss, weak heat, and gurgling behind the dash—based on the criterion of “evidence of internal coolant leakage.”
Next, use these signs to separate a “maybe later” issue from an “urgent leak.”
- Wet passenger-side carpet or damp insulation near the center console
- Sweet smell inside the cabin, especially with heat on
- Fogging windows that returns quickly after wiping
- Coolant level drops with no obvious engine-bay leak
Indicators of a restricted (not leaking) core:
- Weak heat on one side or inconsistent cabin heat
- Heat improves at higher RPM
- Coolant level stays stable
When you see coolant loss plus cabin symptoms, you’re often looking at true heater core replacement—not just an adjustment.
What are cheaper “not-a-heater-core” issues that can mimic the symptoms?
A heater core problem can look like other faults, but blend door issues win for “no heat,” thermostat issues win for “slow warmup,” and low coolant wins for “heat disappears,” while a true core leak is most consistent with wet carpet and a sweet cabin smell.
On the other hand, misdiagnosis is how people overpay.
- Blend door actuator failure (air not routed through the core)
- Thermostat stuck open (engine doesn’t reach proper temp)
- Low coolant level from a different leak (core can’t circulate properly)
- Clogged heater core (poor flow, but not necessarily leaking)
- Air trapped in cooling system after coolant work
This is why a good estimate starts with confirmation steps—pressure test, visual inspection at the heater tubes, and symptom correlation—before committing to heater core replacement.
Evidence (cooling/overheating risk): According to a study by Binzhou University from an engineering research context (published in May 2019), engine overheating faults and piston damage are strongly associated with cooling system failure, and prolonged high temperatures can rapidly reduce component hardness and contribute to severe damage. (ijmret.org)
What “while-you’re-in-there” add-ons can change a heater core estimate, and when are they worth it?
There are 4 main add-on categories that can change a heater core estimate—seals/hoses, airflow controls, HVAC case service, and overlapping cooling/AC work—based on whether the add-on reduces future labor by using the same teardown.
In addition, these add-ons are where overspending happens, so you need a “necessary vs optional” filter.
This section matters because once the dash is out, replacing certain small parts can be cost-effective—while other suggestions are better done only when there’s evidence of failure.
A practical rule: Pay for add-ons that share labor overlap and prevent repeat teardown. Skip add-ons that don’t have a failure signal.
Also, you may hear about Bypassing heater core temporarily risks. Bypassing can stop cabin leakage and restore coolant retention in emergencies, but it also removes cabin heat and defrost capability—creating a safety issue in cold or humid conditions—and it can hide the underlying leak until it becomes bigger. Treat it as a short-term emergency move, not a strategy.
Which related parts are smart to replace during a dash-out heater core job?
There are 5 smart “labor-overlap” parts to consider during a dash-out heater core job: heater hoses/clamps, O-rings/seals, brittle HVAC foam seals, blend door actuator (if failing), and cabin air filter, based on the criterion of “cheap parts that are expensive to access later.”
More specifically, these items are worth considering because the teardown is the costly part, not the component.
Good candidates (when condition supports it):
- Heater hoses at the firewall if aged, swollen, or seeped
- Clamps and seals/O-rings that are disturbed during removal
- Foam seals that prevent air leaks and squeaks
- Cabin air filter if it’s overdue (especially if coolant odor has circulated)
- Blend door actuator only if it’s noisy, inconsistent, or already failing
What to avoid by default: replacing multiple actuators “just because” unless there’s evidence. Actuators can be accessible without dash-out on some vehicles.
When should you consider replacing the evaporator core or servicing the AC at the same time?
No, you should not automatically replace the evaporator core or add AC service during heater core replacement unless there is evidence of AC performance problems, refrigerant leakage, or required disconnection of AC components.
Especially with expensive AC work, scope creep is common—so insist on the reason.
Consider AC-related add-ons if:
- The evaporator shows leakage signs (dye, oil residue, low charge history)
- The car has poor cooling and you’re already paying for major access
- The procedure requires AC line work (vehicle-dependent)
Skip AC add-ons if:
- AC performance is normal
- There’s no leak evidence
- The shop can’t explain why it’s needed
This is where a written estimate protects you: it forces justification, not just suggestion.
Can the job involve airbags/SRS components and why does that matter for cost and safety?
Yes, heater core replacement can involve airbags and SRS-related components because dashboard removal often crosses the same physical space as airbag modules, sensors, and wiring, which increases safety requirements and labor caution.
More importantly, that’s a legitimate reason some shops charge more: they’re pricing careful disassembly and reassembly, not rushing through connectors.
What to ask the shop:
- Do they follow battery disconnect and wait-time procedures?
- Do they document connector handling and torque specs?
- Do they verify SRS lights and scan for codes after reassembly?
Even if you don’t see “SRS” on the estimate, careful handling is part of professional labor time.
What post-repair checks prevent repeat leaks and cabin odor/film issues?
There are 6 post-repair checks that prevent repeat leaks and lingering cabin residue: pressure test, correct coolant fill, proper bleeding, heater output verification, leak recheck under temperature, and interior cleanup/drying, based on the criterion of “confirm the fix and remove contamination.”
Thus, you’re not just paying to replace a part—you’re paying to restore normal operation.
Key checks after heater core replacement:
- Cooling system pressure test to confirm no leaks
- Correct coolant type and mixture for the vehicle
- Bleed air from the cooling system to prevent hot spots
- Verify heat and defrost performance at idle and driving RPM
- Recheck coolant level after a full heat cycle
- Dry carpet padding and clean residue to prevent persistent odor
If a shop replaces the core but doesn’t verify stable coolant level and heat output, you can end up with repeat symptoms and confusion about whether the repair worked.
Evidence (typical cost ranges and labor share): Consumer-facing repair cost references commonly report a wide total range and emphasize that labor accounts for a large share because accessing the heater core often requires dash removal. (autozone.com)