

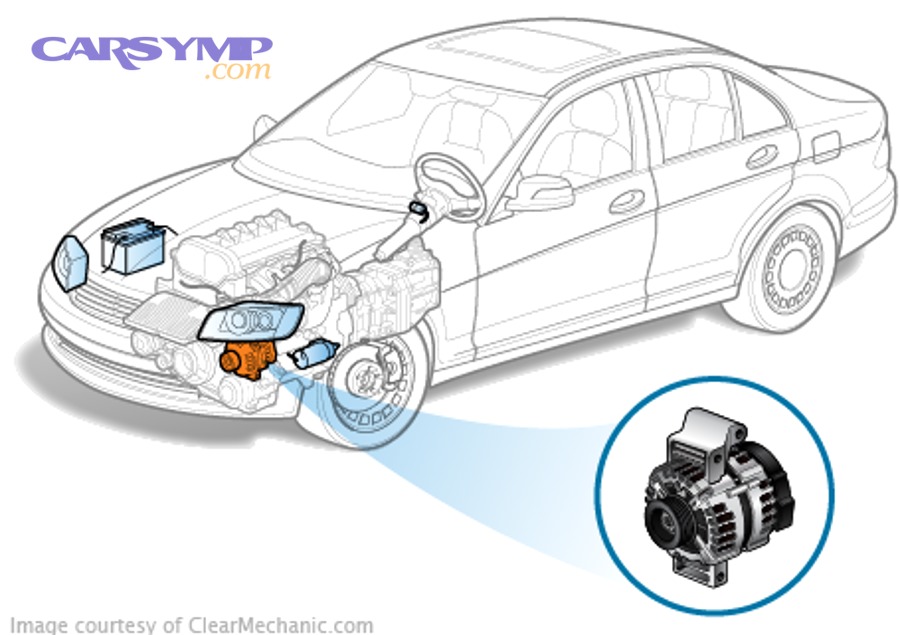
Estimate Alternator Replacement Cost: Average vs Cheap vs OEM
Alternator replacement cost usually falls into a predictable range once you separate three things: the alternator part price, the labor time, and the “extras” shops often add during charging-system work.
Beyond the headline number, what changes your bill most is where you replace it (dealer vs independent shop), how hard your alternator is to access, and whether the job triggers related items like belts, tensioners, or battery charging checks.
Another factor is the type of part you choose—OEM, aftermarket new, or remanufactured—because warranty length and failure risk can shift the true long-term cost even if the upfront price looks lower.
To introduce a new idea: the fastest way to avoid surprises is to understand what’s typically included in a quote, what’s not, and which add-ons are truly necessary versus optional upsells.
What is the average alternator replacement cost, and what does it include?
Average alternator replacement cost is typically the combined total of the alternator part, labor, and standard shop supplies; most drivers pay somewhere in the mid-hundreds to low-thousands depending on vehicle design, local labor rates, and part type.
To connect the dots, once you know what’s included, you can compare quotes apples-to-apples instead of chasing the lowest sticker price.

Which line items usually appear on a real alternator replacement invoice?
Yes—most invoices list alternator cost, labor, shop supplies, and taxes, and they often add a battery/charging check because alternator failure is tied to the whole charging system.
Next, you’ll want to confirm each line item’s purpose so you can spot duplicates or vague “miscellaneous” charges.
- Part: alternator (new, reman, or OEM) with part number and core charge if applicable
- Labor: removal/installation time (flat-rate hours), sometimes including belt removal
- Electrical verification: charging system test before/after replacement
- Shop supplies: small consumables (cleaners, rags) and disposal fees
- Optional add-ons: belt, tensioner, battery, terminal service, pulley, or wiring repair
Why do costs vary so much even for the “same” alternator job?
Because access difficulty, labor rate, and alternator type are the three biggest cost drivers, the same replacement can swing widely across vehicles and regions.
To illustrate, a top-mounted alternator on an older inline engine can be quick, while a modern transverse engine with tight packaging may require removing shields, intake ducts, or even moving other components.
- Access complexity: alternator location, need to remove extra parts, underside access
- Labor rates: metro areas and dealerships generally charge higher hourly rates
- Part strategy: OEM vs aftermarket vs reman affects price and warranty
- Vehicle electrical demand: start-stop systems, higher-output alternators, and smart charging increase complexity
Is a charging system test normally included, and should you insist on it?
Yes, it should be included or at least clearly offered, because a new alternator won’t fix underlying issues like weak battery cells, bad grounds, or corroded cables that can mimic alternator failure.
After that, ask for a simple “before/after” voltage reading so you know the system is charging correctly under load.
- Engine off: battery resting voltage check
- Engine running: charging voltage check at idle and with accessories on
- Load test: confirm stable output when headlights, blower, and rear defrost are running
How do alternator price ranges change by vehicle and alternator type?
Alternator price range by vehicle changes mainly with output rating, packaging, and brand availability; compact cars often have cheaper units, while trucks, luxury models, and hybrids can require higher-output or specialized alternators.
Next, choose the alternator type that matches your risk tolerance and ownership horizon, because part type can dominate the total cost.
OEM vs aftermarket vs reman cost comparison: which is best for most drivers?
OEM is strongest for fitment and predictable quality, aftermarket new is often best for value, and reman is usually the cheapest upfront but varies most in rebuild quality.
However, the “best” choice depends on whether you prioritize long warranty coverage, lowest upfront spend, or maximum reliability for long-term ownership.
- OEM: highest price, best fitment consistency, often solid warranty terms through dealer channels
- Aftermarket new: mid-range pricing, wide availability, quality depends on brand tier
- Remanufactured: lowest upfront price, core return required, rebuild quality can vary
What’s the difference between a high-output alternator and a standard one in pricing?
A high-output alternator typically costs more because it uses heavier-duty internals to deliver higher amperage for accessories, audio systems, towing, or commercial electrical loads.
To move forward smartly, verify your vehicle’s factory amperage rating and avoid “upgrading” unless you truly need it—overpaying for output you won’t use is common.
- Standard output: sized for factory loads; most economical replacement
- High output: pricier; may require wiring upgrades if you push higher amperage
- Smart charging compatibility: some vehicles need alternators matched to ECU control strategy
Why do some alternators include a core charge, and how does it impact total cost?
A core charge is a refundable deposit that encourages returning the old alternator so it can be rebuilt; it raises the upfront bill but is credited back when the core is returned in acceptable condition.
Next, confirm whether your quote includes the core and how the refund works, especially if you’re sourcing the part yourself.
- Upfront total: part price + core charge
- Refund process: return old unit within the time window
- Core rejection risks: broken housing or missing critical parts may reduce refund
Diagnosis fee vs replacement cost: when should you pay for diagnosis first?
Yes, paying a diagnosis fee can save money when symptoms are ambiguous, because many “alternator problems” are actually battery issues, poor cable connections, blown fuses, or belt tension problems.
To connect this to your budget, diagnosis is most valuable when replacing the alternator based on guesswork would be expensive or time-consuming.
What symptoms are commonly mistaken for alternator failure?
Low voltage warnings, dim lights, slow cranking, and random electrical glitches can be caused by a weak battery or poor connections, not just a failing alternator.
Next, check for the simplest culprits first—battery age, corrosion, and belt condition—before committing to a major replacement.
- Battery issues: old battery, bad cells, or weak reserve capacity
- Connection issues: loose terminal clamps, corroded ground straps
- Belt/tension issues: slipping belt reduces alternator output
- Electrical load issues: aftermarket accessories drawing power
What tests should a good shop run before recommending replacement?
A good shop should test battery health, charging voltage under load, and circuit integrity, because replacing the alternator without verifying the system can leave the original problem unresolved.
To keep the flow, ask for printed results or recorded readings—clear documentation reduces “replace-by-default” upsells.
- Battery test: load test or conductance test
- Charging test: voltage and ripple checks
- Voltage drop tests: check power and ground path resistance
- Belt inspection: tension, cracks, glazing, pulley alignment
When is it reasonable to skip diagnosis and replace immediately?
It’s reasonable when the alternator has clear mechanical failure signs (burning smell, seized pulley, obvious bearing noise) or when output is measurably unstable and confirmed by quick testing.
After that, ensure the replacement includes a post-install verification so you’re not leaving with an unresolved charging issue.
- Mechanical clues: loud bearing growl, wobbling pulley, visible damage
- Electrical confirmation: low charging voltage under load or excessive ripple
- History: repeated dead batteries despite recent battery replacement
Labor cost breakdown and time: what are you really paying for?
Labor cost is the price of time and access: you pay for the technician’s hours (or flat-rate time), shop overhead, and the complexity of reaching the alternator safely without damaging nearby components.
Next, once you understand labor drivers, you can judge whether a quote is fair for your specific vehicle layout.
What determines alternator replacement labor time?
Labor time is driven by alternator location, required disassembly, belt routing complexity, and whether extra components need to be moved for clearance.
To connect this to cost, even a modest hourly rate becomes expensive if access requires removing shields, air intake assemblies, coolant hoses, or working from underneath.
- Top-access jobs: generally faster, fewer parts removed
- Side or bottom-access jobs: more lift time and safety steps
- Packaging density: modern engines may require moving multiple components
- Belt drive complexity: serpentine routing and tensioner access matters
Is flat-rate time fair, and how can you verify it?
Yes, flat-rate can be fair because it standardizes estimates, but it can overcharge on easy jobs and undercharge on very hard ones; the key is transparency about the quoted hours.
Next, ask the shop to show the labor hours and whether it includes belt removal, testing, and recheck.
- Ask for: quoted labor hours and the hourly rate
- Confirm: whether diagnostic and post-install tests are included
- Clarify: whether the quote includes belt/tensioner work if needed
How does location affect labor time and cost?
Labor rates vary widely by city, shop type, and local cost-of-living, so the same number of labor hours can yield a very different bill.
To keep your comparison clean, focus on total out-the-door pricing and warranty coverage rather than just the hourly rate.
- Dealer: typically higher labor rate, OEM parts, structured warranty policies
- Independent shop: often lower rate, more flexible part options
- Mobile mechanic: may reduce overhead but can be limited by access and testing equipment
Additional parts that affect cost: what should you replace “while you’re in there”?
Additional parts can be necessary when they contribute to alternator failure or prevent a proper installation; the most common are the serpentine belt, belt tensioner, idler pulley, and sometimes battery terminals or cables.
Next, replacing the right complementary parts can lower repeat labor and reduce the risk of premature alternator issues.
Should you replace the serpentine belt during alternator replacement?
Yes, often you should—especially if the belt is cracked, glazed, noisy, or old—because a slipping belt can reduce charging output and stress the new alternator.
To connect this, if the belt has to be removed anyway, replacing it now can be cheaper than paying labor again later.
- Replace if: cracks, fraying, glazing, squeal, unknown age
- Keep if: recently replaced and still in excellent condition
- Ask for: a quick visual and tension check before deciding
When do the tensioner and idler pulleys become “must replace” items?
They become must-replace when they’re noisy, rough, wobbling, or weak, because failing pulleys can cause belt slip and knock out charging performance even with a new alternator.
Next, ask for a quick spin test and listen for bearing noise—this is a simple check with big payoff.
- Replace if: chirping, grinding, wobble, inconsistent tension
- Cost logic: small parts can prevent repeat alternator or belt failures
- Access logic: if parts are in the same work zone, labor overlap favors replacing now
Do you need a new battery when the alternator fails?
Not always, but sometimes yes—because repeated deep discharges from a failing alternator can shorten battery life and reduce reserve capacity.
To keep the flow, a battery test after alternator replacement is the smart gatekeeper: replace the battery only if the test shows weakness.
- Replace if: battery fails load test or is near end-of-life and has been repeatedly drained
- Keep if: battery passes testing and charges normally
- Watch for: slow cranking and repeated low-voltage warnings even after repair
Hidden costs and common upsells: how do you avoid paying for extras you don’t need?
Yes, hidden costs happen, and you can avoid most of them by demanding itemized quotes, clarifying what tests are included, and asking why each add-on is necessary for your specific symptoms.
Next, once you recognize common upsells, you can approve only what protects reliability instead of what pads the invoice.
Which add-ons are often legitimate versus mostly optional?
Legitimate add-ons are those that directly affect charging stability and belt drive health, while optional ones are convenience services that don’t address the root cause.
To illustrate, a belt and tensioner replacement is legitimate when worn, but “premium electrical cleaning package” can be optional unless corrosion is severe.
- Often legitimate: belt/tensioner if worn, battery test, cable repair if voltage drop is high
- Sometimes legitimate: terminal replacement, ground strap service, fuse/relay replacement
- Often optional: generalized “engine bay detail,” vague “electrical service fees” without readings
What are the most common surprise charges, and how do you prevent them?
Common surprise charges include diagnostic fees added on top of promised “free checks,” shop supply fees that aren’t disclosed, and core charges that weren’t explained.
Next, prevent surprises by getting a written, out-the-door quote that lists parts, labor hours, taxes, and any refundable core charge.
- Diagnosis fee: confirm whether it’s waived if you proceed with repair
- Core charge: confirm refund timing and core eligibility
- Shop supplies: ask for the exact amount or percentage
- Recheck fee: confirm post-install verification is included
How can you compare quotes between shops without missing hidden costs?
Compare quotes by total out-the-door cost, included testing, alternator type, and warranty terms, because a “cheap” quote can become expensive once extras are added.
After that, use a consistent checklist so every shop is answering the same questions.
- What alternator type is quoted (OEM/new aftermarket/reman) and is there a core charge?
- How many labor hours and what rate?
- Is diagnosis included or separate, and is it waived if you approve the job?
- Is a battery/charging test included before and after installation?
- What warranty terms apply to parts and labor?
Dealer vs independent alternator pricing: which option is worth it?
Dealer pricing is often higher but can offer OEM parts and consistent warranty policies, while independent shops frequently provide better value and more part options if you choose a reputable brand and installer.
Next, the right choice depends on your priorities: OEM fitment confidence, budget, and how long you plan to keep the car.
When is the dealership the smarter choice?
The dealer can be smarter when your vehicle has complex smart-charging behavior, limited aftermarket availability, or when you want OEM-only parts with a clear warranty path.
To keep momentum, ask the dealer to specify whether the quote includes any software-related charging calibration if your model requires it.
- Best fit: newer vehicles, premium brands, smart charging systems
- Benefits: OEM parts, standardized process, dealer service records
- Tradeoff: higher labor rates and higher part prices
When is an independent shop the better value?
An independent shop is often better value when it has strong electrical diagnostics, transparent estimates, and offers quality aftermarket new alternators with solid warranties.
Next, confirm the shop’s testing process and warranty handling, because those two factors separate “cheap” from “good value.”
- Best fit: common vehicles with broad aftermarket support
- Benefits: competitive labor rates, flexible parts, faster scheduling
- Tradeoff: quality varies—choose shops with documented testing
How do warranties differ between dealer and independent shops?
Dealer warranties often align with OEM policies, while independent shops may combine a manufacturer part warranty with their own labor warranty, which can be great if clearly written.
After that, always ask what happens if the alternator fails: who pays labor, towing, and diagnostic time for the warranty claim?
- Ask: parts warranty length, labor warranty length, and claim procedure
- Confirm: whether labor is covered for warranty replacement
- Clarify: whether diagnostic confirmation is billed during a warranty claim
DIY alternator replacement cost: is it really cheaper?
Yes, DIY can be cheaper because you eliminate labor costs, but it’s only a true saving if you choose the correct part, have the right tools, and can verify charging performance afterward.
Next, the DIY decision should be based on risk: mistakes can lead to repeat work, damaged wiring, or misdiagnosis that wastes money.
What does DIY alternator replacement usually cost out of pocket?
DIY cost is typically the alternator part plus potential belt-related parts and tool needs, and you may also pay for a battery/charging test if you want confirmation after installation.
To illustrate, a reman alternator can lower the bill, but a quality new aftermarket unit may reduce the chance of doing the job twice.
- Core costs: alternator + possible core charge
- Common extras: serpentine belt, tensioner/idler if worn
- Tool needs: sockets, serpentine belt tool, torque wrench, multimeter
What are the biggest DIY risks that can erase your savings?
The biggest risks are misdiagnosis, damaging connectors, improper belt routing/tension, and skipping post-install verification, all of which can cause continued charging problems.
Next, reduce risk by taking photos before removal, labeling connectors, and checking voltage under load after install.
- Misdiagnosis: replacing alternator when the battery or wiring is the real issue
- Connector damage: brittle plugs and poor pin contact
- Belt errors: wrong routing or weak tensioner causing slip
- No verification: no proof the system charges correctly afterward
What’s the minimum verification you should do after DIY replacement?
At minimum, check resting battery voltage, charging voltage at idle, and charging stability under accessory load; this confirms the alternator and belt drive are performing.
After that, monitor for warning lights and unusual noise over the next few days to catch belt or pulley issues early.
- Engine off: confirm the battery isn’t already weak
- Engine on: confirm charging voltage rises and remains stable
- Loaded test: headlights + blower + defrost to confirm output stability
Warranty terms and what they cover: how do they change the real cost?
Warranty terms change the real cost because they determine whether you pay labor, towing, and diagnostics if the alternator fails again; a longer warranty isn’t valuable if it covers only the part and not the labor.
Next, treat warranty coverage as insurance against repeat labor, especially on vehicles where access is difficult and labor is expensive.
What should a good alternator warranty include?
A good warranty should be clear on part coverage, labor coverage, claim steps, and exclusions, because ambiguity is where “cheap” warranties fail in practice.
To connect this to your wallet, labor coverage matters most when the alternator is hard to access and labor time is high.
- Parts coverage: replacement unit provided if defect/failure
- Labor coverage: reimbursed labor for removal and re-installation
- Diagnostics policy: whether confirmation testing is covered
- Exclusions: electrical misuse, water intrusion, wiring faults, belt issues
How do reman warranties compare to new aftermarket and OEM warranties?
Reman warranties can be long on paper, aftermarket new varies by brand tier, and OEM warranties are often consistent but tied to dealer labor policies; the true difference is how claims are handled and what costs you still pay.
Next, ask a simple question: “If it fails, what will I owe out of pocket?”—that reveals the real warranty value.
- Reman: may offer long part warranty, but labor coverage varies widely
- Aftermarket new: brand-dependent; higher-quality brands often back products better
- OEM: consistent fitment; warranty processes often straightforward at dealers
What paperwork should you keep to protect your warranty claim?
Keep the invoice, part number, warranty statement, and proof of system testing, because many warranties require documentation that the alternator was installed correctly and the charging system was verified.
After that, store photos of the receipt and the alternator label so you can file a claim quickly if needed.
- Invoice: itemized parts and labor
- Warranty document: coverage length and conditions
- Test results: before/after charging readings if available
This table helps you compare typical alternator replacement cost components so you can see how parts, labor, and add-ons combine into the out-the-door number.
| Cost Component | What it Covers | Why It Changes | How to Control It |
|---|---|---|---|
| Alternator part | OEM/new aftermarket/reman unit | Vehicle output rating, brand, availability | Choose quality tier that matches ownership horizon |
| Labor | Removal/installation time | Access difficulty, flat-rate hours, local rates | Compare itemized hours and total out-the-door quote |
| Core charge | Refundable deposit for rebuildable core | Reman policies, retailer rules | Return core on time; confirm eligibility |
| Diagnostics/testing | Battery + charging verification | Shop policy, complexity of symptoms | Ask if fee is waived with repair |
| Add-on parts | Belt, tensioner, pulleys, terminals | Wear condition and access overlap | Approve only if worn or proven by test |
Contextual border: when “cost” becomes “value” and long-term ownership math
Now that you can estimate alternator replacement cost from parts, labor, and add-ons, the next step is turning cost into value by minimizing repeat labor, reducing failure risk, and aligning your choice with how long you’ll keep the vehicle.
To connect this shift, the cheapest invoice isn’t always the cheapest outcome—warranty terms, part quality, and correct diagnosis decide whether you pay once or twice.
How do you pick the best-cost alternator option for your ownership timeline?
Choose OEM if you want maximum fitment confidence and long-term reliability, choose quality aftermarket new for balanced value, and choose reman only when the rebuilder reputation and warranty handling are strong.
Next, match the part choice to how long you plan to keep the car and how expensive repeat labor would be on your model.
- Keeping 3+ years: prioritize reliability and labor coverage
- Selling soon: avoid overpaying for premium parts if not needed
- Hard-access vehicles: prioritize better parts and better warranty support
What questions stop hidden upsells before you approve the work?
Ask for proof-based recommendations: test readings, wear evidence, and what happens if you decline an add-on; this keeps the scope focused on what’s necessary.
After that, insist on an itemized quote that separates diagnosis from repair and lists the alternator type clearly.
- “What readings show the alternator is bad?”
- “Is the diagnosis fee applied to the repair if I proceed?”
- “Is the belt/tensioner worn—can you show me cracks/noise/weak tension?”
- “What exactly is covered if the alternator fails under warranty?”
How do you reduce repeat failures after replacement?
Reduce repeat failures by ensuring belt drive health, clean electrical connections, proper battery condition, and post-install charging verification under load.
Next, treat the alternator as part of a system: the best replacement still fails early if the belt slips or the battery keeps overloading the charging circuit.
- Belt system: replace worn belt/tensioner/pulleys that cause slip or noise
- Electrical integrity: confirm grounds and power connections are clean and tight
- Battery health: replace only if testing shows weakness
- Verification: confirm stable charging with accessories on
What’s the simplest way to get a fair quote quickly?
Get two or three itemized quotes that list alternator type, labor hours, included tests, and warranty terms; then compare out-the-door totals rather than just part price.
Tóm lại, a fair quote is clear, test-backed, and warranty-defined—those three traits protect you from paying more later.
- Must-have: alternator type + labor hours + total out-the-door number
- Should-have: pre/post charging test included
- Deal-breaker: unclear warranty or vague add-on fees
FAQ
Can you drive with a failing alternator, and does it change replacement cost?
Yes, sometimes you can drive briefly, but it can strand you and damage the battery; driving longer can increase cost indirectly by shortening battery life and creating a second repair bill.
Next, if you must drive, reduce electrical loads and head straight to testing rather than gambling on a full commute.
Should you replace the alternator proactively if it’s old but still working?
No, not usually, because alternator lifespan varies and proactive replacement can waste money; instead, test charging output and monitor for noise or voltage instability.
After that, proactive replacement only makes sense when failure risk is high and access is extremely labor-intensive.
Is a cheaper alternator always a bad idea?
No, but it can be risky if quality control is poor; the safest “cheap” choice is often a reputable aftermarket new unit with clear warranty handling, not an unknown-brand reman.
Next, weigh the cost of repeat labor—if labor is high, avoid bargain parts.
What should you do right after replacement to protect your investment?
Check charging voltage under load, confirm no belt slip or new noises, and ensure the battery charges fully; this prevents misdiagnosis and catches installation or belt issues early.
Như vậy, a verified charging system is the best “insurance” against repeat alternator replacement cost.


 5")


