How to Replace a Tie Rod End: Signs of Wear, Cost, and Steps to Restore Steering Control
Replacing a tie rod end is one of the most direct ways to restore safe, responsive steering to a vehicle that has developed looseness, vibration, or pulling in the front end. A tie rod end is the pivot component that connects your steering rack to the wheel’s steering knuckle, and when it wears out, the entire steering system loses the mechanical precision it depends on. The good news is that tie rod end replacement is a manageable repair — whether you choose to handle it yourself or bring it to a professional shop — and addressing it promptly prevents far more expensive damage downstream.
Before committing to a repair, it helps to understand exactly what failure looks like. Bad tie rod symptoms are often mistaken for wheel bearing problems or alignment issues alone, which is why recognizing the specific warning signs — clunking sounds during turns, uneven tire wear, and a steering wheel that shakes or drifts — is the first step toward an accurate diagnosis. These Car Symptoms tend to develop gradually, making it easy to dismiss them early until the problem becomes severe.
Cost is a common concern, and the Tie rod replacement cost estimate ranges widely depending on vehicle type, parts quality, and whether you factor in labor. For most mainstream vehicles, the total job including parts, labor, and the mandatory wheel alignment runs between $400 and $750. DIY-capable owners can reduce that figure significantly by handling the replacement themselves and only paying for the alignment at a shop.
Understanding the full scope of this repair — from the difference between inner and outer tie rod ends to the tools required, the risks of delaying the job, and what to inspect while you have the front end apart — gives you the confidence to make informed decisions about your vehicle’s suspension & steering system. With that foundation in place, here is everything you need to know.
What Is a Tie Rod End and What Does It Do in Your Steering System?
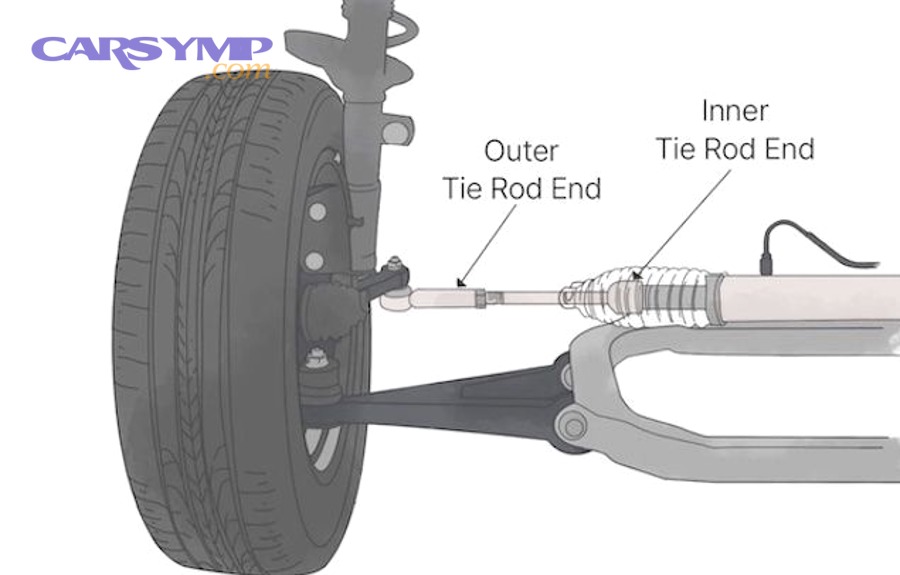
A tie rod end is a ball-joint style steering component that serves as the pivoting link between the steering rack and the steering knuckle, translating rotational steering input into precise lateral wheel movement.
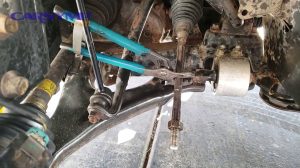
To better understand its role, it helps to trace the path of a steering input from start to finish. When you turn the steering wheel, that motion travels through the steering column into the steering rack, which converts rotational movement into lateral (side-to-side) force. That force then passes through the inner tie rod, across the adjuster sleeve, and into the outer tie rod end, which pushes or pulls the steering knuckle — and with it, the wheel — in the desired direction. Without a fully functioning tie rod end at each end of this chain, the connection between your steering input and your wheels becomes imprecise, delayed, or dangerously loose.
What Is the Difference Between an Inner and Outer Tie Rod End?
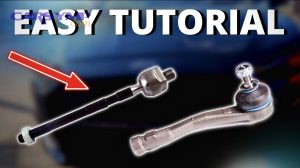
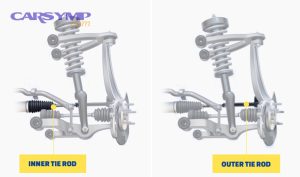
There are two distinct tie rod ends per side of the vehicle — the inner and the outer — and Inner vs outer tie rod differences matter significantly when it comes to diagnosis, replacement complexity, and tooling requirements.
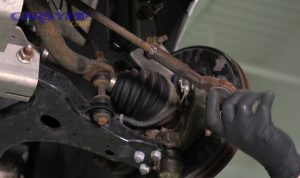
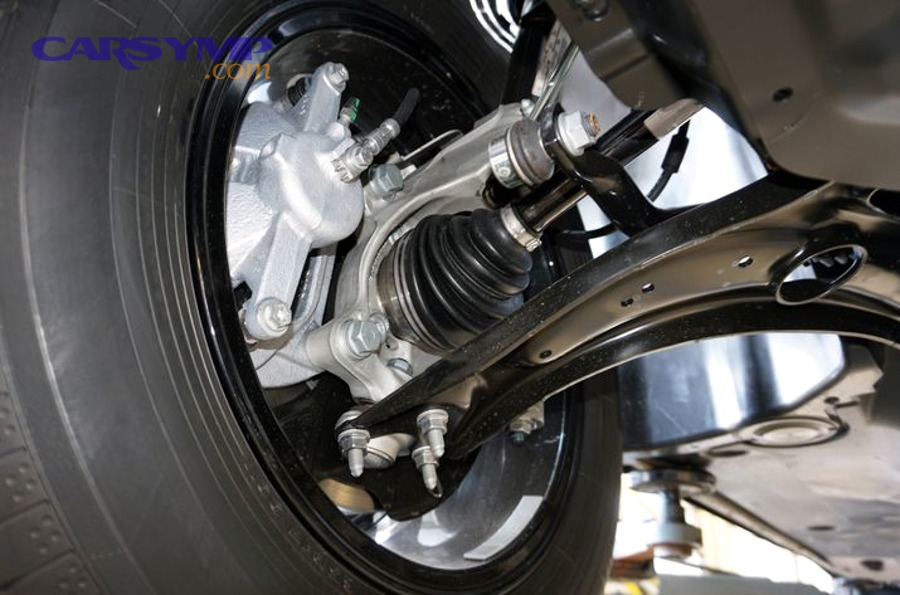
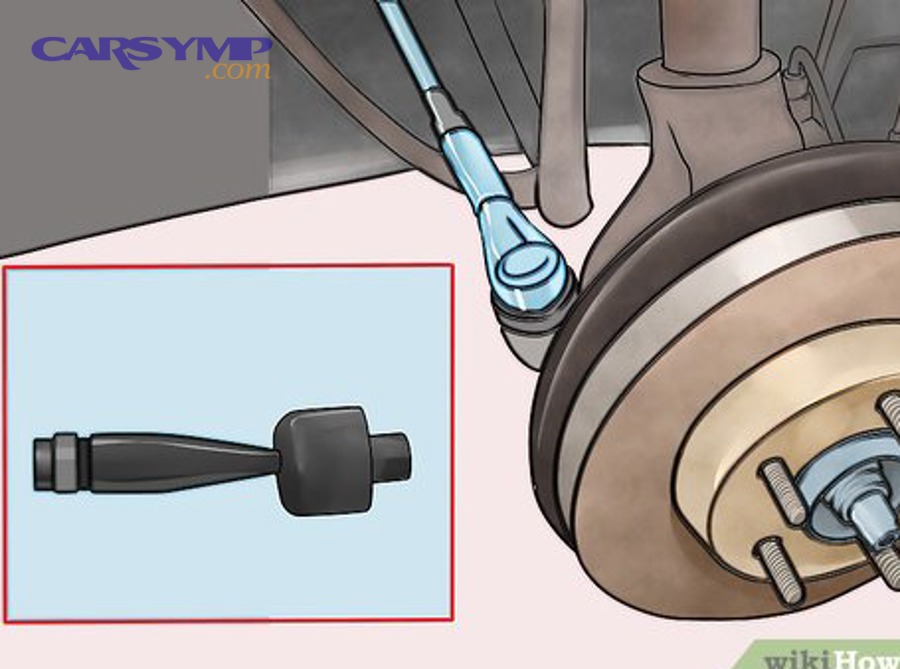
The outer tie rod end connects directly to the steering knuckle and is the more accessible of the two. It is the component most commonly replaced, and its ball socket is exposed to road debris and physical impacts from curb strikes. Failure of the outer tie rod end typically produces noticeable wheel play and vibration that can be felt directly through the steering wheel.
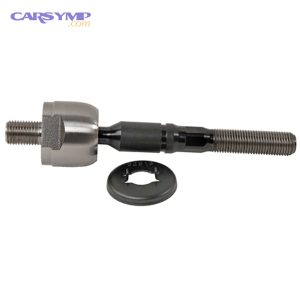
The inner tie rod end threads into the steering rack itself and sits beneath a rubber bellows boot, making it harder to inspect visually. Inner tie rod failure more often produces a general steering wander or imprecise tracking rather than the sharp, localized play associated with outer failure. Replacing an inner tie rod end requires a specialized inner tie rod removal tool that grips the flats of the inner rod body — a standard socket wrench alone is insufficient.
| Feature | Inner Tie Rod End | Outer Tie Rod End |
|---|---|---|
| Location | Inside rubber boot, at steering rack | At steering knuckle, externally accessible |
| Failure symptom | Steering wander, imprecision | Wheel play, vibration, clunking |
| Replacement difficulty | Moderate–High (requires special tool) | Moderate (standard tools sufficient) |
| DIY accessibility | Lower | Higher |
The table above summarizes the key differences between inner and outer tie rod ends across location, failure characteristics, and replacement complexity — useful for deciding which component to prioritize when diagnosing steering problems.
How Do Tie Rod Ends Connect to Your Vehicle’s Wheel Alignment?
Tie rod ends are directly responsible for controlling the toe angle of your front wheels — the measurement of how much each wheel points inward (toe-in) or outward (toe-out) relative to the vehicle’s centerline.
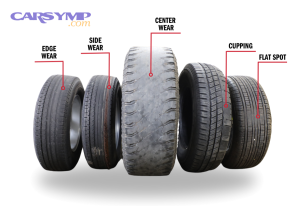
When a tie rod end wears and develops play in its ball socket, the wheel it controls can no longer hold a stable toe position. The result is a continuously shifting toe angle that produces feathered, sawtooth-pattern tread wear across the inner or outer edge of the tire. This is why Alignment required after tie rod replacement is not optional — it is a mechanical necessity. Even if the new tie rod end is threaded onto the adjuster sleeve at exactly the same position as the old one (by counting turns during removal), the precision of a proper four-wheel alignment machine is required to confirm that toe is within manufacturer specification. Skipping the alignment after replacing a tie rod end will result in rapid tire wear and continued steering pull.
What Are the Signs That Your Tie Rod End Needs to Be Replaced?
There are six primary warning signs that a tie rod end needs replacement, including clunking noises during turns, steering wheel vibration, uneven tire wear, pulling to one side, excessive steering play, and recurring alignment loss — all tied to Clunking and uneven tire wear diagnosis.
Recognizing these car symptoms early is critical because tie rod ends are safety-critical suspension & steering components. Specifically, a tie rod end that fails completely can allow a wheel to deflect fully to one side with no steering input, causing an immediate and catastrophic loss of vehicle control. The following sections break down the most diagnostically important symptoms in detail.
Is a Vibrating or Loose Steering Wheel a Sign of a Bad Tie Rod End?
Yes, a vibrating or loose steering wheel is a direct sign of a bad tie rod end, because a worn ball socket in the joint creates mechanical free play that transmits erratic movement back through the steering column to the wheel you are holding.
The most reliable self-diagnostic test for tie rod play is the 9-and-3 wheel shake test: raise the front of the vehicle until the tire clears the ground, place both hands at the 9 o’clock and 3 o’clock positions on the tire (not the steering wheel), and attempt to push and pull the tire side to side. A tire that moves sharply with a knock or clunk at the limit of its travel indicates a loose outer tie rod end. In contrast, vibration originating from an imbalanced wheel or warped brake rotor is felt primarily through the brake pedal or at specific speeds, and it does not produce lateral play at the tire.
Does Uneven Tire Wear Always Mean You Need a Tie Rod Replacement?
No, uneven tire wear does not always indicate a tie rod problem specifically, but worn tie rod ends are one of the most common root causes — particularly when the wear pattern appears as feathering or heavy wear concentrated on the inner or outer tread edge rather than across the full contact patch.
When a tie rod end wears out and loses its ability to hold a fixed toe angle, the affected tire scrubs laterally as it rolls forward. Over thousands of miles, this scrubbing behavior consumes tread from one edge disproportionately. Other causes of edge wear include incorrect tire inflation, excessive negative or positive camber, and worn control arm bushings — all of which should be ruled out during a full front-end inspection. However, when inner edge wear appears alongside steering looseness or a clunking sound, a worn tie rod end should be the first component suspected.
What Are All the Warning Signs of a Failing Tie Rod End?
There are six key warning signs of a failing tie rod end, spanning auditory, tactile, and visual symptoms that together point clearly to suspension & steering degradation.
- Clunking or popping noise when turning or hitting bumps — the most immediately recognizable symptom; caused by the worn ball socket knocking against its housing under load
- Steering wheel pulling to one side — indicates the affected wheel’s toe angle has shifted and is generating drag in one direction
- Excessive play or looseness in the steering wheel — free play of more than 1–2 inches at the rim of the steering wheel is abnormal and often tie-rod-related
- Steering wheel vibration or shimmy at highway speeds — loose front-end components amplify wheel imbalance and road imperfections into felt vibration
- Front-end misalignment returning shortly after an alignment service — if your vehicle pulls or drifts within weeks of a fresh alignment, a loose tie rod is likely the mechanical cause of the recurrence
- Vehicle drifting with hands removed from the steering wheel — a normally aligned vehicle should track straight; consistent drift indicates a toe problem driven by worn tie rod ends
How Much Does Tie Rod End Replacement Cost?
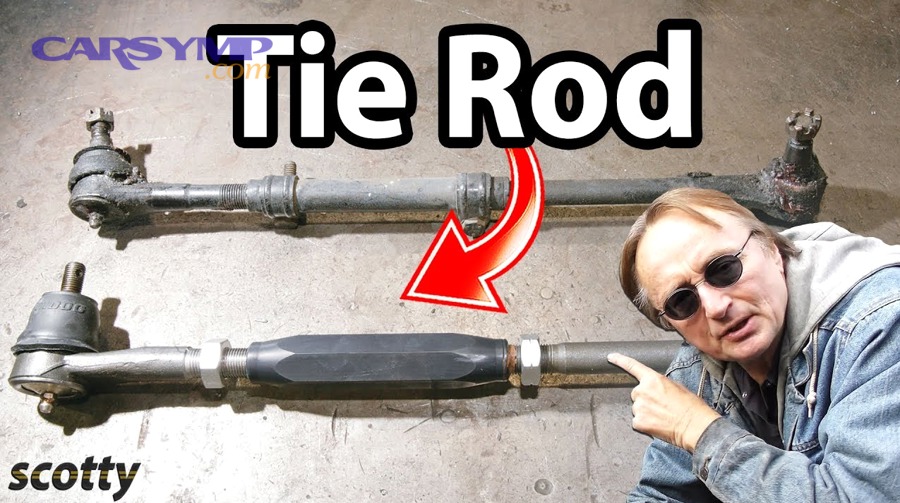
Tie rod end replacement costs between $400 and $750 total for most mainstream vehicles when parts, labor, and the required wheel alignment are all included — making it one of the lower-cost steering repairs relative to its safety impact.
Understanding how that total breaks down helps you evaluate shop quotes accurately and decide whether a DIY approach is financially worthwhile. Below, the parts and labor components are addressed separately, followed by guidance on whether to replace one or both sides at once.
How Much Do Tie Rod End Parts Cost on Their Own?
Tie rod end parts for a mainstream passenger vehicle typically cost between $20 and $120 per side, depending on whether you are replacing the inner end, the outer end, or both — and on the brand and quality tier you select.
- Outer tie rod ends: $20–$100 per side for most domestic and Japanese vehicles; $60–$150 for European or luxury models
- Inner tie rod ends: $30–$120 per side; prices vary more due to vehicle-specific rack thread designs
- OEM parts carry a price premium (often 30–60% above aftermarket) but guarantee exact fit and factory-specification materials
- Aftermarket brands such as Moog, Delphi, and ACDelco Gold are trusted by ASE-certified mechanics and often match or exceed OEM durability; parts with a grease fitting are particularly valued because they allow periodic re-lubrication, extending joint life significantly
For vehicles with higher mileage or those used in harsh climates where corrosion accelerates wear, spending slightly more on a premium aftermarket part with a grease zerk fitting is a worthwhile investment in Tie rod replacement labor time savings later.
How Much Does Labor Cost for a Tie Rod End Replacement?
Labor for tie rod end replacement typically ranges from $75 to $200 per side, depending on the shop’s hourly rate, the accessibility of the components on your specific vehicle, and whether an inner or outer end is being replaced.
The total job — combining parts and labor for both sides plus a four-wheel alignment — lands between $400 and $750 for most mainstream cars and light trucks, as confirmed by automotive experts at Car Talk. Luxury vehicles, European makes, or trucks with heavily corroded hardware can push that figure higher. For DIY-capable owners, eliminating the labor charge reduces the total cost to parts ($50–$200 depending on vehicle) plus the alignment service ($100–$130 at most independent shops), making the total DIY cost roughly $150–$330 — a savings of $200–$400 on a typical job. The tie rod replacement labor time for a professional mechanic on a straightforward vehicle is generally one to two hours per side.
Should You Replace Both Tie Rod Ends at the Same Time?
Yes, you should replace both tie rod ends — and ideally both the inner and outer on the affected side — at the same time, because the components on both sides of the vehicle experience identical road conditions and load cycles, meaning comparable wear levels on one side almost certainly indicate similar deterioration on the other.
Replacing only one side and leaving a marginally worn opposite tie rod end in place creates a predictable pattern: the second side fails within months, requiring a second alignment and a second labor charge. Mechanics experienced in suspension & steering repair consistently recommend doing both sides in a single visit to avoid this outcome. The additional parts cost for the second side is modest, and the alignment is performed only once rather than twice.
How Do You Replace a Tie Rod End Step by Step?
DIY tie rod replacement steps and tools can be summarized as: raise and support the vehicle, remove the wheel, separate and count the old tie rod end off the sleeve, install the new end at the same thread depth, torque to specification, and drive immediately to an alignment shop — a process typically completed in one to two hours.
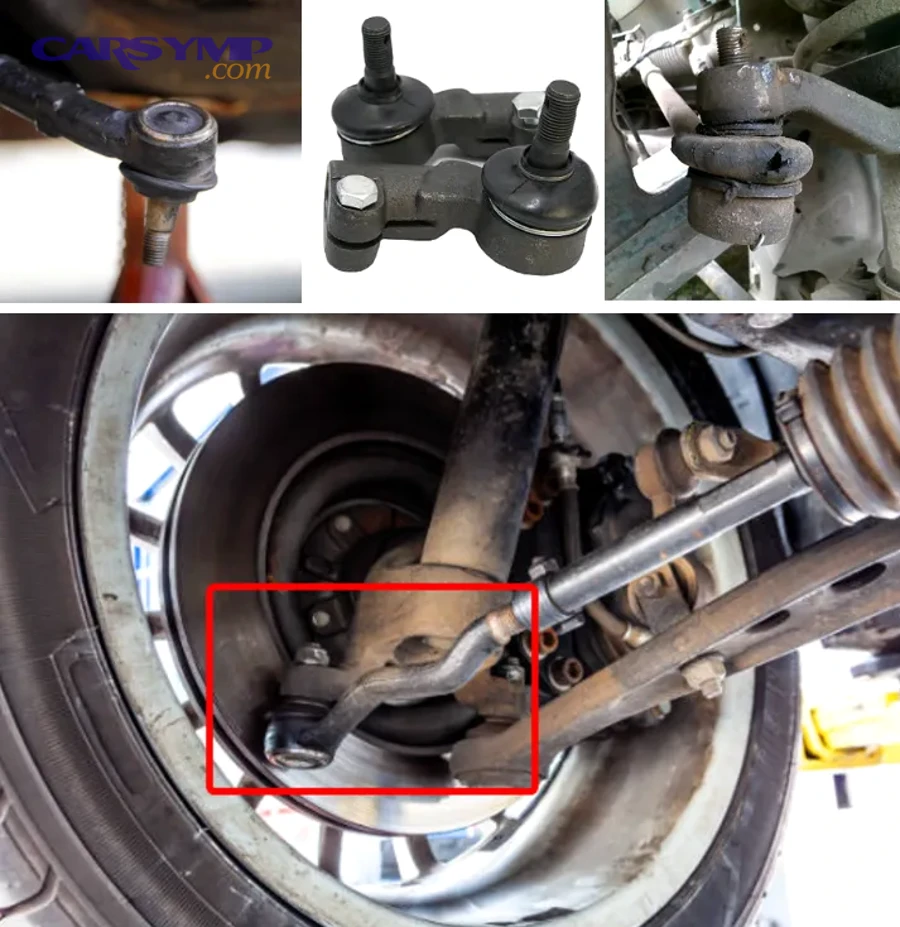
Before beginning, confirm you have all required tools on hand. Attempting this job without a proper tie rod end separator, for example, risks damaging the steering knuckle taper and adding a costly unplanned repair to the job.
What Tools Do You Need to Replace a Tie Rod End?
DIY tie rod replacement steps and tools begin with assembling the right equipment before the vehicle is ever lifted. Attempting the job with improvised tools dramatically increases the risk of injury and component damage.
Required tools:
- Floor jack and jack stands — minimum two jack stands; never work under a vehicle supported only by a floor jack
- Tie rod end puller / ball joint separator — a fork-type or scissor-type separator for removing the tapered stud from the steering knuckle
- Torque wrench — for tightening the castle or lock nut to manufacturer specification (typically 35–55 ft-lb for outer tie rod ends, varies by vehicle)
- Box-end wrenches and socket set — for the lock nut, lug nuts, and adjuster sleeve clamp bolts
- Inner tie rod removal tool — a crow’s foot or specialized socket tool if replacing the inner tie rod end
- Rust penetrant spray — applied to the castle nut, adjuster sleeve clamp bolts, and tapered stud before attempting removal; Seized jam nut removal tips universally start with soaking the hardware in penetrant for 10–15 minutes
- Brake cleaner — for degreasing the adjuster sleeve before inspection and reassembly
- Marker or tape — for marking the adjuster sleeve or counting turns during removal to preserve approximate toe setting
- Grease — if the replacement tie rod end has a grease fitting, pack the joint with fresh grease before installation
How Do You Remove the Old Tie Rod End Safely?
Removing the old tie rod end safely requires sequential steps that respect the hardware’s likely corrosion and the mechanical sensitivity of the tapered stud-to-knuckle interface.
- Lift the vehicle and remove the wheel — locate the manufacturer-specified jacking points; never place jack stands on soft ground, asphalt, or cinder blocks
- Apply rust penetrant — spray the castle nut or lock nut, the adjuster sleeve clamp bolts, and the base of the tapered stud; allow 10–15 minutes of soak time; for severely seized jam nut removal tips, a second application or careful use of an inductive heat tool on the nut (not the stud) can break corrosion loose
- Loosen and remove the nut — use a box-end wrench for maximum leverage; on castle nuts, remove the cotter pin first; do not use an impact wrench here as it can spin the taper and damage the knuckle bore
- Separate the taper — insert the tie rod separator between the tie rod end and the knuckle and apply force until the taper releases with a pop; do NOT hammer directly on the knuckle or the threaded stud
- Count and record turns — as you unthread the tie rod end from the adjuster sleeve, count every full rotation and record the number; this count is your baseline for installing the new end at approximately the same depth, preserving the toe setting enough to drive safely to the alignment shop
- Inspect the adjuster sleeve — check for visible rust, cracking, or damaged threads; replace the sleeve if it shows significant corrosion, as a seized sleeve will make future adjustments impossible
How Do You Install the New Tie Rod End Correctly?
Installing the new tie rod end correctly means threading it onto the adjuster sleeve at the exact turn count recorded during removal, fully seating the taper in the steering knuckle before tightening, and torquing the nut to the vehicle manufacturer’s specification.
- Thread the new end onto the sleeve using the recorded turn count — thread it in the same direction as the original (note that adjuster sleeves have one right-hand and one left-hand threaded end; confirm direction before starting)
- Insert the tapered stud into the steering knuckle — push the taper fully into its bore by hand before tightening the nut; the taper must seat completely before torque is applied
- Tighten the nut with a ratchet or torque wrench — never use an impact wrench, which can cause the taper to spin in its bore and gall the knuckle; if the stud spins, hold it stationary with a hex key through the stud end while tightening the nut
- Install cotter pin — if the vehicle uses a castle nut, a new cotter pin must be installed after torquing; do not reuse the old one
- Grease the joint — if the replacement has a grease fitting, inject grease until it just begins to emerge from the boot seal
- Reinstall the wheel and torque lug nuts to specification in a star pattern
- Drive directly to the alignment shop — do not resume normal driving until a proper four-wheel alignment confirms the toe angles are within specification; alignment required after tie rod replacement is non-negotiable for tire life and steering accuracy
Is It Safe to Drive With a Bad Tie Rod End?
No, it is not safe to drive with a bad tie rod end, because a tie rod end that has worn beyond its serviceable limit can fail completely without warning, producing an immediate and total loss of directional steering control.
The catastrophic failure scenario is not theoretical — a fully failed outer tie rod end allows the affected wheel to pivot freely to one side under road forces, causing the vehicle to swerve sharply and, in most cases, come to a sudden uncontrolled stop. At highway speeds, this scenario is life-threatening. Even in the more common case of a “worn but not yet failed” tie rod end, the daily cost of continued driving includes accelerating tire wear, progressive misalignment, and increasing steering imprecision that reduces the driver’s ability to respond quickly in emergency maneuvers. Preventing tie rod wear through periodic inspections and addressing early symptoms immediately is far less costly — financially and in terms of safety — than managing the consequences of a complete failure. If a mechanic or inspection reveals a bad tie rod end, the recommended approach is to tow the vehicle to the shop or, if the damage is early-stage, drive it only at low speed on a direct route to the repair facility.
What Else Should You Know Before Replacing Your Tie Rod End?
There are four critical considerations beyond the basic replacement steps that affect parts selection, system compatibility, and whether adjacent components should be addressed simultaneously — all of which influence the long-term outcome of the repair.

Having replaced the tie rod end itself, the decisions that follow — which brand to buy, whether the steering system type changes the procedure, whether the boot needs replacement, and what else to inspect while the front end is already apart — determine whether the repair delivers lasting results or creates a follow-up job within months.
OEM vs. Aftermarket Tie Rod Ends: Which Should You Choose?
OEM wins in guaranteed fitment precision, aftermarket brands like Moog and Delphi are best for value and long-term durability, and grease-fitting variants are optimal for owners who want maximum joint life through periodic maintenance.
The comparison is nuanced. OEM parts are sourced from the same supply chain as the original component and require no fitment verification, but they carry a price premium of 30–60% over equivalent aftermarket options. Quality aftermarket manufacturers such as Moog, Delphi, and ACDelco have invested in fatigue testing and corrosion-resistant coatings — Delphi, for example, applies a cataphoretic (e-coat) finish to its tie rod ends for superior rust protection in high-moisture environments. The single most practically valuable feature to prioritize regardless of brand is a grease fitting (zerk fitting): it allows the ball socket to be repacked with fresh grease periodically, which dramatically slows wear and extends joint life well beyond that of a sealed, non-serviceable unit. According to ASE-certified mechanics interviewed by Car Talk, if a replacement part is available with a grease fitting, that version is almost always the preferred choice.
How Does Tie Rod End Replacement Differ on Rack-and-Pinion vs. Recirculating Ball Steering?
Rack-and-pinion systems are best for modern cars where the inner tie rod threads directly onto the rack, while recirculating ball steering — found on older trucks and body-on-frame SUVs — requires a different approach involving a drag link, idler arm, and in some cases a pitman arm puller in addition to a standard tie rod separator.
On a rack-and-pinion system, the inner tie rod screws into the end of the steering rack housing. Removing it requires an inner tie rod removal tool that grips the wrench flats on the inner rod body, because standard sockets cannot reach inside the bellows boot. This is the dominant system on passenger cars manufactured after the mid-1980s.
On a recirculating ball system (common on older full-size trucks, Jeep models, and large SUVs), the steering linkage uses a center link, idler arm, and drag link rather than a direct rack. Tie rod ends in this system thread into the drag link and steering arms rather than a rack, and the geometry of the system means that toe adjustment may require modifying the drag link length rather than the tie rod sleeve. Alignment procedure also differs slightly, as technicians must account for the additional linkage components when setting toe.
Should You Replace the Tie Rod Boot at the Same Time?
Yes, you should replace the tie rod boot at the same time as the tie rod end if the boot shows any cracking, splitting, or grease loss, because the labor required to replace the boot is nearly identical to the labor already performed during a tie rod end replacement — making it a highly cost-efficient add-on.
The tie rod boot (also called a bellows boot or dust boot on the inner tie rod) serves a critical protective function: it seals fresh grease around the ball socket and prevents road grime, moisture, and abrasive particles from entering the joint. A cracked or split boot allows grease to escape and debris to enter, converting a well-lubricated joint into a grinding, accelerated-wear scenario. Catching a damaged boot before the joint itself fails and combining the boot replacement with the tie rod end job eliminates a separate labor charge that would otherwise be nearly as large as the original repair.
What Other Steering and Suspension Parts Should Be Inspected During a Tie Rod Replacement?
There are five adjacent components that should be inspected whenever a vehicle is raised and the front wheels are removed for a tie rod end replacement — addressing worn items now eliminates duplicate labor costs and prevents a second unplanned repair visit within months.
- Ball joints: They share identical wear conditions with tie rod ends — road impacts, moisture, and load cycles — and produce overlapping symptoms including clunking and steering imprecision; inspect for play using the same jack-and-shake method used to check tie rod play safely
- Control arm bushings: Worn rubber or polyurethane bushings amplify the steering instability caused by a new tie rod end and will cause the vehicle to handle poorly even after a perfect alignment; visually inspect for cracking, separation, or visible bushing collapse
- Sway bar end links: These components attach the sway bar to the control arm and produce clunking symptoms nearly identical to those of a worn tie rod end; replace if there is visible looseness or cracked rubber bushings at the attachment points
- Wheel bearings: With the wheel off and the vehicle raised, spin the hub by hand and listen for grinding, and check for radial play by grasping the tire at 12 and 6 o’clock and attempting to rock it; a failing bearing caught during a tie rod job avoids a third separate front-end repair
- Steering rack boots: Inspect the rubber boots at both ends of the steering rack for cracks, tears, or evidence of power steering fluid accumulation; a torn rack boot accelerates internal rack wear and, left unaddressed, leads to a full rack replacement — one of the most expensive steering repairs on any vehicle
Addressing these components during the same service visit, when the vehicle is already raised and the wheel is already removed, reduces total labor time significantly compared to scheduling each repair separately. It is the most efficient approach to restoring the full integrity of the suspension & steering system in a single session.