


If you’re searching for control arm replacement labor time, you want one thing: a reliable way to estimate flat-rate hours (book time) for your specific vehicle so you can judge how long the job should be billed and whether a quote makes sense.
Then, you also want to know what “normal” looks like—typical labor-hour ranges for front vs rear, upper vs lower, and one side vs both sides—so you can sanity-check your expectations before you call a shop or start wrenching.
Next, you want to understand why labor time varies so widely: rust, seized hardware, suspension design, and whether the part is a complete arm or requires pressing bushings can change the hours dramatically—sometimes more than the part price itself.
Introduce a new idea: once you can estimate hours with confidence, you can translate those hours into dollars and compare quotes line-by-line without guessing.
What does “control arm replacement labor time” mean in flat-rate hours?
Control arm replacement labor time is the flat-rate (book time) estimate—measured in billable hours—that a labor guide or shop uses to price the remove-and-replace work, regardless of the real clock time.
More importantly, that definition becomes useful only when you know what’s included—and what’s usually excluded—so you can compare quotes correctly.
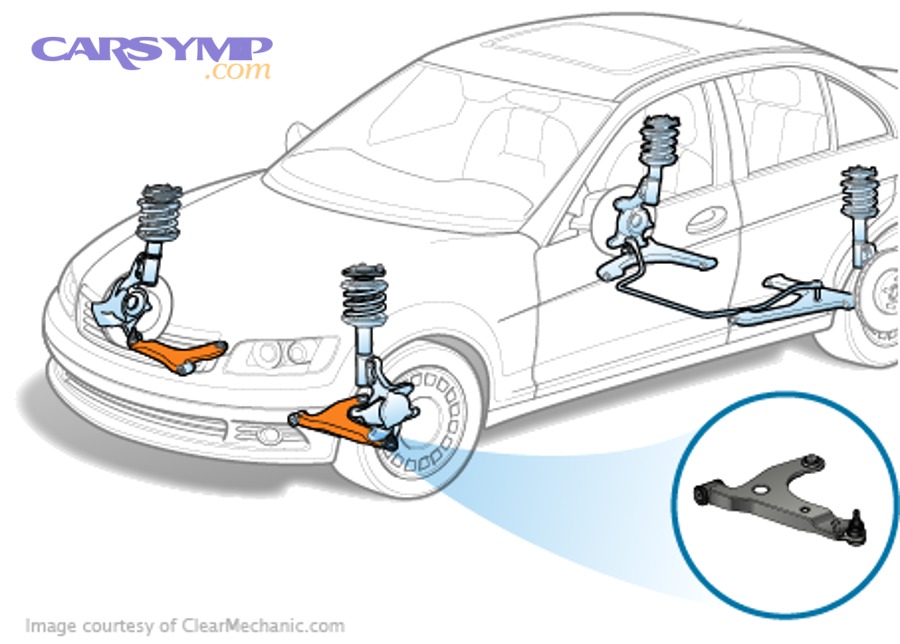
In practice, flat-rate hours are a standardized way to bill work: the job has an expected time, and billing often follows that number even if a technician finishes faster or slower. Many people call flat rate “book time,” and the concept is widely used in automotive service pricing.
When you see “control arm labor time,” assume it refers to the time to:
- raise/support the vehicle, remove wheel
- disconnect the arm from the knuckle and chassis mounts
- install the new arm (or arm assembly)
- torque fasteners correctly (often at ride height for bushing-friendly designs)
- reassemble and road-check
What it doesn’t automatically mean is “the entire suspension refresh” or “alignment included.” That difference matters because two estimates can look far apart while actually covering different line items.
Is flat-rate time the same as how long the job takes in real life?
No, flat-rate hours are a billing benchmark, not a stopwatch, because efficiency, equipment, and complications (like corrosion) can make real time shorter or longer even when the billed hours stay the same.
However, that gap is exactly why learning the “why” behind the hours helps you predict what a fair quote looks like.
Here’s how to think about it as a car owner or DIYer:
- Flat-rate hours = pricing baseline. A shop may quote using a labor guide plus local experience.
- Clock time = what actually happens today. Rust, stuck hardware, and access issues can turn a “simple” job into a long one.
- Your goal = compare like-with-like. If Shop A quotes 1.6 hours plus alignment and Shop B quotes 2.2 hours without alignment, the “cheaper” quote might not be cheaper.
A quick reality check: even “typical” estimates you’ll see online vary by context—some sources suggest around 1.0–1.5 hours for a generic control arm replacement, while some vehicle-specific how-tos cite higher per-side times for certain platforms. (jerry.ai)
Does “labor time” usually include an alignment?
No, control arm labor time usually does not include alignment because alignment is commonly billed as a separate operation, and replacing suspension parts often changes alignment settings enough to justify that extra service.
In other words, alignment is frequently the next line item you should expect to see.
A plain-English rule: if you remove and reinstall components that define wheel position, you should plan for alignment afterward, even if the shop doesn’t bundle it. A commonly cited recommendation in automotive Q&A is that major front suspension work warrants alignment to avoid tire wear. (mechanics.stackexchange.com)
Why this matters for labor-time estimates:
- A quote might show “control arm replacement labor time” and then add “four-wheel alignment.”
- Another quote might include alignment in a package price (but still usually tracks the labor operations internally).
- DIYers often skip alignment “for now,” then pay for tires later—especially if toe changes.
How many labor hours does a control arm replacement usually take?
There are 4 common labor-time groupings for control arm replacement—front lower, front upper, rear arms, and “both sides”—based on location and suspension complexity, and most vehicles fall into predictable hour ranges within those groups.
To make those ranges usable, you want them framed the same way shops frame them: per side, per axle, and with alignment clearly separated.
Before the details, here’s the context for the table below: it summarizes typical billed labor-hour ranges you’ll see discussed across general estimates, forum/shop conversations, and some vehicle-specific guidance. These are not guarantees—your exact “book time” depends on year/make/model, rust, and whether the arm is complete.
Typical labor-time ranges for control arm replacement scenarios
| Scenario (typical) | Typical billed labor-time range (hours) | Why it lands there |
|---|---|---|
| Front lower control arm (per side) | ~1.0–2.5 | Access, cam bolts, ball joint separation, subframe clearance |
| Front upper control arm (per side) | ~1.0–2.5 | Often easier on some designs; harder on others (tight packaging) |
| Both front sides (pair) | ~2.0–4.5+ | Shared setup time; but rust can erase savings |
| Vehicle-specific outliers | ~3.0–4.5 per side (some models) | Complex layouts, corrosion, special procedures (jerry.ai) |
The most important takeaway: labor time is “shaped” by the vehicle and the hardware, not just the part.
How many hours for a front lower control arm per side vs both sides?
Replacing one front lower control arm wins for lowest total hours, replacing both sides wins for best efficiency per arm, and doing both sides is optimal when the suspension is symmetrical and hardware cooperates.
However, that efficiency only holds when the job doesn’t get derailed by seized fasteners.
Here’s how shops and experienced DIYers typically reason about it:
- Per side (one arm): you pay for setup once and complete one side—good when only one side is bad or budget is tight.
- Both sides (pair): you often save time on repeated steps (lifting, wheel removal, tool setup), and you reduce the chance of uneven handling from mismatched wear.
- Rust penalty: if one cam bolt is seized, the “both sides” advantage may disappear because you spend extra time on removal and cleanup.
You’ll commonly see community estimates around ~1.5 hours per side in routine cases, but the realistic range expands quickly with rust or complicated suspension geometry. (reddit.com)
How many hours for upper vs lower control arms?
Upper control arms win for easier access on many vehicles, lower control arms are best for addressing load-bearing bushing wear, and lower arms are often the time-driver when they use cam bolts or require more disassembly.
Still, the “upper vs lower” time difference is vehicle-dependent, so the smart move is to estimate by design, not by label.
What changes the hour count most:
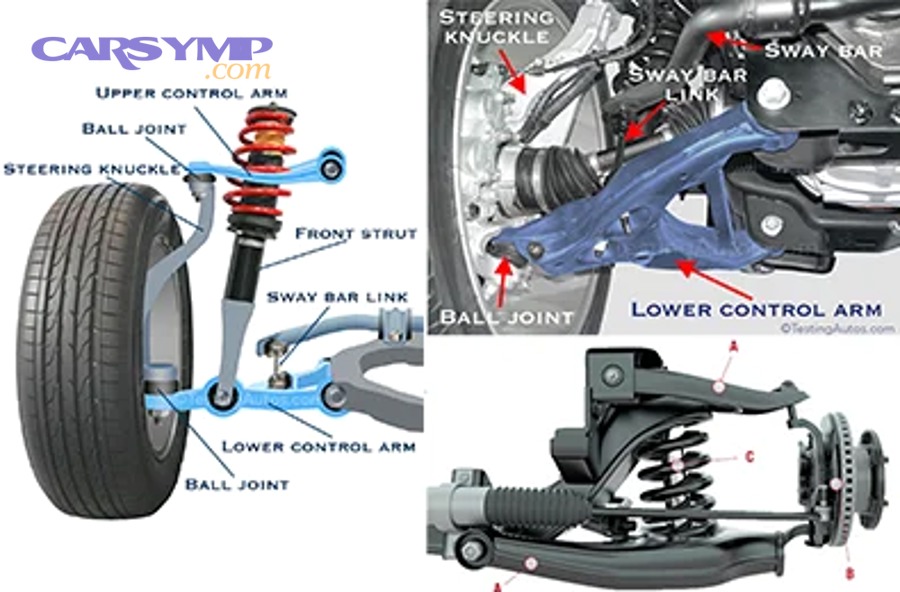
- Connection points: Lower arms often connect to the subframe and carry alignment-adjustment hardware (like eccentrics/cam bolts).
- Ball joint style: If the ball joint is integrated and the arm is replaced as a unit, labor can be simpler than pressing a joint.
- Clearance: Some vehicles require moving skid plates, braces, or underbody panels.
If you’re getting symptoms like noise or unstable tracking, remember that control arms aren’t the only culprit—tie rods, sway links, and struts can mimic the same feel. (That’s why “Clunking and wandering steering causes” is a useful diagnostic phrase to keep in mind when you’re deciding whether to replace one part or refresh multiple.) (repairpal.com)
How many hours for rear control arms (trailing/toe/camber arms) compared to front?
Front control arms win for predictability, rear control arms are best for correcting rear-end stability issues, and rear multi-link arms are optimal for precise geometry but can take longer when alignment eccentrics and tight packaging are involved.
Meanwhile, rear work often forces a more careful alignment plan because rear toe changes can affect straight-line tracking.
Rear “control arm” is a broad label. Many vehicles have multiple rear links (toe arm, camber arm, trailing arm). Labor time shifts because:
- Hardware is smaller but more corrosion-prone in some climates.
- Eccentric bolts for alignment can seize in bushings.
- Access can be awkward around exhaust routing or subframe members.
If your goal is to estimate labor time, treat rear arms as “multiple smaller operations” rather than one big front-style arm swap.
How do you calculate your specific control arm labor time by vehicle and setup?
Use a vehicle-specific estimation method in 5 steps—identify the exact arm, identify suspension design, determine hardware risk, choose part type (complete vs press work), and decide whether alignment is separate—to predict realistic flat-rate hours and avoid surprise add-ons.
Then, the estimate becomes actionable because it matches how a shop actually builds a quote.
Here’s the key idea: you don’t need a paid labor database to make a solid estimate. You need the right inputs and a way to adjust for known time multipliers.
What details do you need before estimating labor hours (year/make/model, side, arm type)?
You need 6 details to estimate accurately: year/make/model, front or rear, upper or lower (or which rear link), left or right, drivetrain/suspension type, and whether the part is an assembly—because each detail changes the book-time baseline and the probability of complications.
To better understand why, consider how each detail changes the work plan.
Use this checklist before you ask for quotes:
- Vehicle identifiers: year, make, model, trim (or VIN if you’re calling a shop).
- Location: front/rear + left/right + upper/lower (or toe/camber/trailing link in the rear).
- Suspension type: MacPherson strut, double-wishbone, multi-link, truck SLA, etc.
- Drivetrain & packaging: AWD components, skid plates, underbody aero panels.
- Condition: rust-belt exposure, prior suspension work, visible corrosion.
- Parts plan: full arm assembly (with bushings/ball joint) vs reusing/pressing components.
If you’re doing control arm replacement yourself, these details also determine what tools you’ll need and whether you should budget extra time for stuck fasteners. (repairpal.com)
Which replacement method changes labor time the most: complete arm vs bushing/ball joint only?
Complete control arm assemblies win for speed, bushing-only repairs are best for saving parts cost when you have tools, and ball-joint/bushing pressing is optimal only when labor access is easy and the press work is straightforward.
However, most DIYers underestimate how much time press work adds—and many shops price it accordingly.
Why assemblies are often faster:
- Assembly swap: unbolt old arm, bolt in new arm—minimal bench work.
- Press work: remove arm, press bushings/ball joint in/out, verify orientation, reinstall—extra steps, extra risk.
This is also where quotes diverge. One shop might quote “control arm assembly replacement,” another might quote “control arm bushing replacement.” Those are not the same job even if the symptom is the same.
What tools or constraints can add labor hours (press, torch, air hammer, lift)?
Three tool/constraint categories add the most labor hours: (1) seized fasteners requiring heat/penetrant, (2) press work for bushings/ball joints, and (3) access constraints that force partial disassembly—because each category introduces steps you can’t shortcut safely.
More specifically, the biggest time jump usually comes from hardware that refuses to move.
Common hour-adders:
- Press requirement: You need a shop press or specialty tool for some bushings.
- Heat cycles: Torch or induction heater time, plus cooling/quenching steps.
- Extraction tools: bolt extractors, cut-off wheels, drills—used when bolts snap or seize.
- Lift vs jack stands: A lift speeds access, but good stands still work with extra repositioning time.
If you anticipate corrosion, build your estimate around Rusted bolt removal tips rather than around the best-case scenario—because rust is the #1 reason a normal job turns into an all-day job.
What factors increase or decrease control arm labor time?
Yes—control arm replacement labor time can increase significantly because rust, suspension design complexity, and parts/fitment choices are the three biggest drivers of extra labor hours.
Besides, knowing these drivers lets you predict when a quote that looks “high” is actually reasonable.
Think of labor time like a baseline plus multipliers:
- Baseline: what a clean, familiar vehicle typically takes.
- Multipliers: what turns bolts into battles, and simple swaps into multi-step procedures.
Does rust or a seized cam bolt add significant labor time?
Yes, rust or a seized cam bolt adds significant labor time because it can require penetrant soak time, heat cycles, cutting, or bolt replacement—each of which adds steps and risk that labor guides can’t fully predict.
More importantly, seized alignment hardware can create secondary repairs (like replacing cam bolts or bushings) that aren’t in the original plan.
Here’s why cam bolts are notorious:
- They pass through bushings and sleeves where corrosion bonds metal-to-metal.
- They’re often tied to alignment adjustment, so damage affects alignment capability.
- Cutting them out can require freeing space, protecting surrounding components, and cleaning mounting holes.

A practical workflow many mechanics recommend is penetrating oil → correct socket contact → controlled force → heat if needed, with safety precautions (especially around rubber bushings and flammable penetrants). General industrial maintenance guidance also emphasizes giving penetrants time to work rather than rushing.
Is AWD or a more complex suspension design associated with higher labor hours?
Yes, complex suspension designs and some AWD packaging are associated with higher labor hours because they reduce access, add components to move, and increase alignment sensitivity—so the same “control arm” swap may require more disassembly and more careful torque sequencing.
However, “AWD” itself isn’t the point—the point is what AWD packaging does to space and procedure.
Examples of complexity multipliers:
- Multi-link layouts: more links near the same space can block tool access.
- Subframe clearance: some vehicles require loosening a subframe brace or shifting components.
- Underbody panels: modern aero shields add removal steps.
- Tighter tolerances: geometry changes can feel more obvious in steering behavior afterward.
So when you estimate, don’t ask only “is it AWD?” Ask: “Will I have to remove extra parts to get the arm out cleanly?”
Do aftermarket parts reduce or increase labor time compared to OEM?
OEM parts win for consistent fit, high-quality aftermarket assemblies are best for cost-per-mile, and budget aftermarket parts can increase labor time when fitment or hardware differs—because installers may spend extra time aligning holes, chasing threads, or reworking mounts.
In addition, labor time can rise when aftermarket parts don’t include bushings/ball joints pre-installed or when their geometry changes alignment targets.
What to watch for in the parts box:
- Included hardware: new nuts/bolts can save time if originals are corroded.
- Assembly completeness: bushings and ball joint installed vs not.
- Fit consistency: small differences can create big frustration.
- Lifted/off-road setups: aftermarket UCAs may require extra clearance checks.
If your priority is minimizing labor time, a complete, proven-fit assembly is often worth paying slightly more for—because the “cheap part + extra hour” rarely ends up cheaper.
How do you convert labor hours into a labor cost estimate and compare quotes?
Convert labor time into cost using a 3-part method—labor hours × shop rate, then add alignment (if separate), then add parts/taxes/fees—to produce a comparable estimate you can use to judge quotes fairly.
Thus, you stop comparing totals and start comparing what’s actually included.
A common quote confusion is mixing labor hours with labor dollars. Shops may publish a rate; they may not. But the math always exists.
How do you calculate labor cost from labor time and shop rate?
Use this formula in 3 steps: (1) find the billed flat-rate hours, (2) multiply by the shop’s posted hourly rate, and (3) add separate operations like alignment—so you get a labor subtotal that matches how the invoice is built.
For example, that subtotal becomes your anchor when you compare two quotes with different “bundles.”
Simple example:
- Flat-rate hours: 1.8
- Shop rate: $140/hr
- Labor subtotal: 1.8 × 140 = $252
Then add:
- alignment (if separate)
- shop supplies / disposal
- taxes
- parts
If you want a reality check on totals, RepairPal’s estimator shows a typical total cost range and separates labor vs parts in its breakdown for control arm replacement (not vehicle-specific “book time,” but useful for sanity checks). (repairpal.com)
What should a transparent control arm quote include (and exclude)?
There are 7 must-have items in a transparent quote: parts description, labor hours, labor rate, alignment line item, hardware assumptions, taxes/fees, and warranty terms—because each item changes the “real” price and what you’re agreeing to.
Meanwhile, what’s missing can be more important than what’s present.
A quote should include:
- Exact job description: “front lower control arm, left” vs “suspension work.”
- Parts line: brand, assembly vs bushing-only, whether ball joint is included.
- Labor hours: flat-rate hours for the job.
- Shop rate: hourly rate used in the calculation (or a flat labor total with hours disclosed).
- Alignment: included or separate.
- Hardware policy: will they reuse cam bolts? replace if seized? what’s the contingency?
- Warranty: parts and labor terms.
A quote should not hide:
- “Shop supplies” so large it replaces real labor accounting
- vague “suspension repair” line items with no scope
If your quote lacks these basics, ask for an itemized version before you decide.
When is a higher labor time estimate actually reasonable?
Yes, a higher labor time estimate can be reasonable because rust risk, known seized cam bolts, complex access, and aftermarket lift geometry can legitimately add steps that a “clean” book-time assumption doesn’t reflect.
More importantly, the best quotes explain the reason for the extra hours rather than just inflating the number.
Higher hours are commonly justified when:
- The car is from a rust-prone region and the shop expects bolt seizure.
- The suspension uses eccentric/cam bolts that often seize in bushings.
- The job requires partial subframe movement or significant underbody disassembly.
- The vehicle has an aftermarket lift and needs extra adjustment time afterward.
To connect this back to what you feel as a driver: unstable steering, clunks, and wandering can come from multiple worn parts, so a shop that finds additional wear may quote more work (or more time) than your initial assumption. RepairPal also notes related components often get replaced alongside the control arm, which can change labor scope. (repairpal.com)
According to a study by Eindhoven University of Technology from the Department of Mechanical Engineering (Dynamics and Control Group), in 2007, increasing toe angle was associated with substantially higher simulated tire wear, indicating that small alignment changes after suspension work can accelerate wear if not corrected. (pure.tue.nl)
Now that you can estimate flat-rate hours and understand what drives them up or down, the section below expands into related decisions that affect ride quality, safety, and total repair cost.
What else should you replace or check when replacing control arms to avoid repeat labor?
There are 4 high-value checks to avoid repeat labor: choose the right arm strategy (assembly vs press work), inspect common companion wear items, plan alignment settings, and avoid driving long distances without alignment—because these steps prevent paying twice for the same teardown.
Especially when labor is the expensive part, “while you’re in there” decisions can save real money.
Should you replace bushings and ball joints separately or choose a complete control arm assembly?
Complete assemblies win for reducing labor time, separate bushings/ball joints are best when parts are scarce or you have press tools, and assemblies are optimal for most owners who want predictable results and fewer installation variables.
However, the best choice depends on what’s actually worn and what your shop can warranty.
Use this decision filter:
- Choose complete assembly if you value time, warranty clarity, and simplicity.
- Choose bushing/ball joint only if the arm is expensive/rare and you have a reliable press workflow.
- Choose OEM-style geometry if steering feel and alignment stability matter most.
If your aim is minimizing total cost, remember: saving $80 on parts can disappear instantly if it adds even 0.6 labor hours.
Which related suspension parts commonly fail at the same time (sway links, tie rods, struts)?
There are 5 commonly co-failing parts with control arms: sway bar end links, outer tie rods, ball joints (if separate), struts/shocks, and sometimes wheel bearings—based on shared mileage, shared load cycles, and shared exposure to road grime.
For example, clunks from a worn sway link can sound like a control arm bushing.
A practical “bundle check” when symptoms include looseness or noise:
- Sway bar end links: clunking over bumps
- Tie rods: looseness, wander, steering play
- Ball joints: clunk + uneven tire wear + looseness
- Struts/shocks: bounce, instability, cupped tires
- Bushings: drift, braking pull, vague steering feel
This is where the phrase “Clunking and wandering steering causes” matters: if you replace the control arm but ignore a worn tie rod, you may still feel wander and assume the repair “didn’t work.”
What alignment settings change most after control arm replacement (camber/caster/toe)?
There are 3 alignment settings most affected after control arm replacement: toe changes the fastest, camber often shifts with bushing position, and caster can move when arm geometry or mounting points change—because control arms directly locate the knuckle in space.
To illustrate, toe is the setting most likely to destroy tires quickly if it’s off.
- Toe: strongest driver of scrub and rapid wear; most sensitive to tie-rod and arm position.
- Camber: influences inside/outside shoulder wear; can shift if arm length/position changes.
- Caster: affects stability and steering return; often changes with arm geometry, especially on trucks and performance suspensions.
The TU/e research above supports why toe and camber matter for wear mechanisms: as those angles increase, simulated wear increases. (pure.tue.nl)
Can delaying alignment after control arm replacement cause uneven tire wear quickly?
Yes, delaying alignment after control arm replacement can cause uneven tire wear quickly because toe and camber can shift immediately after the new arm’s bushings settle, and misalignment increases tire scrub, heat, and localized wear.
In addition, misalignment can degrade fuel efficiency because increased rolling resistance wastes energy.
If you must delay alignment:
- drive gently and minimize mileage
- avoid high-speed highway runs
- schedule alignment as soon as possible
For a plain evidence point on the “misalignment costs energy” idea, experimental work published in an automotive engineering journal reports that toe-angle misalignment increases rolling resistance and fuel consumption, reinforcing why alignment isn’t just “nice to have.” (link.springer.com)
And if rust is what’s stopping you from finishing the job on schedule, go back to your Rusted bolt removal tips playbook: penetrant time, safe heat use, correct tools, and a plan for replacement hardware can turn a stuck day into a completed repair.