


A clunk over bumps or a loose steering wheel usually comes from play (looseness) in a ball joint, excess movement in a control arm bushing, or damage/wear in the control arm assembly—and you can separate them by matching when the symptom happens to what direction the joint or bushing can move.
Next, you’ll learn a clear symptom map—what “clunk,” “wander,” “pull,” and “uneven tire wear” tend to mean—so you’re not guessing or replacing parts blindly.
Then, you’ll get a safe, repeatable DIY inspection sequence (jack-and-check, pry-bar checks, and visual confirmations) to confirm whether the problem is the ball joint, the bushing, or the entire control arm assembly.
Introduce a new idea: once you can identify the failing part, the real win is choosing the right repair scope—part vs whole—without creating new problems like bushing preload errors or unsafe shortcuts.
What do “ball joint,” “control arm bushing,” and “control arm” each do in the suspension?
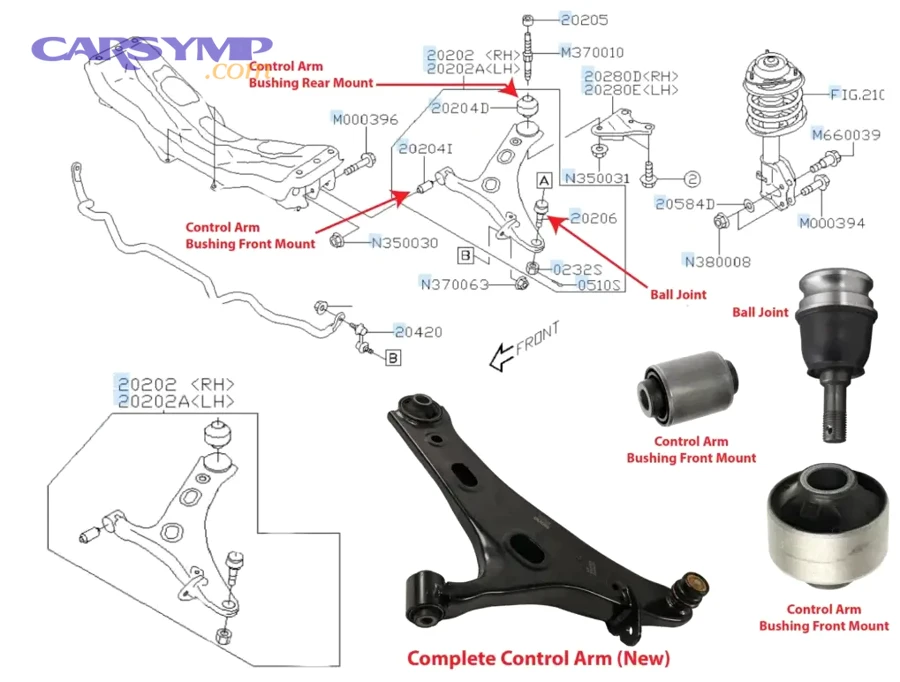
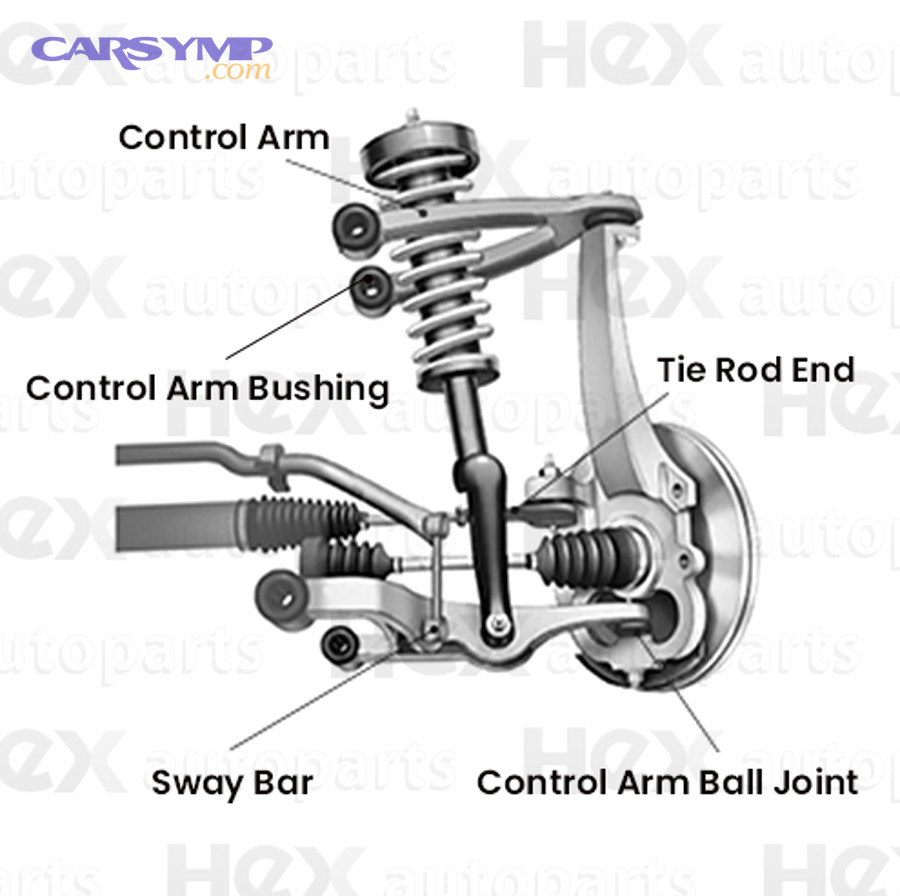
A ball joint is a load-bearing pivot in the steering/suspension, a control arm bushing is an elastic mount that allows controlled movement while isolating vibration, and the control arm is the structural link that positions the wheel—together forming a parts-to-whole system that governs alignment and stability.
More importantly, this “parts vs whole” picture is what makes diagnosis possible: a ball joint fails by developing play at a spherical pivot, while a bushing fails by allowing the arm to shift or bind at its mount, and a control arm fails when its structure or mounting points no longer hold geometry.
What is a ball joint, and what types (upper/lower; pressed/bolt-in) affect diagnosis?
A ball joint is a spherical bearing that connects the steering knuckle to the suspension so the wheel can turn left/right and move up/down without binding.
Specifically, diagnosis changes depending on where the joint sits and what loads it carries:
- Lower ball joints often carry more vehicle load in many layouts, so wear can show up as clunks over bumps, steering wander, and visible vertical play when unloaded correctly.
- Upper ball joints (common on double wishbone) may show play differently—sometimes more noticeable during steering articulation.
- Pressed-in ball joints (serviceable) can be replaced alone, but poor press work can damage the bore or seat.
- Bolt-in ball joints are easier to replace, which changes your repair decision after diagnosis.
The key diagnostic idea is simple: ball joint wear creates “free movement” where there should be none. If you can reproduce play at the stud/socket (not at the bushing mounts), you’re likely looking at a ball joint issue.
Evidence (if any): According to a study by Dunărea de Jos University of Galați from the Faculty of Engineering, in 2014, researchers reported that about 50% of steering-system friction losses are attributed to the swivel–ball joint bearing, showing how influential ball-joint interfaces are in steering behavior. (if.ugal.ro)
What is a control arm bushing, and how does bushing design change symptoms?
A control arm bushing is a rubber (or polyurethane/hydraulic) isolator bonded to sleeves that lets the control arm move through suspension travel while controlling how far and in what direction it can shift.
However, bushings don’t just “wear out”—they fail in different ways, and each failure mode has its own feel:
- Cracked rubber (surface aging) can look scary but may still function if the rubber remains bonded.
- Torn/separated rubber allows the arm to shift under braking/acceleration, often felt as clunks, pull, or wander.
- Hydraulic/voided bushings can thump when internal structure deteriorates or fluid leaks.
- Binding bushings can cause a sticky, inconsistent steering return (more on this later).
Diagnosis principle: bushings fail by allowing the arm to move at the mount (or by resisting movement unevenly)—so you look for mount deflection, separation, and alignment shift under load.
What is the control arm assembly, and when is the “arm” itself the problem?
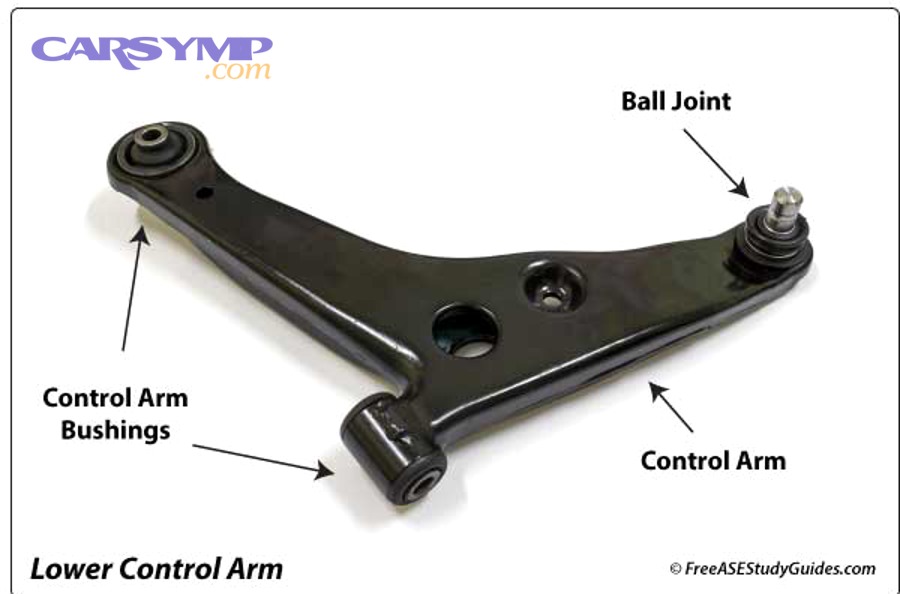
A control arm is the rigid link (often stamped steel, cast, or forged aluminum) that sets the wheel’s position relative to the chassis using two main interfaces: bushings at the body/subframe and a ball joint at the knuckle.
On the other hand, the “arm itself” becomes the problem when structure—not just rubber—fails:
- Bent arm after impact (curb/pothole) can permanently alter camber/caster and create persistent pull or tire wear.
- Cracked arm (rare but serious) can cause sudden instability and is a stop-driving condition.
- Elongated mounting holes or damaged brackets can mimic bushing failure because the arm can’t hold geometry.
- Corrosion can weaken structural sections or compromise bushing seats.
Practical takeaway: if you see clear deformation, cracking, or mounting damage, you’re no longer diagnosing “just a bushing” or “just a ball joint”—you’re diagnosing the assembly’s ability to hold alignment under load.
Which symptoms point to a bad ball joint vs a bad bushing vs a bad control arm?
Ball joints win as the most likely cause of clunks with measurable pivot play, control arm bushings are best at explaining wander/pull that changes with braking or throttle, and the control arm assembly is optimal as the culprit when geometry won’t hold even after parts look “okay.”
To make that comparison useful, you need a consistent method: match the symptom to the driving condition, then confirm with movement direction tests (vertical/lateral play vs mount deflection).
Does clunking over bumps usually mean ball joint wear or bushing movement?
No—clunking over bumps does not automatically mean a ball joint, because both ball joints and bushings can clunk, but they clunk for different mechanical reasons.
However, you can separate them by when and how the clunk appears:
- Ball joint clunk pattern
- Louder on sharp bumps or speed bumps
- May clunk while turning and hitting bumps
- Often pairs with a subtle “loose” steering feel
- Bushing movement clunk pattern
- More noticeable during braking/acceleration transitions
- Feels like the wheel shifts fore/aft, then “settles”
- Can appear as a single thunk when you apply brakes
The diagnostic hook is this: ball joints clunk from pivot clearance, while bushings clunk from arm shift at the mount.
Is steering play or wandering more consistent with bushings than ball joints?
Yes—steering play or wandering is often more consistent with control arm bushing problems, because bushings can allow toe and caster to change under load, and that creates a “darting” or “floating” feel.
Meanwhile, worn ball joints can also create wander, but it usually shows up with other signs of pivot looseness. The practical difference is:
- Bushing-led wander often changes when you:
- brake lightly vs brake hard
- accelerate vs coast
- hit crosswinds or road grooves
- Ball-joint-led wander often changes when you:
- go over bumps while turning
- load/unload suspension (dips/crests)
- reproduce measurable play at the joint
Evidence (if any): According to a study by Chalmers University of Technology from the Department of Mechanics and Maritime Sciences, in 2022, researchers concluded that suspension motion characteristics depend strongly on kinematics and bushing compliance, and their target-driven design method reduced development lead time by about half, highlighting how much bushing compliance can shape steering behavior. (research.chalmers.se)
What tire wear patterns suggest ball joint vs bushing vs bent control arm/alignment change?
There are 3 main types of tire-wear clues—edge wear, cupping, and feathering—based on how the wheel is moving or misaligned, and each points toward different suspects.
- Edge wear (inside or outside)
- Common with persistent alignment drift (camber/toe)
- Can occur with bushing shift (toe changes under load)
- Can occur with a bent control arm (permanent geometry change)
- Cupping/scalloping
- Often linked to uncontrolled wheel movement (bounce)
- Can worsen if joints/bushings let the wheel oscillate
- Feathering (sawtooth feel across tread)
- Frequently points to toe problems
- Bushings that allow toe change under braking are common contributors
The tie-back to diagnosis: tire wear tells you whether the issue is dynamic (moves under load)—often bushings—or static/persistent (always off)—often bent parts or long-term misalignment.
Can vibration or braking shimmy come from control arm bushings instead of rotors?
Yes—braking shimmy can come from control arm bushings instead of rotors for at least three reasons: the arm shifts under braking force, toe changes dynamically, and the wheel oscillation feeds back into the steering wheel.
However, you can separate bushing-related shimmy from rotor issues by pattern:
- If the shake is speed-specific and brake-pressure sensitive, bushings become more likely.
- If the shake is consistent and strongly tied to brake application, rotors remain a key suspect.
- If the shake appears with small steering corrections while braking, bushing compliance steer is often in the mix.
Evidence (if any): According to a study by Dunărea de Jos University of Galați from the Faculty of Engineering, in 2014, researchers described ball-joint and bearing friction as major contributors to steering-system losses, supporting why vibration and steering feedback can escalate when joint interfaces degrade. (if.ugal.ro)
How can you safely diagnose the cause at home with basic tools?
Use a three-phase “observe, isolate, confirm” method in 7 steps—road-test notes, safe lifting, wheel-play checks, pry-bar deflection checks, visual bushing inspection, joint boot inspection, and a final re-check—to identify whether the ball joint, bushing, or control arm is at fault.
Next, focus on safety and repeatability: the goal isn’t to “feel something move,” but to see the correct part moving while everything else stays still.

What is the safest “jack-and-check” sequence for front suspension play?
The safest sequence is: flat ground → chock wheels → lift at correct points → support on jack stands → shake test with hands in safe positions → confirm movement visually.
More specifically, do it like this:
- Park on level ground, set parking brake, and chock the opposite end.
- Break lug nuts loose slightly before lifting (don’t remove yet).
- Lift at a proper jacking point (pinch weld, subframe point, or manufacturer lift pad).
- Set jack stands under a structural point; lower the vehicle onto stands.
- Keep hands clear of pinch zones and never put fingers between tire and fender liners.
- Perform wheel play checks with controlled force—don’t slam the wheel.
- Use a flashlight and watch the joint/bushing while a helper rocks the wheel.
This setup matters because unsafe lifting leads to bad diagnosis and real risk—exactly the kind of scenario that makes "DIY control arm replacement risks" worth understanding before you start unbolting suspension links.
Which movement tests isolate ball joint play vs bushing deflection?
Ball joint play shows up as movement at the knuckle pivot, while bushing deflection shows up as movement where the control arm mounts to the frame/subframe.
Use these isolation tests:
- Ball joint isolation (pivot play test)
- Watch the ball joint stud relative to the housing while a helper rocks the wheel.
- Look for a clear “gap change” or knock at the joint itself.
- Bushing isolation (mount deflection test)
- Use a pry bar to gently load the control arm near the bushing.
- Watch the bushing sleeve vs bracket: healthy bushings flex smoothly; failed bushings let the sleeve shift, separate, or “jump.”
The rule: if the mount moves, it’s a bushing/mount issue; if the pivot moves, it’s a ball joint issue.
What visible damage confirms a bushing failure (tears, separation, fluid leaks)?
There are 4 common visual confirmations of bushing failure based on how the rubber bonds and supports the sleeve:
- Tears in rubber that connect to the inner sleeve or outer collar
- Separation/debonding where rubber pulls away from metal
- Deformed or off-center sleeve showing the arm “sitting wrong”
- Fluid leaks on hydraulic bushings (wet, oily appearance without engine-oil source)
Cracks alone can be cosmetic; a true failure is when the rubber no longer controls the arm’s position under load—exactly what you see in torn/separated bushings.
When should you stop DIY diagnosis and get a professional inspection?
Yes—you should stop DIY diagnosis and get professional help if you see severe looseness, structural damage, or unsafe symptoms, because (1) the wheel can lose control under load, (2) you may need specialized press/alignment equipment, and (3) continued driving can cascade damage into other components.
More importantly, stop and escalate if any of these are true:
- The wheel shows obvious, repeatable play you can feel and see.
- You see a torn boot with grit intrusion plus measurable joint looseness.
- The vehicle pulls hard or feels unstable during braking.
- You see cracks in the control arm, bent structure, or damaged mounts.
At that point, the best next step is not another pry-bar test—it’s a confirmed plan for repair, whether that’s a targeted part replacement or a full "control arm replacement".
Do you replace the part or the whole assembly, and what’s the smartest repair choice?
Ball-joint-only replacement wins for lowest parts cost, bushing-only replacement is best when the control arm is structurally solid and you have press capability, and full control arm assembly replacement is optimal when multiple wear points exist or labor time matters.
Then, connect your diagnosis to your decision: if the problem is part-level, replace the part; if the problem is system-level (age, corrosion, multiple wear points), replace the assembly and reset your baseline.
Should you replace only the ball joint, only bushings, or the entire control arm?
A smart rule is: replace only what failed if the surrounding pieces are healthy, but replace the whole control arm when age, corrosion, or multiple wear points make “parts-only” a false economy.
Use this decision logic:
- Replace only the ball joint when:
- the bushing mounts are tight and rubber is bonded
- the control arm is not bent or rust-compromised
- the joint is serviceable (pressed/bolt-in) and the bore is sound
- Replace only bushings when:
- the arm is strong and straight
- you can press bushings accurately (or have a shop do press work)
- the ball joint shows no play and has a healthy boot
- Replace the entire control arm assembly when:
- the arm is heavily rusted or bent
- both bushings and the ball joint are aged/worn
- labor cost and downtime matter more than parts-only savings
This is why many DIYers choose assemblies: you avoid press variables and reduce the chance of misinstallation—especially if you’re also trying to predict "How long control arms typically last" so you don’t redo the job in a year.
Is it worth doing both sides at the same time?
Yes—doing both sides is often worth it because (1) wear tends to be symmetric over mileage, (2) you maintain left/right handling balance, and (3) you can reduce alignment and labor duplication.
However, “both sides” is smartest when:
- the vehicle has high mileage and both sides are original
- you’ve confirmed similar bushing aging or boot deterioration on both
- you’re already paying for an alignment and want one final setup
If only one side shows clear damage from impact (curb strike) and the other side is healthy, single-side replacement can still be rational—but you should expect differences in feel until everything matches again.
Do you need an alignment after ball joint/bushing/control arm work?
Yes—you usually need an alignment after ball joint, bushing, or control arm work because (1) control arms locate the wheel, (2) bushing position affects toe/caster under load, and (3) removal/installation can shift subframe or cam bolts even if you “put it back the same.”
More specifically:
- control arm replacement: alignment is strongly recommended.
- Bushing replacement: alignment is recommended because bushing seating and torque can change geometry.
- Ball joint replacement: alignment is often recommended, especially if knuckle position or camber bolts are disturbed.
Even when alignment numbers look close, proper alignment confirms that the wheel is stable through travel—not just sitting “close enough” at rest.
What installation mistakes cause repeat failures (torque at ride height, pre-load, fasteners)?
There are 4 common mistakes that cause repeat failures, based on how bushings and joints are designed to move:
- Torquing bushing bolts at full droop
- This preloads the rubber at the wrong angle and can tear it early.
- Reusing torque-to-yield or damaged hardware
- Some platforms specify one-time-use fasteners.
- Pressing bushings in the wrong orientation
- Many bushings have voids that must face a specific direction.
- Hammering/forcing joints without supporting mating surfaces
- This can damage bores, boots, or joint seats.
The big diagnostic-to-repair link is simple: you might correctly identify a worn bushing, but if you install the replacement incorrectly, you’ll recreate the same symptoms faster than expected.
Evidence (if any): According to a study by Chalmers University of Technology from the Department of Mechanics and Maritime Sciences, in 2022, researchers emphasized that suspension kinematics and bushing compliance have complex interactions and demonstrated a method that reduced design lead time by about half, underscoring how sensitive outcomes are to correct setup and constraints. (research.chalmers.se)
What problems can mimic ball joint or bushing failure, and how do you rule them out?
There are 4 common look-alike causes of clunks and steering play—sway bar links, tie rods, strut mounts, and subframe/mounting movement—based on where the noise originates and how force transfers through the chassis.
Next, use a “rule-out” mindset: if your tests don’t clearly show ball joint play or bushing deflection, you’re likely hearing or feeling a nearby component that shares the same load path.
Can sway bar links, tie rods, or strut mounts cause the same clunk ?
Yes—these parts can cause the same clunk because they all transmit suspension loads into the body, but you differentiate them by what input triggers the noise.
Use these quick separators:
- Sway bar link clunk
- Often repeats rapidly over small bumps
- Less tied to steering angle, more tied to left/right wheel movement
- Tie rod play
- Shows up as steering looseness and a clunk when rocking wheel left/right
- Often visible at the outer tie rod while a helper moves the wheel
- Strut mount noise
- Can clunk or pop during steering at low speed
- Often pairs with a “spring wind-up” feel in the steering wheel
If the clunk appears when steering in place (or at parking-lot speeds) more than when hitting bumps, you should suspect steering-link and mount components before blaming the control arm assembly.
What is “memory steer,” and can binding bushings cause it instead of looseness?
Memory steer is a steering behavior where the wheel doesn’t return smoothly to center and seems to “remember” a turned position, and yes—binding bushings can cause it even when nothing feels loose.
However, memory steer is almost the opposite of classic looseness:
- Loose components create free play, wandering, and delayed response.
- Binding bushings create sticky response, uneven return-to-center, and “step-like” steering feel.
A practical test is to drive slowly on a safe, empty road: if the steering return is inconsistent and feels like it “hangs,” suspect bushing bind or top-mount friction before assuming ball joint play.
Do hydraulic/voided bushings fail differently than solid rubber bushings?
Yes—hydraulic/voided bushings fail differently because their internal structure is designed to tune motion and NVH, while solid rubber is designed for simpler elastic control.
In practice:
- Hydraulic/voided bushing failures may show thumps, inconsistent feel, or fluid leakage.
- Solid rubber failures often show progressive cracking, then tearing/separation.
- Polyurethane swaps can sharpen response but increase NVH and may transmit more road texture.
The diagnostic clue is consistency: hydraulic bushing issues sometimes feel “condition-dependent” (temperature, load transitions), while torn solid rubber tends to be consistently sloppy under load.
Can subframe movement or mounting damage imitate control arm bushing failure?
Yes—subframe movement or mounting damage can imitate bushing failure because the entire suspension pickup point can shift, making your symptoms look like “the arm is moving” when the mount structure is the real problem.
Watch for these hints:
- Alignment numbers that won’t hold after adjustments
- Clunks that persist even after obvious wear parts are replaced
- Visible witness marks around subframe bolts or mounts
- Symptoms that change after hitting bumps hard (shift event)
If you suspect this, a professional inspection is often the fastest route, because confirming subframe shift typically requires careful measurement, torque verification, and sometimes manufacturer procedures.
Contextual Border (transition recap): You now have a complete diagnosis flow (symptom mapping + safe tests) and a repair decision framework (part vs whole). From here, you can confidently confirm what’s actually worn before buying parts or booking an alignment.
Evidence (if any): According to a study by Dunărea de Jos University of Galați from the Faculty of Engineering, in 2014, researchers described structured ball-joint wear verification tests (including rotation/tilting moments and stiffness checks), reinforcing why controlled testing beats guesswork when symptoms overlap. (if.ugal.ro)