


Most vehicles need several labor hours to replace a heater core because technicians must access the HVAC case behind interior panels, and many models require partial or full dashboard removal. If you’re trying to plan downtime or verify a quote, focus on labor hours billed and what’s included in that number.
Next, the labor hours are not “one-size-fits-all” because the same job can be a quick access-panel swap on one car and a dash-out procedure on another. Understanding why the hours change will help you predict where your vehicle lands on the time spectrum.
Then, the biggest decision is whether to have a shop do the work or attempt it yourself, because DIY time can be much longer than flat-rate labor even when the part is inexpensive. This comparison matters most when you have limited tools, limited time, or a high risk of breaking interior trim.
Introduce a new idea: once you understand labor hours, you can connect them to cost, estimate how long the vehicle will be down, and reduce surprises by asking the right questions before the work begins.
What is “heater core replacement labor time,” and what does it include?
heater core replacement labor time is the billed technician hours to access the HVAC housing, remove the old heater core, install the new unit, and reassemble the interior and cooling system so heat works correctly. Next, it helps to separate “labor hours billed” from the total time your car is unavailable.
What’s the difference between labor hours billed and the time your car is in the shop?
Labor hours billed are the flat-rate or estimated technician hours that appear on your invoice, while “time in the shop” includes scheduling, diagnosis, parts delivery, and post-repair checks.
Specifically, a job listed as 6.0 labor hours does not guarantee the car is ready in six hours. A shop may need to:
- Confirm the leak source and rule out other cooling system issues.
- Wait for the heater core (or related seals/clamps) to arrive.
- Let the engine reach operating temperature, verify cabin heat output, and check for coolant odor or fogging.
- Perform a short road test and recheck coolant level once the thermostat cycles.
This distinction matters because owners often plan around “hours” when they really need to plan around a full day, or sometimes an overnight stay, depending on shop workflow.
Is heater core replacement usually a “dash-out” job?
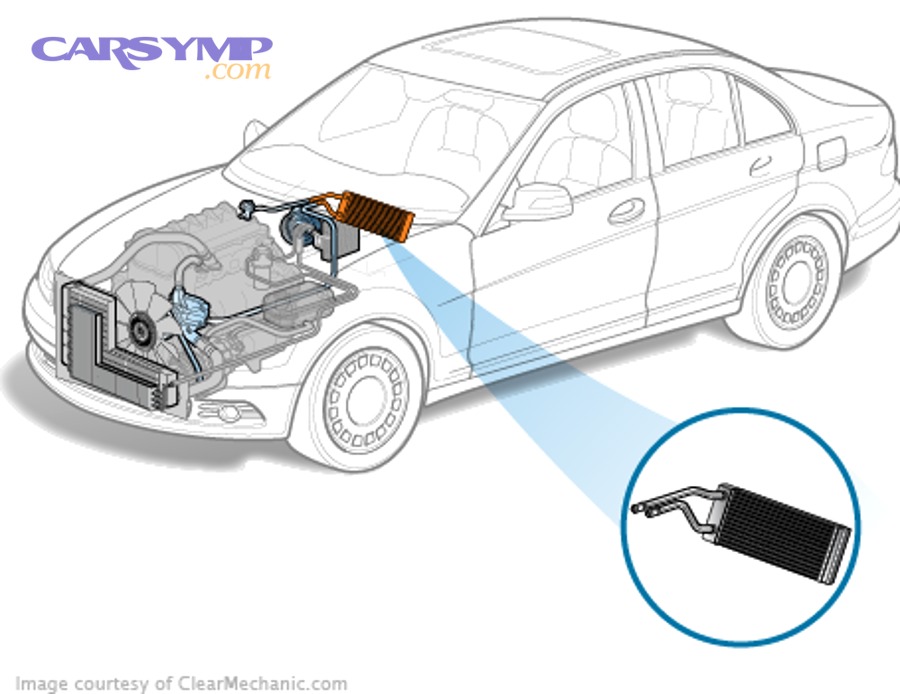
Yes, heater core replacement is often a dash-out or dash-loosened job, because the core sits inside the HVAC case behind the dashboard on many vehicles—and that location drives labor time. However, some models provide access panels or a simpler HVAC housing design, so the answer depends on the exact vehicle.
More specifically, the “dash-out” label can mean different levels of work:
- Full dash removal: steering column loosened, major trim and fasteners removed, HVAC case accessed deeply.
- Dash loosened and pulled back: enough movement to open the HVAC case and slide the core out.
- Access panel approach: limited interior removal with a service opening that reaches the core.
Because labor time is mostly “access time,” small differences in dashboard architecture can change the billed hours dramatically.
What tasks are typically included in heater core labor time?
There are 7 main task groups included in heater core labor time: diagnosis confirmation, coolant handling, interior access, HVAC case access, core swap, reassembly, and functional testing.
To illustrate what shops commonly do during heater core replacement, here is a practical checklist of labor steps:
- Confirm the failure mode
- Verify coolant loss in cabin, wet carpet, sweet odor, or poor heat output.
- Pressure test the cooling system (if needed).
- Prepare the cooling system
- Drain coolant to a safe level for hose disconnection.
- Clamp or disconnect heater hoses at the firewall.
- Create interior access
- Remove trim, glove box, center console panels, and lower dash components.
- Protect airbags/SRS connectors and interior surfaces.
- Access the HVAC case
- Remove case fasteners and covers.
- Move wiring looms and brackets safely.
- Replace the heater core
- Remove the old core and seals.
- Install the new core, ensuring correct seating and gasket alignment.
- Reassemble everything
- Reinstall panels, ducts, connectors, and fasteners in the correct order.
- Confirm blend doors and controls move correctly.
- Refill and verify
- Top up coolant and check for leaks.
- Confirm cabin heat, stable engine temperature, and no fogging.
In short, the billed labor is the sum of access + replacement + verification, not just the moment the part is swapped.
How many labor hours does heater core replacement usually take?
There are 3 common labor-hour ranges for heater core replacement—low, mid, and high—based on how much interior removal is required to reach the HVAC case. Then, you can narrow your expectation by identifying which vehicle design category you have.

What’s a typical labor-hour range for heater core replacement on most vehicles?
A practical way to think about labor time is as access tiers:
- Low-access tier (about 2–4 labor hours): vehicles with easier access paths, smaller interiors, or service panels.
- Mid-access tier (about 4–8 labor hours): partial dash removal or significant trim removal.
- High-access tier (about 8–12+ labor hours): dash-out jobs, complex HVAC housings, or additional steps that force deep disassembly.
This general framing aligns with mainstream repair guidance that highlights dash removal as the key reason labor dominates the job cost and time. autozone.com
To make this more concrete, the table below summarizes what each tier usually implies in terms of work scope.
Table: Typical heater core labor hour tiers and what they usually involve
| Tier | Typical labor hours | What’s usually happening | What you’ll notice as an owner |
|---|---|---|---|
| Low access | 2–4 | Limited trim, shorter HVAC access path | Faster turnaround, fewer interior parts removed |
| Mid access | 4–8 | More panel removal, partial dash loosened | Car may be down most of the day |
| High access | 8–12+ | Dash-out or deep HVAC case disassembly | Higher quote, higher risk of delays if clips/fasteners fight back |
The purpose of the tiers is not to “guarantee” hours, but to help you predict which bucket you’re likely in.
Which vehicle design factors push the labor time higher or lower?
There are 5 main design factors that decide whether your job is a 3-hour access job or a 10-hour dash job:
- HVAC case location and opening method
- A split case with an accessible cover tends to reduce time.
- A fully enclosed case buried behind structural dash supports increases time.
- Dashboard architecture
- More layers of trim and brackets = more removal time.
- Tight packaging around the HVAC box = more careful disassembly.
- Steering column involvement
- Some vehicles require loosening or moving the column for clearance.
- More steps mean more labor hours and more opportunities for delays.
- Ducting and wiring density
- Dense wiring harnesses and duct routing slow down access.
- More connectors increase careful labeling and reinstall time.
- Fastener condition and interior age
- Brittle plastic clips, stripped screws, or past repair damage can add unexpected time.
Because heater core labor is access-heavy, these design factors matter more than the heater core itself.
When does heater core replacement require A/C work, and how does that affect hours?
Yes, heater core replacement can require A/C-related work on some vehicles, and it usually increases labor hours because the HVAC case shares space with the evaporator housing and lines. Moreover, if refrigerant recovery and recharge are required, the process adds both time and cost.
In many modern HVAC layouts, the heater core and evaporator are part of the same HVAC module. Some vehicles allow heater core removal without disturbing A/C lines, but others require:
- Evacuating refrigerant with proper equipment,
- Removing components that block access,
- Reassembling and recharging to specification.
Even when the heater core can be swapped without opening A/C lines, the job can still involve significant HVAC case handling—so it’s smart to confirm whether the quote includes any A/C service steps.
Why does heater core labor time vary so much between vehicles and shops?
Heater core labor time varies because the job is dominated by access complexity, and access complexity changes by vehicle design, fastener condition, and shop workflow. Besides that, flat-rate guides and real-world conditions can diverge in ways that affect your final bill.

What are the most common “time adders” that increase labor hours?
There are 7 frequent time adders that push heater core labor hours upward:
- Brittle interior plastics and broken clips
- Older interiors crack or snap, slowing removal and reassembly.
- Seized or corroded fasteners
- Rusted hardware increases removal time and can require drilling or extraction.
- Firewall hose connection issues
- Quick-connect fittings can break; hose clamps can be hard to reach.
- Wiring connector complications
- Locks break; connectors are hard to access; routing must be restored exactly.
- Hidden fasteners and overlapping panels
- Many dashboards use layered assemblies with fasteners behind other parts.
- Aftermarket accessories and past repairs
- Alarm systems, stereos, or previous interior work can create “unknowns.”
- Extra diagnosis work
- Shops may confirm whether the leak is the core, a hose, or another component.
If you want fewer surprises, ask the shop whether they expect any of these risks based on your vehicle’s age and condition.
Do shops charge “book time” even if the job takes longer or shorter?
Yes, many shops charge book time because flat-rate labor is designed to price the job consistently, even when real-world time varies between technicians and vehicle conditions. However, some shops adjust if complications occur, and others bill time-and-materials in special cases.
To better understand the difference, “book time” is a labor guide estimate intended for a standard procedure on a vehicle in typical condition. Real jobs can take less time when:
- The technician knows the model well,
- Fasteners are clean,
- Access is unusually straightforward.
Real jobs can take more time when:
- Interior parts are brittle,
- Hardware is corroded,
- Prior repairs created obstacles,
- The HVAC case design is unusually complex.
That’s why you may see widely different quoted labor hours for different vehicles—and sometimes for the same vehicle at different shops.
How can you sanity-check a heater core labor quote before approving it?
You can sanity-check a heater core quote by comparing (1) listed labor hours, (2) labor rate, and (3) included operations, then matching those items to what your vehicle likely requires.
More specifically, use this quick verification checklist:
- Does the estimate list labor hours explicitly? (e.g., 6.5 hours)
- Does it list the labor rate? (e.g., $150/hr)
- Does it include coolant and disposal fees?
- Does it mention HVAC module access steps?
- Does it include any A/C service operations if required?
- Does it include testing and warranty terms?
Also, it helps to compare your quote to real-world examples of high-access vehicles where flat-rate times can approach ~10 hours in some cases. reddit.com
Shop vs DIY: how long will heater core replacement take at home compared to a shop?
A shop is usually faster in billed hours, while DIY often takes significantly longer in clock time because learning, labeling, careful trim handling, and unexpected obstacles add hours. Meanwhile, DIY can still be worthwhile if you have time, tools, and patience.
If a shop bills X labor hours, what’s a realistic DIY time for a first-time car owner?
If a shop bills 4–8 labor hours, a first-time DIYer often spends a full weekend because the job includes:
- Finding hidden fasteners,
- Taking photos and labeling connectors,
- Carefully removing trim to avoid cracks,
- Re-checking steps during reassembly.
To illustrate the time inflation effect, flat-rate labor assumes familiarity and repetition. DIY adds:
- Research time (manuals, videos, torque specs),
- Tool runs (trim tools, clamps, extensions),
- Correction time (misrouted ducts, missed connectors).
That’s why DIY time is best estimated as 2× to 3× the billed labor hours for beginners, especially on dash-heavy designs.
What tools and prep reduce DIY time the most?
There are 6 preparation moves that cut DIY time more than any single tool:
- Document everything
- Take photos at every stage; label connectors and fasteners in bags.
- Use trim tools
- Plastic pry tools reduce clip breakage and keep panels clean.
- Get a service manual procedure
- A correct removal sequence prevents “backtracking hours.”
- Set up a clean parts layout
- Organized fasteners reduce reassembly errors.
- Plan coolant handling
- Proper drain pan, funnels, and correct coolant reduce refill mistakes.
- Prepare for the finishing step
- Know your plan for After replacement: bleeding cooling system so you don’t overheat the engine or lose cabin heat due to trapped air.
This final step is where many DIY jobs stall, because the interior is back together but heat output is weak due to air pockets.
Is it worth DIYing a heater core replacement to save money?
Yes, DIY can be worth it for heater core replacement if you have time, the right tools, and a low-risk access design—but no, it’s often not worth it when the job is dash-out, because mistakes can create leaks, electrical issues, or rattles. More importantly, you should weigh savings against the cost of a redo.
DIY makes sense when:
- The vehicle has easier access,
- You can work slowly without rushing,
- You can tolerate an extended downtime window.
DIY is risky when:
- Airbag/SRS connectors and steering column work are involved,
- Interior plastics are brittle,
- A/C lines must be disturbed,
- You have no safe method to confirm leak-free operation.
If you decide to DIY, test thoroughly before final reassembly so you don’t repeat the entire access procedure.
How do heater core labor hours translate into total repair cost?
Heater core repair cost is mainly labor rate × labor hours, plus parts, coolant, and any add-on services like A/C handling or diagnostics. Thus, labor time is the fastest way to forecast the bill—especially when labor dominates the estimate.
A mainstream repair overview notes that labor can account for a large share of the total because the dashboard often must be removed. autozone.com
What line items should appear on a heater core estimate besides labor hours?
There are 8 common line items you should expect beyond labor hours:
- Heater core part (OEM or aftermarket)
- Coolant / antifreeze (type and quantity)
- New seals or O-rings (HVAC case and tube seals)
- Hose clamps or short hoses (if degraded)
- Shop supplies and disposal fees
- Diagnostic fee (sometimes waived if repair is approved)
- A/C evacuate and recharge (only if required)
- Pressure test / post-repair verification
If the estimate is missing these items entirely, ask whether they’re included elsewhere or will be added later.
Also, some owners ask about Flushing heater core vs replacing it. Flushing can restore heat when the core is restricted by deposits, but it won’t solve a leaking core. A good shop distinguishes between “restricted” and “leaking” before recommending replacement.
What’s the best way to compare two quotes with different labor hours?
The best method is to compare quotes by normalizing them into the same structure: total cost = (labor rate × labor hours) + parts + included services, then verifying the scope.
To illustrate, two quotes can look different but be equally fair:
- Quote A: lower hours but higher rate, includes coolant and testing.
- Quote B: higher hours but lower rate, does not include coolant or A/C service.
Use these questions to compare scope:
- Does each quote include coolant refill and leak check?
- Does either quote include warranty on labor and parts?
- Are they quoting the same part quality level (OEM vs aftermarket)?
- Do they anticipate any time adders based on vehicle age?
If you compare apples-to-apples, labor hours become meaningful rather than confusing.
What “while you’re in there” repairs can change heater core labor time and results?
There are 4 common “while you’re in there” items that can change labor time and improve results: HVAC actuators, foam seals, hoses/clamps, and cooling-system cleanup. In addition, these items matter because reopening the dashboard later repeats the hardest part of the job.
Which HVAC parts are smart to inspect or replace during heater core replacement?
There are 5 HVAC-related parts worth inspecting when the dash is already apart:
- Blend door actuator
- A weak actuator can mimic “no heat” even after replacement.
- Foam seals on ducts and doors
- Missing foam reduces airflow direction and heat efficiency.
- Cabin air filter
- A clogged filter reduces airflow and defroster performance.
- Blower motor and resistor (where accessible)
- If noisy or weak, replacement is easier with panels removed.
- Drain paths and housing cleanliness
- Debris can cause odors and moisture issues.
These checks prevent the frustration of doing the big access job twice.
Can stop-leak residue or a dirty cooling system increase labor time?
Yes, stop-leak residue or contamination can increase time because it may require extra flushing, hose cleaning, and repeated bleed cycles to restore stable heat output. Especially, residue can clog narrow passages and complicate the refill step.
In practical terms, contamination increases:
- The time needed to get consistent cabin heat,
- The risk of repeat complaints after the job,
- The chance you’ll need multiple heat cycles to purge air and residue.
If the coolant is muddy, rusty, or contains sealing additives, expect a shop to recommend additional cleanup or system service to protect the new core.
How do broken interior clips and brittle plastics affect the final labor time?
Brittle plastics increase labor time because technicians must remove panels slowly, replace broken clips, and correct fitment so you don’t get rattles, misaligned trim, or visible gaps.
More specifically, older vehicles can turn a “standard” procedure into a careful restoration job:
- Clips snap and must be replaced.
- Panels need gentle flexing and patience.
- Hidden screws can strip if rushed.
- Reassembly takes longer to eliminate noise and ensure proper alignment.
If your car is older, ask the shop how they handle broken clips and whether replacement hardware is included in the estimate.
When should you walk away from DIY and choose a shop instead?
Yes, you should choose a shop instead of DIY when the job involves airbags/SRS handling, dash-out procedures, A/C equipment needs, or you cannot afford extended downtime. More importantly, a shop is the safer route when failure could create overheating or coolant leaks behind the dashboard.
Choose a shop when:
- You cannot safely manage interior airbag connectors.
- You don’t have a controlled way to refill and purge the system.
- You can’t risk repeating interior disassembly if the first attempt leaks.
- Your Car Symptoms suggest multiple issues (coolant loss + overheating + weak heat), and you need accurate diagnosis before replacing parts.
To sum up, heater core labor time is mostly an access problem, and access problems punish rushed DIY attempts.
Evidence (if any)
According to a study by Bulent Ecevit University from the Mechanical Engineering Department, in 2021, radiator testing with a nanofluid coolant showed the cooling power increased up to 17.46% compared to a standard 50/50 ethylene glycol-water mixture—highlighting how cooling-system performance changes with coolant behavior and test conditions. thermalscience.rs