


Rotor wear and warp symptoms usually show up as a repeating shake, pulse, noise, or uneven braking that changes with speed and pedal pressure—classic clues that “bad rotors” (or something acting like them) are interfering with smooth pad-to-rotor contact.
Beyond the sensation, the real goal is to connect what you feel to what’s happening at the disc: friction surface condition, thickness variation, heat spots, runout, and hardware or torque issues that can create rotor-related vibration patterns.
If you’re deciding whether to keep driving, diagnose further, or schedule service, the most useful approach is symptom-first: match the vibration/noise pattern to likely root causes, then confirm with quick checks and a few measurements before you spend money.
Giới thiệu ý mới: Below is a step-by-step symptom map that helps you spot rotor wear and warp symptoms, separate them from look-alikes, and choose the next move with less guesswork.
What are the most common rotor wear and warp symptoms while driving?
The most common rotor wear and warp symptoms are brake pedal pulsation, steering wheel shake, and rhythmic vibration during braking, because the pads are grabbing unevenly as the disc rotates.
To move from “I feel it” to “I can diagnose it,” the next step is to match the sensation to when it happens and where you feel it.

Brake pedal pulsation: what it usually indicates
Pedal pulsation typically means the braking torque is rising and falling once or twice per rotor revolution, which is often linked to disc thickness variation (DTV), uneven friction film, or a rotor face that isn’t running true.
To be clear, a “warped rotor” feeling is often not a rotor physically bent like a potato chip; it’s frequently a thickness or friction variation that the hydraulic system translates into a pulse you can feel.
To illustrate, if the pulsation is consistent at the same vehicle speed and pedal force, it’s more likely related to a repeatable rotor condition than to random ABS activation or loose suspension parts.
Steering wheel shake: front rotor bias and load transfer
Steering wheel shake during braking is commonly front-end dominated because the front brakes do more work under weight transfer, amplifying any uneven rotor contact at the front wheels.
However, the feel can be misleading if a rear issue creates chassis vibration that travels forward, so you still want to confirm with inspection and measurement instead of assuming “front rotors” every time.
Specifically, if the steering wheel oscillates left-right under moderate braking, suspect front rotor condition first, then verify wheel balance and suspension play if symptoms persist off-brake.
Rhythmic thump, scraping, or “whoosh-whoosh” sounds
Noise that repeats with wheel rotation can be caused by rotor surface scoring, pad glazing, rust ridges, or debris trapped between pad and rotor, because the friction interface is no longer smooth and uniform.
Next, you’ll want to determine whether the noise changes when you lightly apply the brakes (often friction-related) or stays identical whether braking or coasting (often wheel/tire-related).
In practice, a light brake application that changes the sound immediately is a strong clue you’re dealing with the braking surfaces rather than a tire tread pattern or a wheel bearing.
Heat-related smell, fade, or pulling
A hot smell, temporary fade, or pulling can occur when one rotor runs hotter due to dragging pads, stuck slide pins, or a caliper issue, causing uneven friction and temperature across the axle.
After that, it’s important to check both sides of the axle, because rotor symptoms are often asymmetric when hardware is the root cause.
As a rule of thumb, if one wheel is significantly hotter than the other after similar braking, treat it as a hardware/dragging problem until proven otherwise.
How do “bad rotors” feel different at low speed vs highway speed?
Bad rotors often feel like a slow pulse at low speed and a faster vibration at highway speed, because the same repeat pattern occurs more frequently as the rotor spins faster.
To narrow it down further, focus on whether the vibration appears only when braking, only when coasting, or in both situations.

Low-speed clues: slow pulse and “grab-release” sensation
At low speeds, rotor-related issues usually present as a slow, noticeable pulse you can count, because each high/low spot in thickness or friction shows up clearly once per rotation.
Next, test with gentle braking on a smooth road; if the pulse remains and scales with vehicle speed, the rotor pattern is likely repeatable and measurable.
For many drivers, this feels like the brakes “catch” then “let go” in a predictable rhythm as the vehicle rolls to a stop.
Highway-speed clues: vibration that scales with speed and pedal pressure
At higher speeds, the vibration often becomes a buzz or shake, because the frequency increases and the chassis responds more strongly to small variations under load.
However, tire balance issues can feel similar at speed, so the key separator is whether the vibration is dramatically worse when you apply the brakes.
If you feel a smooth ride at 65 mph but a strong shake only when braking from 65 to 45, that pattern fits rotor-related causes more than wheel balance.
Why it can feel “fine” until you brake harder
Harder braking increases clamping force and friction heat, which can amplify thickness variation, surface deposits, or slight runout into a much more obvious vibration.
So, if your symptoms appear mainly during moderate-to-hard stops, your inspection should prioritize rotor surface condition, pad condition, and caliper hardware before blaming tires.
In addition, repeated hard stops can create new hot spots or uneven friction film, meaning the symptom can worsen quickly if you keep testing aggressively.
What can you see on the rotor that suggests wear, heat damage, or warping?
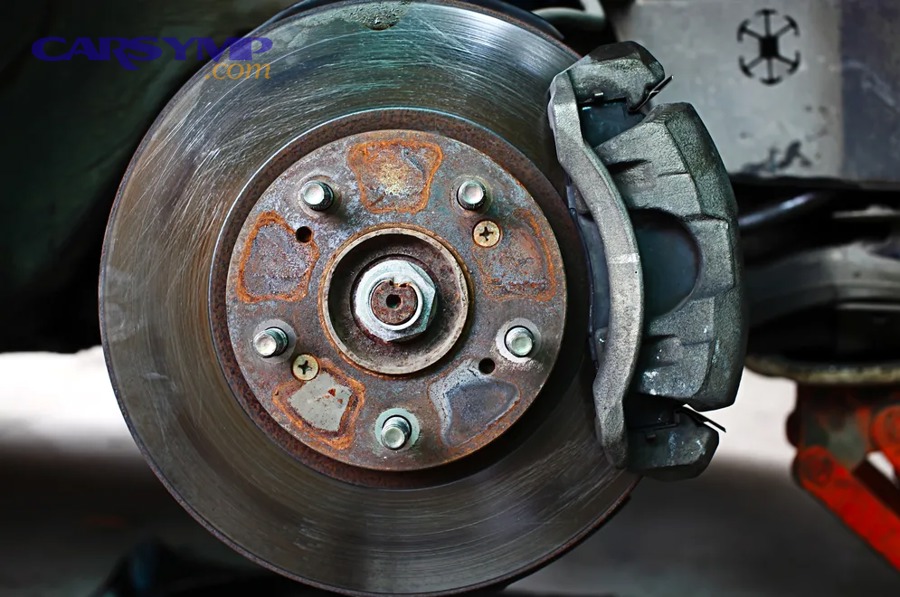
Visible rotor clues include deep grooves, heavy lip at the outer edge, blue/black heat spotting, cracking, and patchy friction marks, because these reflect uneven wear or overheating history.
To confirm the “feel,” the next move is a careful visual inspection with the wheel off (or through the wheel spokes if access is limited).

Outer edge “lip” and what it implies
A pronounced outer lip forms when the pad contact area wears the rotor face while the outer edge remains less contacted, indicating measurable wear and potentially reduced thickness near the pad sweep area.
Next, compare left vs right rotors on the same axle; unequal lips often point to unequal pad pressure, slide pin issues, or caliper problems.
As a practical check, if one rotor has a sharp ridge and the other is relatively flat, treat that axle as a system issue, not just a rotor issue.
Heat spots, discoloration, and hard patches
Blue or purple discoloration can indicate high heat events, and patchy dark areas can suggest uneven friction film or localized overheating that may contribute to vibration.
To understand the impact, remember that heat cycling can change surface characteristics and promote uneven pad transfer if bedding-in was poor or the brakes were overheated.
This matters because a rotor can look “not terrible” yet still have uneven friction behavior that creates a strong pedal pulse.
Cracks, checking, and when to stop driving
Radial cracks, heavy heat checking, or chunks missing are serious, because they can indicate structural compromise or severe thermal stress.
After that, your safest choice is to avoid hard braking and schedule immediate inspection, since a compromised disc can fail unpredictably under heat and load.
Even small cracks that grow from repeated heat cycles should be taken seriously, especially if you tow, drive mountains, or do frequent high-energy stops.
Rust bands and uneven friction marks
Rust bands on the rotor face or uneven shiny/dull patches often indicate uneven pad contact, caliper drag, or a vehicle that sat for long periods, which can create vibration until surfaces normalize—or until deposits become permanent.
Next, consider how the car has been used; long storage, short trips, and wet climates can all increase rust and uneven surface conditions.
In many cases, light surface rust cleans up after a few normal stops, but heavy pitting or persistent bands can keep causing noise and pulsation.
Which measurements confirm rotor problems: runout, thickness, and surface condition?
The most reliable confirmations come from measuring lateral runout and rotor thickness at multiple points, because these directly quantify uneven rotation and thickness variation that cause pulsation.
To make those numbers meaningful, you also need to control the basics: clean hub face, correct lug torque, and consistent measurement technique.

Runout: what it is and why it matters
Lateral runout is the side-to-side wobble of the rotor as it rotates, and too much runout can create uneven pad contact that later “machines” the rotor into thickness variation.
Next, treat runout as a system measurement: hub cleanliness, rotor seating, and wheel lug torque can all change the result.
A small amount of runout can be tolerated, but if you’re chasing persistent vibration, even modest runout can be enough to create DTV over time.
To add a practical detail without turning this into a full procedure, a dial indicator placed near the rotor’s outer friction surface is commonly used to observe the total indicator reading as you rotate the rotor by hand.
Thickness variation: the hidden driver of pulsation
Disc thickness variation means the rotor is not the same thickness all the way around, causing the caliper piston to move in and out and producing the brake pulse you feel.
After that, measure thickness in multiple spots around the rotor (and at consistent distances from the edge), because single-point checks can miss localized high/low areas.
Importantly, thickness variation can be caused by heat, deposits, and runout-related wear, so it’s both a symptom and a clue to deeper causes.
In service conversations, you may hear “Rotor thickness minimum specs explained” as a decision threshold: once a disc is at or below its minimum thickness, resurfacing is off the table and replacement becomes the safe choice.
Surface condition: scoring, glazing, and friction film
Surface scoring and glazing can reduce consistent friction and increase noise, while uneven friction film can mimic “warp” by creating high/low grip zones around the rotor.
Next, look at pad condition too, because pads and rotors create a matched friction surface; replacing only one half of the pair can leave the root cause untouched.
In many real-world cases, what drivers call “warped rotors” is actually a friction film issue that can sometimes be corrected with proper bedding and surface preparation—provided thickness and structure are still within safe limits.
Hub and lug torque: the measurement-killer you must control
Uneven lug torque or corrosion on the hub face can clamp the rotor unevenly, creating runout that looks like rotor warp even if the disc itself is fine.
So, before you trust any measurement, ensure the hub face is clean and the wheel is torqued evenly to specification, because this can eliminate false positives.
This is also why careful installation matters after brake service; the best parts can still produce vibration if the mounting surfaces or torque pattern are wrong.
What causes rotor “warping” symptoms if the rotor isn’t actually bent?
Warping-like symptoms often come from thickness variation or uneven friction deposits rather than a physically bent disc, because the pads experience changing contact forces as the rotor rotates.
To reduce repeat problems, the next step is identifying which cause created that unevenness in the first place.

Uneven friction deposits and heat imprinting
When brakes get hot and the vehicle is held stopped with firm pedal pressure, pad material can imprint unevenly, creating a high-friction patch that repeats every rotation.
Next, connect this to your driving pattern: repeated hard stops, downhill braking, towing, or track-style use increases heat and raises the chance of uneven deposits.
In everyday terms, this can feel like “bad rotors” even when thickness is still acceptable, because the grip is not uniform around the disc.
Caliper hardware problems: slide pins, sticking pistons, and drag
Sticky slide pins or a dragging piston can keep one pad in contact, overheating one rotor face and encouraging uneven friction and wear.
After that, look for asymmetry: one wheel hotter, one pad much thinner, or one rotor face more discolored than the other is a strong hardware clue.
Fixing symptoms without fixing the hardware is how many brake jobs turn into repeat vibration within weeks or months.
Installation factors that create runout and future DTV
Rust, debris, or improper seating between hub and rotor can introduce runout immediately, which can then wear into thickness variation over time.
So, when vibration appears soon after new parts, suspect the mounting surfaces and torque pattern before blaming the new rotor quality.
This is also where correct “brake rotor replacement” practices matter: clean mating surfaces, verify hub condition, torque evenly, and confirm the rotor runs true after installation.
Heat management and driving behavior
Overheating a rotor can change its surface behavior and promote uneven deposits, even if the disc is structurally intact.
Next, consider whether your brake system is matched to your use: heavy loads, steep grades, or aggressive braking may require higher-quality pads, better airflow, or updated maintenance habits.
In the long run, controlling heat and bedding-in correctly can reduce the risk of recurring pulsation more than simply swapping parts repeatedly.
How can you tell rotor symptoms from other issues that mimic them?
You can separate rotor symptoms from look-alikes by checking whether vibration happens only during braking, whether it changes with pedal pressure, and whether the steering wheel or seat is the primary vibration path.
To avoid chasing the wrong fix, the next step is a quick pattern-based diagnosis before parts are replaced.

ABS activation vs rotor pulsation
ABS activation feels like rapid, machine-gun pulsing with noise and pedal feedback, usually triggered by low traction or panic stops, while rotor-related pulsation is smoother, repeatable, and tied to vehicle speed during normal braking.
Next, think about conditions: if it happens on ice, gravel, or wet paint lines, ABS is more likely; if it happens on dry smooth pavement every time, rotors move up the list.
Also, ABS events often come with a warning light or stored codes if there’s a sensor fault, while rotor issues typically do not trigger ABS lights.
Wheel balance and tire issues
Wheel imbalance typically causes vibration that increases with speed even when you’re not braking, while rotor-related vibration usually spikes when braking and can be minimal when cruising.
After that, do a simple A/B check: if the steering shake is present at 60–70 mph while coasting and does not change much when braking lightly, suspect tires/wheels first.
Conversely, if braking transforms a smooth cruise into a strong shake, “bad rotors” or rotor-adjacent causes remain a top hypothesis.
Suspension and steering play
Loose tie rods, worn bushings, or ball joints can amplify any brake vibration and can also create their own shake patterns, especially on rough roads.
Next, listen and feel: clunks over bumps, wandering steering, and uneven tire wear point to chassis wear that may need attention alongside brake work.
Even a perfect rotor cannot fully mask a front end with excessive play, so a combined inspection often saves time and repeat repairs.
Wheel bearing noise and hub issues
A failing wheel bearing often causes a growl or roar that changes when you turn left or right, while rotor issues are more braking-linked and rhythm-based.
So, if you hear a constant growl that gets louder in turns even without braking, shift focus to bearings and hub condition before replacing rotors.
Hub issues matter because a worn hub can also contribute to runout readings and vibration, complicating rotor diagnosis if ignored.
When should you resurface, replace, or leave the rotors alone?
You should replace rotors when thickness is at or near minimum, when there are cracks or severe heat damage, or when vibration persists despite corrected runout and hardware, because safety and durability depend on structural margin.
To choose correctly, the next move is to combine measurements with visible condition and your driving demands.
Resurfacing: when it can help and when it can’t
Resurfacing can help when the rotor is thick enough and structurally sound, and the main issue is surface scoring or minor thickness variation that can be corrected by machining.
Next, consider the practical tradeoff: resurfacing removes material, so it reduces heat capacity and margin; if you’re already close to minimum thickness, it’s a short-term fix at best.
Also, resurfacing won’t cure root causes like sticking calipers or uneven lug torque; if those remain, vibration can return quickly.
Replacement: what to prioritize beyond “new parts”
Replacement is the right call when the rotor is below spec, cracked, heavily heat-spotted, or too uneven to machine safely, because the braking system needs predictable thickness and strength.
After that, choose parts that match your use: daily commuting, mountains, towing, or spirited driving all impose different heat demands and pad compatibility needs.
In discussions, you’ll see “Drilled/slotted vs plain rotor pros/cons” debated; the practical takeaway is to prioritize correct fit, quality metallurgy, and proper installation over marketing features if your goal is smooth, durable braking.
“Leave it alone”: when symptoms are not rotor-driven
If vibration happens mainly while cruising, if braking does not make it worse, or if a tire issue is obvious (cupping, separated belt, out-of-round), replacing rotors may not change the symptom.
So, before spending money, confirm the symptom pattern and do a basic wheel/tire and suspension check to avoid an expensive no-fix outcome.
In many cases, solving a wheel balance or tire defect restores smooth braking “feel” without touching the rotors at all.
A quick decision table to match symptom to likely action
This table helps you map the symptom pattern to the most likely next step, so you can prioritize inspection and avoid replacing parts blindly.
Use it as a starting point, then confirm with measurements and a hardware check before final decisions.
| Symptom pattern | Most likely rotor-related cause | Best next step |
|---|---|---|
| Pulsation only when braking, repeatable by speed | Thickness variation or uneven friction film | Measure thickness/runout; inspect pads and caliper hardware |
| Steering shake under braking, minimal shake when cruising | Front rotor condition or mounting/runout issue | Check hub cleanliness, lug torque, and front rotor measurements |
| Vibration at speed even without braking | Often not rotors (wheel/tire balance or out-of-round) | Inspect tires/wheels; balance/road-force test if available |
| One wheel much hotter, pulling, uneven pad wear | Dragging caliper or slide pin issue | Repair hardware first; then reassess rotor condition |
| Cracks, severe heat spots, deep scoring | Structural/thermal damage | Replace rotors; verify pads and hardware; improve heat management |
What safety risks come with driving on worn or “warped” rotors?
Worn or warp-like rotor conditions can increase stopping distance, reduce braking consistency, and distract the driver with vibration and noise, because the friction interface is less stable under heat and load.
To stay safe, the next step is to recognize the red-flag symptoms that justify immediate inspection.

Longer stops and inconsistent pedal response
Uneven contact can reduce effective friction and create inconsistent torque, which can lead to longer stops or unpredictable pedal feedback, especially during repeated braking events.
Next, remember that consistency matters as much as peak performance; smooth, predictable braking helps you modulate and avoid skids in real traffic.
If your pedal feel changes from stop to stop, treat it as a system problem rather than an annoyance.
Heat buildup, fade, and compounding damage
When rotors are thin, heavily scored, or heat-damaged, they have less ability to absorb and shed heat, increasing the risk of fade and accelerating pad and fluid stress.
So, if you’re towing, driving long descents, or doing heavy city braking, prioritize restoring proper rotor condition and hardware function before the problem escalates.
What starts as a mild pulsation can turn into a larger repair if overheating spreads to pads, seals, and fluid.
Structural risks: cracking and separation
Severe thermal stress can promote cracking, and extreme damage can lead to fragments or failure that compromise braking and wheel area safety.
After that, the right response is not “drive gently for a while,” but to schedule inspection promptly and avoid conditions that force heavy braking until fixed.
Even if the vehicle still stops, a compromised rotor can fail at the worst possible moment—under heat, downhill, or emergency braking.
FAQ: Quick answers about rotor wear, warping, and diagnosis
These quick answers address the most common follow-up questions drivers have when they feel rotor wear and warp symptoms, because small details often decide whether the issue is rotors, hardware, or a look-alike.
To get the most value, the next step is to pair each answer with your symptom pattern and a basic inspection.

Can new rotors still cause vibration right after installation?
Yes, new rotors can still cause vibration if the hub face is rusty, the rotor isn’t seated flat, lug torque is uneven, or caliper hardware is sticking, because these issues can introduce runout and uneven contact immediately.
Next, verify installation basics before blaming the parts: clean surfaces, correct torque pattern, and a quick runout check can prevent repeat comebacks.
If symptoms began the same day as service, installation and hardware checks should come before another parts swap.
Do “warped rotors” always mean you must replace them?
No, not always—some warping-like symptoms come from uneven friction film or mild thickness variation that can be corrected if thickness is still above minimum and the rotor is structurally sound.
However, if cracks, severe heat spotting, or minimum thickness limits are involved, replacement becomes the safe and durable solution.
To avoid guessing, measure thickness and runout, and inspect pads/hardware as part of one decision.
Why does the vibration sometimes come and go?
Vibration can come and go when heat changes friction behavior, when deposits shift slightly, or when pad contact varies with moisture and temperature, making the symptom more noticeable under certain braking conditions.
Next, observe patterns: cold vs hot, light vs hard braking, and whether the symptom changes after a long highway cruise.
Intermittent symptoms still deserve measurement, because mild runout or deposits can evolve into persistent thickness variation.
Can pad choice affect rotor vibration symptoms?
Yes, pad compound and bedding-in affect friction film stability; a mismatched pad or poor bedding can promote uneven deposits that mimic rotor warp symptoms.
After that, treat pads and rotors as a pair: compatible parts and correct break-in can reduce the chance of repeated pulsation and noise.
If the problem started after a pad swap, inspect rotor surface and confirm the bedding procedure was appropriate for that pad type.
Contextual Border
Choosing rotors and preventing repeat “bad rotors” symptoms
To prevent repeat bad rotors complaints, focus on correct rotor selection, proper installation, and hardware health, because most recurring vibration is caused by system factors that recreate runout, deposits, or uneven wear over time.
Next, use the following micro-level strategies to build durability into your brake setup instead of chasing symptoms repeatedly.

Match rotor type and quality to how you drive
If you drive mountains, tow, or brake aggressively, prioritize rotors known for stable metallurgy and heat management, because thermal stability reduces the chance of uneven deposits and hot spotting.
In contrast, for normal commuting, a high-quality plain rotor paired with the right pad and correct installation often delivers the smoothest results over time.
What matters most is consistency and correct fit: a well-made rotor that runs true and stays within spec will outperform a feature-heavy rotor installed on a dirty hub.
Install like a measurement depends on it (because it does)
Clean the hub face thoroughly, remove rust scale, and torque lugs evenly to spec, because even small debris or torque imbalance can create runout that later becomes thickness variation.
Next, confirm the wheel and hub are healthy: a bent wheel, damaged hub, or worn bearing can undermine even the best brake parts.
If you’re chasing persistent pulsation, consider a runout check immediately after installation to catch issues before pads wear the pattern into the rotor.
Protect the friction film with correct bedding and heat habits
Proper bedding-in stabilizes the friction layer and reduces uneven deposits, especially after installing new pads or rotors, because it conditions the surfaces to work together under controlled heat.
After that, avoid holding heavy pedal pressure after hard stops when the brakes are extremely hot, because that can encourage imprinting and patchy transfer.
Small habit changes—like rolling slightly at a stop after a hard brake event when safe—can reduce the risk of repeat pulsation for some driving profiles.
Don’t ignore caliper hardware and fluid maintenance
Healthy slide pins, boots, and caliper movement prevent drag and uneven heat, while fresh brake fluid supports consistent pedal feel and reduces heat-related problems across the system.
Next, inspect pad wear patterns regularly; uneven pad wear is often the earliest warning that hardware is failing and rotor symptoms are coming next.
By treating the brake system as a complete set—rotors, pads, hardware, hub surfaces, and torque—you reduce the chance that rotor wear and warp symptoms return after service.