


A weak parking brake is usually fixable with a specific adjustment order: verify the problem, set the brake mechanism (shoes/pads) first, then remove cable slack, and finally confirm it holds on a safe incline test. That sequence restores holding power without creating brake drag.
Next, you’ll learn how to tell whether your parking brake is truly “weak” versus simply misadjusted, and how to run a quick driveway test that doesn’t damage your brakes or put you at risk.
Then, you’ll identify which system your vehicle uses—rear drum, drum-in-hat, or caliper-integrated—because the correct adjustment points and access locations change with the design.
Introduce a new idea: once you can adjust it to hold, you’ll also want to prevent the opposite problem—over-tightening—and cover edge cases like EPB service mode and brake work precautions and winter conditions.
Is your parking brake actually weak (and unsafe) right now?
Yes—your parking brake is actually weak if it can’t hold the vehicle, because (1) it fails an incline hold test, (2) the lever/pedal travel is excessive with little bite, and (3) it releases or slips after you’ve applied it firmly. Next, that “weak” diagnosis matters because you only want to adjust what’s necessary, not tighten blindly and create dragging brakes.
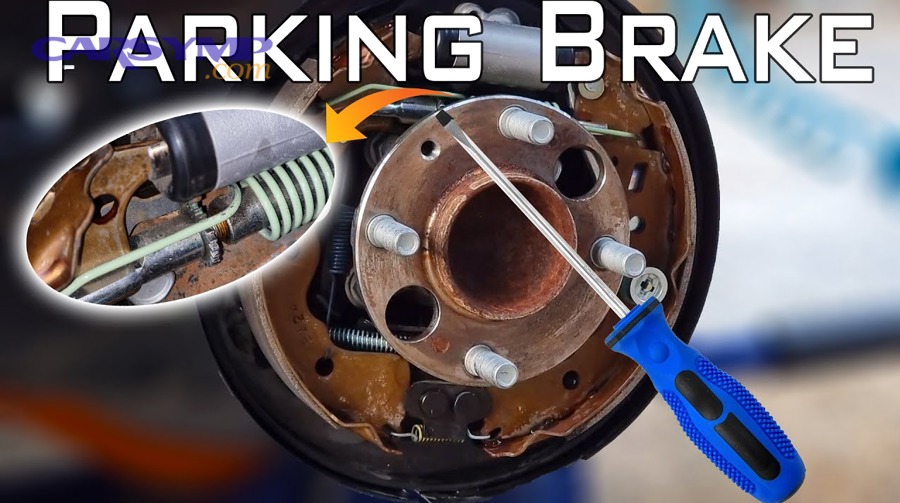
A parking brake (also called an emergency brake or e-brake) is not just a “backup.” It’s a mechanical holding system designed to keep a parked vehicle from rolling. When it’s weak, you’ll notice one or more of these real-world signs:
- The vehicle creeps when the parking brake is applied on a mild incline.
- The lever/pedal goes high with little resistance (lots of travel, poor bite).
- One rear wheel seems to hold while the other does almost nothing (imbalance).
- You apply it firmly, but after a minute it relaxes and the vehicle shifts.
If you see any of those, treat it like a safety issue first. Choose a flat area, use wheel chocks, and don’t “test” holding power by standing behind the vehicle or putting anyone downhill from it.
Can you do a safe driveway holding test without damaging the brakes?
Yes—you can do a safe driveway holding test because (1) you can control the environment with wheel chocks, (2) you can start on flat ground and progress gradually, and (3) you can keep forces low by using idle and gentle incline angles. Then, the point is to get a clear pass/fail result without heat, speed, or risk.
Here’s a simple, repeatable test sequence:
- Start on flat ground
- Put the transmission in Park (automatic) or in gear (manual).
- Chock at least one wheel (two is better).
- Apply the parking brake with firm, consistent force.
- Check for engagement feel
- Hand lever: you should feel increasing resistance as you pull.
- Foot pedal: it should firm up rather than sink endlessly.
- Low-load creep check (safe version)
- With the parking brake applied and foot on the service brake, shift into Drive (or 1st gear for manual).
- Release the service brake slightly while staying ready to reapply it.
- A healthy parking brake resists strongly and does not let the vehicle roll freely.
- Incline confirmation (only if safe)
- Choose a very mild incline in a controlled area.
- Keep your foot near the service brake and avoid traffic.
- Apply the parking brake firmly, shift into neutral briefly, and confirm it holds.
Pass/fail rule: If the vehicle can roll or creep easily with the parking brake applied, it’s weak and needs adjustment or repair.
Does excessive lever/pedal travel always mean it needs cable tightening?
No—excessive lever/pedal travel does not always mean you should tighten the cable, because (1) shoe/pad clearance can be too large, (2) self-adjusters can be stuck or mis-set, and (3) worn hardware can prevent the mechanism from “taking up” properly. Next, the safest path is to set the brake mechanism first so the cable doesn’t end up masking a deeper problem.
This is the biggest DIY mistake: tightening the cable until the lever feels “short,” while the shoes are still far from the drum (or the internal mechanism is out of position). The cable then becomes the compensator for the wrong gap, and you risk:
- Dragging brakes (heat, smell, premature wear)
- Poor full release (reduced fuel economy, uneven wear)
- A parking brake that feels “tight” but still doesn’t hold well under load
That’s why the rest of this guide focuses on correct adjustment order rather than “tighten until it feels right.”
What is the “parking brake adjustment” you’re actually changing?
Parking brake adjustment is the process of setting the brake mechanism’s clearance and cable slack so mechanical force turns into holding torque, with the mechanism (shoes/pads) set first and the cable adjusted second. Then, once you understand what’s being adjusted, you can fix weakness without creating drag.

Most parking brakes work by converting lever/pedal motion into cable pull, which spreads shoes against a drum surface or applies a caliper mechanism. Two different “adjustments” get confused:
- Base adjustment (mechanism clearance)
- Sets how close the shoes/pads sit to the drum/hat or how the caliper lever/piston geometry starts.
- Controls how quickly the brake “bites” and how much torque it can create.
- Cable adjustment (slack removal and equalization)
- Removes excess slack so lever travel is reasonable.
- Balances left/right engagement through an equalizer.
If you only adjust the cable, you can shorten travel but still have poor holding power because the shoes/pads may not be positioned to generate torque efficiently.
What’s the difference between adjusting the brake mechanism vs adjusting the cable?
Mechanism adjustment wins for holding power, while cable adjustment is best for lever travel and balance, because the mechanism creates friction contact and torque, and the cable mainly transmits and equalizes force. Then, you can think of the cable as “fine-tuning,” not the foundation.
A practical rule:
- If your lever travels far and holding power is poor → start with mechanism adjustment.
- If holding power is strong but lever travel is excessive → adjust cable slack.
- If one side holds and the other doesn’t → check mechanism balance first, then cable equalizer.
This order also aligns with common professional guidance that cables can develop slack over time and should not be used to compensate for worn or mis-set internal adjustments. (brakeandfrontend.com)
What tools and supplies do you need to adjust a weak parking brake?
There are 3 main tool groups you need for weak parking brake adjustment: safety/support tools, adjustment tools, and inspection/cleanup tools, based on whether you’ll access an adjuster through a port or remove drums/rotors. Next, having the right tools reduces “guesswork tightening,” which is how dragging brakes happen.
Safety/support (non-negotiable):
- Jack and jack stands
- Wheel chocks
- Gloves and eye protection
- Torque wrench (wheel lug torque matters)
Adjustment tools:
- Flat screwdriver or brake spoon (star wheel adjusters)
- Sockets/wrenches for console/equalizer adjusters
- Pliers for clips (some systems)
Inspection/cleanup:
- Flashlight/headlamp
- Brake cleaner (use responsibly)
- Small wire brush
- High-temp brake lubricant for adjuster threads (sparingly, correct locations)
If you suspect cable binding, add penetrant and plan for a deeper inspection—especially in winter/salt areas where cable corrosion is common.
Which parking brake design does your vehicle use (and why does it change the steps)?
There are 3 main parking brake designs—rear drum, drum-in-hat, and caliper-integrated—based on where friction is created and where the adjuster lives, and that design determines your access point and adjustment sequence. Then, identifying your design first prevents wasted time adjusting the wrong part.
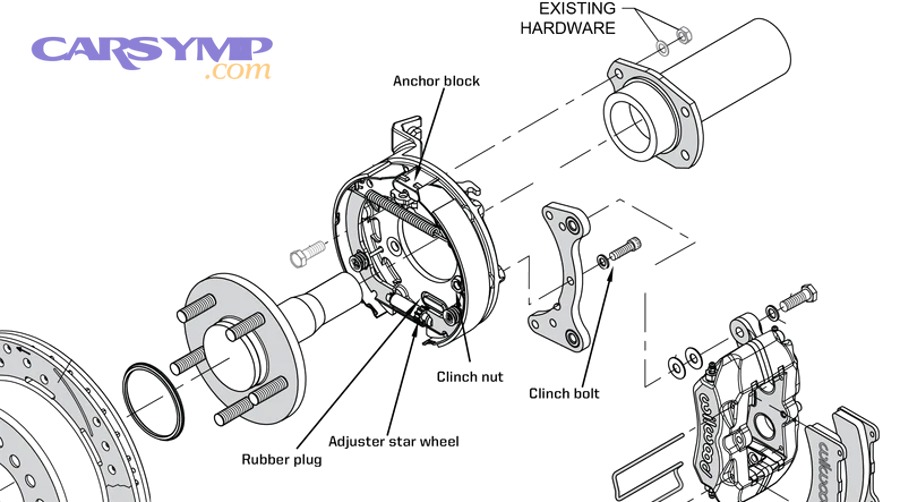
Use these quick identifiers:
- Rear drum brakes: You have a drum at the rear wheel; parking brake is usually the same drum system.
- Rear disc brakes + drum-in-hat: You have rear rotors, but the parking brake uses small shoes inside the rotor “hat.”
- Rear disc brakes + caliper-integrated: Parking brake uses the rear caliper mechanism (lever or motor at caliper).
Is it a rear drum parking brake (star wheel inside the drum)?
Yes, it’s a rear drum parking brake if the rear wheel uses a drum and the adjustment usually involves a star wheel that sets shoe-to-drum clearance, because that clearance controls bite and holding torque. Then, the classic symptom is lots of lever travel with weak hold.
Typical access points:
- Adjustment through a slot in the backing plate (sometimes with a rubber plug)
- Drum removal for cleaning and inspection
What commonly goes wrong:
- Star wheel seized or dirty
- Shoes worn or glazed
- Hardware springs weak or broken
- Self-adjuster mechanism not operating properly
Is it a drum-in-hat parking brake (shoes inside the rotor “hat”)?
Yes, it’s a drum-in-hat parking brake if you have rear disc rotors but also a small internal drum surface in the rotor hat where dedicated parking brake shoes expand, because the parking brake is separate from the hydraulic disc pads. Next, your adjustment focuses on shoe clearance inside the rotor hat.
This system is very common on SUVs and trucks. You often adjust:
- Through an access port (sometimes behind the rotor) or
- By removing the rotor for full visibility
Common pitfalls:
- Shoes contaminated by gear oil or brake dust
- Rust ridge inside the hat that reduces effective contact
- Misadjusted shoes that never fully “seat” against the drum surface
Is it a caliper-integrated parking brake (lever/piston mechanism)?
Yes, it’s a caliper-integrated parking brake if the rear caliper has a lever or built-in mechanism that applies clamp force mechanically, because parking force is created by the caliper rather than separate drum shoes. Then, adjustment and diagnosis focus on lever return, cable travel, and caliper health.
Two common variants:
- Mechanical lever on caliper: Cable pulls the lever; lever rotates the internal mechanism.
- Electronic Parking Brake (EPB): Motorized actuator applies the mechanism.
If the caliper lever doesn’t return freely, or the internal mechanism is worn, cable adjustment alone won’t restore holding power. This is where parking brake repair sometimes means component replacement rather than just adjustment.
How do you adjust a weak parking brake step-by-step (the correct order)?
Use the mechanism-first method in 6 steps—secure the vehicle, inspect, set base shoe/pad clearance, remove cable slack, equalize left/right, and re-test—so the parking brake holds firmly without dragging. Then, this order fixes weakness while preventing the common over-tightening trap.

To keep the steps universal, treat this as a workflow:
- Secure and lift safely (chock wheels, jack stands).
- Identify system type (drum, drum-in-hat, caliper-integrated).
- Inspect key components (shoes/pads, adjuster, cables, equalizer).
- Set base adjustment (the friction mechanism).
- Set cable adjustment (remove slack only, balance engagement).
- Verify hold and full release (driveway test + drag check).
Below are the critical details that make those steps actually work.
What are the exact steps to set the base adjustment so it holds without dragging?
Set base adjustment by tightening until you get light, consistent drag and then backing off slightly, because that places the shoes/pads close enough for strong torque while preserving full release. Next, this is the step that most directly fixes weak holding.
For rear drum or drum-in-hat systems (shoe-based):
- Release the parking brake fully.
- Lift the rear safely; remove the wheel if needed for access.
- Find the star wheel adjuster access slot (backing plate or rotor hat access).
- Turn the star wheel to expand the shoes until you feel noticeable drag when rotating the wheel/rotor by hand.
- Back off the adjuster slightly until the drag becomes light and even, not scraping or binding.
- Repeat on the other side and aim for similar drag left and right.
Key cautions:
- If the adjuster is stiff, don’t force it. Remove the drum/rotor and clean/lube the adjuster threads appropriately.
- If shoes are contaminated (oil/grease), adjustment won’t fix holding power reliably—plan for service.
For caliper-integrated systems:
- Base “adjustment” may not be a star wheel; it can involve ensuring the caliper mechanism returns correctly and pads are in proper condition.
- If the lever on the caliper doesn’t return to its stop, fix that binding first.
Evidence sentence: According to a study by the University of Leeds from the School of Mechanical Engineering, in 2007, parking brake holding torque can reduce as the brake cools due to system relaxation, and the likelihood of rollaway is linked to brake temperature at the time of parking—reinforcing why consistent mechanism setup (and correct application force) matters. (etheses.whiterose.ac.uk)
How do you tighten the cable/equalizer properly after base adjustment?
Tighten the cable/equalizer only enough to remove slack, because (1) it restores reasonable lever travel, (2) it balances left/right engagement, and (3) it preserves full release without dragging. Then, cable tightening becomes a finishing step, not the main fix.
Look for the adjustment point:
- Underbody near the rear cable junction/equalizer
- Under center console at the hand lever
- Near pedal assembly on some trucks
Cable adjustment method (universal):
- Confirm base adjustment is already set on both sides.
- With the parking brake released, tighten the adjuster until slack is removed.
- Apply the parking brake and check engagement:
- Lever systems often aim for a firm bite within a reasonable number of clicks (varies by vehicle).
- Release the brake and spin the rear wheels/rotors:
- They should rotate freely with minimal residual drag.
- If one side engages earlier than the other, check:
- Equalizer alignment
- Cable routing/binding
- Base adjustment symmetry
Parking brake cable replacement overview (when adjustment isn’t enough):
If you run out of adjustment range (nut bottomed out) or the cable sticks, frays, or binds, replacement is often the correct fix. A bad cable can steal force through friction and prevent full return. If you’re already doing underbody work, inspect cable housings for cracks and corrosion and plan replacement before it fails completely. (saemobilus.sae.org)
How do you confirm the fix with a repeatable test (and avoid over-tightening)?
Confirm the fix by passing a controlled hold test and a full-release drag check, because (1) holding proves torque, (2) release proves no drag, and (3) consistency proves the adjustment is stable. Then, you’ll know you fixed weakness without creating a new problem.
Repeatable confirmation checklist:
- On flat ground: parking brake applied → vehicle resists gentle creep.
- On mild incline (safe area): parking brake applied → vehicle holds.
- After release: rear wheels rotate freely by hand when lifted.
- After a short drive: no burning smell, no abnormal heat at a rear wheel.
Drag vs weak hold “feel” cues:
- Dragging: car feels sluggish, smell/heat, wheel harder to spin, MPG drop.
- Weak hold: lever travel long, vehicle creeps on incline, holds inconsistently.
If you’re unsure, err on the side of slightly looser and re-check base adjustment, rather than tightening cable aggressively.
What causes a weak parking brake—and what do you fix first?
There are 5 common causes of a weak parking brake—misadjusted shoe clearance, worn shoes/pads, stretched/binding cables, seized adjusters, and damaged hardware—and you fix them in that order because the friction mechanism must be correct before cable tension can work. Next, this diagnostic map prevents “endless tightening” and leads to durable parking brake repair.

(If the image above fails to load due to hosting changes, use the equalizer photo earlier in the article as your reference point.)
Here’s the practical “fix first” logic:
- Base adjustment wrong (most common): Fix shoe/pad clearance first.
- Shoes/pads worn or contaminated: Replace and then adjust.
- Cable slack or stretch: Remove slack only after base adjustment.
- Cable binding or corrosion: Repair/replace cable.
- Hardware failures: Springs/clips/lever return issues require parts service.
Professionals also note that cable efficiency varies with construction and condition; friction and internal losses can reduce the force that actually reaches the brake mechanism. (saemobilus.sae.org)
If it won’t hold even after adjustment, do the shoes/pads or hardware need replacement?
Yes—if it won’t hold even after correct adjustment, the shoes/pads or hardware likely need replacement because (1) friction material may be worn or glazed, (2) hardware may not apply evenly, and (3) contamination can prevent real grip no matter how tight you set it. Then, replacement becomes the only path to restore torque.
Look for these replacement triggers:
- Shoes are thin, cracked, or unevenly worn
- Glazing (shiny surface) and poor bite even when adjusted close
- Broken or weak return springs
- Rust ridge in drum/hat preventing full contact
- Oil/grease contamination (common with axle seal leaks)
A common symptom pattern:
You can tighten the cable to get a “short lever,” but the car still slips. That usually means you’re pulling on a mechanism that can’t generate friction torque.
If one side grabs more than the other, is the cable/equalizer binding?
Yes—one-side grabbing often points to binding or imbalance because (1) a sticking cable can prevent equal force, (2) the equalizer can sit off-center, and (3) one mechanism can be adjusted tighter than the other. Next, you’ll fix imbalance by matching base adjustment and ensuring cables move freely.
Quick checks:
- With the vehicle lifted and parking brake released, confirm both rear wheels spin similarly.
- Apply the parking brake lightly and see whether one side starts dragging much earlier.
- Inspect the equalizer: does it pull straight, or does it twist?
If the cable housing is cracked or corroded, or the cable doesn’t spring back smoothly, replacement is typically more effective than repeated lubrication. That’s where a Parking brake cable replacement overview becomes a practical next step, especially for vehicles in salt states.
What should you do after adjustment to prevent dragging, uneven hold, or quick fade?
After adjustment, you should verify full release and stability because (1) dragging creates heat and wear, (2) imbalance reduces holding confidence, and (3) some systems need a brief bedding-in for consistent grip. Then, this post-check phase is what turns a one-time adjustment into reliable long-term performance.
Do you need to bed-in (burnish) parking brake shoes after replacing or adjusting them?
Yes, you may need to bed-in parking brake shoes because (1) new friction surfaces need to mate to the drum/hat, (2) light glazing can reduce initial bite, and (3) controlled heat cycles can stabilize friction. Next, bedding-in is a gentle process—never an aggressive “smoke test.”
A safe, general burnishing approach:
- In a safe area at low speed, apply the parking brake lightly for a short moment (not enough to lock wheels).
- Release, drive briefly to cool, and repeat a few times.
- Re-check hold and release afterward.
If you smell strong burning or feel significant drag, stop and re-check adjustment immediately.
How can you tell the adjustment is too tight (dragging) vs too loose (weak hold)?
Too tight (dragging) shows heat and resistance, while too loose (weak hold) shows excessive travel and slipping, because these are opposite failure modes with different symptoms and risks. Then, you can correct the right problem instead of chasing the wrong one.
Too tight / dragging indicators:
- Rear wheel hard to spin when lifted
- Burning smell after a short drive
- One rear wheel noticeably hotter than the other
- Reduced MPG or “sluggish” feeling
Too loose / weak hold indicators:
- Lever/pedal goes far before firming up
- Vehicle creeps on an incline
- Parking brake holds only on one side
A smart correction pattern:
- Dragging → back off cable slightly, then confirm base adjustment isn’t overly tight.
- Weak hold → confirm base shoe/pad clearance first, then remove slack.
If you have an electronic parking brake (EPB), do you need service mode or calibration?
Yes, you often need EPB service mode because (1) the system can apply unexpectedly, (2) the actuator can be damaged if forced, and (3) manufacturers require a service procedure to prevent injury and component damage. Next, treat EPB work as procedure-driven, not improvisational.
This is where EPB service mode and brake work precautions become non-negotiable. A common safety warning is to follow the manufacturer’s service steps to place the EPB into service/maintenance mode before servicing rear brakes to prevent unexpected application or damage. (mightyautoparts.com)
General guidance:
- Use the vehicle’s recommended procedure (dash sequence or scan tool).
- Do not pry or force an EPB caliper mechanism without the correct mode.
- After service, follow the deactivation/reinitialization steps.
What are the fastest troubleshooting checks if the parking brake is still weak after adjustment?
There are 4 fast troubleshooting checks if the parking brake is still weak: confirm correct base adjustment, confirm cable free movement, inspect friction surfaces for contamination, and check left/right balance under light application. Then, these checks help you decide whether you need deeper parking brake repair or a simple re-set.
1) Reconfirm base adjustment
- Light, even drag on both sides when set
- No severe scraping, no binding
2) Check cable movement
- Smooth pull and return
- No “sticky” feel or delayed release
- Equalizer moves straight and returns naturally
3) Inspect friction surfaces
- Drum/hat interior free of oil/grease
- No deep grooves or heavy rust ridge
- Shoes not glazed to a mirror finish
4) Balance test
- Light application should begin to drag both sides similarly
- If one side engages early, correct base adjustment first
Winter freezing parking brake tips (when conditions are harsh):
In freezing weather, moisture can freeze components in place. Many winter guides recommend avoiding setting the parking brake overnight when freezing is likely, especially if there’s moisture present, and using wheel chocks when parked on flat ground instead. (oilchangers.com)
Evidence sentence: According to a study by the University of Leeds from the School of Mechanical Engineering, in 2007, rollaway risk was found to be directly linked to brake temperature when parking, and the research noted rollaway can be reduced by lowering initial brake temperature and increasing input load when applying the parking brake. (etheses.whiterose.ac.uk)
Evidence (if any)
- According to a study by the University of Leeds from the School of Mechanical Engineering, in 2007, rollaway likelihood was linked to brake temperature at parking and could be reduced by lowering initial brake temperature and increasing input load when applying the parking brake. (etheses.whiterose.ac.uk)
- According to a study published by SAE International in 2011, parking brake cable construction affects parking brake system efficiency, with input/output force and travel measured under controlled testing—supporting the idea that cable condition and losses can impact real holding performance. (saemobilus.sae.org)