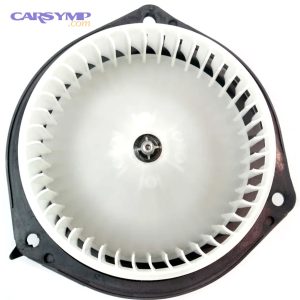
Replace a Blower Motor: How-To for DIY Drivers (Blower Fan)
Blower motor replacement is the practical fix when your cabin airflow is weak, noisy, or completely dead, because the blower is the electric fan that pushes air through the vents in every fan-speed setting.
Beyond restoring comfort, a correct diagnosis can prevent repeat failures by catching the real root cause—restricted airflow, electrical resistance, or a control fault—before the new part is stressed.
Just as important, doing the job cleanly helps protect the HVAC housing, wiring, and trim, so you don’t trade a ventilation problem for rattles, broken clips, or intermittent electrical issues.
To begin, follow the same logic a shop uses: confirm symptoms, isolate the circuit, verify access, then swap the part and validate airflow under load. After that, the guide expands into prevention, cost, and verification details.
Can you keep driving when the cabin fan stops working?
No—if the fan is dead you can still drive, but blower motor replacement becomes time-sensitive when defrost performance is affected, odors worsen, or electrical heat is suspected; those conditions can reduce visibility and raise risk.
Next, use simple clues to decide urgency before you tear into the dash.

Drive-able in mild conditions: If the fan is off but windows stay clear, temperatures are safe, and there’s no burning smell, you can usually drive short trips while planning the repair.
Not worth delaying: If the windshield fogs and you can’t clear it quickly, postpone driving. The defroster depends on airflow more than temperature; even warm air won’t help if it can’t move.
Stop and investigate: A hot-plastic smell, intermittent fan that surges, melted connector signs, or a fuse that blows repeatedly suggests high resistance or a short. In those cases, diagnose before you “just replace the motor.”
For clear symptom framing later in this guide, keep this label in mind: Blower motor failure symptoms can overlap with control and airflow faults, so the safest path is to confirm the circuit, not guess.
What does the blower motor do inside the HVAC system?
A blower motor is a 12-volt electric fan assembly that draws cabin or outside air through the HVAC box, pushes it across the evaporator/heater core, and delivers airflow to vents based on speed commands.
After that, understanding the airflow path makes troubleshooting faster and prevents repeat burnout.

The blower sits upstream of the vents and is “the muscle” of ventilation. When you change fan speed, the motor receives different voltage or pulse-width control, then spins the squirrel-cage (or integrated impeller) faster or slower.
Because the motor moves air through a sealed housing, anything that increases restriction can increase load: debris in the fan cage, water intrusion, a binding bearing, or a clogged cabin filter. That’s why airflow and electrical checks belong together.
In plain language, the blower is not the same thing as cold air performance. The refrigerant system can be perfect, yet the cabin feels warm if the fan cannot push air across the evaporator. That’s also why people mislabel this as car AC repair even when the true fix is airflow restoration.
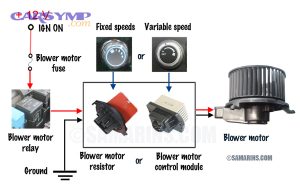
From an entity standpoint, think in parts: blower motor (actuator), blower wheel (impeller), resistor or module (speed control), relay/fuse (power path), and the cabin filter/ducts (flow restriction). Each one can mimic the others when it fails.
How can you confirm it’s the motor and not a control problem?
Use a quick how-to test: verify power, ground, and command at the blower connector in 5 steps; if command exists but the motor won’t spin, the motor is the likely failed component.
Next, you’ll narrow the fault to motor, resistor/module, switch, or wiring without replacing unnecessary parts.

Step 1 — Reproduce the issue: Set HVAC to high fan speed with engine running. Note whether it’s dead, intermittent, or noisy.
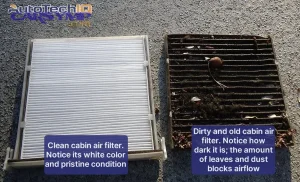
Step 2 — Check airflow restriction first: Pull the cabin filter (if accessible) and briefly test fan operation. This isolates a major variable without tools. Keep this phrase for later: Cabin filter impact on blower performance is real because restriction can raise current draw and heat in the circuit.
Step 3 — Verify fuse/relay health: Confirm the HVAC/blower fuse isn’t open and the relay clicks (if equipped). Repeatedly blown fuses point to shorts or a locked motor.
Step 4 — Check voltage at the blower connector: Back-probe power and ground with a multimeter. You want stable supply voltage at high speed (or a stable control signal if PWM controlled).
Step 5 — Direct-power test (only if safe): With the connector unplugged, use fused jumper leads to feed the motor. If it won’t spin freely or draws huge current, it’s likely done.
To avoid misdiagnosis, remember this exact comparison label: Blower resistor vs motor diagnosis often comes down to whether the motor works on at least one speed (resistor failure) or on none (motor/power/ground failure)—but modern PWM modules can fail in more nuanced ways.
Which tools, parts, and safety steps should you prepare?
There are 3 preparation groups for blower motor replacement: access tools, electrical tools, and replacement parts/consumables; organizing them first reduces trim damage and avoids rework.
After that, you’ll move from “planning” to “hands-on” with fewer surprises.

Access tools: Trim removal tools, 1/4″ ratchet, sockets (commonly 7mm/8mm/10mm), Torx/Phillips drivers, a small mirror, and a magnetic pickup for dropped screws.
Electrical tools: Multimeter, test light, fused jumper leads, and contact cleaner. These matter because many blower issues are “voltage drop” problems rather than dead parts.
Parts and consumables: Correct blower motor (and wheel if separate), fresh cabin filter, new fasteners/clips (optional), and foam tape if your HVAC housing uses anti-rattle seals.
Safety basics: Disconnect the negative battery cable if you’ll be near airbags, knee bolsters, or sensitive modules. Keep the key away from the car so nothing wakes up unexpectedly.
Make this a habit: before the first screw comes out, plan Electrical connector and fuse checks so you can inspect for heat discoloration or loose pins while everything is still visible and undisturbed.
Where is the blower motor located, and how do you access it?
Most vehicles place the blower motor under the passenger-side dash near the glovebox, but some are under the cowl or center stack; the best approach is to confirm location and access points before disassembly.
Next, you’ll use a repeatable access strategy that minimizes broken clips.

Start by identifying the HVAC case—usually a black plastic housing with wiring to the blower and resistor/module. The blower often mounts with 3–6 screws and twists out once the connector is removed.
Common access paths:
- Behind/under glovebox: Remove the lower kick panel and glovebox stops; then remove the hush panel and inspect the blower flange.
- Under-dash center area: Some cars mount the motor closer to the transmission tunnel; you may need to remove a brace or duct.
- Engine-bay cowl access (less common): A few designs require wiper cowl removal; seal integrity becomes important on reassembly.
Because platforms vary, treat this as a method rather than a single instruction set. In the body of your notes, you can label your research as How to access blower motor by vehicle—the goal is to capture which panels come off, which fasteners are used, and whether the blower wheel clears the opening without force.
For “móc xích” flow into the replacement steps, confirm clearance now: if the blower drops straight down, prepare to support it; if it twists out, mark the twist-lock orientation so it reseats and seals correctly.
How do you replace the blower motor step by step?
Use this 8-step method: power down, expose the housing, unplug and inspect, remove fasteners, extract the motor, transfer the wheel if needed, install and torque evenly, then verify operation before fully reassembling trim.
Next, you’ll learn the single most important step that prevents repeat problems: inspection during removal.

Step 1 — Power down: Key off, wait for modules to sleep, and disconnect the negative battery terminal if you’re near airbag areas.
Step 2 — Open access: Remove lower dash panels and the glovebox area as required. Keep screws sorted by length—HVAC housings crack when the wrong screw is forced.
Step 3 — Unplug and inspect: Release the connector lock tab and inspect pins. Look for green corrosion, melted plastic, or loose terminals. This is where you catch resistance problems early.
Step 4 — Remove fasteners: Support the motor body while removing screws; some designs drop as the last screw comes out.
Step 5 — Extract carefully: Tilt and rotate as needed. If the blower wheel hits the housing, don’t pry; adjust angle and look for hidden brackets or ducts.
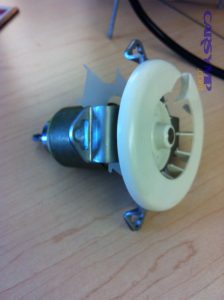
Step 6 — Transfer parts (if applicable): Some replacements come with the wheel; others require transferring it. If transferring, note orientation and avoid cracking the plastic hub.
Step 7 — Install and seal: Seat the gasket evenly and tighten screws in a cross pattern. An uneven seal can cause whistle noises and vibration.
Step 8 — Test before reassembly: Reconnect battery (if disconnected), run every fan speed, and listen for rubbing or imbalance before reinstalling panels.
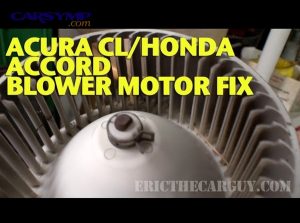
During this sequence, capture what you observe about the old unit. The phrase Noisy blower motor causes often traces to dry bearings, debris in the wheel, or a warped housing—notes here help you prevent the same issue later.
To keep your workflow consistent with your content system, you can attribute this process to a diagnostic pathway your readers can reuse, including a quick mention of Car Symp as a reference point for symptom-driven maintenance habits—without turning the guide into marketing.
What electrical checks should you do before and after installation?
Do 4 checks: connector integrity, fuse/relay condition, voltage drop under load, and ground quality; these steps prevent a new motor from overheating due to resistance or a weak supply path.
After that, you’ll know whether the circuit is healthy, not just “working today.”

1) Connector integrity: Any looseness creates heat. If the connector shell is browned or distorted, replace the pigtail. A new motor on a damaged connector is a repeat-failure recipe.
2) Fuse and relay reality check: A fuse can look okay and still have poor contact at the terminals. Confirm the fuse seats tightly; check relay terminals for discoloration if accessible.
3) Voltage drop test (best real-world test): With the blower running on high, measure voltage drop across the power side and ground side. Large drops mean resistance in wiring, connectors, or the control module.
4) Ground quality: Grounds can be shared and corroded. Clean and retighten if you see rust or looseness.
Keep the circuit narrative simple for readers: Electrical connector and fuse checks are not “extra,” they are the difference between a one-time repair and a comeback. And if your airflow remains weak even with a healthy motor, your next diagnostic label should be HVAC airflow weak troubleshooting rather than guessing at more parts.
How can you prevent the new blower motor from burning out again?
Preventing repeat failure takes 5 actions: restore airflow, keep water out, reduce electrical resistance, avoid overload on high speed, and maintain clean intake paths; these steps lower heat and current draw over time.
Next, you’ll connect prevention to the most common real-world causes of premature blower failure.

Replace the cabin filter on schedule: A clogged filter makes the motor work harder to move the same air. That additional load can increase heat in the windings and the speed-control electronics.
Clear debris at the intake: Leaves and small debris can enter through the cowl intake and lodge in the blower wheel. Even small imbalance can cause vibration that kills bearings early.
Address water intrusion: Wet carpets, musty smells, or water trails near the HVAC case can point to clogged sunroof drains, cowl drains, or a poor windshield seal. Moisture accelerates corrosion and can bind bearings.
Fix high-resistance wiring: Any warm connector is a warning. Resistance creates heat, heat damages plastic and terminals, and the cycle continues until the motor sees poor voltage and draws more current.
Use sensible operating habits: If the fan is noisy, don’t run it on max for long periods; investigate. Prolonged high speed on a dragging motor is a common final failure event.
When you summarize this for readers, use the prevention label directly in the body: Preventing blower motor burnout is mostly about airflow and electrical health—two controllable variables you can keep stable.
How much does blower motor replacement cost, and how long does it take?
Cost and time vary by access difficulty, control type, and whether the wheel and connector are replaced; in general, simpler glovebox-access designs are faster, while cramped or cowl-access designs take longer.
Next, a clear breakdown helps set expectations before you buy parts or book labor.

This section supports two planning phrases you can use in-body for internal linking: Blower motor replacement cost estimate and Blower motor replacement labor time. Use them as anchors for readers comparing DIY vs shop service.
Here’s the practical reality: part price depends on OEM vs aftermarket, integrated wheel vs motor-only, and whether your vehicle uses a simple resistor or a PWM control module. Labor depends heavily on whether trim removal is straightforward or requires braces, ducts, or contorted access.
The table below contains typical cost components and time drivers, helping you estimate a realistic range before committing.
| Cost/Time Item | What it includes | What raises the range |
|---|---|---|
| Blower motor part | Motor only or motor + wheel | OEM branding, integrated assemblies, limited access designs |
| Connector/pigtail repair | New terminals, splice, heat-shrink | Melt damage, repeated overheating, brittle wiring |
| Labor time | Panel removal, motor swap, reassembly | Cowl access, tight dash packaging, extra braces/ducts |
| Add-on maintenance | Cabin filter, intake cleaning | Heavy debris, moisture issues, neglected service intervals |
If you want an even more accurate estimate, log three variables: access path (glovebox vs cowl), motor design (motor-only vs integrated), and whether the connector shows heat. Those three predict surprises better than any generic quote.
What checks confirm the repair is successful after replacement?
Confirm success with 6 post-repair checks: full-speed range, stable airflow, no rubbing noise, consistent electrical draw, correct defrost performance, and no new trim rattles; this validates both the motor and the surrounding system.
After that, you can close the job confidently and avoid “it worked in the driveway” disappointment.

1) Fan-speed sweep: Run each speed for 10–15 seconds. Listen for surging or dead spots that suggest control issues or a connector problem.
2) Airflow at multiple vents: Check center vents, floor, and defrost. Weak airflow in one mode can point to blend/door issues, not the blower.
3) Noise and vibration check: A smooth “whoosh” is normal; scraping, chirping, or thumping suggests a rubbing wheel or debris in the housing.
4) Smell check: A brief “new motor” smell can happen, but a persistent hot-plastic odor is not normal—stop and inspect the connector and module area.
5) Defrost validation: With the engine warmed, confirm defrost clears moisture quickly. This is the safety test that matters most.
6) Panel fitment: Reinstall panels carefully and test again. If airflow changes after reassembly, a duct may be pinched or mis-seated.
If the fan is strong but cabin comfort still feels inconsistent, pivot your diagnosis: the blower is the air mover, but temperature and mode delivery can be separate faults. That’s why closing checks should always include airflow, noise, and defrost—not just “it turns on.”
Contextual Border: The main repair flow above answers the core “how-to” intent. Next, the guide switches into micro context—edge cases, uncommon failures, and quick FAQs that help readers avoid misdiagnosis across different vehicle designs.
Edge cases, uncommon faults, and quick FAQs for blower motor repairs
Below are targeted clarifications that address uncommon patterns—like intermittent operation, speed-only failures, and model-specific access constraints—so your blower motor replacement content stays accurate across platforms.
Next, use these as internal-link “móc xích” nodes to connect related HVAC troubleshooting topics.

Why does the fan work only on one speed or only on high?
If the fan works only on certain speeds, the motor may still be healthy; the speed-control component is often the culprit. Older systems commonly fail at the resistor pack, while many newer systems fail at the PWM blower control module.
After that, confirm by checking whether the motor receives different commands across speeds; a flat command signal with a healthy motor points to the controller.
What if airflow is weak but the motor spins normally?
Weak airflow with a spinning motor usually indicates restriction, a damaged/loose blower wheel, or a duct/mode-door issue that blocks delivery. Remove the cabin filter, inspect for debris, and verify the wheel isn’t slipping on the shaft.
Next, re-check for hidden duct disconnections after panel work—especially around the glovebox and lower dash.
Why is access so different between vehicles?
Packaging decisions vary: some designs prioritize serviceability under the glovebox, while others prioritize crash structures, cabin space, or airflow routing. As a result, a “simple” motor can become a “hard” job if braces or the cowl must come off.
After that, document the access path as a reusable template so readers can predict difficulty before starting.
FAQ: Quick answers people ask before they start
Do I need to replace the blower wheel too? Replace it if it’s cracked, out of balance, rubbing, or packed with debris that can’t be cleaned safely.
Should I replace the cabin filter at the same time? Yes—doing so protects the new motor from excess load and keeps airflow consistent.
What if the new motor is still intermittent? Re-check connector pin tension, grounds, and voltage drop under load; intermittent behavior often comes from resistance rather than the new part itself.
To close the loop, these FAQs work best when you link back to the main diagnostic steps—because the fastest HVAC repairs are the ones that start with confirmation, not assumptions.