How to Replace Brake Pads Yourself: Complete Step-by-Step Guide for DIYers
Replacing brake pads yourself requires gathering essential tools, preparing your vehicle safely, removing old pads, installing new components, and performing a proper break-in procedure—a process that typically takes 1-2 hours per axle and can save you $200-$400 in professional labor costs. This DIY car repair task demands moderate mechanical skill, attention to safety protocols, and systematic execution of each critical step to ensure your vehicle stops reliably after the job is complete.
Understanding what tools you’ll need before starting prevents mid-project delays and ensures you can complete the Brake pad replacement time estimate of approximately two hours. The essential toolkit includes a hydraulic jack, jack stands, lug wrench, C-clamp or caliper piston compressor, socket set, and new brake pads matched to your vehicle’s specifications. Having everything ready transforms this potentially intimidating task into a manageable weekend project that builds your confidence in automotive maintenance.
Knowing when to replace brake pads prevents damage to expensive rotors and maintains safe stopping performance. Visual inspection reveals friction material thickness below the critical ¼-inch threshold, while auditory warnings like squealing indicate wear sensors contacting the rotor surface. Many DIYers also wonder When to replace rotors with pads, as rotor condition directly impacts brake performance and determines whether you’re performing a simple pad swap or a complete brake job.
The comparison between DIY vs shop brake pad replacement cost reveals substantial savings potential, with parts costing $30-$100 versus professional services ranging from $200-$500 per axle. Beyond monetary considerations, understanding professional alternatives helps you make informed decisions about when to tackle the job yourself and when specialized equipment or expertise justifies the investment. Below, we’ll walk through each phase of the replacement process, from preparation through the Post-job test drive checklist, ensuring you complete this critical safety maintenance correctly.
What Tools and Materials Do You Need to Replace Brake Pads?
You need seven essential tools for brake pad replacement: a hydraulic floor jack, two jack stands, a lug wrench, a brake caliper piston compressor, a socket set with metric sizes, brake cleaner, and high-temperature brake grease. These Tools needed for a brake pad job enable safe vehicle elevation, wheel removal, caliper manipulation, and proper installation of new friction components.
To successfully complete this DIY car repair, gather your equipment before beginning work. The hydraulic jack lifts your vehicle to working height, while jack stands provide crucial safety support that prevents catastrophic accidents if the jack fails. Your lug wrench loosens wheel fasteners, and the socket set removes caliper bolts that typically require 10mm to 19mm sizes depending on your vehicle manufacturer. The brake caliper piston compressor—available as a simple C-clamp or specialized ratcheting tool—retracts the piston to accommodate thicker new pads.
What Are the Essential Safety Equipment Requirements?
Safety equipment protects you from crushing injuries, chemical exposure, and brake system contamination during the replacement process. You must use jack stands rated for your vehicle’s weight, position wheel chocks behind the wheels remaining on the ground, and wear safety glasses to shield your eyes from brake dust and fluid splashes. Nitrile gloves protect your hands from brake cleaner chemicals and contaminated brake dust, which may contain harmful materials in older vehicles.
The parking brake must remain engaged throughout the procedure when working on front brakes, while the transmission stays in Park for automatic vehicles or first gear for manual transmissions. Working on a level concrete surface prevents vehicle rolling and jack instability that could cause serious injury. Never rely solely on a hydraulic jack to support a vehicle—the fluid seals can fail without warning, and only properly rated jack stands provide reliable support for working underneath or around your car.
How Do You Choose the Right Replacement Brake Pads?
The right brake pads match your vehicle’s specifications, driving style, and performance expectations based on three main material types: ceramic, semi-metallic, and organic compounds. Ceramic brake pads generate less dust, operate quietly, and provide consistent performance for daily driving, making them ideal for most passenger vehicles and light trucks. Semi-metallic pads contain steel fibers that increase heat dissipation and stopping power, suiting performance vehicles and heavy towing applications despite producing more brake dust and rotor wear.
Consult your vehicle’s owner manual or use an online parts catalog to identify the correct pad shape, size, and specification for your year, make, and model. OEM (Original Equipment Manufacturer) pads replicate the factory-installed components with guaranteed compatibility, while aftermarket options from reputable brands like Wagner, Bosch, or Akebono often provide enhanced performance at competitive prices. Premium pad sets include new hardware clips, anti-rattle shims, and wear sensors that simplify installation and extend service life.
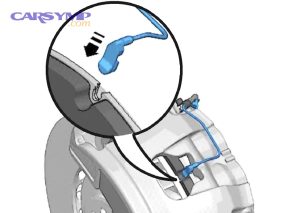
Pad wear sensors and how to handle them represent a critical consideration when selecting replacement components. Some vehicles use mechanical wear indicators—small metal tabs that create a squealing sound when pad thickness reaches the replacement threshold—while others employ electronic sensors that illuminate dashboard warning lights. Ensure your replacement pads include the appropriate sensor type and verify proper installation position during the procedure.
How Do You Know When Your Brake Pads Need Replacement?
Yes, your brake pads need replacement when the friction material measures less than ¼ inch (approximately 7mm) thick, when you hear persistent squealing or grinding noises during braking, or when your dashboard brake warning light illuminates. These three primary indicators signal that pad material has worn to unsafe levels, risking rotor damage and compromised stopping performance.
Understanding these warning signs prevents the cascading damage that occurs when metal backing plates contact rotors after friction material depletes completely. The replacement threshold of ¼ inch provides adequate material for safe braking while allowing time to schedule the maintenance before emergency conditions develop. Most brake pads feature wear indicator grooves molded into the friction material at the critical thickness, creating a visual reference point during inspection.
What Are the Warning Signs of Worn Brake Pads?
Squealing or screeching noises during braking indicate that small metal wear indicator tabs have begun contacting the rotor surface, creating the distinctive high-pitched sound designed to alert drivers. This auditory warning typically begins when pad thickness reaches 2-3mm, providing advance notice before complete wear occurs. The sound may start intermittently during light braking and intensify as wear progresses, eventually becoming constant whenever you apply the brakes.
Grinding sounds represent an emergency condition where the friction material has worn completely away, allowing the steel backing plate to grind directly against the rotor. This metal-on-metal contact creates a deep, rumbling growl that sounds distinctly different from the higher-pitched squealing of wear indicators. Operating your vehicle with grinding brakes damages rotors through heat and abrasion, potentially requiring rotor replacement and substantially increasing repair costs beyond simple pad replacement.
Dashboard warning lights activate when electronic wear sensors embedded in the brake pad detect that friction material has worn to the replacement threshold. These sensors consist of a wire loop embedded in the pad material at a predetermined depth—when wear exposes the wire to rotor contact, the circuit breaks and triggers the warning system. Not all vehicles include electronic sensors, with many relying solely on mechanical indicator tabs or visual inspection schedules.
Performance changes during braking provide additional warning signs beyond noise and lights. Increased stopping distances indicate reduced pad effectiveness as friction material thickness decreases and heat dissipation capability declines. Pedal pulsation suggests uneven pad wear creating thickness variation that generates rhythmic feedback through the brake pedal. Vehicle pulling to one side during braking reveals unequal pad wear between left and right wheels, requiring immediate attention to prevent loss of directional control during emergency stops.
How Do You Visually Inspect Brake Pad Thickness?
Visual inspection through wheel spokes allows preliminary assessment without removing the wheel, though complete evaluation requires wheel removal for clear viewing access. Look between the spokes toward the brake caliper assembly where the brake pad edges appear as dark friction material compressed against the shiny rotor surface. The visible pad edge should measure at least ¼ inch thick—if the material appears thinner than a pencil width or you cannot clearly see pad material, removal and direct measurement become necessary.
Remove the wheel for definitive measurement by using a ruler or digital caliper to measure the friction material thickness from the backing plate to the pad surface. Measure at multiple points across the pad surface because uneven wear patterns develop from sticking caliper pistons, contaminated pads, or warped rotors. Any measurement below ¼ inch at any point requires immediate pad replacement, while measurements below ⅛ inch indicate dangerous conditions requiring replacement before operating the vehicle.
Wear indicator grooves molded into the pad surface at the ¼-inch depth provide built-in measurement references. When the pad wears down to the groove depth, these channels become visible across the friction surface, signaling replacement time without requiring precise measurements. Some pads feature multiple groove depths, with the shallowest indicating service intervals for inspection and the deepest marking the replacement threshold.
Uneven wear patterns reveal mechanical problems requiring attention beyond simple pad replacement. Tapered wear with one edge thinner than the other indicates sticking caliper slide pins that prevent the caliper from centering properly over the rotor. Cupped or concave wear patterns suggest contamination from brake fluid or grease that has degraded friction material. Excessive wear on inner pads compared to outer pads points to seized caliper pistons that fail to retract fully, maintaining constant light contact between pad and rotor.
What Is the Step-by-Step Process to Replace Brake Pads?
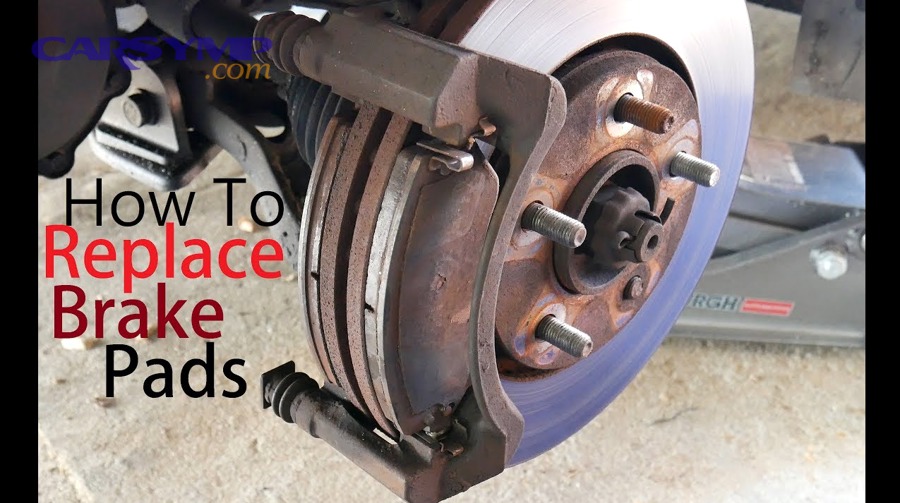
The brake pad replacement process involves four main phases: vehicle preparation and wheel removal, old component removal, new pad installation, and system testing—requiring approximately 1-2 hours per axle for moderately experienced DIYers to complete safely and correctly. Following systematic procedures for How to replace brake pads step-by-step ensures proper brake function and prevents costly mistakes that compromise vehicle safety.
Executing each phase methodically prevents common errors and maintains the logical progression from disassembly through reassembly. The preparation phase establishes safe working conditions through proper vehicle support and initial component access. Component removal exposes worn parts while revealing the condition of related brake system elements requiring inspection. Installation integrates new components using proper techniques for Compressing caliper piston safely and positioning pads correctly. Final testing verifies brake system integrity before returning the vehicle to normal operation.
How Do You Prepare Your Vehicle for Brake Pad Replacement?
Vehicle preparation begins with loosening lug nuts approximately one-half turn while the wheel remains on the ground, preventing wheel rotation during the initial break-free of tight fasteners. Park on level concrete in a well-ventilated area, engage the parking brake for front brake work, place the transmission in Park or first gear, and position wheel chocks behind the wheels remaining on the ground. Open the brake fluid reservoir cap slightly to allow fluid displacement during piston compression, checking the fluid level and removing excess if the reservoir appears overfilled.
Position the hydraulic jack under the manufacturer-specified jacking point—typically reinforced frame rails or designated lift points identified in your owner’s manual—and raise the vehicle until the wheel clears the ground by 3-4 inches. Immediately place jack stands under the appropriate support points and carefully lower the vehicle onto the stands, leaving the jack in position as backup support but not bearing the vehicle’s weight. Remove the lug nuts completely and pull the wheel straight off the hub, setting it aside in a location where it won’t roll or create a tripping hazard.
The one-wheel-at-a-time approach maintains three reference points for correct reassembly and prevents mixing components between sides. Attempting simultaneous wheel removal risks confusion about parts placement and eliminates the reference of proper installation visible on the opposite side. This methodical approach particularly benefits first-time brake jobs where uncertainty about component orientation can lead to installation errors.
Turn the steering wheel to full lock in the direction providing maximum caliper access, rotating the suspension assembly to create working clearance for your hands and tools. This simple adjustment often means the difference between comfortable access and awkward reaching that increases fatigue and error risk during the procedure.
How Do You Remove the Old Brake Pads and Caliper?
Caliper removal begins with identifying and removing two mounting bolts that secure the caliper to the bracket—typically located on the back side of the caliper body and requiring 10mm to 14mm sockets or Allen wrenches depending on the vehicle manufacturer. Apply penetrating oil to rusty or corroded bolts and allow several minutes of soaking time before attempting removal to prevent bolt breakage. Once both bolts are removed, grasp the caliper firmly and pull it straight up and away from the rotor, using a gentle rocking motion if the pads resist separation from the rotor surface.
Never allow the caliper to hang by the rubber brake hose, which can damage internal hose construction and cause eventual brake failure. Support the caliper weight using a bungee cord, wire hook, or by resting it on a nearby suspension component that provides stable support without stretching the brake line. This crucial safety step prevents expensive brake line replacement and maintains system integrity throughout the procedure.
Slide the old brake pads out of the caliper bracket, noting their orientation and the position of any wear sensors for correct installation of replacement pads. Most brake systems position the wear sensor on the inner pad, though some configurations place sensors on both pads or only on specific wheels. Take a photograph with your phone before disassembly to create a reference image showing original component positions.
Remove the old hardware clips, springs, and anti-rattle shims from the caliper bracket, inspecting each component for corrosion, damage, or excessive wear. Replacement pad sets typically include new hardware that should replace the old components even if they appear serviceable—new hardware ensures optimal pad movement and prevents brake noise from worn springs or corroded clips. Clean the caliper bracket contact surfaces thoroughly with a wire brush, removing rust, brake dust, and old lubricant that could prevent smooth pad movement.
Inspect the caliper piston and bore for brake fluid seepage, which appears as wet spots, fluid drips, or crystallized residue around the piston dust boot. Minor moisture may represent condensation, but active fluid leakage requires caliper replacement or rebuild before installing new pads. Check the rubber dust boot surrounding the piston for tears, cracks, or separation from the piston or caliper body—damaged boots allow contamination entry that accelerates piston corrosion and causes premature caliper failure.
How Do You Install New Brake Pads Properly?
New pad installation starts with applying high-temperature brake grease to the caliper bracket contact points where pads slide during brake application and release, creating smooth movement that prevents noise and uneven wear. Place small amounts of grease on the bracket ledges, avoiding contamination of the friction surfaces, rotor, or brake fluid components. Install the new hardware clips by snapping them firmly into the bracket channels where the old clips were removed, ensuring complete seating with no gaps or loose edges.
Position the new brake pads in the caliper bracket with wear sensors facing the correct direction—typically pointing down or toward the rear of the vehicle depending on the specific application. The inner pad usually differs from the outer pad in shape or sensor placement, requiring careful attention to orientation that prevents installation errors. Refer to your reference photo or consult the pad manufacturer’s instructions if uncertainty exists about proper positioning.
Compressing the caliper piston represents the critical step enabling new pad installation, as thicker unworn pads require more clearance than the worn pads they replace. Place a C-clamp or brake piston tool against the piston face, using one of the old brake pads as a cushion that distributes pressure evenly across the piston surface. Slowly tighten the tool while monitoring the brake fluid reservoir for overflow—stop immediately if fluid begins spilling and remove excess fluid before continuing compression.
Some rear brake calipers use pistons that screw into the bore rather than pushing straight in, requiring specialized cube-style tools that engage slots or pins in the piston face. These threaded pistons demand clockwise rotation during compression, with the tool threads matching piston threads to prevent cross-threading damage. Forcing a threaded piston with a standard C-clamp destroys the piston mechanism and necessitates expensive caliper replacement.
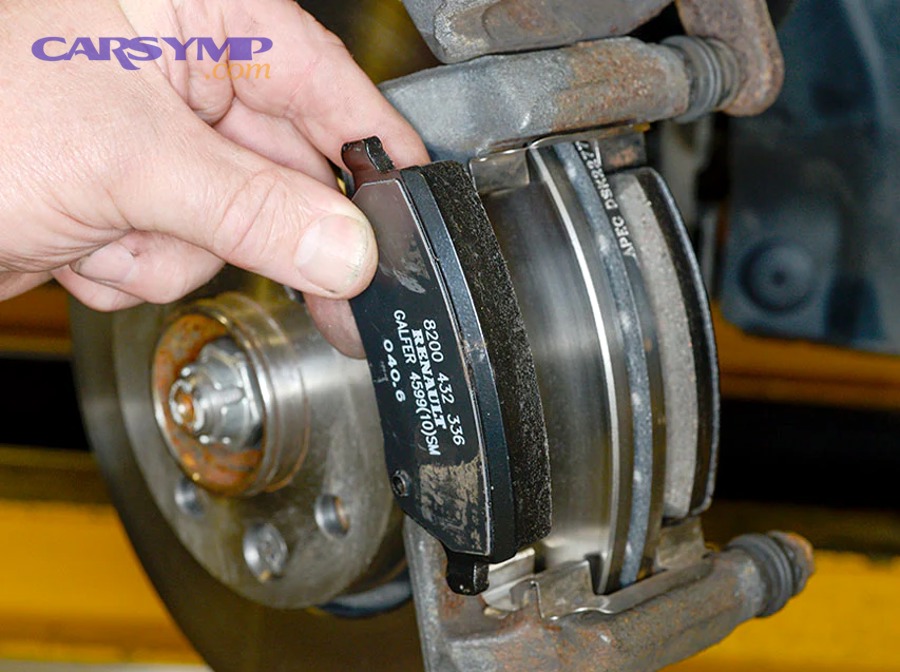
Lower the caliper assembly over the new pads and rotor, aligning the mounting bolt holes with the bracket threads. Start both mounting bolts by hand to prevent cross-threading, then tighten them to manufacturer-specified torque using a torque wrench—typically 25-35 foot-pounds for sliding calipers, though specifications vary by vehicle. Proper torque ensures secure caliper mounting without over-stressing bolt threads or distorting caliper components.
How Do You Complete the Installation and Test the Brakes?
Installation completion begins with reinstalling the wheel and hand-threading all lug nuts to prevent cross-threading on wheel studs. Raise the vehicle slightly with the hydraulic jack to remove jack stand support, then lower the car until the wheel contacts the ground with partial weight support. Tighten lug nuts in a star pattern to manufacturer specifications—typically 80-100 foot-pounds for passenger vehicles—using a torque wrench to ensure even pressure distribution that prevents wheel warping or stud damage.
Check the brake fluid reservoir level and add fresh fluid matching the DOT specification listed on the reservoir cap if the level appears low. The fluid level typically rises during piston compression and may require adjustment to maintain proper operating range. Replace the reservoir cap securely to prevent moisture contamination that degrades brake fluid performance over time.
Pump the brake pedal slowly several times with the engine off until you feel firm resistance, indicating the brake pads have contacted the rotor and the system has pressurized properly. Start the engine and pump the brakes again while monitoring pedal feel—the pedal should feel solid with consistent resistance throughout the travel range. Never drive the vehicle if the pedal feels spongy, travels to the floor, or lacks normal resistance, as these symptoms indicate air in the system or installation errors requiring immediate correction.
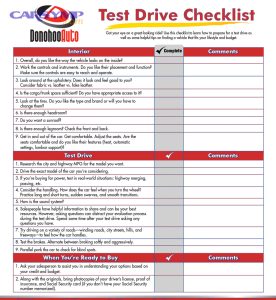
The post-job test drive checklist begins in a safe, controlled environment like an empty parking lot where you can verify brake function at low speeds. Accelerate to 15-20 mph and apply the brakes gently, checking for straight-line stopping without pulling to either side. Gradually increase test speed to 30-40 mph, performing several moderate stops to verify consistent braking performance and absence of vibration, noise, or steering feedback.
Execute the Brake pad bedding-in process to properly mate the new pads with the rotor surface through controlled friction that transfers pad material onto the rotor. The standard 30-30-30 method involves 30 stops from 30 mph with 30-second cooling intervals between stops, using moderate pedal pressure that brings the vehicle to approximately 5 mph before complete stopping. This bedding procedure prevents glazing that reduces friction and creates optimal pad-to-rotor contact for maximum braking performance.
Avoid hard stops, high-speed braking, or extended brake applications during the first 200-300 miles after installation, allowing the bedding process to complete gradually during normal driving. The initial break-in period establishes the friction layer and seats the pads into their final operating position within the caliper bracket. Performance pads may require more aggressive bedding procedures specified by the manufacturer to achieve optimal friction characteristics.
What Are Common Mistakes to Avoid When Replacing Brake Pads?
Common mistakes replacing brake pads include failing to compress the caliper piston, reusing old hardware clips, contaminating friction surfaces with grease, and skipping the break-in procedure—errors that compromise braking performance, create noise issues, and potentially cause safety hazards. Recognizing these pitfalls before beginning work prevents costly corrections and ensures your brake job delivers reliable stopping power.
Understanding why these mistakes occur helps you avoid them during your repair. Time pressure encourages shortcuts that skip critical steps, while lack of experience prevents recognition of proper techniques. Tool limitations may tempt improper methods for compressing pistons or torquing fasteners. Below, we examine the most critical errors and their prevention strategies.
Why Should You Never Skip the Caliper Piston Compression Step?
Skipping caliper piston compression prevents new brake pad installation because thicker unworn pads cannot fit between the retracted piston and the rotor surface that accommodated thinner worn pads. The piston extends gradually as pads wear, maintaining constant pad-to-rotor clearance throughout the pad service life. New pads restore original thickness, requiring piston retraction to the fully compressed position that existed when the previous pads were new.
Forcing the caliper over new pads without proper compression damages the piston, tears the dust boot, or cracks the caliper body through excessive mechanical stress. The hydraulic system resists sudden compression attempts, potentially rupturing seals or distorting internal components that regulate fluid flow. Proper compression using appropriate tools applies gradual, controlled pressure that safely retracts the piston while monitoring for fluid overflow at the reservoir.
Brake fluid overflow occurs during piston compression because the displaced fluid has nowhere to go except back through the system into the master cylinder reservoir. Reservoirs filled to the maximum line may overflow when piston compression adds significant fluid volume, creating spillage that damages paint and introduces contamination risk. Checking the fluid level before beginning compression and removing excess fluid prevents overflow mess and maintains system cleanliness.
The compression process also reveals caliper problems requiring attention before new pad installation. Pistons that resist compression or compress unevenly indicate internal corrosion, seal damage, or contamination requiring caliper service. Fluid leaking from around the piston during compression signals seal failure necessitating caliper replacement or rebuild. Identifying these issues during the procedure prevents wasted labor from installing new pads on faulty calipers that fail shortly after the brake job.
What Happens If You Don’t Replace Brake Hardware?
Failing to replace brake hardware creates vibration, noise, and uneven pad wear from springs and clips that have lost tension and proper fit characteristics after years of heat cycling and corrosion exposure. The anti-rattle clips prevent pad movement within the caliper bracket during driving, maintaining consistent pad position that eliminates clicking, rattling, or buzzing sounds. Worn clips lose their spring tension, allowing pads to shift and vibrate against the bracket or caliper body.
Corroded hardware interferes with smooth pad movement during brake application and release, creating friction that causes one pad to drag while the other releases normally. This asymmetric behavior generates uneven wear patterns where the dragging pad wears faster than its partner, requiring premature replacement and potentially damaging the rotor through continuous light contact. The dragging condition also decreases fuel economy and may create a pulling sensation during braking as brake force differs between sides.
New hardware included with quality pad sets ensures proper fit, tension, and lubrication points for optimal brake operation. The manufacturer designs hardware specifically for their pad compound and backing plate configuration, providing correct spring rates and contact surfaces. Using the supplied hardware eliminates compatibility questions and ensures the complete brake system operates as designed.
The cost of new hardware represents a minimal addition to the total brake job expense—typically $10-20 for a complete set—making the decision to reuse old components a false economy that risks poor brake performance. Professional technicians universally replace hardware during brake services, recognizing that the small upfront cost prevents callbacks for noise complaints and premature pad wear. Following this professional standard ensures your DIY brake job delivers factory-quality results.
How Does DIY Brake Pad Replacement Compare to Professional Service?
DIY brake pad replacement excels in cost savings, averaging $30-100 for parts versus $200-500 for professional service, professional service provides specialized equipment and warranty protection, while time investment favors professionals for those lacking tools or experience. This comparison helps you evaluate whether your specific situation justifies the DIY approach or warrants professional expertise.
Weighing these factors requires honest assessment of your mechanical ability, available time, and tool access. The DIY vs shop brake pad replacement cost differential becomes less significant if you must purchase specialty tools for a one-time use or if installation errors necessitate professional correction. Conversely, DIYers with basic tool collections and moderate mechanical aptitude achieve substantial savings while gaining valuable maintenance knowledge transferable to future automotive repairs.
What Is the Cost Difference Between DIY and Professional Brake Pad Replacement?
The cost difference between DIY and professional brake pad replacement ranges from $170 to $400 per axle, with DIY parts costing $30-100 while professional services charge $200-500 including parts and labor. Material costs remain similar whether purchasing for DIY installation or through a professional shop, as both sources access the same manufacturers and quality levels. The labor component—typically $150-400 depending on regional rates and vehicle complexity—represents the primary cost differential.
Tool investment for first-time DIYers adds $100-200 to initial project costs for essential equipment like jack stands, torque wrench, and caliper compression tools. However, these tools serve multiple future projects, amortizing their cost across numerous maintenance tasks over years of vehicle ownership. Renting specialty tools from auto parts stores eliminates purchase costs for infrequent-use items, maintaining DIY cost advantages while accessing professional-grade equipment.
Hidden costs emerge from installation errors requiring professional correction, potentially exceeding the cost of initial professional service. Common mistakes like cross-threaded bolts, damaged pistons, or contaminated friction surfaces may necessitate additional parts and labor to rectify. Time investment represents another cost factor—the 2-4 hours required for DIY brake replacement carries opportunity cost that varies based on individual circumstances and alternative uses of that time.
Professional services include warranty protection typically spanning 12-24 months or 12,000-24,000 miles, covering both parts and labor for brake-related issues arising after service. This warranty transfers responsibility for repeat repairs to the service provider, protecting against defective parts or installation errors. DIY installations carry full responsibility for any problems, requiring additional investment in time and materials to address issues that would receive warranty coverage from professional installers.
When Should You Choose Professional Brake Replacement Over DIY?
Choose professional brake replacement when your vehicle features electronic parking brakes, integrated ABS systems requiring scan tool activation, or performance brake systems with specialized bleeding procedures. Modern vehicles increasingly incorporate brake system integration with stability control, collision avoidance, and driver assistance technologies that require diagnostic equipment beyond typical DIY tool collections. Electronic parking brake systems must be placed in service mode using manufacturer scan tools before caliper piston compression, preventing motor damage during the procedure.
Lack of appropriate workspace, tools, or mechanical confidence justifies professional service despite higher costs, as improper brake repairs create immediate safety risks and potential liability. Working on brakes demands reliable vehicle support, adequate lighting, and clean conditions that may not exist in apartment parking lots or roadside locations. Attempting brake work without jack stands or proper tools exposes you to serious injury risk that vastly outweighs any cost savings from DIY installation.
Time constraints during urgent situations favor professional service, particularly when brake failure symptoms require immediate attention. Professional shops complete brake jobs in 1-2 hours versus the 2-4 hours typical for DIY first-timers, with multiple technicians available to handle unexpected complications. Emergency brake situations requiring same-day service exceed DIY capabilities for most vehicle owners lacking ready parts access and available time blocks.
Warranty considerations influence the decision for newer vehicles where dealer service records affect resale value and potential warranty claims. Some manufacturer warranties specify required maintenance documentation, and DIY service may complicate warranty claims if brake-related issues develop. Consulting your warranty documentation clarifies whether DIY brake service affects coverage before proceeding with self-installation.
What Additional Services Do Professionals Provide That DIYers Might Miss?
Professional brake services include comprehensive system inspection covering brake lines, wheel cylinders, master cylinder, and brake fluid condition beyond simple pad replacement. Technicians identify corrosion, leaks, and wear in components that DIYers often overlook while focusing exclusively on pad replacement. This systematic approach catches developing problems before they cause failures, preventing roadside breakdowns and expensive emergency repairs.
Rotor measurement and evaluation determine whether existing rotors meet minimum thickness specifications or require replacement to ensure safe brake operation. Professionals use micrometers to measure rotor thickness at multiple points, comparing measurements against manufacturer specifications stamped on the rotor. Rotors worn below minimum thickness lack adequate heat capacity and structural strength, requiring replacement regardless of surface condition. DIYers frequently skip this measurement, installing new pads on rotors that should be replaced.
Brake fluid testing and exchange removes moisture-contaminated fluid that accumulates over 2-3 years of service, restoring proper boiling point and preventing internal corrosion. Moisture absorption degrades brake fluid performance, lowering boiling point from 400°F+ to potentially under 300°F where pedal fade occurs during hard braking. Professional shops use test strips or refractometers to measure fluid moisture content, recommending complete fluid exchange when contamination exceeds acceptable thresholds.
Caliper service includes cleaning and lubricating slide pins that enable proper caliper movement, preventing uneven pad wear from binding mechanisms. Seized slide pins create the single most common cause of premature brake pad wear and pulling during braking, yet many DIYers never remove or service these critical components. Professional technicians disassemble slide pin assemblies, clean away old grease and corrosion, inspect rubber boots for damage, and reinstall with fresh high-temperature lubricant specified for brake applications.
How Do You Perform the Proper Break-In Procedure for New Brake Pads?
The proper break-in procedure uses the 30-30-30 method: 30 moderate stops from 30 mph with 30-second cooling intervals, transferring a thin layer of friction material onto the rotor surface for optimal braking performance. This bedding process creates the initial friction layer through controlled heat generation that bonds pad material to the rotor without causing glazing or uneven deposits. The moderate deceleration generates sufficient heat for material transfer while avoiding the extreme temperatures that damage pads or create vibration-causing deposits.
Execute the procedure in a safe location with minimal traffic, such as an empty business park or industrial area where you can perform repeated stops without interfering with other vehicles. Accelerate to 30 mph and apply steady brake pressure to slow the vehicle to approximately 5 mph before releasing the brakes completely. Allow 30 seconds of driving at moderate speed between stops, providing air circulation that cools the brakes and prepares them for the next cycle. Repeat this process for 30 total stops, monitoring for unusual odors, smoke, or vibration that could indicate problems.
The cooling intervals prevent excessive heat buildup that glazes pad surfaces, creating a hard, shiny layer that reduces friction and causes squealing. Glazed pads must be sanded or replaced to restore proper friction characteristics, wasting time and materials from improper bedding. The 30-second interval provides sufficient cooling for standard street pads while avoiding complete temperature loss that would require restarting the bedding process.
Performance or track-oriented brake pads require more aggressive bedding procedures specified by the manufacturer, often involving higher speeds and harder stops that generate elevated temperatures needed for racing compound activation. These specialized pads use friction materials designed for extreme temperatures that exceed normal street driving conditions, requiring intentional high-heat cycles during bedding to establish proper friction layers. Consult pad manufacturer instructions for specific bedding requirements that may differ from the standard 30-30-30 procedure.
Avoid hard stops, prolonged brake applications, or panic braking during the first 200-300 miles following installation, allowing the bedding layer to mature through normal driving conditions. The initial friction layer remains vulnerable to damage from excessive heat or pressure before it fully bonds to the rotor surface. Highway driving with minimal brake use, frequent hard stops from high speeds, or mountain driving with continuous braking can disrupt proper bedding and create performance issues requiring correction.
According to testing conducted by brake manufacturer Wagner Brake in 2024, properly bedded brake pads demonstrate 15-20% shorter stopping distances and 40% longer service life compared to pads installed without following bedding procedures. The company’s engineering division measured stopping performance across 500 test cycles using identical pads with varied bedding protocols, establishing clear performance advantages for systematic break-in procedures. These findings reinforce professional recommendations that DIYers invest the 30-40 minutes required for proper bedding to maximize their brake investment and ensure optimal safety performance.