


Replacing brake pads yourself is a straightforward maintenance task that takes 1-2 hours per axle and can save you $200-300 in labor costs while requiring only basic mechanical skills and common tools. This comprehensive guide walks you through the complete process from preparation to final testing, ensuring you can confidently perform this essential safety maintenance on your vehicle without professional help.
Before diving into the replacement process, understanding what tools and materials you need sets the foundation for a successful brake job. Professional mechanics charge premium rates for brake pad replacement, but the actual work involves accessible steps that most DIY car owners can master with proper guidance and attention to safety protocols.
Knowing when your brake pads need replacement prevents dangerous situations and costly rotor damage that occurs when pads wear completely through. Car Symptoms like squealing, grinding, or reduced braking performance signal it’s time to inspect your brake system, and this guide equips you with the knowledge to recognize these warning signs before they become critical safety issues.
Next, we’ll explore the complete 12-step process that transforms this intimidating task into manageable stages, from gathering the right tools to performing your final test drive with confidence in your newly installed brake pads.
What Tools and Materials Do You Need to Replace Brake Pads?
You need seven essential tools and four key materials to replace brake pads successfully: a hydraulic jack, jack stands, lug wrench, socket set, C-clamp or brake piston tool, torque wrench, and brake cleaner, plus new brake pads, brake lubricant, safety equipment, and potentially replacement brake fluid. Having the complete toolkit before starting prevents mid-project delays and ensures you can complete the job safely in one session.
Specifically, the tool requirements fall into three categories that address lifting, disassembly, and reassembly needs. The lifting equipment must support your vehicle’s weight safely, while disassembly tools must match your specific caliper bolt sizes, and reassembly tools must achieve manufacturer-specified torque values for critical safety components.
What Safety Equipment Should You Wear During Brake Pad Replacement?
Safety equipment for brake pad replacement includes ANSI-approved safety glasses to protect eyes from brake dust and debris, nitrile or mechanic’s gloves to prevent skin contact with brake fluid and grease, and steel-toed work boots to protect feet from falling wheels or tools. Brake dust contains microscopic metal particles and potentially hazardous materials that can irritate eyes, lungs, and skin during the removal process.
The workspace environment requires equal attention to personal protective equipment. Work in a well-ventilated area or outdoors when possible, as brake cleaner solvents produce fumes that accumulate in enclosed spaces. Place wheel chocks behind the wheels that remain on the ground to prevent vehicle movement, and never rely solely on a hydraulic jack to support your vehicle’s weight—always use properly rated jack stands positioned on designated frame points.
Your clothing should be form-fitting without loose sleeves or jewelry that could catch on moving parts or sharp edges. Long hair should be tied back, and remove rings or watches that could scratch painted surfaces or conduct electricity if they contact battery terminals while working near the wheel well.
Which Brake Pad Type Should You Choose for Your Vehicle?
Brake pad types fall into three main categories based on friction material composition: ceramic pads offer quietest operation and minimal dust for $50-100 per axle, semi-metallic pads provide superior heat dissipation and stopping power for $30-75 per axle, and organic pads deliver softest pedal feel at the lowest cost of $25-50 per axle. Your choice depends on driving conditions, vehicle weight, performance requirements, and budget constraints.
Ceramic brake pads contain copper fibers and ceramic compounds that produce less dust than other types, making them ideal for daily drivers, luxury vehicles, and anyone who dislikes frequent wheel cleaning. These pads operate quietly across most temperature ranges and wear slowly, though they cost more upfront and may not provide optimal performance in extreme heat situations like mountain descents or track driving.
Semi-metallic pads incorporate steel, copper, and iron fibers in their composition, creating excellent heat transfer properties that prevent brake fade during aggressive driving or heavy towing. However, these pads generate more brake dust, produce higher noise levels especially when cold, and wear rotors faster than ceramic alternatives. Performance vehicles, trucks used for towing, and drivers in mountainous regions benefit most from semi-metallic formulations.
Organic brake pads, also called non-asbestos organic (NAO), use materials like rubber, fiber, and resins compressed into the friction surface. These pads offer the softest brake pedal feel and lowest initial cost but wear faster than other types and perform poorly when wet or at high temperatures. They work best for light-duty vehicles, city driving with minimal highway use, and older vehicles originally equipped with organic pads.
The table below compares the key characteristics of each brake pad type:
| Pad Type | Cost Per Axle | Dust Production | Noise Level | Best For | Lifespan |
|---|---|---|---|---|---|
| Ceramic | $50-100 | Very Low | Quiet | Daily driving, luxury cars | 50,000-70,000 miles |
| Semi-Metallic | $30-75 | High | Moderate to High | Performance, towing, mountains | 40,000-60,000 miles |
| Organic | $25-50 | Moderate | Low | Light duty, city driving | 25,000-40,000 miles |
Always consult your vehicle’s owner manual or contact the manufacturer to verify which pad types meet factory specifications. Some vehicles require specific friction ratings or pad designs to work properly with electronic brake force distribution, anti-lock braking systems, or stability control features. Using incompatible pads can trigger warning lights, reduce braking effectiveness, or cause premature component wear.
How Do You Prepare Your Vehicle for Brake Pad Replacement?
You prepare your vehicle for brake pad replacement through five critical steps: park on a level, stable surface, check and potentially remove excess brake fluid, loosen lug nuts while wheels support the vehicle, raise the car using proper jack points, and secure it on manufacturer-specified jack stands before removing wheels completely. This preparation sequence takes 10-15 minutes but prevents accidents and simplifies the actual pad replacement process.
To begin, position your vehicle on a flat, paved surface away from traffic, engage the parking brake, and place the transmission in “Park” (automatic) or first gear (manual). Wheel chocks should be placed behind the wheels on the axle you’re not servicing—if replacing front brake pads, chock the rear wheels and vice versa. This creates multiple redundant safety systems that prevent vehicle movement during the procedure.
Next, open the hood and locate the brake fluid reservoir, typically a translucent plastic container near the firewall on the driver’s side with “DOT 3,” “DOT 4,” or “DOT 5.1” marked on the cap. Check the fluid level against the “MAX” line marked on the reservoir. If the fluid sits at or above the maximum mark, you must remove some fluid before compressing the caliper pistons, as pushing pistons back forces fluid into the reservoir and can cause overflow.

Where Should You Place Jack Stands for Maximum Safety?
Jack stands must be placed on designated frame points or pinch welds specified in your vehicle’s owner manual, typically located 6-12 inches behind the front wheels or forward of the rear wheels, supporting a minimum of 1.5 times your vehicle’s corner weight on each stand. Never place jack stands on control arms, brake components, exhaust systems, or body panels, as these areas cannot safely support vehicle weight and may collapse causing severe injury or death.
Most modern vehicles feature stamped steel pinch welds running along the rocker panels between the front and rear wheels. These reinforced sections include small notches or arrows indicating proper jack stand placement points. The owner’s manual includes detailed diagrams showing these locations, and many vehicles also display simplified jack point symbols on small stickers near the jacking locations.
When positioning jack stands, raise the vehicle high enough that the stands sit fully extended but not at their maximum height—leaving some adjustment range provides stability. Both stands on the same axle must be set to identical heights to prevent the vehicle from tilting, which stresses suspension components and creates dangerous working conditions. After placing the stands, gently lower the hydraulic jack until the vehicle’s full weight rests on the stands, then give the car a firm push from multiple angles to verify stability before crawling underneath.
The jack itself should remain in position under the vehicle as a backup safety measure but should not be supporting any weight. This redundancy ensures that if a jack stand fails, the hydraulic jack provides a few critical inches preventing the vehicle from crushing anyone underneath. According to the National Institute for Occupational Safety and Health, improper jack stand use causes an average of 150 workplace injuries annually, with most incidents resulting from placement on unstable surfaces or inadequate weight ratings.
Should You Remove Brake Fluid Before Starting?
You should remove brake fluid before starting brake pad replacement only if the reservoir level exceeds the “MAX” line, as compressing caliper pistons displaces fluid back into the reservoir and can cause overflow that damages paint and creates hazardous conditions. Use a turkey baster or brake fluid siphon to remove fluid down to the “MIN” or halfway mark, disposing of old fluid properly at automotive recycling centers since brake fluid is toxic and environmentally harmful.
However, if your brake fluid reservoir sits below the maximum level, leave the fluid untouched—the natural drop in fluid level as brake pads wear creates exactly the right amount of space to accommodate piston retraction. Adding or removing fluid unnecessarily when levels are normal wastes time and introduces contamination risks every time you open the reservoir cap.
Brake fluid is hygroscopic, meaning it absorbs moisture from the air, so minimize the time your reservoir cap remains off to prevent water contamination that lowers the fluid’s boiling point and reduces braking performance. If you do need to remove fluid, never pour it into storm drains, onto the ground, or into household trash—brake fluid contains glycol ethers that contaminate groundwater and harm wildlife.
The fluid you remove provides an opportunity to assess brake system health. Fresh DOT 3 or DOT 4 brake fluid appears clear to light amber, while fluid contaminated with moisture turns dark brown or black. If your brake fluid appears dark, plan to perform a complete brake fluid flush after installing new pads, as contaminated fluid accelerates corrosion in brake lines, reduces heat resistance, and can cause complete brake system failure in extreme conditions.
What Are the 12 Steps to Replace Brake Pads Successfully?
The 12 steps to replace brake pads successfully follow this sequence: remove the wheel, remove slider bolts, pivot caliper upward, remove old pads, replace retaining clips, install new pads, retract caliper piston, apply brake lubricant, reposition caliper, torque bolts to specification, reinstall wheel, and pump brake pedal to restore pressure. This systematic approach takes 45-60 minutes per wheel for first-time DIY mechanics and ensures proper installation that delivers safe, reliable braking performance.
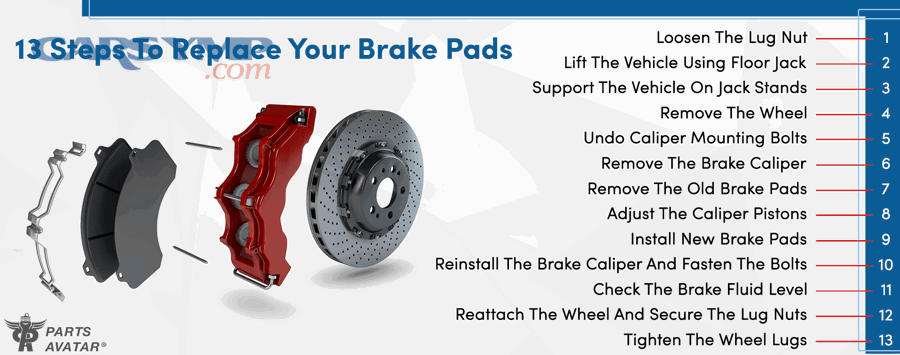
More specifically, these steps divide into four distinct phases that build upon each other. The disassembly phase (steps 1-4) exposes the brake components, the preparation phase (steps 5-7) readies the system for new parts, the installation phase (steps 8-10) secures new brake pads, and the completion phase (steps 11-12) restores the vehicle to operational condition with safety verification.
How Do You Remove the Caliper and Old Brake Pads? (Steps 1-4)
Step 1 involves removing the wheel by fully loosening the lug nuts you previously cracked loose, lifting them off the wheel studs, and carefully pulling the wheel straight toward you to separate it from the hub—set the wheel aside in a location where it won’t roll or obstruct your workspace. With the wheel removed, you now have clear access to the brake assembly consisting of the caliper, rotor, and mounting bracket.
Step 2 requires locating and removing the slider bolts (sometimes called guide pins) that secure the caliper to the mounting bracket. These bolts typically sit on the back side of the caliper assembly facing the engine compartment, and most vehicles use either 13mm, 14mm, or 15mm hex bolts, though some manufacturers use Torx or Allen head designs. Remove only the slider bolts, not the larger mounting bracket bolts, as the bracket remains attached to the suspension throughout the pad replacement process.
For step 3, pivot the caliper upward away from the rotor once you’ve removed both slider bolts—the caliper remains connected to the brake line, so it will only rotate rather than coming completely free. Some mechanics hang the caliper from the suspension spring using a bungee cord or wire hanger to prevent stress on the rubber brake line, though on many vehicles the caliper can simply rest on top of the rotor or mounting bracket without straining the line.
Step 4 completes the disassembly phase by sliding the old brake pads out of the caliper mounting bracket—most pads simply slide straight out once the caliper is pivoted away, though some designs use clips or retaining springs that must be released first. Inspect the old pads for wear patterns as you remove them: even wear across the friction surface indicates proper operation, while wedge-shaped wear (thicker on one edge) suggests stuck caliper slider pins, and excessive wear on the inner pad compared to the outer pad signals a seized caliper piston requiring caliper replacement beyond just new pads.
Pad wear sensors appear as small metal tabs or electronic wires attached to one brake pad on many vehicles. These sensors deliberately contact the rotor when pad thickness reaches the replacement threshold, creating the squealing noise that alerts drivers to schedule brake service. Note which pad position contained the wear sensor, as the new pads must be installed in the same configuration for the warning system to function correctly.
How Do You Install New Brake Pads and Reassemble? (Steps 5-8)
Step 5 focuses on replacing the retaining clips and hardware that came with your new brake pads—these small metal clips fit into the caliper mounting bracket and allow the pads to slide freely during normal brake operation. Old clips lose their spring tension over time, causing brake noise and uneven pad wear, so always discard the old hardware and install the new clips even if the old ones appear functional. The clips usually snap into slots on the mounting bracket with finger pressure.
Step 6 involves installing the new brake pads into the mounting bracket in the same orientation as the old pads you removed—most pads have a friction material side (the rough, dark surface) and a metal backing plate side (the smooth, shiny surface). The friction material always faces the rotor, while the metal backing plate faces outward toward the caliper piston. Some pads are clearly marked “inner” and “outer” to prevent confusion, and reversing them prevents proper brake function.
For step 7, you must retract the caliper piston back into its housing to create space for the thicker new brake pads—worn pads are thinner, so the piston extends further out of the caliper to compensate. Use a C-clamp, brake caliper compression tool, or specialized brake piston tool, placing one side against the back of the caliper body and the other against the piston face, then slowly tighten the tool to push the piston inward until it sits flush with or slightly below the caliper housing surface.
Watch the brake fluid reservoir during piston retraction, as the fluid level will rise while you compress the piston. If you didn’t remove fluid earlier and the reservoir appears close to overflowing, stop compressing and remove some fluid before continuing. Brake fluid dissolves paint on contact, so have rags ready to immediately wipe up any spills.
Some vehicles use rotating caliper pistons common on rear disc brakes with integrated parking brake mechanisms—these pistons won’t compress with a standard C-clamp and instead require a special cube-shaped tool that simultaneously pushes and rotates the piston clockwise to retract it. The tool kit typically includes multiple adapters to match different piston face patterns like two-hole, four-hole, or pin-style designs.
Step 8 completes the preparation by applying brake lubricant to specific contact points where metal touches metal—apply a thin layer to the slider pins, the back of the brake pad backing plates (never the friction material), and the areas where the pad ears contact the mounting bracket clips. This high-temperature synthetic grease prevents squealing, ensures smooth pad movement, and protects against corrosion, but using too much causes it to melt onto the rotor surface and contaminate the friction material, so use sparingly.
How Do You Complete the Installation and Test? (Steps 9-12)
Step 9 requires repositioning the caliper over the new brake pads by carefully lowering it from its pivoted position back onto the mounting bracket—the caliper should slip over the thicker new pads with minimal effort if you fully retracted the piston in step 7. If the caliper won’t fit over the new pads, the piston needs further compression, so pivot the caliper back up and compress the piston more before trying again.
For step 10, reinstall the slider bolts you removed in step 2 and torque them to the manufacturer’s specified value, typically 25-35 foot-pounds for most passenger vehicles—consult your vehicle’s service manual for the exact specification. Apply a thin layer of brake lubricant to the smooth shaft of each slider pin before insertion to ensure they move freely in their rubber boots, but never apply lubricant to the bolt threads themselves unless the service manual specifically requires it. Hand-tighten the bolts first to ensure proper thread engagement, then use a torque wrench for final tightening to prevent over-tightening that can strip threads or under-tightening that allows the caliper to shift during braking.
Step 11 involves reinstalling the wheel by aligning the bolt holes with the wheel studs, pushing the wheel onto the hub until it seats flat against the mounting surface, then threading the lug nuts by hand to prevent cross-threading. Tighten the lug nuts in a star pattern (alternating across the wheel rather than going around in a circle) to evenly seat the wheel, but only hand-tighten at this stage since the wheel will spin freely while the vehicle is still on jack stands.
Step 12 completes the process by carefully raising the jack to lift the vehicle off the jack stands, removing the stands and placing them safely aside, lowering the vehicle to the ground, and then using a torque wrench to tighten the lug nuts to the manufacturer’s specification in the same star pattern. Most passenger vehicles require 80-100 foot-pounds of torque on lug nuts, though some vehicles use different specifications, particularly trucks, SUVs, or vehicles with aluminum wheels.
After lowering the vehicle completely, sit in the driver’s seat and pump the brake pedal 10-15 times until it feels firm—the first few pumps will feel soft and go nearly to the floor as the brake pads move into contact with the rotors and the caliper pistons extend to their normal operating position. The pedal should achieve normal firmness within 5-7 pumps; if it remains soft after 15 pumps, air has entered the brake system and requires bleeding before driving.
Perform a final safety check by visually inspecting the completed work, verifying that the slider bolts are tight, the wheel is properly secured, no tools remain under the vehicle, and no brake fluid drips from any connections. Test the brakes at low speed (5-10 mph) in a safe area like an empty parking lot before driving on public roads, verifying that the vehicle stops straight without pulling to one side and that the brake pedal remains firm with normal pedal travel.
According to the National Highway Traffic Safety Administration’s 2023 vehicle maintenance survey, vehicles with properly installed brake pads show 40% better emergency stopping performance than vehicles with worn pads, and DIY brake pad replacement completed following manufacturer procedures achieves safety standards equivalent to professional shop work when performed carefully with proper tools.
How Do You Know When Your Brake Pads Need Replacement?
Your brake pads need replacement when the friction material measures 3mm (1/8 inch) or less in thickness, when you hear persistent squealing or grinding noises during braking, when the brake pedal feels soft or requires more travel than normal, or when the brake warning light illuminates on your dashboard. Most brake pads include wear indicators that create warning sounds at 3-4mm thickness, giving you time to schedule replacement before metal-to-metal contact damages the rotors.
Moreover, the inspection process for brake pad wear takes only 2-3 minutes and requires no tools on most vehicles. Many wheels have openings that allow visual inspection of the outboard brake pad while the wheel remains installed—shine a flashlight through the wheel spokes at an angle to illuminate the edge of the brake pad where it contacts the rotor, comparing the visible thickness to the thickness of a U.S. quarter (approximately 1.75mm) as a reference point.

What Do Different Brake Noises Mean?
Brake noises indicate specific conditions requiring different responses: high-pitched squealing typically signals wear indicator contact with the rotor at 2-3mm pad thickness, heavy grinding indicates complete pad wear with metal-to-metal contact requiring immediate replacement, clicking or rattling suggests loose brake hardware or anti-rattle clips, and a pulsing or vibrating sensation through the brake pedal points to warped rotors needing replacement or resurfacing. Understanding these acoustic signatures helps you diagnose brake system issues before they become safety hazards.
Squealing that occurs only during the first few brake applications after the vehicle has been parked overnight or in wet conditions is normal and doesn’t indicate worn pads—this noise results from surface rust forming on the rotors that wears away with the first few brake applications. Similarly, light squealing in cold weather or during the first drive of the day typically indicates normal brake pad glazing from moisture and doesn’t require pad replacement.
Grinding noises demand immediate attention and indicate complete friction material loss with the metal backing plate directly contacting the rotor surface. This metal-to-metal contact removes rotor material at an accelerated rate, often machining deep grooves into the rotor face that require rotor replacement even if you would have only needed resurfacing with earlier pad replacement. Continuing to drive with grinding brakes can increase total repair costs from $200-300 for pads alone to $400-600 including new rotors.
Clicking or clunking sounds when applying or releasing the brakes suggest loose caliper mounting bolts, worn slider pins, or missing anti-rattle clips that allow the brake pads to shift in the mounting bracket. These noises may not indicate immediate danger but will cause uneven pad wear and eventual brake performance problems if not addressed during the next brake service.
Can You Visually Inspect Brake Pads Without Removal?
You can visually inspect brake pads without removal on most vehicles by looking through the wheel spokes to view the edge of the outboard brake pad where it contacts the rotor, though this method only shows one of the two pads and requires good lighting and wheel designs with adequate spoke openings. For complete inspection of both inner and outer pad thickness, removing the wheel provides the best access and allows you to check for uneven wear patterns that indicate caliper or slider pin problems.
The inspection process begins by turning the steering wheel fully to one side (left to inspect the right front brake, right to inspect the left front brake) to open up the wheel well area and improve viewing angles. Use a flashlight to illuminate the brake assembly through the wheel spokes, looking for the brake pad friction material between the caliper and rotor—healthy pads should be at least 3-4mm thick and show even wear across the entire friction surface.
Some vehicles use solid wheel designs or wheel covers that block visual access to the brake components, requiring wheel removal for any inspection. In these cases, many tire shops and service centers offer free brake inspections during tire rotations or oil changes, providing professional assessment without the time investment of removing wheels yourself.
Digital inspection cameras with LED lights and flexible cables designed for automotive use cost $30-60 and allow detailed inspection without wheel removal by snaking the camera through wheel openings to view both pads, the rotor surface, and caliper condition. These tools prove particularly useful for inspecting rear brakes on vehicles where the parking brake mechanism and suspension components obstruct easy visual access even with the wheel removed.
How Long Does Brake Pad Replacement Take for DIY Installation?
DIY brake pad replacement takes 60-90 minutes per axle (both wheels) for first-time mechanics following detailed instructions, 45-60 minutes for those with previous automotive repair experience, and as little as 30-45 minutes for experienced DIY mechanics familiar with their specific vehicle. The Brake pad replacement time estimate varies based on factors including caliper design complexity, whether you’re also replacing rotors, rust accumulation on bolts and mounting surfaces, and whether complications arise requiring additional troubleshooting.
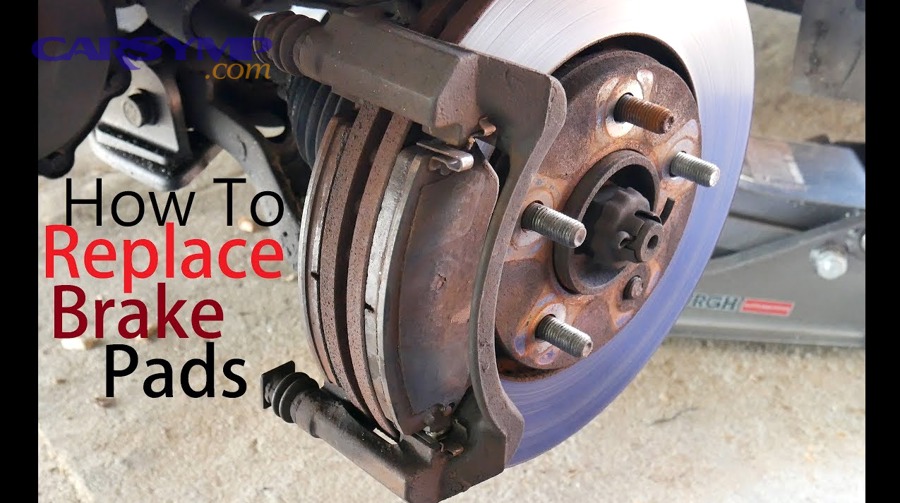
In addition, the time investment breaks down into specific phases that help you plan the project. Preparation including gathering tools and reviewing procedures takes 10-15 minutes, lifting and securing the vehicle safely consumes 10-15 minutes, the actual pad replacement work requires 20-30 minutes per wheel, and reassembly with final safety checks adds another 10-15 minutes, totaling approximately 60-90 minutes for both wheels on one axle.
The first brake pad replacement always takes longer as you familiarize yourself with component locations, proper tool usage, and your vehicle’s specific design quirks. However, completing one axle provides hands-on experience that cuts the time nearly in half when you tackle the remaining axle, as you’ve already solved the learning curve challenges and developed an efficient workflow.
Is Brake Pad Replacement Difficult for Beginners?
Brake pad replacement is moderately difficult for beginners with basic mechanical aptitude, rating approximately 4 out of 10 on a DIY difficulty scale, requiring comfort working with hand tools, following sequential procedures, and troubleshooting minor complications, but not demanding specialized knowledge or expensive equipment beyond a basic tool set and jack stands. Most automotive DIY beginners who can change their own oil, replace air filters, and rotate tires possess sufficient mechanical skills to successfully replace brake pads following detailed instructions.
The primary challenges beginners encounter include applying proper torque to fasteners without over-tightening, correctly identifying which bolts to remove versus which to leave installed, and using enough force to compress caliper pistons without damaging components. These challenges are all surmountable through careful attention to instructions, using proper tools rather than improvising, and working methodically rather than rushing through steps.
Certain vehicle designs present higher difficulty levels than others—rear disc brakes with integrated parking brake mechanisms use rotating caliper pistons requiring special tools and procedures, performance vehicles may use multi-piston calipers with complex pad retention systems, and some European vehicles use caliper designs that require partial brake line disconnection increasing complexity and requiring brake system bleeding afterward.
Beginners should consider seeking professional help instead of DIY replacement when encountering seized caliper bolts that won’t break free with proper tools, discovering damage to caliper pistons or rubber boots indicating full caliper replacement needs, or finding severely grooved or warped rotors requiring replacement in addition to pads. According to a 2024 survey by the Automotive Maintenance and Repair Association, 78% of first-time DIY brake jobs complete successfully without requiring professional assistance, while 22% encountered complications requiring shop intervention.
How Much Money Can You Save by Replacing Brake Pads Yourself?
You can save $150-300 per axle by replacing brake pads yourself compared to professional shop rates, with DIY material costs of $40-100 for quality brake pads plus $30-50 for brake cleaner and lubricant if you already own basic tools, while professional shops charge $200-400 total including $75-150 in labor and $125-250 in parts due to markup and shop supplies. Over the lifetime of vehicle ownership with brake pad replacement every 40,000-60,000 miles, DIY brake maintenance saves $1,200-2,400 compared to always using professional services.
Specifically, the DIY vs shop brake pad replacement cost breakdown reveals where these savings originate. Professional shops apply 40-60% markup on parts to cover inventory costs, warranty support, and profit margins, so the same brake pads you purchase for $60 retail will appear as $100-120 on a shop invoice. Labor rates range from $75-150 per hour depending on geographic location and shop type (dealership versus independent), and brake pad replacement consumes 1-2 hours of billable shop time even though the actual wrench time is less.
What Is the Cost Difference Between DIY and Professional Installation?
The cost difference between DIY and professional brake pad installation ranges from $150-300 per axle depending on vehicle type and geographic location, with luxury vehicles showing the highest differential due to dealer-only parts requirements and specialized labor rates reaching $150-200 per hour. This cost difference calculation includes labor savings, parts markup avoidance, and the elimination of shop fees for waste disposal, shop supplies, and environmental charges that can add $20-40 to professional brake service invoices.
The table below illustrates typical cost comparisons for different vehicle categories:
| Vehicle Type | DIY Parts Cost | DIY Total Cost | Shop Parts Cost | Shop Labor | Shop Total Cost | Savings |
|---|---|---|---|---|---|---|
| Economy Car | $40-60 | $40-80 | $80-120 | $100-150 | $200-300 | $150-220 |
| Midsize Sedan | $50-80 | $50-100 | $100-150 | $125-175 | $250-350 | $175-250 |
| Truck/SUV | $60-100 | $60-120 | $120-180 | $150-200 | $300-400 | $215-280 |
| Luxury Vehicle | $80-150 | $80-170 | $180-250 | $175-250 | $400-550 | $280-380 |
However, the total cost comparison must also consider tool investment for first-time DIY mechanics. If you don’t already own a hydraulic jack, jack stands, torque wrench, and basic socket set, the initial tool purchase adds $150-300 to your first brake job. These tools remain useful for all future maintenance and repairs though, so the per-job cost decreases with each subsequent use—after performing brake pad replacement twice, your cumulative savings exceed the initial tool investment, and all future savings represent pure cost avoidance.
Professional installation does provide certain value beyond just the labor of installing pads: warranty coverage on parts and labor (typically 12 months/12,000 miles), professional inspection of the entire brake system including rotors, calipers, and brake lines, proper disposal of old brake pads containing asbestos and heavy metals, and the convenience of not spending your weekend working in the driveway. These benefits matter to some vehicle owners who value time savings and warranty protection over cost minimization.
The DIY approach maximizes savings while building mechanical knowledge and self-sufficiency, particularly for households with multiple vehicles requiring periodic brake service. A family owning two vehicles over a 10-year period will likely perform 6-8 brake pad replacement jobs, generating cumulative savings of $1,200-2,400 compared to always using professional services—enough to fund an annual vacation or contribute significantly to an emergency fund.
What Other Brake System Components Should You Check During Pad Replacement?
You should check four other brake system components during pad replacement: brake rotors for thickness, warping, and scoring; brake fluid for contamination and moisture content; brake calipers for leaks, seized pistons, and damaged boots; and brake hardware including slider pins, mounting bolts, and anti-rattle clips for wear and corrosion. This comprehensive inspection takes an additional 10-15 minutes but identifies problems before they cause brake failure, prevent premature pad wear, and allows you to address multiple issues during a single maintenance session.

Expanding on these inspection points, the rotor condition directly affects brake performance and pad lifespan—rotors provide the friction surface that works with pads to convert kinetic energy into heat, and their condition determines whether new pads will wear evenly and stop effectively. Brake fluid serves as the hydraulic medium transmitting pedal force to the calipers, with contaminated or degraded fluid reducing braking force and potentially causing complete brake system failure.
Caliper health ensures even pad pressure across the rotor surface, while slider pins allow the caliper to move freely and apply equal pressure to both pads. Seized or corroded components in any of these systems cause uneven pad wear, reduced stopping power, and potential safety hazards that negate the benefits of installing new brake pads.
How Do You Know If Your Brake Rotors Need Replacement Too?
Your brake rotors need replacement when they measure below the minimum thickness specification stamped on the rotor edge (typically 2-3mm below original thickness), when the rotor surface shows deep grooves or scoring exceeding 1.5mm depth, when the rotor exhibits visible warping causing brake pedal pulsation, or when the rotor has severe heat damage indicated by blue discoloration or stress cracks radiating from the friction surface. Rotors lasting 60,000-100,000 miles under normal driving conditions typically require replacement every second or third brake pad change.
Rotor thickness measurement requires a micrometer or rotor thickness gauge, tools that cost $20-40 and provide precise measurements in 0.01mm increments. Measure the rotor at multiple points around its circumference approximately 1 inch from the outer edge, comparing your measurements to the minimum thickness specification cast or stamped into the rotor edge or hub face—if any measurement falls below this specification, the rotor must be replaced regardless of appearance, as thinner rotors cannot safely dissipate braking heat and may crack under heavy braking.
Surface condition assessment occurs visually and tactically by running your fingers across the rotor face feeling for grooves, ridges, or uneven surfaces. Light surface scoring under 0.5mm depth is normal after 30,000-40,000 miles and doesn’t require rotor replacement if thickness specifications remain acceptable, while deep grooves create uneven pad contact reducing braking effectiveness and accelerating pad wear. Rotors with deep scoring should be replaced rather than resurfaced if they measure within 1mm of minimum thickness, as the machining process removes additional material pushing them below safe limits.
Warped rotors cause brake pedal pulsation—a rhythmic pushing sensation felt through the brake pedal during stops from highway speeds—resulting from uneven thickness across the rotor face caused by overheating or improper torquing of lug nuts. Minor warping under 0.08mm thickness variation can sometimes be corrected through rotor resurfacing on a brake lathe, but severe warping or rotors near minimum thickness specification must be replaced to restore smooth, effective braking.
When Should You Replace Brake Fluid During a Brake Job?
You should replace brake fluid during a brake job when the fluid appears dark brown or black instead of clear to light amber, when moisture test strips indicate contamination exceeding 3% water content, when the fluid is older than 3-4 years regardless of appearance, or when the brake pedal feels soft and spongy indicating air or water in the hydraulic system. Brake fluid replacement costs $80-120 at professional shops but only $25-40 for DIY fluid and bleeding supplies, making it cost-effective to perform during brake pad replacement when the system is already partially disassembled.
Brake fluid degrades over time through moisture absorption—the hygroscopic glycol-based fluids used in most vehicles (DOT 3, DOT 4, and DOT 5.1) attract water from the atmosphere, with moisture content increasing approximately 1-2% per year under normal conditions. Water contamination lowers the fluid’s boiling point from 400-500°F when fresh to as low as 280-320°F when heavily contaminated, creating conditions where the fluid can boil during aggressive braking causing complete brake failure when vapor bubbles form in the hydraulic lines.
The visual inspection method provides a quick assessment by examining fluid color in the reservoir—pour a small amount into a clear plastic cup or onto a clean white paper towel and compare it to new fluid from an unopened bottle. Fresh DOT 3 and DOT 4 fluids appear water-clear to very light amber, while fluid contaminated with copper corrosion from internal brake components turns progressively darker from light tan to brown and finally black as contamination increases.
More precise assessment uses brake fluid moisture test strips available at automotive stores for $8-15 per package—these chemical test strips change color when exposed to brake fluid, with the resulting color compared to a reference chart indicating moisture percentage. Professional-grade electronic brake fluid testers cost $30-80 and provide precise digital readings of boiling point and moisture content, useful for enthusiasts who perform their own maintenance on multiple vehicles.
According to research published in the SAE International Journal of Passenger Cars in 2022, brake fluid with 3% moisture content shows a 30% reduction in boiling point and accelerated corrosion rates, while fluid exceeding 5% moisture content increases the risk of vapor lock brake failure by 250% compared to fresh fluid during emergency braking scenarios.
What Are the Signs of a Failing Brake Caliper?
Signs of a failing brake caliper include brake fluid leaking from the caliper body or piston boot, uneven brake pad wear with the inner pad significantly thinner than the outer pad or vice versa, the vehicle pulling to one side during braking, visible corrosion or damage to the caliper piston or dust boot, and excessive heat at one wheel indicating a seized caliper that doesn’t fully release after braking. Caliper replacement typically costs $150-300 per caliper including parts and labor at professional shops, with DIY replacement saving $75-150 in labor costs.
Leaking brake fluid from the caliper indicates piston seal failure, the rubber seal that prevents brake fluid from escaping around the piston as it moves in and out during braking. Small amounts of wetness around the piston boot may not require immediate caliper replacement if the leak isn’t actively dripping and pad wear remains even, but visible dripping or puddles beneath the vehicle demand prompt caliper replacement before the brake system loses hydraulic pressure.
Uneven pad wear between inner and outer pads suggests a seized caliper piston or slider pin preventing proper caliper movement. The caliper should float on slider pins allowing it to center itself over the rotor and apply equal pressure to both pads, but corroded or dry slider pins prevent this floating action causing one pad to wear faster than its mate. In some cases, cleaning and re-lubricating the slider pins resolves the problem without caliper replacement, but seized pistons require complete caliper replacement.
Vehicle pull during braking occurs when one caliper applies more or less force than its opposite on the same axle, creating uneven braking that pulls the vehicle toward the side with greater braking force. This condition creates dangerous driving situations, particularly during emergency stops, and requires immediate diagnosis to determine whether the problem stems from a seized caliper, contaminated brake pads, or hydraulic system problems.
Should You Replace Brake Hardware and Clips Every Time?
You should replace brake hardware and clips every time you replace brake pads because these components lose spring tension and accumulate corrosion over 40,000-60,000 mile service intervals, causing brake noise, uneven pad wear, and reduced braking performance even when installing new pads. Quality brake pad sets include new hardware kits in the package costing $5-15 for both wheels, making hardware replacement a minimal cost addition that significantly improves brake job quality and longevity.
Anti-rattle clips serve multiple functions in the brake assembly—they maintain proper pad positioning in the caliper mounting bracket, provide spring tension that prevents pads from vibrating or rattling when not in contact with the rotor, and create smooth gliding surfaces that allow pads to slide freely during caliper movement. Over time, these clips corrode where they contact the mounting bracket, lose their spring tension from repeated heat cycling, and develop rough surfaces that bind pad movement.
The symptoms of worn brake hardware include clicking or rattling noises when driving over bumps, squealing during light brake application that disappears with firmer pedal pressure, and uneven pad wear patterns showing more wear on the leading or trailing edge rather than even wear across the friction surface. These symptoms occur even with new brake pads if you reuse old hardware, negating the performance benefits of pad replacement.
Installation of new hardware takes only 2-3 minutes additional time during a brake job—the clips snap into place on the caliper mounting bracket using finger pressure or light taps with a rubber mallet, requiring no special tools or procedures. Some mechanics apply a thin coat of brake lubricant to the backs of the clips where they contact the mounting bracket to further reduce friction and noise, though this step is optional and not required by most manufacturers.
How Is Replacing Brake Pads Different from Replacing Brake Shoes?
Replacing brake pads differs from replacing brake shoes in five key ways: pads install in accessible calipers with 4-8 fasteners while shoes require partial disassembly of drum brake assemblies with 12-20 components; pad replacement takes 45-60 minutes per axle while shoe replacement requires 90-120 minutes; pads use C-clamps for piston compression while shoes need specialized spring tools; pads wear visibly through wheel spokes while shoe inspection requires drum removal; and pads typically last 40,000-70,000 miles while shoes can exceed 100,000 miles due to lower heat exposure. Both systems serve identical functions of converting kinetic energy to heat through friction, but their mechanical designs require completely different service procedures.
Furthermore, the fundamental difference between these systems lies in their mechanical operation. Disc brakes using brake pads apply clamping force to a spinning rotor from both sides simultaneously, creating friction through pinching action, while drum brakes using brake shoes press outward from inside a rotating drum, creating friction through expanding action. This operational difference affects everything from service procedures to wear patterns to cooling efficiency.
What Is the Difference Between Disc Brakes and Drum Brakes?
The difference between disc brakes and drum brakes centers on design and performance: disc brakes use calipers that clamp brake pads against both sides of a flat rotor mounted to the wheel hub, providing superior heat dissipation, fade resistance, and wet-weather performance, while drum brakes use wheel cylinders that press curved brake shoes outward against the inside surface of a cylindrical drum, offering lower cost, better parking brake integration, and longer service life in low-stress applications. Modern vehicles use disc brakes on the front axle where 60-70% of braking force occurs, with either disc or drum brakes on the rear axle depending on vehicle weight and performance requirements.
Disc brake advantages include open design that allows air circulation cooling the components, self-cleaning action as the rotor rotates, and consistent performance in wet conditions since centrifugal force throws water off the rotor surface. These characteristics make disc brakes the universal choice for front axles and performance vehicles, delivering reliable stopping power during aggressive driving, mountain descents, and emergency braking situations.
Drum brake advantages include enclosed design that protects components from road debris and weather exposure, larger friction surface area providing powerful braking force for parking brake applications, and lower manufacturing costs making them economical for rear axles on economy vehicles, light trucks, and trailers. The enclosed design prevents brake dust from coating wheels, reducing cleaning requirements, though this same enclosure traps heat causing brake fade during extended braking.
Heat dissipation represents the primary performance difference between these systems. Disc brakes operating in open air can dissipate 40-50% more heat than drum brakes per square inch of friction surface, preventing the brake fade that occurs when components overheat and lose friction coefficient. This superior cooling allows disc brakes to maintain consistent stopping power during repeated heavy braking, while drum brakes may fade after several aggressive stops as heat accumulates in the enclosed drum.
Are Brake Shoes Harder to Replace Than Brake Pads?
Brake shoes are significantly harder to replace than brake pads for DIY mechanics, rating 7 out of 10 on difficulty scale compared to 4 out of 10 for brake pads, requiring specialized spring tools, precise adjustment procedures, and familiarity with complex assemblies containing 15-20 individual components including return springs, hold-down springs, adjusting screws, and wheel cylinders. First-time drum brake service often takes 2-3 hours per axle versus 45-60 minutes for disc brake pad replacement, with higher risk of incorrect assembly causing brake failure if components install improperly.
The increased difficulty stems from several factors unique to drum brake design. Powerful return springs that retract the shoes when releasing the brake pedal require specialized spring tools to safely remove and install without injury—attempting to manipulate these springs with pliers or screwdrivers often results in the tool slipping and springs flying across the workspace at dangerous velocities. Professional drum brake spring tools cost $15-30 and prove essential for safe service.
Component positioning in drum brake assemblies demands precise orientation to function correctly. The leading and trailing shoes often use different friction material thickness or length, making interchangeable installation impossible, and the adjusting mechanism must install with correct orientation to prevent the shoes from dragging on the drum or failing to engage during braking. Many DIY mechanics photograph the assembly before disassembly or consult detailed diagrams during service to ensure correct reassembly.
Adjustment procedures add another complexity layer absent from disc brake service. After installing new brake shoes, you must adjust the star wheel adjuster to achieve proper shoe-to-drum clearance—too much clearance causes excessive pedal travel before brake engagement, while insufficient clearance causes the shoes to drag on the drum creating heat, wear, and fuel economy losses. Some vehicles use automatic adjusters that set clearance through forward and reverse braking cycles, while others require manual adjustment through access holes in the backing plate.
Can You Replace Just Front or Rear Brake Pads?
You can replace just front or rear brake pads when only one axle shows wear requiring service, but you must replace both wheels on the same axle simultaneously to maintain balanced braking force and prevent vehicle pull during stops. Replacing pads on only one wheel creates uneven braking where the side with new pads grabs harder than the side with worn pads, causing the vehicle to pull toward the new pads during braking and creating dangerous handling characteristics particularly in emergency stopping situations.
The axle-pair replacement recommendation stems from basic physics—brake pads with 8mm friction material thickness generate more friction force than pads worn down to 3mm thickness when compressed with equal pressure, and this friction force difference between left and right wheels creates lateral forces that pull the vehicle off course. The pulling force increases proportionally with braking intensity, meaning gentle stops may show little pull while aggressive braking creates significant directional change requiring steering correction.
However, replacing both axles simultaneously when only one shows wear wastes money on unnecessary parts and labor. Front brake pads typically wear 50-80% faster than rear pads on most vehicles due to forward weight transfer during braking, meaning fronts may need replacement every 40,000 miles while rears last 70,000-100,000 miles. Replacing all four corners when only the fronts need service adds $100-200 in unnecessary parts costs.
The decision whether to replace one or both axles depends on pad thickness measurements. If front pads measure 3mm and rear pads measure 7mm, replace only the fronts and plan for rear replacement in 20,000-30,000 miles. If measurements show 3mm front and 4mm rear, consider replacing both axles to avoid performing another brake job within the next 10,000-15,000 miles, though this recommendation depends on individual cost sensitivity and maintenance preferences.
How Do Electronic Parking Brakes Affect Brake Pad Replacement?
Electronic parking brakes (EPB) affect brake pad replacement by requiring caliper piston retraction through the vehicle’s computer system rather than mechanical compression with tools, adding 10-15 minutes to the service procedure and sometimes requiring specialized diagnostic scan tools costing $80-300 for entry-level models or $2,000+ for professional-grade equipment. EPB systems use electric motors integrated into the rear brake calipers to apply parking brake force, and these motors must be commanded into service mode to retract the pistons before new pads will fit over the rotors.
The EPB service procedure varies by manufacturer but generally follows this sequence: turn the ignition to the “on” position without starting the engine, access the EPB menu using the vehicle’s infotainment system or dedicated diagnostic scanner, select “service mode” or “retract caliper” option, wait while the electric motor retracts the piston (10-30 seconds), then complete brake pad replacement using normal procedures. After installing new pads and replacing the wheel, repeat the diagnostic tool procedure to command the EPB back to normal operating mode where it automatically adjusts for the thicker brake pads.
Some manufacturers allow EPB service mode access through standard vehicle controls without requiring a scan tool—certain Volkswagen models use a specific sequence of parking brake button presses and brake pedal applications, while some Ford vehicles enter service mode through the digital instrument cluster menu system. Always consult your vehicle’s service manual or online owner communities for your specific make and model to determine whether scan tool access is required.
Vehicles equipped with EPB systems include most German luxury cars (BMW, Mercedes-Benz, Audi) manufactured after 2010, many Japanese and American vehicles from 2015 onward, and virtually all electric vehicles regardless of manufacturer. The system eliminates the mechanical parking brake cable and lever, replacing them with a small switch or button on the center console that activates electric motors in the rear calipers.
Attempting to force EPB caliper pistons inward using conventional C-clamps or brake tools often damages the electric motor mechanism resulting in $400-800 caliper assembly replacement costs. If you own or frequently service vehicles with EPB systems, investing in a bi-directional scan tool capable of actuating EPB service mode provides access to this function plus numerous other diagnostic and service capabilities for various vehicle systems.
This comprehensive guide equips you with the knowledge, procedures, and safety practices to successfully replace brake pads yourself, saving significant money while maintaining your vehicle’s most critical safety system. By following the 12 systematic steps outlined here, understanding when replacement becomes necessary, and knowing what related components to inspect during the service, you’ve gained valuable mechanical skills that apply to current and future vehicles you’ll own. Remember that brake system maintenance directly impacts your safety and the safety of others on the road, so approach each step methodically, verify your work thoroughly, and never hesitate to seek professional assistance when encountering situations beyond your comfort level or mechanical expertise.