Diagnose Excessive Oil Consumption (Oil Burning) in Your Engine: Step-by-Step Checks for Car Owners
If your oil level keeps dropping between oil changes, you can diagnose oil consumption by first measuring it correctly, then separating external leaks from internal consumption, and finally confirming the cause with targeted checks like PCV inspection, plug readings, and basic engine tests.
You’ll also learn how to recognize the most common Car Symptoms—like blue smoke, oily spark plugs, and oil smell—and how each symptom points toward a specific failure pattern so you don’t waste money replacing parts at random.
From there, you’ll map your results to the most likely causes (PCV, leaks, valve seals, piston rings, turbo oil seals, oil viscosity issues) and decide what’s realistically fixable versus what needs a shop-level diagnosis.
Introduce a new idea: below is a step-by-step workflow that starts with measurement, moves into quick checks, and ends with confirmatory testing and a practical “repair or escalate” decision.
Is your engine’s oil consumption actually “excessive”?
Yes—oil consumption diagnosis starts by confirming the drop is truly excessive, because inaccurate dipstick readings, inconsistent top-offs, and changing driving conditions can mimic a serious problem.
Then, to keep the diagnosis clean, you need one repeatable baseline and one repeatable measurement method.

Should you measure oil consumption over a fixed distance before diagnosing?
Yes—Monitoring oil use accurately over a fixed distance is the fastest way to avoid false alarms, because it standardizes your starting level, your mileage interval, and your refill record.
Next, once you standardize the measurement, every later clue (smoke timing, plug condition, PCV behavior) becomes far easier to trust.
How to measure oil consumption like a technician (simple 10-minute setup):
- Park on level ground and check the oil the same way each time (same temperature and same waiting time after shutdown).
- Set the oil level to the “full” mark (do not overfill).
- Record the odometer and date.
- Drive normally for a defined interval (example: 1,000 miles / 1,600 km).
- Re-check the level under the same conditions and record how much you add to return to “full.”
Why this matters: oil readings vary if you check on a slope, check immediately after shutdown, or wipe/insert the dipstick inconsistently. A repeatable process prevents you from “diagnosing” a problem that is really a measurement error.
Evidence: According to multiple manufacturer oil-consumption test procedures published as service bulletins, technicians commonly record the oil level after a hot shutdown and have the driver return after a defined mileage window to quantify use (for example, a 1,500–1,700 mile interval is explicitly used in some oil consumption test instructions). (static.nhtsa.gov)
What does “normal oil consumption” mean, and why does it vary by engine?
Normal oil consumption is a small, expected amount of engine oil that is burned or evaporated during operation, and it varies with engine design, mileage, load, speed, and crankcase ventilation behavior.
To better understand “normal vs excessive,” treat it as a trend you measure rather than a single reading you guess.
Here’s a practical Normal vs excessive oil consumption guide you can apply without arguing over internet numbers:
- Normal trend: Oil drops slowly and predictably, with no sudden change, and the vehicle shows no new symptoms.
- Suspicious trend: Oil use suddenly increases, the pattern changes (e.g., worse at highway speed), or new symptoms appear (smoke, misfire, oil smell, or wet underbody).
- High-risk trend: Oil drops fast enough that you must add oil frequently to stay safe (and especially if you ever reach low oil pressure or warning lights).
Why engines vary so much:
- Design: Ring pack design, cylinder finish, and PCV routing change how much oil mist can be pulled into the intake.
- Operating conditions: high RPM, heavy load, towing, and long highway runs can increase consumption.
- Oil properties: higher volatility oils can evaporate more under heat and airflow.
- Wear: ring and cylinder wear increase blow-by and oil control loss over time.
Evidence: According to a manufacturer service bulletin, an “accepted rate” of oil consumption for certain engines can be as high as 1 quart per 2,000 miles (3,200 km), illustrating how “normal” can be defined differently by OEMs and why documentation matters. (static.nhtsa.gov)
What are the quickest checks to separate “leaks” from “oil burning”?
There are 3 main checkpoints to separate external leaks vs internal consumption: (1) under-car leak evidence, (2) engine-bay seep sources, and (3) exhaust/odor clues—because leaks leave trails while burning leaves timing patterns and residues.
Next, you’ll use a simple External leaks vs internal consumption checklist so you don’t skip the basics.
Where should you look first for external oil leaks (top-to-bottom checklist)?
There are 6 common external leak zones to check first: valve cover area, oil filter housing area, oil pan/drain plug area, front crank seal area, rear main seal area, and turbo oil feed/return line area (if equipped).
Then, once you spot where oil starts, you can do focused oil leak repair instead of chasing oil that was blown backward by airflow.
Top-to-bottom leak search (fast and reliable):
- Valve cover and upper engine edges
- Look for wetness at the gasket seam and oil pooling in plug wells (on coil-on-plug engines).
- Oil filter / filter housing / oil cooler area
- Look for fresh wet oil around the filter base and housing seams.
- Timing cover edges and front of engine
- Oil flung on belts or pulleys can point to a front seal leak.
- Oil pan gasket and pan perimeter
- Pan leaks often create a wet “edge line” around the pan flange.
- Drain plug and crush washer / gasket
- A reused washer or overtightened plug can seep slowly.
- Rear main area (between engine and transmission)
- Look for oil dripping from the bellhousing inspection area.
Quick tip: clean the suspected area first. Oil that has been collecting for months can fool you; fresh oil after cleaning tells the truth.
Does blue smoke always mean oil burning, and when does it appear?
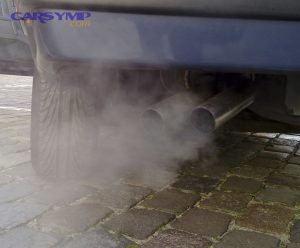
Blue smoke patterns and what they indicate depend on when the smoke happens: oil burning often shows blue/blue-gray smoke, but timing (startup vs acceleration vs decel) is what identifies the likely path oil takes into combustion.
However, the same engine can show both a small leak and internal burning, so smoke clues should be combined with your measured consumption.
Common smoke interpretations (high-level):
- Startup after sitting: oil seeping past valve seals or turbo seals into the hot side.
- Hard acceleration: ring sealing issues or turbo seal issues under boost/flow.
- Deceleration/engine braking: high vacuum pulling oil past valve guides/seals.
- Long idle: oil pooling and then burning when you rev.
Which symptoms point to PCV-related oil consumption vs mechanical wear?
PCV-related oil consumption wins as the most likely cause when intake/oil mist evidence is strong, mechanical wear is more likely when compression/leak-down indicators are poor, and turbo-related issues dominate when consumption rises under boost with oily charge piping.
Meanwhile, treating these as separate buckets prevents you from mislabeling every oil loss as “bad rings.”

Can a faulty PCV valve or separator cause oil burning without visible smoke?
Yes—PCV system causing oil consumption can happen without obvious smoke because oil is ingested as vapor/mist, burned gradually, and may not create dramatic exhaust color, especially with modern catalysts and normal driving.
Next, the goal is to find “PCV ingestion” fingerprints instead of waiting for movie-style smoke.
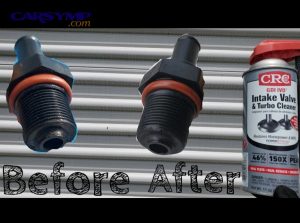
Look for these PCV-linked clues:
- Oil film inside the intake tube or throttle body
- Oily residue in intercooler piping (turbo engines)
- Rough idle or lean/rich corrections from unmetered airflow (some failures create vacuum leaks)
- Seeping gaskets from elevated crankcase pressure (PCV restriction)
Evidence: According to an automotive diagnostic overview explaining PCV function, a faulty PCV system can contribute to pressure buildup and oil-related issues, including increased smoke and leaks, because blow-by gases must be managed and recycled correctly. (innova.com)
What intake clues suggest PCV ingestion rather than worn rings?
PCV ingestion wins when you see oil accumulation in the intake tract with otherwise decent cylinder health, worn rings are more likely when blow-by and low compression accompany consumption, and turbo seal issues are most likely when oil concentrates in boost plumbing.
However, you should confirm with at least one “engine health” test before concluding it’s only PCV.
Practical comparisons you can use:
- PCV ingestion: oil at throttle body/intake runners + normal/consistent compression + consumption mostly steady
- Worn rings: increased crankcase pressure/blow-by + compression variance + consumption worsens under load
- Turbo-related: oily intercooler pipes + consumption spikes after boost events + smoke on acceleration or after long decel into throttle
What do spark plugs and exhaust clues reveal about where the oil is going?
There are 4 main plug/exhaust clue groups that reveal where oil is going: oily plug deposits, single-cylinder vs multi-cylinder patterns, tailpipe residue, and misfire correlation—because oil leaves different signatures depending on how it enters combustion.
Specifically, you’re using physical evidence to narrow the “entry door” oil is using.

What does an oil-fouled spark plug look like, and what does it indicate?
An oil-fouled spark plug is a plug with wet, shiny, or heavy dark deposits that indicate engine oil is entering the combustion chamber and contaminating the plug tip, often causing misfires under load or at idle.
Next, once you identify fouling, the pattern across cylinders is what points to the cause.
What to notice:
- Wet/oily, shiny deposits: active oil entry; can cause misfire
- Dry, fluffy black soot: often fuel-rich or ignition-related (not necessarily oil)
- Ashy, crusty deposits: can be oil additive ash, long-term burning, or coolant-related contamination
Tie this back to your measured consumption: one “ugly plug” is a clue, not a verdict.
If only one cylinder shows oil fouling, what are the most likely causes?
There are 5 common “single-cylinder” oil-fouling causes: a valve stem seal/guide issue on that cylinder, localized ring/cylinder wear, a PCV/oil entry distribution quirk, a head-gasket/oil passage oddity, or turbo/intake pooling feeding certain runners more than others.
Moreover, a single-cylinder pattern is valuable because it narrows the mechanical search.
A simple cylinder-pattern cheat sheet:
- One cylinder only: valve seal/guide or localized ring issue is most likely
- Two adjacent cylinders: possible head-gasket or localized head issue
- All cylinders similar: PCV ingestion, oil volatility, generalized ring wear, or overfill/viscosity mismatch
How do you narrow causes using “when it smokes” (startup, idle, accel, decel)?
There are 4 main smoke-timing categories to narrow oil burning causes: startup smoke, idle smoke, acceleration smoke, and deceleration smoke—because each condition changes vacuum, pressure, and oil flow paths in predictable ways.
Then, you’ll align timing with Oil burning causes: rings vs valve seals (and turbo when applicable).

If it smokes on startup after sitting, are valve seals the most likely cause?
Yes—startup smoke after sitting often points to valve seals because oil can seep down valve stems while the engine rests, pooling until the next start, although turbo seals or pooled intake oil can create a similar first-smoke event.
Next, the trick is to verify by repeating the condition: overnight sit, then observe cold start.
Confirming clues:
- Smoke is strongest in the first few seconds and fades quickly
- Consumption is moderate but consistent
- Plugs may show mild oil traces rather than heavy, constant fouling
If it smokes under acceleration, does that point to piston rings or turbo seals?
Piston rings win when smoke appears with load plus you see blow-by/engine-health decline, turbo seals are best supported when smoke correlates with boost and oily charge piping, and valve seals are less likely if smoke is mainly acceleration-specific.
However, you should avoid guessing—pair the timing clue with either plug patterns or a basic compression check.
Oil consumption after turbo issues diagnosis often follows this pattern:
- Smoke on acceleration after boost builds
- Oil film in intercooler pipes
- Consumption that rises after long highway pulls
If it smokes on deceleration/engine braking, what does that typically indicate?
Deceleration smoke typically indicates valve guide/seal leakage because high intake vacuum during engine braking can pull oil past worn guides or hardened seals into the combustion chamber.
In addition, some turbo configurations can show smoke after a long decel followed by throttle, because oil has time to migrate before being burned.
A safe way to reproduce:
- Warm engine
- Cruise at moderate speed
- Lift off and engine-brake for several seconds
- Then reapply throttle and watch for a puff
Which tests confirm internal engine wear vs “serviceable” causes?
There are 3 main tests to confirm internal wear vs serviceable causes: a compression test, a leak-down test, and a crankcase/air-path inspection—because together they separate sealing failure from ventilation or leak problems.
Next, you’ll use these tests to stop guessing and start confirming.

Should you run a compression test or a leak-down test for oil consumption diagnosis?
Compression testing wins for fast screening, leak-down testing is best for pinpointing leakage paths, and using both is optimal when oil consumption is significant or worsening—because compression shows “how much,” while leak-down shows “where.”
To better understand the decision, treat compression as a quick “health snapshot” and leak-down as the “detective test.”
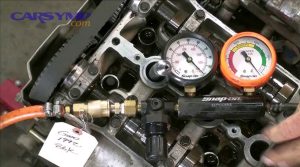
Here are Compression and leak-down test basics in plain English:
- Compression test (dynamic): measures peak pressure during cranking; good for comparing cylinders.
- Leak-down test (static): pressurizes a cylinder at top dead center and measures leakage percentage while you listen for where air escapes.
What results suggest worn rings vs leaking valves?
There are 4 main result patterns that separate worn rings from leaking valves: air heard at the oil fill/crankcase (rings), air heard at intake (intake valve leak), air heard at exhaust (exhaust valve leak), and bubbles in coolant (head gasket path).
Moreover, this is where your earlier clues—smoke timing and plug patterns—either match or contradict the test.
A simple interpretation guide:
- Rings/cylinder wear:
- Leak-down air noise at oil fill or dipstick tube
- Often paired with higher blow-by and oily PCV routing
- Intake valve leak: hissing at intake/throttle body
- Exhaust valve leak: hissing at tailpipe
- Head gasket path: bubbling in coolant (serious; stop driving until evaluated)
Evidence: A standard description of leak-down testing notes that the mechanic can listen at different locations (exhaust, intake, crankcase) to identify leak origin, and that higher leakage often indicates internal repairs may be required. (en.wikipedia.org)
What are the most common “fixable” causes before major engine work?
There are 6 common fixable causes before major engine work: PCV service, external leak sealing, correct oil level/viscosity, intake system repairs, turbo oil feed/return corrections, and deposit-related ring sticking mitigation—because these can reduce oil loss without rebuilding the engine.
Next, you’ll prioritize fixes by probability and by what your evidence already shows.

Can using the wrong oil viscosity or overfilling cause higher oil consumption?
Yes—wrong viscosity or overfill can increase oil consumption because higher volatility oils can evaporate more, thin oil can bypass control rings more easily in worn engines, and overfill can increase aeration and PCV ingestion.
Then, once you correct the basics, you re-measure using the same interval to prove the change worked.
Practical rules:
- Use the manufacturer-specified viscosity first (don’t “fix” the symptom by guessing).
- Avoid topping above the full mark.
- Re-check after any service where overfill is common (quick-lube errors happen).
Which repairs typically reduce oil consumption the most (PCV, leaks, valve seals, turbo lines)?
There are 5 repair categories that most often reduce oil consumption: PCV replacement/cleaning, sealing common external leak points, valve seal repairs when smoke timing matches, turbo oil feed/return corrections on boosted engines, and ring-related fixes when test results support it.
Especially, the best approach is “repair one proven cause, then re-measure,” instead of stacking multiple guesses.
Below is a practical table showing what the Repair cost estimate for common causes often looks like in real-world terms (ranges vary by vehicle, labor rates, and accessibility). This table helps you choose the next step based on evidence and budget.
| Likely cause | Typical diagnostic clue | Usual fix direction | Cost level (relative) |
|---|---|---|---|
| PCV valve / separator / hoses | oil in intake, pressure-related seepage | replace valve/hoses, clean separator | Low–Medium |
| External gasket/seal leak | wet trails, drips, underbody oil | targeted oil leak repair (gasket/seal) | Low–Medium |
| Valve stem seals | startup or decel smoke timing | seal replacement (sometimes head work) | Medium–High |
| Turbo oil feed/return or seal issue | boost-linked smoke, oily charge pipes | line repair, turbo service | Medium–High |
| Rings/cylinder wear | poor leak-down/compression + blow-by | engine repair/rebuild decisions | High |
Evidence: Service bulletins on oil consumption commonly require inspection steps before major repairs, including leak checks, PCV-related evaluation, and standardized testing, reflecting the practical workflow of “verify → inspect → test → repair.” (static.nhtsa.gov)
When should you stop DIY diagnosis and see a mechanic?
Yes—you should stop DIY oil consumption diagnosis and see a mechanic when oil loss is rapid, symptoms escalate (misfire, heavy smoke, low oil pressure), or testing points to internal engine repairs, because continued driving risks engine damage and catalytic converter failure.
In short, your goal is not to “win DIY,” but to prevent a small oil-use problem from turning into a total failure.

Is it unsafe to keep driving if oil level drops quickly or you see heavy blue smoke?
Yes—rapid oil drop or heavy blue smoke is unsafe because low oil can starve bearings, heavy burning can overheat/poison emissions components, and sudden loss can happen if a leak worsens.
Next, if you must move the car, the safest short-term move is to keep oil within the safe range and avoid high load until inspected.
Immediate safety steps:
- Check oil level before any longer drive.
- Top up to the correct level (not above full).
- If smoke is severe or you have warning lights, don’t continue driving—get it inspected or towed.
Should you request an official oil consumption test and keep records?
Yes—an official oil consumption test and records are valuable because they standardize measurement, support warranty/TSB eligibility when applicable, and prevent “it feels like it uses oil” arguments from replacing real data.
Then, once the shop has baseline numbers, you can compare pre- and post-repair results objectively.
What to log:
- Date, mileage, oil added amount, oil brand/viscosity, and driving pattern changes
- Any smoke timing events (startup/accel/decel)
- Any repairs performed between measurement intervals
Evidence: Manufacturer oil-consumption test instructions describe recording mileage and oil level at “full,” then having the driver return after a defined mileage interval to measure usage, reinforcing why documentation is central to diagnosis. (static.nhtsa.gov)
What edge-case methods help diagnose oil consumption when there are no obvious leaks or smoke?
There are 4 high-value edge-case methods for hidden oil loss: UV dye tracing, borescope inspection, crankcase pressure testing, and oil analysis—because they reveal micro-leaks, oil entry paths, and operating conditions that basic checks can’t confirm.
Next, these methods help when your measurements prove oil loss but your eyes can’t find the route.

How can UV dye and a blacklight reveal micro-leaks that normal inspection misses?
UV dye leak detection is a method that adds fluorescent dye to engine oil so small leaks glow under a blacklight, making seep points visible even when oil spreads across surfaces during driving.
More specifically, this is ideal when the underside is oily “everywhere” and you need to identify the start point.
Best practice:
- Clean the engine area first
- Drive for a short period
- Inspect with a UV light in a darkened area
- Follow the glow upward to the source
Can a borescope inspection confirm oil entry through valve seals or ring wear patterns?
Yes—a borescope can confirm oil entry clues because it can reveal oily wetness, unusual deposits, or cylinder wall scoring patterns, although it cannot measure sealing like leak-down does.
Then, if borescope findings match your smoke timing and plug pattern, you gain confidence in the diagnosis.
What a borescope may reveal:
- Oil-wet areas near valves (suggesting top-end oil entry)
- Vertical scoring (possible wear)
- Abnormal carbon patterns that align with a “bad cylinder” plug
When does crankcase pressure testing help, and what does “excess blow-by” imply?
Crankcase pressure testing helps when you suspect blow-by because excess pressure implies combustion gases are escaping past rings into the crankcase, increasing PCV flow demands and making oil control harder.
Moreover, pressure-driven oil seepage can look like “random leaks” when the real cause is internal sealing loss.
Should you use Used Oil Analysis (UOA) to support an oil consumption diagnosis?
Yes—UOA can support oil consumption diagnosis because it can flag fuel dilution, viscosity changes, or abnormal contamination that worsens volatility and consumption, although it won’t identify the exact physical entry point by itself.
In addition, UOA can be most useful when combined with your measurement log and symptom timing.
Evidence: Peer-reviewed and technical literature on oil volatility has linked volatility behavior to oil consumption differences under certain operating conditions, supporting why oil selection and condition can influence usage—not just mechanical wear. (jstor.org)