


If you’re choosing between press-in control arm bushings and a full control arm replacement, the best option is the one that minimizes total cost and rework risk for your arm condition: press bushings when the arm is healthy and you can press accurately; replace the whole arm when labor, corrosion, or an aging ball joint makes redoing the job likely.
The fastest way to decide is to match your symptoms to what’s actually failing (bushing vs ball joint vs bent/corroded arm), because the wrong diagnosis turns a “cheap bushing” into a repeat repair with another alignment bill.
Next, you need a realistic cost model that includes alignment, hardware, and labor time, not just part prices—because pressing bushings often costs more in labor even when the bushing itself is cheap.
Introduce a new idea: once you know which path wins for your situation, you can go one level deeper and choose the bushing material (rubber vs polyurethane vs hydraulic) that matches your comfort and handling goals.
What are press-in control-arm bushings and what does “full control arm replacement” mean?
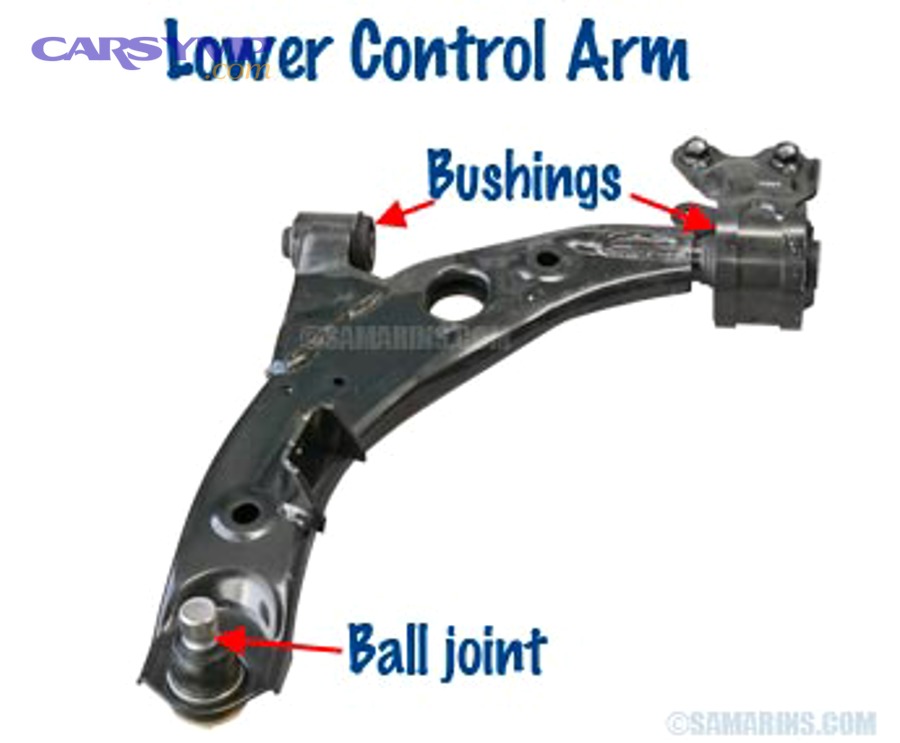
Press-in control-arm bushings are interference-fit sleeves (usually rubber-bonded) installed into the control arm, while “full control arm replacement” swaps the entire arm assembly—often including new bushings and sometimes a new ball joint—so the whole joint system resets at once.
More specifically, the difference matters because you’re deciding whether to replace a single wear component or the entire loaded structure that locates the wheel.
What do control arm bushings do for handling, comfort, and tire wear?
Control arm bushings isolate vibration and control wheel movement by allowing a designed amount of flex while keeping the suspension geometry stable under braking, acceleration, and cornering. Specifically, that controlled flex is why worn bushings can cause:
- Clunks over bumps (rubber tears or separates from its sleeve)
- Wander or pull under braking (wheel shifts rearward/forward)
- Uneven tire wear (toe and camber change as the wheel moves)
- Extra vibration/noise through the chassis (lost damping)
Rubber bushings are widely used to reduce vibration and noise, and their friction and wear behavior can accelerate as they age or operate under harsh loading conditions. According to a study by the National Institutes of Health, rubber bushings in particular begin losing their ability to isolate after repeated high-stress loads.
What parts do you get with a new control arm (and when is the ball joint included)?
A new control arm typically comes as a complete assembly with bushings already installed, and in many designs the ball joint is integrated (non-serviceable separately), meaning a full arm swap also replaces the ball joint and restores factory-fit interfaces.
In addition, a new arm can include fresh sleeves, correct bushing orientation, and an undamaged bore—reducing the risk of press-fit problems that can happen when you reuse an old arm.
Are your symptoms pointing to bushings only—or is the whole arm likely compromised?
Yes—most symptoms can point you toward bushings-only or whole-arm replacement if you check three things: bushing integrity, ball joint play, and arm condition (bent/corroded).
To better understand the choice, you need to confirm whether the problem is isolated rubber failure or a structural/ball-joint problem that makes a press-in repair short-lived.
Is it safe to drive with worn control arm bushings? (Yes/No—and when it becomes “No”)
It depends: Yes, you can sometimes drive short-term with mild bushing wear, but No when you have (1) strong braking wander, (2) loud clunks with visible separation, or (3) tire wear/instability that suggests geometry is shifting under load.
However, those “No” conditions matter because the control arm helps keep the wheel located; if the wheel can move, your car can react unpredictably in emergency maneuvers.
Use this quick “Yes vs No” guide:
- Usually “Yes, briefly”: light cracking, minor noise, stable steering, no abnormal tire wear
- “No—stop and repair”: steering wander under braking, wheel visibly shifting, metal-to-metal contact, or you suspect the ball joint is involved (because ball joint separation is a safety-critical failure mode).
For more information, visit this resource.
What are the most common signs of bushing failure vs ball joint failure?
There are two main groups of symptoms—bushing-type and ball-joint-type—based on whether the wheel is moving at the chassis mounts or at the steering knuckle joint.
For example, this split helps you decide whether pressing bushings solves the issue or whether a control arm replacement is the safer reset.
Bushing failure signs (mount movement):
- Clunk when transitioning gas/brake (wheel shifts fore/aft)
- Wander or pull under braking
- “Thunk” over bumps that changes with load
- Visible tears, separation, or leaking fluid on hydraulic bushings
Ball joint failure signs (knuckle joint movement):
- Knock over bumps while steering
- Looseness you can feel in the wheel (play when rocked)
- Steering that feels vague or “notched”
- Uneven tire wear combined with joint looseness
How can you visually inspect bushings and control arms without removing parts?
You can do a basic visual and pry-bar inspection by checking three zones: the rubber around each sleeve, the arm metal near mounts, and the ball joint boot and stud area.
Moreover, even without disassembly, you can spot “replace the arm” red flags like:
- Arm damage: bends, cracks, heavy rust scaling, or torn metal near bushing cups
- Bushing separation: rubber pulling away from the outer shell or inner sleeve
- Hydraulic bushing leak: oily residue or wetness around the bushing body
- Ball joint boot failure: split boot, grease loss, rust dust, or visible looseness
If you can safely lift the car and support it, a careful pry test can reveal excessive movement—but don’t treat a driveway check as definitive when symptoms are severe.
Which option is cheaper: press-in bushings or a complete control arm replacement?
Press-in bushings usually win on parts cost, full arm replacement often wins on labor predictability, and the cheapest overall option is the one that avoids redoing the job (and paying for alignment twice).
On the other hand, “cheap” changes fast when you add time, tools, seized bolts, and the probability of a future ball joint failure.
What’s the real “installed cost” formula (parts + labor + alignment + incidentals)?
The real cost is:
Installed Cost = Parts + Labor Hours + Alignment + Hardware/Consumables + Risk Buffer
Specifically, include these line items:
- Parts: bushings-only kit *or* complete arm assembly
- Labor hours: pressing is time-heavy; arm swap is often more predictable
- Alignment: almost always required after control arm work; budget it up front
- Hardware: stretch bolts, eccentric bolts, cotter pins, seized fasteners
- Consumables: penetrant, anti-seize, shop supplies
- Risk buffer: the cost of repeating labor if pressing goes wrong or the ball joint fails later
If you’re writing a Control arm replacement cost estimate for your own car, this formula is the one that stays honest because it forces you to account for the “second-order” costs people forget.
When do press-in bushings cost more than replacing the whole arm?
Press-in bushings cost more when labor and risk dominate, especially in these common scenarios:
- Shop labor rates + press time: pressing requires setup, correct drivers, and careful alignment; many shops price it higher than swapping an arm.
- Corrosion and seized fasteners: if eccentric alignment bolts seize, time explodes and parts can be destroyed during removal.
- Arm/ball joint is near end-of-life: pressing bushings into a tired arm can be a false economy if the ball joint fails soon after.
Real-world repair guidance often notes that bushing-only replacement “involves more labor and could cost more,” which is why complete arm replacement is frequently chosen in practice. Read more here.
When does pressing bushings save money (and actually make sense)?
Pressing bushings saves money when you’re reusing a good arm and you have the capability to press accurately. It usually makes sense when:
- The control arm is expensive or hard to source, but bushings are available
- The arm is straight, corrosion-free, and structurally healthy
- The ball joint is serviceable separately (or already new)
- You want a specific bushing upgrade (comfort-focused rubber, performance poly, or OEM hydraulic)
- You can press with a hydraulic shop press or a high-quality on-car press kit and correct adapters
However, if you’re unsure about pressing, consult with a professional before starting to avoid making costly mistakes.
How difficult is pressing bushings compared with bolting on a new control arm?
Pressing bushings is usually harder than bolting on a new control arm because it adds precision steps (press setup, orientation, bore protection), while a complete arm swap is more repeatable—unless seized bolts or access issues turn it into a fight.
Meanwhile, the difficulty gap is also where most DIY control arm replacement risks show up: the job is less about “can you turn a wrench” and more about “can you avoid geometry and safety mistakes.”
Do you need a hydraulic press, or can you use an on-car press kit?
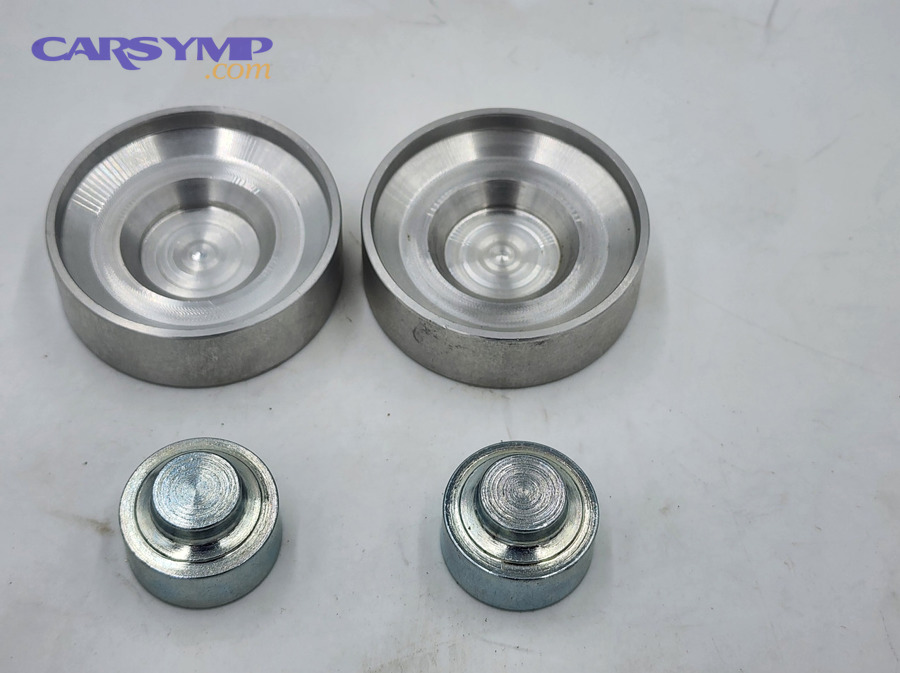
You don’t always need a hydraulic press: Yes, an on-car press kit can work for many bushings, but No, it’s not universal—tight access, large shells, and stubborn corrosion often make a shop press safer and more reliable.
Specifically, choose based on clearance and force:
- Hydraulic shop press (best control): stable, square pressing, lower risk of cocking
- On-car press kit (more flexible): useful when you can’t remove the arm easily, but alignment is fussier and force can be limited
If the bushing shell is bonded by corrosion or the arm is aluminum with sensitive bores, the margin for error shrinks.
What can go wrong when pressing bushings ?
There are five common failure modes when pressing bushings, and each one has a prevention habit:
- Cocking (crooked installation): start perfectly square; press slowly; confirm alignment every few millimeters
- Bore damage or stretching: use the correct driver cups; never press on the wrong surface
- Wrong orientation/clocking: mark the old bushing position; follow manufacturer alignment marks
- Rubber tearing or separation: avoid forcing a stuck shell; clean the bore; use proper lubricant where specified
- Wrong sleeve preload: tighten control arm pivot bolts at ride height (or simulated ride height) so the bushing rests in its neutral position
These are exactly the small errors that turn “cheap bushings” into a second repair.
Is replacing the whole control arm a true “bolt-on” job for DIYers?
Yes, control arm replacement is often bolt-on in concept, but No, it isn’t always simple because (1) bolts seize, (2) access can be tight, and (3) torque-and-alignment steps are safety-critical.
More importantly, treat the “bolt-on” label as incomplete unless you plan for:
- Seized alignment/camber bolts and the possibility of cutting them
- Ball joint separation technique (proper puller tools, avoiding boot damage)
- Torque specs and tightening at the correct suspension position
- Immediate alignment after reassembly
A common repair range cited for replacing one control arm includes parts, labor time, and a separate alignment charge. Read more here.
Which option lasts longer and reduces repeat repairs: bushings only or full arm replacement?
Bushings-only can last just as long when the arm and ball joint are healthy, while full arm replacement lasts longer overall when it resets multiple wear points at once—especially on high-mileage cars where ball joints and arm bores are also aging.
Besides, durability isn’t only about part quality; it’s also about installation quality and whether you remove all the “future failures” in the same labor window.
Does aftermarket control arm quality change the decision?
Yes—aftermarket quality can change the decision because a low-quality arm can wear prematurely, while a high-quality OE or reputable aftermarket arm can be the most durable “one-and-done” fix.
Specifically, durability depends on:
- Ball joint sealing and hardness
- Bushing compound and void design
- Arm metallurgy and corrosion protection
- Manufacturing tolerances (especially on aluminum arms)
If you’re choosing between pressing OEM-style bushings into a known-good arm versus installing a questionable arm assembly, bushings-only can be the safer durability bet.
Should you replace control arms or bushings in pairs (left/right)?
Yes, you often should replace them in pairs because (1) wear rates are similar side-to-side, (2) handling symmetry matters, and (3) alignment results are more stable when both sides match.
However, there are exceptions: if one side was damaged by impact or a torn boot, you may replace one side—but you should still inspect the other side carefully to avoid a near-term repeat job.
If your ball joint is worn, does that automatically mean full arm replacement?
No, not automatically—but it often does in practice because many ball joints are integrated, and even when replaceable, the combined labor frequently makes full arm replacement the smarter reset.
To illustrate the logic:
- Ball joint serviceable separately: you can replace just the ball joint *and* press bushings if the arm is excellent
- Ball joint integrated/non-serviceable: a full arm replacement becomes the direct, reliable solution