Guide to Alternator Replacement for Drivers: New vs Reman
Alternator replacement is the fix when your charging system can’t keep the battery topped up, causing dim lights, warning icons, or a vehicle that stalls once the battery is drained. If your alternator is failing, replacing it restores stable voltage so the battery can recharge while the engine runs.
Beyond “swap the part,” the real win is diagnosing correctly first—because a weak battery, a slipping belt, or a wiring issue can mimic a bad alternator and waste your time and money.
You’ll also want to choose the right unit (new or remanufactured), confirm belt/tensioner condition, and verify charging after installation so you don’t repeat the same breakdown a week later.
Giới thiệu ý mới: Below is a step-by-step, driver-friendly breakdown that connects symptoms to diagnosis, replacement decisions, and post-install checks—so the repair actually solves the problem.
What is alternator replacement, and when is it truly needed?
Alternator replacement is installing a functioning alternator so your engine can generate electricity to run accessories and recharge the battery, and it’s needed when the alternator can’t maintain system voltage under real driving load. To connect the “why” to the “when,” start with symptoms that show the battery is being used as the power source instead of being recharged.
Which alternator failure symptoms matter most?
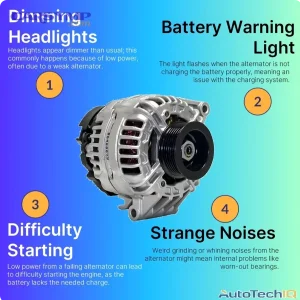
Yes—certain signs strongly point to alternator failure: charging warning light, lights dimming with RPM changes, repeated dead batteries, and electrical glitches that worsen as you drive. Next, the key is understanding why these symptoms happen so you can separate a weak battery from a weak charge source.
- Battery/charging warning icon while driving: The system voltage is outside the expected charging window.
- Dimming headlights at idle: The alternator output is low and the battery is supplementing the load.
- Slow windows, weak blower, flickering dash: Voltage is sagging under accessory load.
- Car starts, then dies later: The starter used battery power, but the alternator never replenished it.
Cụ thể hơn: Many alternators fail in ways that are “partial” at first—charging intermittently, charging only at higher RPM, or charging but with unstable regulation—so symptoms can come and go for days.
The most common internal failure points tend to be in the regulation and rectification side of the unit. Theo nghiên cứu của nhóm nghiên cứu đăng tải trên ResearchGate (phân tích ca thực tế 2008–2010), phần lớn hư hỏng trên alternator reman đến từ bộ điều áp (regulator) chiếm khoảng 63.68%, tiếp theo là rectifier khoảng 13.25% và chổi than khoảng 11.97%.
Why does a failing alternator cause “random” electrical problems?
A failing alternator can cause random electrical behavior because modern vehicles rely on stable voltage; when output drops or ripple increases, modules and sensors may misread signals or reset. Tiếp theo, once you see why stability matters, you’ll avoid the common trap of replacing the battery repeatedly without fixing the charging source.
In plain terms, the alternator is your vehicle’s on-demand generator. When it can’t meet load, the battery becomes the backup power supply—until it’s empty.
How do belts and pulley drive affect the decision to replace?
No—an alternator isn’t always “bad” when charging is weak; sometimes the pulley drive can’t spin it properly due to belt slip or tensioner failure. Để hiểu rõ hơn, treat belt condition as part of alternator replacement planning, not an afterthought.
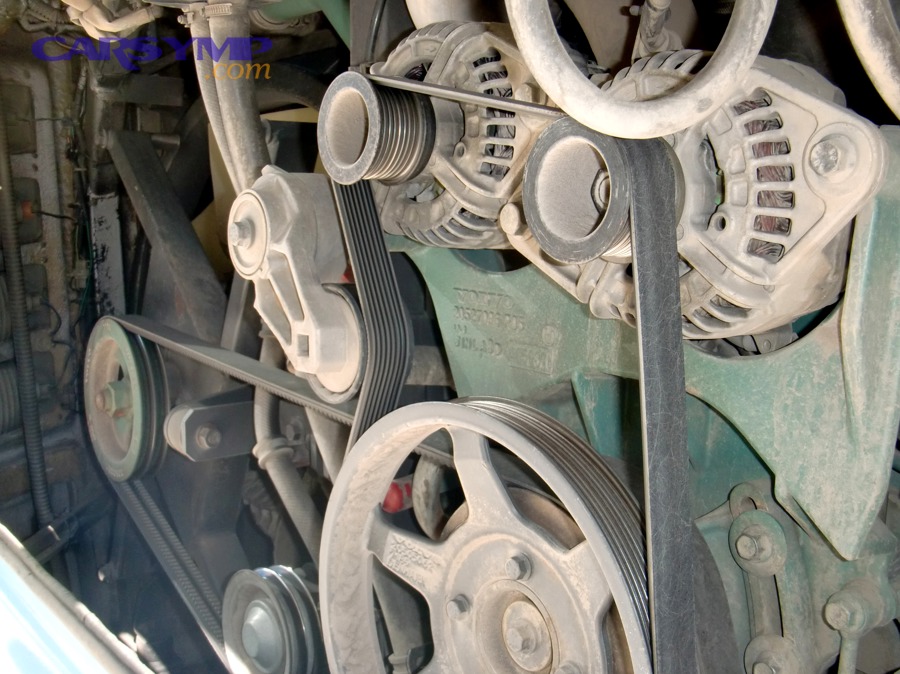
If the belt slips, the alternator may undercharge at idle or under load, and you’ll chase electrical symptoms that look like alternator failure. That’s why a Belt and tensioner check during replacement is not optional if you want a durable fix.
Can you drive with a failing alternator?
Yes, you can sometimes drive briefly with a failing alternator, but it’s risky because the vehicle is running on stored battery energy and will eventually lose spark/fuel control once voltage drops too far. However, the real question is how far you can go and how to reduce the chance of getting stranded.
When is it “safe enough” to limp to a shop?
Yes—if the engine is running normally and you’re heading straight to a nearby repair facility, you may be able to limp there, especially in daylight with minimal accessories. Tiếp theo, your goal is to conserve battery power because you’re spending it like fuel.
- Turn off non-essentials: seat heaters, rear defrost, high audio power.
- Reduce blower speed and avoid max A/C if possible.
- Drive in daylight to avoid headlight load.
- Avoid stop-and-go; restarting is expensive for the battery.
Cụ thể: If the battery/charging warning is on and headlights are already dim, assume you have limited time—minutes to maybe an hour depending on battery state, vehicle loads, and weather.
What are the “stop now” signs?
No—if you see severe symptoms like stalling, dashboard going dark, steering assist dropping, or multiple control warnings erupting, you should not keep driving because system voltage is collapsing. Ngoài ra, if the engine cuts out once, you may not get a second start.
In practice, a failing alternator can create a cascade: voltage sags → modules misbehave → fuel/ignition control destabilizes → engine stalls.
Why does accessory load shorten your driving window?
Accessory load shortens your driving window because every amp you use must come from the battery when the alternator isn’t supplying it. Hơn nữa, research on auxiliary loads shows how meaningful this can be: Theo nghiên cứu của Idaho National Laboratory (2015), tài liệu tổng quan trích dẫn hiệu suất alternator “điển hình” khoảng 55%, cho thấy tạo ra điện từ động cơ có tổn hao và việc tăng tải phụ trợ có thể tác động đáng kể đến tiêu hao nhiên liệu và hệ thống điện.
That’s the “why” behind the advice to shut off non-essential loads: it directly buys you more time before the battery voltage falls below operating thresholds.
How do you tell whether the alternator, battery, or starter is the problem?
You can tell by combining symptom timing with a few voltage checks: starters fail during cranking, batteries fail at rest or under load, and alternators fail while running or under accessory demand. To move from guesses to certainty, use a simple decision sequence rather than swapping parts.

Cụ thể: Many shops categorize this as Alternator vs battery vs starter diagnosis because the symptoms overlap—but the test logic is straightforward when you follow the right order.
What symptom timing points to each component?
There are three common patterns: battery problems show up before starting and after sitting, starter problems show up during cranking, and alternator problems show up while driving. Tiếp theo, validate the pattern with voltage, because “it feels weak” isn’t a measurement.
- Battery: slow cranking after sitting, needs frequent jumps, voltage low at rest.
- Starter: single click, no crank, or intermittent crank with good battery voltage.
- Alternator: battery light while driving, dim lights at idle, battery keeps dying despite being new.
How do cables and grounds mimic alternator failure?
Yes—bad connections can mimic alternator failure because the alternator may be charging, but power can’t reach the battery or vehicle due to corrosion or poor ground paths. Để bắt đầu isolating this, visually inspect terminals and measure voltage drop across the main charging cable and grounds.
This is where auto electrical repair fundamentals matter: clean metal-to-metal contact, correct torque, and secure grounds often solve “mystery” charging complaints.
What quick checks prevent unnecessary alternator replacement?
A quick set of checks can prevent wasted replacement: confirm belt condition, confirm battery health, and confirm charging voltage at the battery with the engine running. Hơn nữa, if the system passes these, the issue may be parasitic drain or intermittent wiring rather than the alternator itself.
How do you test an alternator with a multimeter?
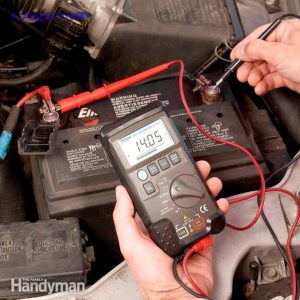
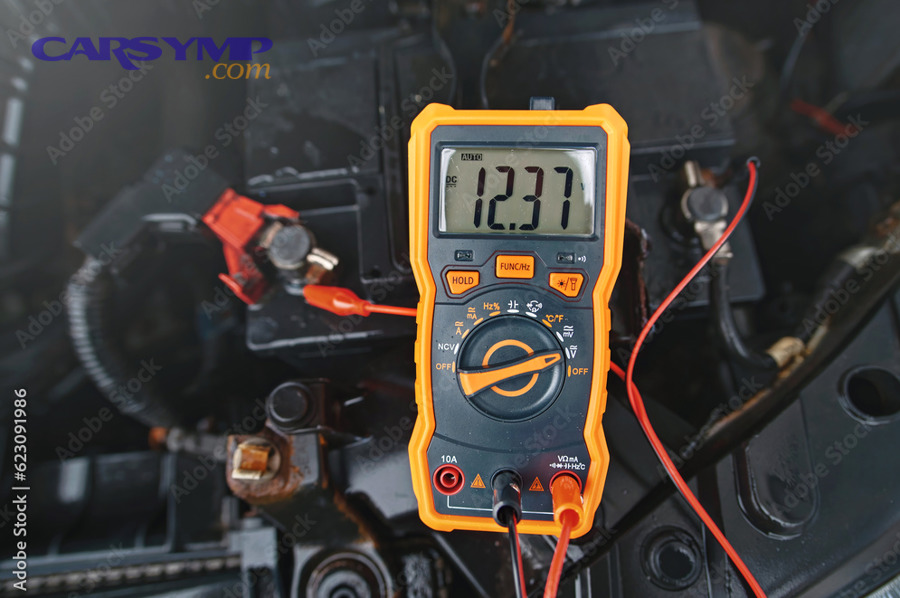
You test an alternator with a multimeter by measuring battery voltage at rest, then measuring charging voltage and stability while the engine runs under load, which tells you if the alternator and regulator are doing their job. Next, the important point is that a single reading isn’t enough—you want a small “story” of readings.
Step-by-step voltage checks that actually mean something
The main method uses 5 steps and gives a clear result: measure rest voltage, start voltage, idle charge voltage, loaded charge voltage, and voltage drop across cables. Tiếp theo, the most important step is the loaded test because weak alternators sometimes look “okay” with no load.
- Engine off (rest): Measure at the battery posts. A healthy, fully charged 12V battery is typically around 12.6V (temperature and state of charge affect this).
- Cranking: Watch the lowest voltage during start. A big drop can indicate battery weakness or starter draw issues.
- Engine idling: Measure battery voltage again. Many healthy charging systems are roughly 13.8–14.7V depending on vehicle strategy and temperature.
- Load test: Turn on headlights, blower, rear defrost. Voltage should remain stable and not drift downward.
- Voltage drop: Measure from alternator output terminal to battery positive; then battery negative to engine ground. Big drops indicate cable/ground resistance.
What readings suggest alternator failure vs regulation issues?
If voltage never rises above battery rest voltage when the engine runs, the alternator likely isn’t charging (or the belt isn’t turning it). However, if voltage jumps too high or oscillates, the regulator or wiring feedback may be the issue. Ngoài ra, some failures show up as “normal voltage but poor current,” which becomes obvious only under load.
To avoid misreads, always test at the battery posts (not the clamp) so you’re measuring the system’s real usable voltage.
How do you interpret charging behavior in modern vehicles?
Modern vehicles may vary charging voltage to improve efficiency and battery life, so you might not always see a fixed 14.4V. Hơn nữa, that’s why the loaded test and trend (stable vs falling) matter more than chasing a single “perfect number.”
Should you buy a new alternator or a remanufactured one?
New alternators tend to be stronger on reliability and consistency, while remanufactured alternators can be cost-effective if the reman process and warranty are solid; the right choice depends on your risk tolerance, vehicle value, and downtime cost. To connect choice to outcome, focus on failure modes and what is actually replaced inside the unit.
In many parts catalogs this decision shows up as New vs reman alternator pros/cons, but you can make it concrete with practical criteria:
When is a new alternator the smarter purchase?
A new alternator is often the smarter purchase when you need maximum reliability (daily commuting, rideshare, long-distance driving) or when access is difficult and labor is expensive. Tiếp theo, the more labor-intensive the job, the more you should pay to avoid repeating it.
- High labor access: buried alternator, subframe movement, tight engine bay.
- High electrical demand: aftermarket audio, added lighting, winch, frequent short trips.
- Downtime is costly: work vehicle, delivery routes, family logistics.
When can a reman alternator make sense?
A reman alternator can make sense when you have a strong warranty, a reputable reman source, and easy access for replacement if needed. Ngoài ra, it can be a good value on older vehicles where you’re balancing repair cost with remaining vehicle life.
However, reman quality can vary by supplier. Theo nghiên cứu của nhóm nghiên cứu đăng tải trên ResearchGate (case study dữ liệu 2008–2010), các điểm hỏng nổi bật trong alternator reman thường tập trung ở regulator và rectifier, gợi ý rằng chất lượng linh kiện và kiểm tra tải/điện áp sau reman là yếu tố sống còn.
What selection checklist reduces the risk either way?
Use a checklist: match amperage rating, match pulley type, confirm connector pinout, confirm mounting ears, and verify return policy. Hơn nữa, if your vehicle uses a decoupler pulley (common on many modern engines), mismatching it can create belt noise and tensioner bounce even if the alternator “works.”
What are the alternator replacement steps in a safe overview?
The main method is a structured 8-step process: disconnect power, access the drive belt, remove electrical connections, unbolt the alternator, install the new unit, reinstall belt correctly, reconnect power, then verify charging. Next, the most important step is safety—because the alternator output circuit can deliver high current even at low voltage.

In many guides you’ll see this summarized as Alternator replacement steps overview. Here is the practical flow that fits most vehicles (details vary by model):
Step 1–3: Prep, access, and belt release
Start by disconnecting the negative battery terminal, then remove covers/intake ducts as needed for access, then relieve belt tension with the correct tool on the tensioner. Tiếp theo, take a photo or reference the belt routing diagram before removing the belt.
- Disconnect battery negative: prevents shorting the alternator output stud.
- Document belt routing: avoids misrouting that can shred a new belt.
- Relieve tensioner smoothly: don’t let it snap back and damage the stop.
Step 4–6: Remove old alternator and install the new unit
Remove the electrical connector(s) and output cable, remove mounting bolts, and lift the alternator out; then position the replacement alternator, hand-thread bolts, torque to spec, and reconnect wiring securely. Ngoài ra, inspect the output cable for heat damage or brittle insulation—charging issues can be wiring, not the alternator.
Step 7–8: Belt routing, tension check, and final assembly
Route the belt correctly, ensure it’s seated in every pulley groove, then release the tensioner and recheck alignment. Hơn nữa, this is exactly where belt and tensioner check during replacement pays off: a worn tensioner can cause slip, squeal, and undercharge, making the new alternator look “bad.”
To reduce comebacks, confirm the tensioner moves smoothly, the pulley bearings aren’t rough, and the belt isn’t glazed or cracked. If you hear squeal or see oscillation, fix that now.
What should you inspect on the belt and tensioner while doing the job?
You should inspect belt condition, pulley alignment, tensioner damping, and idler bearing smoothness because these parts directly control alternator speed and can cause charging complaints or noise after the replacement. Next, think of the belt drive as the alternator’s “fuel line”—if it’s restricted, the alternator can’t do its job.
How do you spot belt slip and glazing quickly?
Look for shiny glazed ribs, cracking, missing chunks, or black dust near pulleys; these signs often indicate slip or age-related hardening. Tiếp theo, remember that slip is worst under load—exactly when alternator demand peaks (headlights, defrost, blower).
What tensioner behaviors indicate replacement?
If the tensioner arm bounces excessively, sticks, or has a rough pulley bearing, it’s a candidate for replacement. Ngoài ra, weak damping can amplify belt vibration and create chirps or squeals that people misinterpret as “bad alternator bearings.”
Why does pulley type matter for noise and longevity?
Some alternators use one-way clutch/decoupler pulleys to smooth belt dynamics; mismatches can lead to belt flutter, noise, and tensioner wear. Hơn nữa, this is a common “everything is new but it still squeals” scenario—so match the original pulley design when possible.
How long does alternator replacement take, and what drives labor cost?
Alternator replacement labor time ranges from under an hour on easy-access vehicles to several hours on tight engine bays, and cost is driven mainly by access difficulty, belt routing complexity, and whether related parts must be removed. Next, use labor time as a decision tool: high labor jobs favor higher-quality parts and preventive belt/tensioner service.
Shops often describe this as Alternator replacement labor time. The range is wide because “alternator location” matters more than the alternator itself.
What are common labor time tiers?
There are three practical tiers: easy access (0.5–1.5 hours), moderate access (1.5–3 hours), and difficult access (3–6+ hours). Tiếp theo, confirm your vehicle’s alternator location and what must be removed to reach it.
- Easy: top-front mounting, simple belt release, minimal disassembly.
- Moderate: intake ducts, coolant reservoir, or fan shroud removal.
- Difficult: wheel well access, subframe shift, or multiple accessory removal.
Which “extra steps” increase the bill?
Extra steps include seized bolts, broken connectors, belt/tensioner replacement, and electrical cable repair. Ngoài ra, corrosion at the alternator output terminal can require cleaning or cable replacement to ensure safe, low-resistance charging.
What’s a smart way to avoid paying labor twice?
Bundle related wear items that share labor: if the belt and tensioner are due soon, replacing them during alternator service often costs less than doing two separate visits. Hơn nữa, this is where good planning beats reactive repair.
Before the next section, here’s a quick table to connect symptoms, likely causes, and the best “first test” so you can avoid unnecessary parts swapping.
| Symptom | Likely Cause | Best First Test |
|---|---|---|
| Battery light on while driving | Charging system output low | Charging voltage at battery (idle + load) |
| Car needs frequent jump starts | Battery weak or parasitic drain | Rest voltage + battery load test |
| Squeal/chirp after repair | Belt slip or pulley mismatch | Visual belt seat + tensioner movement |
| Intermittent electrical glitches | Regulator/ripple or poor grounds | Voltage stability + voltage drop tests |
What should you do right after alternator replacement to confirm it worked?
You should verify charging voltage, confirm battery recovery, and check for belt alignment/noise because a newly installed alternator can still underperform if wiring, grounds, or belt drive problems remain. Next, treat post-checks as part of the repair, not an optional bonus.
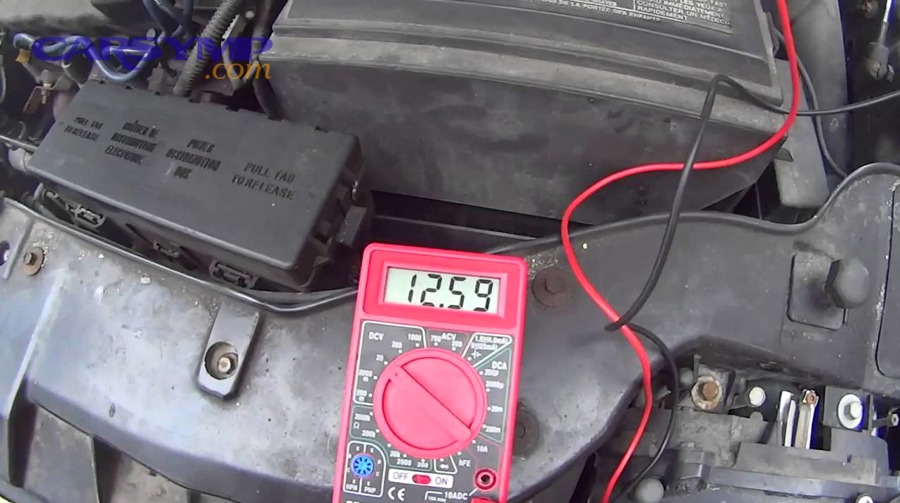
Which post-install charging checks are non-negotiable?
Measure voltage at the battery at idle and with accessory load, then recheck after a short drive. Tiếp theo, if the voltage is stable and the battery light stays off, you’ve proven the charging system is functioning in real conditions.
- Idle voltage check: confirm the system rises above rest voltage.
- Loaded voltage check: confirm it doesn’t steadily fall.
- Recheck after drive: confirm no intermittent connector issues.
How do you help the battery recover after being drained?
If the battery was deeply discharged, don’t rely on short idling to “fix it”; instead, give it enough driving time or use a charger so it can return to a healthy state of charge. Hơn nữa, this is where After replacement battery charging tips matter: a stressed battery can fail soon and make you suspect the alternator again.
Practical approach: if you had multiple no-start events, consider charging the battery fully with a proper charger and then re-test. This separates “charging source is fixed” from “battery health is gone.”
What wiring checks reduce repeat failures?
Confirm the alternator output nut is tight, the connector clicks fully, and the main grounds are clean and secure. Ngoài ra, check that the cable routing isn’t rubbing on sharp edges—because vibration damage can create intermittent faults that look like alternator failure.
What causes alternator-related noise before or after replacement?
Alternator-related noise is usually caused by belt slip, pulley/bearing wear, misalignment, or tensioner issues, and the fix depends on identifying whether the sound is friction-based (chirp/squeal) or bearing-based (grind/whine). Next, use sound character plus a quick inspection to avoid misdiagnosis.

Drivers often search for Common alternator noise causes because the sound is alarming—but the source is usually traceable.
How do you distinguish squeal from bearing noise?
Squeal is high-pitched and changes with load or moisture, often tied to belt friction; bearing noise is rough, growly, or whiny and may persist even after belt removal (when spun by hand). Tiếp theo, if squeal appears right after replacement, suspect belt seating, contamination, or tensioner weakness first.
What mistakes create noise right after installation?
Common mistakes include misrouting the belt, leaving the belt off a groove, contaminating the belt with oil/coolant, overtightening or undertightening certain mounts (alignment), and mismatching a decoupler pulley. Ngoài ra, a worn tensioner that was “barely okay” before can become obvious once the new alternator adds different rotational drag.
When should you seek professional electrical service?
If noise is combined with charging instability, repeat warning lights, or burnt-smell wiring, it’s time for professional inspection because the issue may involve high-resistance connections or internal alternator faults. Hơn nữa, a reputable shop that focuses on auto electrical repair can load-test the system and verify ripple/diode health more deeply than basic voltage checks.
Contextual border: Up to this point, you’ve covered the core decision loop—symptoms → diagnosis → replacement → verification. Below is a focused extension that helps you prevent repeat failures and make smarter long-term choices without drifting away from the alternator replacement intent.
Supplementary: How do you prevent repeat charging problems after alternator replacement?
You prevent repeat charging problems by managing electrical load, protecting wiring/grounds, maintaining belt drive health, and choosing parts that match your vehicle’s charging strategy. Next, these small habits create big reliability gains—especially on vehicles with high accessory demand.
How do driving patterns and electrical load influence alternator stress?
Short trips with heavy accessory use can keep the battery undercharged, forcing the alternator to work harder on every drive to catch up. Tiếp theo, if you frequently run heated features, high blower, or add aftermarket electronics, consider a higher-output alternator only if your vehicle supports it safely.
The relationship between auxiliary electrical demand and engine load is real. Theo tổng quan nghiên cứu trong báo cáo của Idaho National Laboratory (2015), hiệu suất alternator thường được nhắc đến ở mức khoảng 55%, cho thấy việc tạo điện có tổn hao và tải phụ trợ có thể ảnh hưởng đáng kể đến hệ thống vận hành.
What maintenance habits protect the charging system?
Keep battery terminals clean, check grounds periodically, and address belt noise immediately rather than “turning up the radio.” Ngoài ra, if your battery is aging, replacing it before it fails can prevent alternator overwork from chronic recharge demand.
How do parts quality and warranty change the real cost?
Parts quality and warranty change the real cost because a cheaper alternator that fails early costs you twice: the part plus the labor and downtime. Hơn nữa, this is where the “new vs reman” decision should reflect your labor time and how critical the vehicle is to your day-to-day life.
What’s the smartest rule for deciding DIY vs shop work?
If access is tight, tools are specialized, or you’re unsure about safe electrical handling, a professional service is the smarter option; if access is easy and you can verify charging with measurements, DIY can be safe and cost-effective. Ngoài ra, the best outcome is not “doing it yourself,” but doing it correctly once.
FAQs about alternator replacement
These quick answers address common follow-up questions that drivers ask after diagnosing and replacing an alternator. Tiếp theo, use them as a final checklist to confirm you’re not missing a simple cause.
Can a bad battery ruin a new alternator?
Yes, a severely weak battery can stress a new alternator because the alternator may run at high output trying to recharge a battery that can’t accept charge properly. Hơn nữa, charging a deeply discharged battery with an external charger first can reduce strain and improve reliability.
Will replacing the alternator fix the battery warning light every time?
No, not every time—because the warning light can also be triggered by belt slip, wiring faults, poor grounds, or a sensor/control issue depending on the vehicle. Ngoài ra, that’s why you should confirm charging voltage and cable integrity after the install.
Is it normal for voltage to vary after replacement?
Yes, some variation can be normal because many vehicles adjust charging based on temperature, load, and battery state, but voltage should remain stable and should not steadily fall under load. Hơn nữa, if you see frequent drops and recoveries, recheck belt tensioner behavior and connector seating.
What’s the fastest way to avoid getting stranded again?
Do three things: confirm charging voltage under load, fully recharge the battery if it was drained, and inspect belt/tensioner condition so the alternator can spin correctly. Ngoài ra, if the vehicle previously died while driving, don’t assume the battery is healthy just because the alternator is new.
Where does “Car Symp” fit into troubleshooting?
If you’re using symptom-based guides like “Car Symp” style checklists, treat them as a starting point, then validate with voltage measurements and belt inspection so you don’t confuse similar symptoms across the battery, starter, and alternator. Như vậy, you turn symptom clues into a confirmed diagnosis and a repair that lasts.