Fix Broken Power Windows: Complete Repair Guide for Car Owners & Cost-Saving Solutions
Power window repair addresses malfunctioning automotive window systems caused by failed regulators, worn motors, faulty switches, or electrical issues, with professional repairs costing $150-$800 compared to dealership prices of $300-$1,200. Car owners face this common issue when windows become stuck, move slowly, make grinding noises, or stop responding entirely, requiring diagnosis to determine whether the motor, regulator mechanism, or electrical components need replacement. The repair process typically takes 45 minutes to 2 hours at independent shops, while DIY attempts require 2-4 hours and mechanical skills to remove door panels and install replacement parts correctly.
Understanding what causes power window failures helps you recognize early warning signs before complete breakdown occurs. Motors burn out from repeated use over 5-10 years, plastic regulator gears crack from stress, cables fray and detach, and electrical connections corrode from moisture exposure. Each component plays a specific role in the window assembly, and identifying which part failed determines whether you need a $50 switch replacement or a $400 regulator overhaul.
Choosing between DIY repair and professional service depends on your mechanical ability, available tools, and risk tolerance for damaging other door components. While replacing a window switch takes minimal skill and saves significant money, regulator replacement requires removing the entire door panel, disconnecting airbag wiring, and precisely aligning mechanical components. Professional shops provide warranties, diagnostic equipment, and experience that prevents costly mistakes, whereas DIY repairs offer maximum cost savings for confident home mechanics.
Finding a reputable repair service requires evaluating warranties, pricing transparency, and specialization in power window systems rather than general auto glass shops. Below, this guide examines every aspect of power window repair to help you make informed decisions about fixing your vehicle’s windows quickly and affordably.
What Are Power Windows and How Do They Work?
Power windows are electrically controlled automotive window systems that use motors, regulators, switches, and wiring to raise and lower side glass panels automatically when drivers or passengers press control buttons. These systems replaced manual crank mechanisms in most vehicles after the 1980s, providing convenience through electrical automation that moves windows up and down at the touch of a button. The entire assembly consists of interconnected mechanical and electrical components working together to translate electrical signals into physical window movement.
To understand power window repair, you must first grasp how these systems function under normal operation. Let’s examine the key components that make power windows work.
What Are the Main Components of a Power Window System?
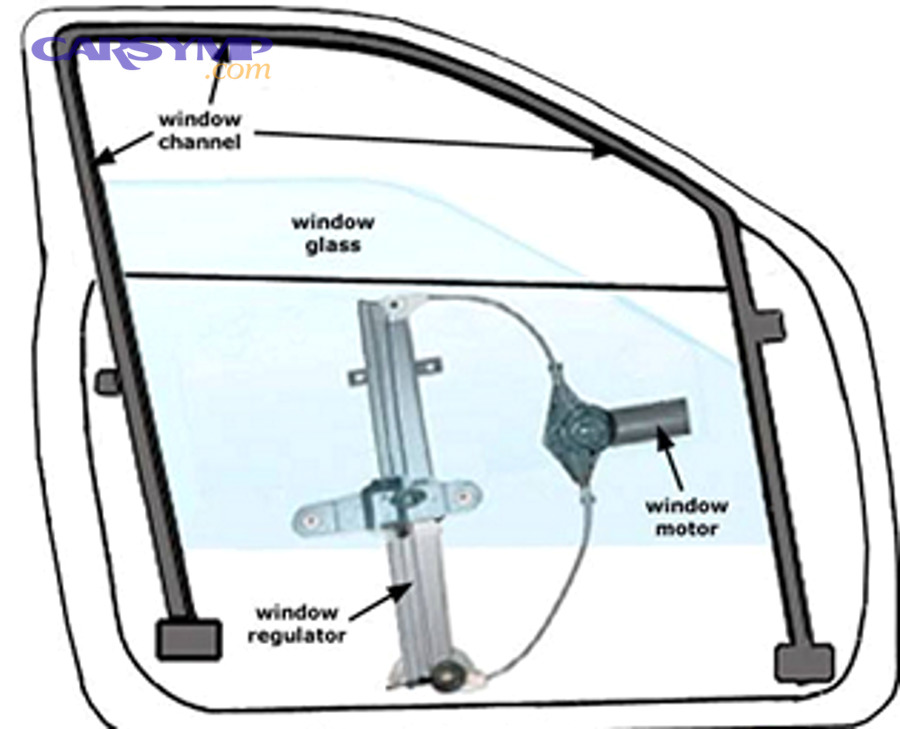
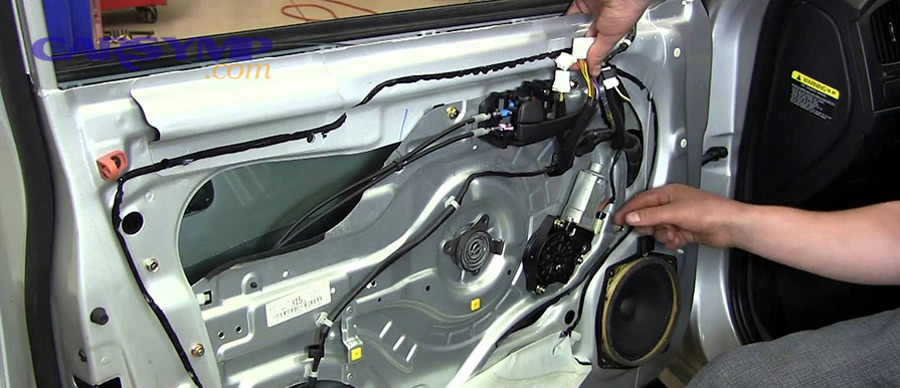
The window regulator serves as the mechanical framework that guides window movement along predetermined tracks within the door cavity. This component comes in two primary designs: scissor-type regulators using X-shaped metal arms that extend and compress, and cable-driven regulators employing steel cables wound around pulleys to pull the window glass up and down. Modern vehicles predominantly use cable-driven systems because they’re lighter, quieter, and fit within thinner door panels.
The electric motor assembly converts electrical energy into rotational force that drives the regulator mechanism. These DC motors typically produce 12 volts of power and include internal gearing that reduces speed while increasing torque, allowing the motor to lift heavy glass panels smoothly. Most window motors feature thermal protection that shuts down the motor if it overheats from excessive strain, preventing permanent damage when windows freeze shut or encounter obstructions.
Window switches and control modules serve as the user interface and electronic brain of the power window system. Each door contains a switch assembly with up/down buttons that send electrical signals to the motor, while the driver’s door typically houses a master switch controlling all four windows plus lock-out functions for rear passenger windows. Modern vehicles include Body Control Modules (BCM) that manage window functions, including auto-up features, pinch protection, and one-touch operation.
Window tracks and guides provide the physical pathway that keeps glass panels aligned as they move vertically within the door. Metal or reinforced plastic channels run along the front and rear edges of each window, preventing side-to-side movement while allowing smooth vertical travel. Weatherstripping lines these channels, creating seals that block wind noise and water intrusion when windows close completely.
Wiring and electrical connections form the nervous system linking switches, motors, and control modules together. Each window circuit includes power wires carrying current to the motor, ground wires completing the electrical circuit, and sometimes signal wires communicating with the BCM for advanced features. Connectors at each junction point allow technicians to disconnect components during repairs, though these connections also represent potential failure points when corrosion develops.
How Does the Window Regulator Mechanism Function?
The motor-driven regulator operates through a simple mechanical principle: rotational motor movement converts to linear up-down motion through gearing and leverage. When you press the window switch, electrical current flows to the motor, spinning its output shaft in the direction corresponding to your button press (up or down). This rotating shaft drives either the scissor arm pivot points or the cable drum, depending on regulator type, which then physically moves the window glass attached to the regulator mechanism.
Cable and pulley systems work by winding and unwinding steel cables around motor-driven drums positioned at opposite ends of the door cavity. As the motor rotates clockwise, one cable winds up while the opposite cable releases, pulling the window glass upward. Reversing the motor direction unwinds the first cable while winding the second, lowering the window. The glass panel attaches to a carrier plate connected to both cables, ensuring balanced force distribution that prevents binding or tilting during operation.
Safety features and auto-reverse functions protect passengers from injury when windows close on obstructions. Modern power window systems include current-sensing circuits that detect increased motor load when the window encounters resistance, automatically reversing direction to prevent crushing fingers, hands, or objects. This anti-pinch technology became mandatory in many markets after 2010, using sensors that measure motor amperage draw and react within milliseconds when obstruction occurs. Some premium vehicles add pressure-sensitive weatherstripping that triggers reversal before the window touches the obstruction, providing an additional safety layer.
What Are the Common Signs Your Power Window Needs Repair?
Common power window failure signs include complete inability to move (stuck open or closed), abnormally slow movement taking 5+ seconds to travel full distance, grinding or clicking noises during operation, and intermittent function where windows work sometimes but fail randomly. These symptoms indicate specific component failures: stuck windows typically mean motor or regulator breakdown, slow movement suggests worn gears or binding mechanisms, grinding noises reveal damaged regulator components, and intermittent operation points to electrical issues like faulty switches or corroded wiring connections.
Recognizing these warning signs early allows you to address power window problems before they escalate into complete failure or secondary damage. Below, we’ll examine the most common symptoms and what they reveal about your window system’s condition.
Is Your Power Window Stuck in the Up or Down Position?
Complete window failure leaving glass stuck in one position indicates total motor failure, catastrophic regulator damage, or complete electrical circuit interruption. When motors burn out internally, they lose all ability to generate rotational force, leaving the window frozen at whatever position it occupied when failure occurred. Similarly, broken regulator cables snap suddenly, dropping the window into the door cavity where it jams against internal components, while shattered plastic regulator gears prevent any force transmission from motor to glass.
Immediate safety concerns arise depending on whether windows stick open or closed. Stuck-open windows expose vehicle interiors to weather, allowing rain to soak upholstery and potentially damage electronic components while eliminating security since anyone can reach inside to unlock doors. Stuck-closed windows trap passengers during emergencies, prevent ventilation on hot days, and block access to parking ticket machines, drive-through windows, and toll booths. Either condition requires prompt attention to restore normal vehicle function and security.
Emergency temporary fixes provide short-term solutions until proper repairs occur. For stuck-open windows, heavy-duty plastic sheeting taped securely to the door frame keeps out weather but doesn’t restore security or prevent determined thieves from tearing through plastic barriers. For stuck-closed windows, some vehicles allow manual operation by removing the door panel and physically pushing or pulling the window glass, though this risks further damage if regulator components bind against the glass. These workarounds should only serve as bridges to professional repair, not permanent solutions.
Does Your Power Window Move Slowly or Make Grinding Noises?
Early warning signs of motor or regulator wear manifest as progressively slower window operation over weeks or months. Fresh power window systems move glass panels from fully open to fully closed in 2-3 seconds, but aging motors with worn brushes and commutators gradually lose power output, extending this duration to 4, 5, or even 6+ seconds. This degradation accelerates when vehicles operate in extreme temperatures: cold weather thickens lubricants, increasing mechanical resistance, while desert heat degrades plastic components and dries out grease, creating additional friction.
Sounds that indicate specific component failures help diagnose problems without disassembling doors. Grinding noises resembling gravel in a blender signal stripped plastic gears inside the regulator mechanism, where teeth wear away until they skip and grind against adjacent surfaces. Clicking sounds occurring at regular intervals during window travel point to broken cable guides or detached cable ends repeatedly striking door panel metal. Squealing noises similar to unoiled door hinges indicate dried-out regulator pivots or window tracks desperately needing lubrication. High-pitched whining from the motor itself suggests worn internal bearings approaching failure.
Addressing issues before complete failure occurs saves significant money and prevents inconvenience. Slow window movement often responds to simple fixes like lubricating tracks with silicone spray or cleaning accumulated dirt from channels, costing nothing but 15 minutes of time. Grinding noises caught early might only require regulator repair rather than full replacement, reducing costs from $400 to $150 in many cases. Waiting until windows stop completely often means dealing with additional damage: stuck windows stress motors until they burn out, failed regulators drop glass panels that crack on impact, and broken cables scratch window surfaces during chaotic movement.
Do You Hear Clicking Sounds But the Window Won’t Move?
Broken regulator cables or gears create distinctive clicking noises when motors engage but fail to transfer force to the window glass. Cable-driven systems produce loud “CLICK-CLICK-CLICK” sounds as the motor spins the cable drum, but detached cables simply wind around the drum without pulling the window. The clicking comes from the cable end repeatedly striking its mounting bracket or door panel metal with each motor rotation. Scissor-type regulators generate similar clicking when plastic rivets break, allowing metal arms to pivot freely without gripping each other, causing arms to collapse and click against stops.
Motor engagement issues occur when electrical power reaches the motor successfully, but internal mechanical failures prevent actual rotation. These situations create clicking from electromagnetic relays or solenoids energizing repeatedly as the switch sends signals, but the motor shaft remains stationary due to seized bearings, stripped output gears, or complete internal failure. You can distinguish motor clicking from regulator clicking by listening to timing: motor clicks synchronize with switch presses, while regulator clicks continue as long as you hold the switch.
Switch malfunction indicators include clicking sounds emanating from the switch assembly itself rather than the door cavity. Quality switches produce crisp, single clicks when pressed, but failing switches create multiple rapid clicks or crackling sounds as internal contacts arc and bounce. Dead spots in switch travel, where pressing harder or at specific angles suddenly makes windows work, confirm switch problems rather than motor or regulator issues. Testing switches requires checking whether other windows operated by the same master switch work normally, isolating whether the problem affects one window mechanism or the entire control circuit.

What Causes Power Window Failures?
Power window failures result from three primary causes: mechanical wear of motors and regulators (accounting for 60-70% of failures), electrical problems with switches and wiring (responsible for 20-25% of issues), and environmental damage from weather extremes (causing 10-15% of breakdowns). Motors typically last 100,000-150,000 window cycles before internal components wear out, while plastic regulator parts deteriorate faster in vehicles exposed to temperature extremes, often failing between 80,000-120,000 miles. Understanding these failure mechanisms helps car owners recognize early symptoms and take preventive action.
Different components fail at different rates based on usage patterns and environmental exposure. Let’s examine the specific failure modes that affect each major power window component.
What Are the Most Common Motor and Regulator Problems?
Worn-out motors from frequent use eventually fail when internal carbon brushes wear down to nubs, losing contact with the rotating commutator that delivers electrical current. These brushes physically press against spinning copper segments, creating friction that slowly erodes the carbon material over thousands of window cycles. Most window motors feature brushes designed for 100,000-150,000 cycles, meaning vehicles in hot climates where drivers operate windows daily can wear out motors in 3-5 years, while temperate-climate vehicles might last 8-10 years. When brushes wear completely, motors draw power but fail to rotate, leaving windows stuck and requiring complete motor replacement.
Broken plastic gears and clips in regulators represent the most common mechanical failure across all vehicle makes and models. Manufacturers use injection-molded nylon or ABS plastic for regulator components because these materials cost less, weigh less, and don’t corrode compared to metal alternatives. However, plastic deteriorates when exposed to heat cycling, UV light penetrating door seals, and mechanical stress from repeated operation. Gear teeth crack and break off, pulleys split apart, and mounting clips shatter, especially in vehicles parked in direct sunlight or operated in desert environments where door panel temperatures exceed 140°F during summer. According to automotive repair data from RepairPal analyzing 2015-2020 model years, plastic regulator component failure accounts for 48% of all power window repairs.
Cable detachment or fraying occurs when steel cables repeatedly bend around pulleys under tension, causing individual wire strands to break and unravel over time. Cable-driven regulators route cables through plastic or metal guides that change cable direction by 90-180 degrees, creating stress concentration points where flexing occurs with every window cycle. After 80,000-100,000 cycles, cables develop kinks and frayed spots that weaken structure, eventually snapping under load. When cables break, windows typically drop into the door cavity suddenly, sometimes cracking glass panels on impact with internal door structures. Replacement requires complete regulator assembly replacement since cables aren’t sold separately in most repair scenarios.
Regulator arm failure affects scissor-type mechanisms when metal pivot points wear egg-shaped holes in plastic mounting brackets. The scissor arms must pivot smoothly while maintaining precise alignment to lift windows straight up without binding, but plastic wear allows excessive play that causes binding, jamming, and uneven force distribution. Metal fatigue can also cause arm breakage at weld points on older vehicles with steel regulators, though this occurs less frequently than plastic component failures. When arms fail, windows tilt at odd angles, jam partially open, or drop into the door cavity completely.
Can Electrical Issues Cause Power Window Malfunctions?
Faulty switches and button wear create electrical circuit interruptions that prevent power from reaching motors even when all mechanical components function perfectly. Window switch assemblies contain multiple electrical contacts that close when you press buttons, completing circuits that energize motors in the desired direction. These contacts oxidize over time from exposure to humidity entering door panels, while plastic button mechanisms crack from repeated pressing by different drivers using varying force levels. Master switches in driver’s doors fail more frequently because they control all windows, handling 3-4 times the electrical load of individual passenger switches. Window switch and fuse troubleshooting begins by testing whether other windows work normally, isolating switch problems from motor or wiring issues.
Wiring harness damage occurs in the flexible section connecting the door to the body, where constant opening and closing gradually fatigues copper conductors until individual strands break. This flex zone experiences thousands of bend cycles throughout the vehicle’s life, and wire insulation cracks from movement and age, allowing bare conductors to short against metal door frames. Symptoms include windows that work intermittently or only when the door occupies specific positions, pointing to broken wires making occasional contact. auto electrical repair specialists use multimeters to test continuity through door harnesses, identifying break locations that require wire splicing or complete harness replacement.
Blown fuses and relay problems present as complete electrical failure affecting one or multiple windows simultaneously. Modern vehicles use dedicated fuses for power window circuits, typically rated 20-30 amps, which blow when excessive current flows through the circuit due to shorted motors or binding mechanisms. Fuses protect wiring from overheating and fire, sacrificing themselves to open the circuit safely. Relays act as electromagnetic switches that handle high current loads without routing that current through delicate switch contacts, and relay failure leaves windows completely non-functional despite having power at the fuse box. Checking fuses requires consulting the owner’s manual to locate the power window fuse position and visually inspecting whether the internal metal element remains intact.
Control module failures affect vehicles with computerized Body Control Modules (BCM) managing power window functions. These modules receive input signals from switches and send output commands to motors, while also managing auto-up features, pinch protection, and window lock-out functions. Module failures often present as bizarre symptoms: windows that operate backward (up button causes down movement), windows that move in small increments requiring multiple button presses, or complete loss of auto-up features while manual operation still works. BCM problems require professional diagnosis using dealer-level scan tools that communicate with body control systems, reading fault codes that identify specific circuit failures or module programming issues.
How Do Weather and Environmental Factors Damage Power Windows?
Ice and snow jamming mechanisms occur when moisture freezes in window channels, creating solid barriers that prevent normal glass movement. When windows freeze shut during winter, motors struggle against ice resistance, drawing excessive current that overheats windings and potentially burns out motors if drivers persist in operating frozen windows. Ice accumulation also binds regulator mechanisms, breaking plastic components when motors apply force to frozen systems. Smart vehicle owners avoid operating windows when temperatures drop below freezing until ice melts naturally or they warm the vehicle interior sufficiently to melt ice in channels. Slow window movement and lubrication fixes become crucial preventive measures in winter climates.
Extreme heat degrading plastic components accelerates power window failures in desert regions and vehicles with dark interior colors. When door panels heat to 140-160°F during summer parking, plastic regulator components soften and deform, losing dimensional precision required for smooth operation. Repeated heat cycling causes molecular changes in plastic structures, making materials brittle and prone to cracking under stress. Dashboard temperatures in direct sunlight can reach 180°F, and door panels absorb significant heat through metal skins, conducting thermal energy to internal components. According to research from Arizona State University’s Vehicle Systems Laboratory studying automotive component failures in desert climates during 2018-2020, vehicles operated in Phoenix, Arizona experienced power window regulator failures at 2.3 times the rate of identical models operated in Minneapolis, Minnesota.
Dust and debris in tracks accumulate in vehicles operated on dirt roads, construction sites, or desert environments. Fine dust particles infiltrate door seals, settling in window channels where they mix with lubricants to form abrasive paste that grinds against glass edges and track surfaces. This grit increases friction, forcing motors to work harder and accelerating wear on all moving components. Larger debris like leaves, seed pods, and insects can jam in tracks, creating complete blockages that bind windows mid-travel. Regular cleaning prevents debris accumulation, requiring removal of door panels to access tracks for thorough vacuuming and wiping with clean cloths.
Moisture causing electrical shorts enters door cavities through degraded weatherstripping, drain hole blockages, and microscopic cracks in door seals. Doors include drain holes at the bottom to evacuate water that inevitably enters during rain and car washes, but these holes clog with dirt over time, allowing water to pool in door cavities. Standing water corrodes electrical connections, creates rust on metal components, and shorts electrical circuits when it reaches live terminals. Windows that work intermittently due to wiring issues often correlate with wet weather conditions, improving temporarily when doors dry out. Preventing moisture intrusion requires maintaining door seals, clearing drain holes annually, and addressing water leaks promptly.
How Much Does Power Window Repair Cost?
Power window repair costs range from $150-$800 at independent auto repair shops depending on vehicle make, component replacement requirements, and labor complexity, while dealership prices typically run $300-$1,200 for identical repairs. Simple window switch replacements cost $75-$150 including parts and labor, motor replacements run $200-$450, complete regulator assemblies cost $250-$600, and complex repairs involving multiple components or luxury vehicle parts can exceed $800. These Power window repair cost estimates vary significantly based on whether you choose OEM (Original Equipment Manufacturer) or aftermarket parts, select mobile service or shop-based repair, and whether your vehicle requires specialized labor for complex door panel removal.
Understanding cost breakdowns helps you budget appropriately and recognize fair pricing. Let’s examine specific repair scenarios and their associated expenses.
What Is the Average Cost for Window Regulator Replacement?
Parts cost breakdown between OEM and aftermarket components reveals significant price differences that affect total repair expenses. OEM regulators purchased through dealerships typically cost $250-$500 for the regulator assembly alone, manufactured by the same suppliers that produced the original equipment installed at the factory. These parts include manufacturer warranties (typically 12 months/12,000 miles) and exact fitment guaranteed to match original specifications. Aftermarket regulators from suppliers like Dorman, AC Delco, and TYC cost $80-$200 for equivalent assemblies, offering 60-75% savings over OEM pricing but sometimes featuring slightly different materials or construction methods that may affect longevity. Premium aftermarket brands market upgraded regulators with metal components replacing factory plastic parts, costing $150-$300 while promising extended service life in harsh climates.
Labor costs at different service providers vary based on business overhead, geographic location, and technician expertise. Independent auto repair shops charge $80-$150 per hour for labor, with window regulator replacement requiring 1-2 hours for most vehicles, resulting in $80-$300 labor charges. Dealership service departments command $120-$200 per hour labor rates due to factory training, specialized tools, and overhead costs, generating $120-$400 labor bills for identical work. Mobile repair services often charge flat-rate pricing of $200-$400 for regulator replacement including parts and labor, offering convenience of coming to your location but sometimes using lower-quality aftermarket components to maintain competitive pricing.
Total cost ranges by vehicle make and model reflect accessibility differences in door panel removal and parts pricing variations. Domestic vehicles like Ford F-150 trucks, Chevrolet Silverados, and Dodge Ram pickups typically cost $200-$400 for regulator replacement due to abundant aftermarket parts availability and straightforward door panel access. Japanese vehicles including Honda Accords, Toyota Camrys, and Nissan Altimas run $250-$450 for similar repairs, with slightly higher parts costs balanced by easy service access. European luxury vehicles such as BMW 3-Series, Mercedes-Benz C-Class, and Audi A4 models can cost $500-$800 or more due to expensive OEM-only parts requirements, complex door panel removal involving multiple airbag connectors, and specialized clips that break during disassembly.
How Do Dealership Prices Compare to Independent Repair Shops?
Dealership pricing in the $300-$1,200 range reflects OEM parts markups, premium labor rates, and diagnostic fees that independent shops often waive. Dealerships maintain extensive parts inventories requiring significant capital investment, employ factory-trained technicians commanding higher wages, and operate in expensive facilities with dealer network overhead costs. These expenses translate to 40-60% higher total repair costs compared to independent alternatives. However, dealerships offer advantages including genuine factory parts, technicians experienced specifically with your vehicle brand, and repairs that maintain comprehensive service records valuable for resale.
Independent shops offering 40-70% savings achieve lower pricing through several operational efficiencies. They purchase aftermarket parts at wholesale prices 50-70% below OEM costs, pass savings to customers while maintaining healthy profit margins, and operate with lower overhead than franchise dealerships. Quality independent shops employ ASE-certified technicians with decades of experience working on multiple brands, often possessing equal or superior diagnostic skills compared to dealership technicians who rotate between multiple vehicle systems. The 40-70% savings claim translates to real numbers: a $600 dealership regulator replacement might cost $250-$350 at an independent shop for functionally equivalent results.
Mobile repair services pricing falls between dealerships and traditional shops, typically charging $250-$500 for regulator replacement depending on parts quality. These services eliminate facility overhead costs but incur travel time expenses and vehicle equipment investments. Mobile technicians bring tools and parts to your home or workplace, completing repairs in driveways or parking lots within 1-2 hours. Convenience justifies slight premiums over shop-based service for customers unable to spare vehicles during workdays, though mobile services sometimes compromise on parts quality or warranty terms to maintain competitive flat-rate pricing.
Cost-benefit analysis of each option depends on your priorities regarding price, convenience, parts quality, and warranty coverage. Choose dealerships when maintaining complete service history for lease vehicles or preparing for resale, when complex electrical issues require factory diagnostic equipment, or when your vehicle remains under manufacturer warranty requiring authorized repair facilities. Select independent shops when seeking the best balance of quality and price, when using proven aftermarket parts acceptable, or when building relationships with local mechanics who provide personalized service. Opt for mobile repair when convenience outweighs minor cost differences, when coordinating shop visits creates scheduling difficulties, or when dealing with simple failures like regulator replacement rather than complex diagnostics.
Can You Save Money by Repairing Instead of Replacing?
Regulator rebuilding versus full replacement costs present opportunities for significant savings in specific scenarios. Specialized shops offer regulator rebuilding services where technicians disassemble failed units, replace broken plastic gears with upgraded metal components, install new cables, and reassemble regulators for $100-$200 including parts and labor. This process works best for scissor-type regulators with metal frames, where only internal components fail while frames remain structurally sound. Cable-driven regulators prove harder to rebuild economically since labor-intensive disassembly often costs more than installing new aftermarket assemblies. Rebuilding saves 30-50% compared to OEM replacement while potentially providing superior longevity through upgraded metal components.
Determining when repair proves viable versus replacement becoming necessary requires evaluating damage extent and cost comparisons. Repair makes sense when only cables need replacement on accessible designs, when single gears broke but other components remain intact, or when regulator frames show no cracks or deformation. Replacement becomes necessary when plastic frames crack or break, when multiple components failed simultaneously indicating systemic breakdown, when rust or corrosion compromised metal parts structurally, or when repair costs exceed 70% of replacement costs. Some older vehicle regulators feature riveted construction preventing disassembly, mandating complete replacement regardless of damage extent.
DIY repair cost considerations involve purchasing parts alone without labor charges, potentially reducing expenses to $50-$150 for aftermarket regulators or $20-$40 for switches. However, DIY attempts risk additional costs: broken door panel clips ($20-$60 to replace), damaged airbag connectors ($100+ for repair), cracked window glass from improper handling ($200-$400 replacement), or incorrect installation requiring professional correction ($150-$300 additional labor). Factor your mechanical skill level honestly: confident home mechanics with proper tools save hundreds of dollars, while inexperienced DIYers may spend more fixing mistakes than they saved avoiding professional labor.

Should You Repair Power Windows Yourself or Hire a Professional?
You should hire a professional for power window repair unless you possess moderate mechanical skills, own basic automotive tools, and feel confident removing door panels without damaging clips or electrical connectors, while DIY attempts suit only simple repairs like switch replacement or track lubrication for experienced home mechanics. Professional repair guarantees correct diagnosis, proper installation, warranty coverage, and time savings, costing $150-$800 but eliminating risks of additional damage. DIY repair saves 40-60% on labor costs but requires 2-4 hours, specialized tools for some vehicles, and accepts responsibility for potential mistakes that could escalate total expenses.
This decision impacts both your wallet and your stress level significantly. Let’s analyze the trade-offs between DIY and professional repair comprehensively.
What Are the Pros and Cons of DIY Power Window Repair?
Cost savings potential of $50-$150 in parts-only expenses represents the primary DIY advantage, especially for mechanically inclined car owners comfortable working on their vehicles. Aftermarket window regulators cost $80-$200, motors run $60-$150, and switches cost $20-$60 when purchased directly from auto parts retailers or online suppliers. Eliminating $80-$300 labor charges means DIY repairs cost 50-70% less than professional service for identical parts. These savings multiply for multi-window failures: fixing all four windows DIY might cost $300-$600 in parts versus $800-$2,400 professionally, creating $500-$1,800 in labor savings that justify learning repair procedures.
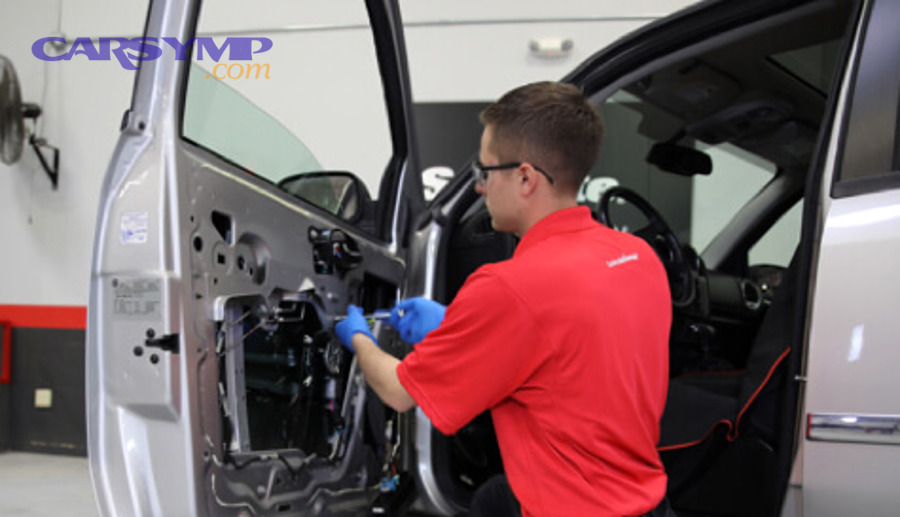
Required tools and mechanical skills include basic hand tools most homeowners possess plus some specialized items. Essential tools comprise screwdrivers (Phillips and flathead), trim removal tools ($10-$20 for plastic pry sets preventing door panel damage), socket sets with extensions for reaching recessed bolts, and electrical testers for diagnosing switch and wiring issues. Some vehicles require Torx bits, specialized window regulator rivets, or panel clip removal tools ($15-$30). Mechanical skills needed include understanding basic electrical circuits, following repair manual diagrams accurately, remembering component reassembly order through photos or notes, and exercising patience during finicky procedures like aligning regulator bolts through access holes in door frames.
Common DIY mistakes and complications include breaking irreplaceable door panel clips during removal, damaging window glass by improper handling, disconnecting airbag wiring incorrectly and triggering fault codes, installing regulators backward or upside-down, overtightening bolts and cracking plastic mounting points, and losing small clips or fasteners that fall into door cavities. These errors transform $150 DIY repairs into $400+ professional corrections. DIY door panel removal tips emphasize using proper plastic trim tools rather than screwdrivers, documenting clip locations with phone photos before removal, storing removed fasteners in labeled containers, and consulting vehicle-specific YouTube tutorials demonstrating your exact model year’s procedure.
Time investment of 2-4 hours for beginners reflects learning curves and unexpected complications. Experienced DIYers complete familiar vehicle repairs in 1-2 hours, while first-timers spend 30-45 minutes studying repair guides, 60-90 minutes removing door panels and accessing components, 45-60 minutes installing parts, and 30 minutes reassembling doors and testing function. Time extends when frozen bolts require penetrating oil, when door panel clips break necessitating parts store trips, or when wrong parts arrive requiring exchanges. Budget entire afternoons for first DIY window repairs rather than expecting quick 1-hour fixes.
Risk of additional damage includes cracking window glass during regulator installation ($200-$400 replacement cost), breaking door panel mounting tabs requiring $50-$100 in replacement panels, shorting electrical systems through improper connections ($100-$300 in repair costs), and damaging paintwork around door edges during panel removal ($150-$400 for paint correction). Insurance typically excludes DIY repair damage, leaving owners financially responsible for mistakes. Conservative DIYers purchase door panel clip assortments ($20-$40) before starting repairs, work slowly and methodically, and know when to stop and seek professional help rather than forcing procedures.
What Are the Benefits of Professional Power Window Repair Services?
Guaranteed workmanship and warranties provide financial protection and peace of mind that DIY repairs cannot match. Reputable shops offer 1-year labor warranties guaranteeing free correction of installation errors, while parts warranties range from 90 days for budget aftermarket components to lifetime coverage for premium upgraded regulators. These warranties mean returning to the shop costs nothing if windows fail again within the coverage period, whereas DIY repairs require purchasing parts again at full cost. Professional installation eliminates concern about incorrect assembly causing premature failure or additional damage to surrounding components.
Proper diagnosis with professional tools identifies root causes rather than guessing based on symptoms. Repair shops use multimeters to test electrical circuits precisely, measuring voltage drops that indicate corroded connections or failing switches. Scan tools read body control module data, retrieving fault codes that pinpoint electronic failures. Experienced technicians recognize subtle symptoms indicating specific component failures: grinding noises isolated to the top 6 inches of window travel suggest upper track damage, while noises throughout the entire range indicate regulator gear failure. This diagnostic accuracy prevents replacing functional parts unnecessarily, saving money despite professional labor costs.
Time savings of 45 minutes to 2 hours versus 3-4 hours DIY preserve valuable personal time for work, family, or leisure activities. Dropping vehicles at shops during morning hours and retrieving them after work eliminates sacrificing entire weekends to repairs. Mobile services add convenience by coming to workplaces or homes, completing repairs in parking lots while customers remain productive. Time value calculations favor professional repair for busy professionals: someone earning $50/hour who spends 4 hours DIY repairs effectively pays $200 in opportunity cost, potentially exceeding professional labor charges while accepting repair quality risks.
Access to quality replacement parts through professional wholesale channels ensures receiving components that meet or exceed OEM specifications. Shops maintain relationships with parts suppliers, obtaining better quality control than individual retail purchases and accessing commercial warranty support when defective parts arrive. Professional technicians identify upgraded regulator designs addressing known factory weak points, recommending metal gear upgrades or improved cable routing that prevents repeat failures. Parts sourcing knowledge prevents ordering incorrect components: many vehicles had mid-year production changes creating multiple regulator designs per model year, requiring VIN-specific lookups that professionals handle routinely.
Mobile service convenience eliminates vehicle downtime and transportation hassles. Mobile technicians arrive at scheduled times, complete repairs in customer driveways or workplace parking lots, and accept payment on-site. This service suits customers without backup vehicles, those unable to arrange shop transportation, or busy professionals maximizing productivity during repair visits. Mobile pricing typically adds $25-$75 to standard shop rates, justified by eliminating your transportation costs, time, and inconvenience of coordinating shop visits during business hours.
How Do You Know If Your Repair Is Beyond DIY Capabilities?
Complex electrical diagnostics requiring scan tools and wiring diagrams exceed most DIY capabilities, particularly on vehicles with computerized body control systems managing window functions. When windows operate erratically (moving in wrong directions, stopping at random positions, or activating unexpectedly), BCM programming issues or circuit faults demand professional equipment for diagnosis. Window works intermittently wiring issues also challenge DIYers lacking electrical testing experience, as intermittent faults require testing under specific conditions that reveal elusive connection problems.
Door panel removal difficulty varies dramatically between vehicle makes and models. Some vehicles feature simple designs with obvious screw locations and clips that release easily with gentle prying, allowing confident DIYers to proceed. Other vehicles hide screws under trim pieces requiring removal sequences, use fragile clips that break with minimal force, or incorporate door-mounted airbags with sensitive connectors that trigger warning lights if disturbed. Research vehicle-specific difficulty ratings on automotive forums before attempting DIY repairs: Honda Civics and Toyota Corollas generally rate as DIY-friendly, while Mercedes-Benz and BMW models often require professional expertise.
Safety concerns with auto-reverse systems demand professional attention when anti-pinch features malfunction or require recalibration. Modern power windows include sensors protecting passengers from injury, and improperly installed components can disable these safety systems without obvious warning. Professional technicians test auto-reverse functions post-repair, ensuring windows stop and reverse when encountering 4-pound resistance as safety standards require. DIY installations occasionally defeat safety features accidentally through incorrect wiring or switch connections, creating liability if windows injure passengers.
Specialized tools requirements create barriers for one-time repairs where purchasing equipment costs more than professional labor. Some vehicles require factory-specific tools for removing door panels without breakage, special rivets for mounting regulators ($40-$60 for rivet guns), or programmed key fobs for relearning auto-up positions after power disconnection ($80-$150 for programming tools). Professionals amortize tool costs across hundreds of repairs annually, while DIYers purchasing specialized equipment for single repairs might spend $100-$200 on tools, negating labor savings entirely.

How Long Does Power Window Repair Take?
Power window repair takes 45 minutes to 2 hours at professional shops for standard regulator or motor replacement, 2-4 hours for first-time DIY attempts, and 30-45 minutes for simple fixes like switch replacement or track lubrication. Repair duration depends on vehicle door panel complexity, component accessibility, parts availability, and technician experience level. Same-day service remains possible when shops stock common regulator assemblies, while custom-order parts extend timelines to 2-5 business days including parts shipping and scheduling.
Understanding realistic timeframes helps you plan vehicle access and set appropriate expectations. Let’s break down repair durations for different scenarios.
What Is the Typical Repair Time at a Professional Shop?
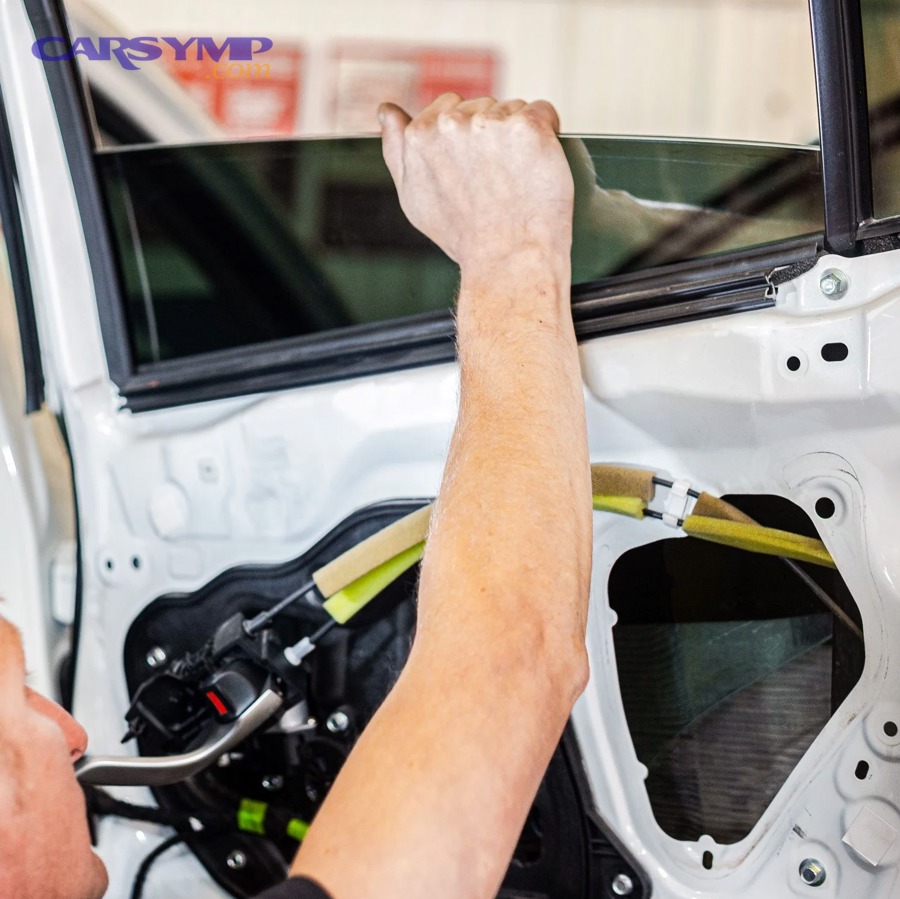
Standard repairs of 45 minutes to 2 hours cover most common power window failures including regulator replacement, motor installation, and switch repairs. Experienced technicians complete door panel removal in 10-15 minutes on familiar vehicles, component replacement in 20-30 minutes, and reassembly with testing in 15-20 minutes. This efficiency stems from daily practice, proper tools, and familiarity with common vehicle designs. Quick repairs benefit customers through lower labor charges: shops billing $120/hour charge $90-$240 for typical window repairs versus $180-$360 for complex 1.5-3 hour jobs on difficult vehicles.
Same-day service availability depends primarily on parts inventory and shop workload. Shops stocking popular regulators for common vehicles (Honda Accord, Toyota Camry, Ford F-150) often complete repairs same-day when customers arrive early, allowing technicians to work vehicles into scheduled appointments. Less common vehicles require ordering parts from regional warehouses offering same-day or next-day delivery in metropolitan areas, extending completion to 1-2 business days. Rural shops might wait 2-3 days for parts delivery from distant warehouses. Calling ahead to verify parts availability before visiting shops maximizes same-day completion chances.
Factors extending repair time beyond standard estimates include severely rusted door panel fasteners requiring cutting and replacement (adding 30-60 minutes), broken clips necessitating replacement parts orders, discovering additional damage after disassembly (corroded wiring, cracked door frames), and complex vehicles with door-mounted airbags requiring careful connector handling. European luxury vehicles typically require longer repair times: BMW, Mercedes-Benz, and Audi models often need 2-3 hours due to complex door panel removal involving multiple hidden fasteners and sensitive electronic components. Technicians quote time estimates conservatively, returning vehicles earlier than predicted when repairs proceed smoothly.
How Long Does DIY Power Window Repair Take?
First-time DIY repairs consuming 2-4 hours reflect learning curves and methodical work pace necessary for avoiding mistakes. Novice mechanics spend 30-45 minutes studying repair guides and videos, gathering tools, and preparing work areas. Door panel removal takes 30-60 minutes when unfamiliar with clip locations and fastener types, requiring careful prying to avoid breakage. Component installation occupies 45-90 minutes as DIYers align regulators through door access holes, route wiring carefully, and test function before final reassembly. Another 30-45 minutes goes toward reassembling door panels, installing trim pieces, and conducting final testing.
Experienced DIYers completing repairs in 1-2 hours have completed multiple window repairs previously, understand their vehicle’s specific quirks, and own proper tools eliminating improvisation delays. Familiarity eliminates research time, muscle memory speeds door panel removal, and prior experience prevents common mistakes like installing regulators backward or forgetting to route wiring properly. Second and third repairs on identical vehicles might take just 60-90 minutes as efficiency improves. Home mechanics working on personal vehicles regularly develop skills rivaling professional technicians for speed, though lacking diagnostic equipment still creates accuracy disadvantages.
Common delays and troubleshooting time include discovering wrong parts after disassembly (adding 1-3 days for exchanges), breaking door panel clips requiring parts store trips (adding 30-90 minutes), frozen fasteners needing penetrating oil applications and waiting periods (adding 30-60 minutes), and alignment difficulties requiring multiple installation attempts. Budget extra time for first repairs, scheduling full afternoons or weekends rather than expecting quick fixes. Murphy’s Law applies to auto repairs: complications arise frequently enough that assuming everything will go perfectly leads to frustration and rushed work causing additional mistakes.
Window off-track and rattling repairs add time when window glass comes loose from regulator mounts during installation. Glass panels attach to regulators via bolts through rubber-mounted brackets, and improper tightening allows windows to shift off-track during operation. Repositioning glass requires loosening mounting bolts, aligning glass vertically and horizontally within door frames, and retightening bolts to proper torque specifications. This adjustment process adds 20-40 minutes to repairs, requiring multiple test cycles of raising and lowering windows while checking alignment.
What Should You Look for in a Power Window Repair Service?
Look for power window repair services offering minimum 1-year labor warranties, parts warranties of 90 days to lifetime depending on component quality, transparent upfront pricing without hidden diagnostic fees, and specialization in power window systems rather than general auto glass installation. Quality shops employ ASE-certified technicians, maintain clean organized facilities, provide written estimates before starting work, and showcase positive customer reviews on Google and Yelp averaging 4+ stars from 50+ reviewers. Avoid services demanding full payment before completing work, lacking physical shop addresses, or unable to explain exactly what components need replacement and why.
Choosing the right repair provider significantly impacts repair quality, cost, and satisfaction. Let’s examine specific quality indicators to evaluate potential service providers.
What Warranties Should Professional Repair Services Offer?
Parts warranty coverage ranging from 90 days to lifetime depends on component quality and supplier backing. Budget aftermarket regulators typically include 90-day to 1-year warranties covering manufacturer defects but excluding installation errors or environmental damage. Mid-grade aftermarket parts feature 1-3 year warranties balancing affordability and coverage duration. Premium upgraded regulators with metal components often carry lifetime warranties against defects, though “lifetime” definitions vary: some mean vehicle ownership duration, others specify 100,000 miles or 10 years. Read warranty terms carefully, noting exclusions for off-road use, racing, or modifications that void coverage.
Labor warranty guarantees of 1 year represent industry standards for quality shops confident in workmanship. These warranties promise free correction of installation errors like improperly aligned regulators, incorrectly connected wiring, or loose mounting bolts causing rattles. Labor warranties don’t cover subsequent failures of different components: if a shop replaces your regulator under labor warranty and later your motor fails independently, that’s a separate repair. Shops offering only 30-60 day labor warranties signal low confidence in technician skills or parts quality, suggesting you seek alternatives.
OEM parts warranty differences matter when choosing genuine factory components versus aftermarket alternatives. Dealerships install OEM regulators backed by 12-month/12,000-mile manufacturer warranties typically, processed directly through parts departments when defects occur. These warranties often transfer with vehicle sales, benefiting resale value. Aftermarket parts use various warranty structures: some require returning defective parts to original retailers, others process claims through shops, and budget brands sometimes lack functional warranty support despite stated coverage. Verify warranty claim procedures before purchasing, ensuring shops handle warranty work rather than requiring you to manage claims independently.
Is Mobile Power Window Repair Service Worth It?
Convenience benefits of mobile repair justify $25-$75 price premiums over shop visits for busy professionals and customers without backup transportation. Mobile technicians arrive at scheduled times within 2-hour windows, complete repairs in driveways or parking lots while customers work or relax at home, and accept payment on-site through credit cards or mobile apps. This service eliminates arranging transportation to shops, coordinating ride shares, or sacrificing productive time to vehicle repairs. Parents with young children, shift workers with irregular schedules, and business owners unable to leave during operating hours find mobile service invaluable despite moderate cost increases.
Pricing compared to shop visits typically adds $50-$100 to base repair costs when comparing identical parts quality. Mobile services quote flat-rate pricing including parts, labor, and travel: $250-$400 for regulator replacement versus $200-$350 at traditional shops. However, some mobile operators use lower-quality parts maintaining competitive pricing, so compare parts brands specifically. Ask whether quotes include OEM or premium aftermarket components, and verify warranty coverage matches shop-based alternatives before committing. Mobile pricing remains competitive when factoring your time value and transportation costs ($20-$40 for ride services or gas/time driving to shops).
Service area limitations restrict mobile operations to defined geographic zones, typically 25-50 mile radiuses from technician bases. Rural customers outside metropolitan service areas often can’t access mobile repair, while suburban and urban residents enjoy abundant options. Some services charge extra for travel beyond standard zones, adding $25-$50 for distant locations. Check service area coverage before requesting quotes, and schedule early morning or late afternoon appointments to avoid midday traffic delays affecting arrival windows.
Quality and warranty considerations for mobile repair match shop-based services when choosing reputable providers. Established mobile companies employ experienced technicians, stock quality parts, and provide equivalent warranties to traditional shops. However, fly-by-night operators using unlicensed technicians, salvaged parts, and questionable practices also advertise mobile services. Verify business licenses, insurance coverage, and online reputation before allowing strangers to work on vehicles at your property. Request written warranties before work begins, and avoid services demanding cash-only payment lacking paper trails for warranty claims.
How Can You Verify a Repair Shop’s Reputation and Expertise?
Online reviews and ratings provide customer experience insights unavailable from shops’ self-promotions. Google Business profiles aggregating customer reviews offer unfiltered feedback about service quality, pricing fairness, communication, and problem resolution. Seek shops averaging 4.0+ stars from 50+ reviewers, indicating consistent positive experiences across numerous customers. Read recent reviews (past 3-6 months) for current accuracy, as management changes affect service quality. Pay attention to review patterns: shops with mostly 5-star and 1-star reviews likely manipulate ratings, while normal distributions of 3-5 stars suggest authentic feedback.
Certifications and experience demonstrate technical competency beyond marketing claims. ASE (Automotive Service Excellence) certification requires technicians to pass comprehensive exams and maintain continuing education, validating knowledge across vehicle systems. Shops displaying ASE certifications typically employ skilled professionals committed to industry standards. Ask how long technicians have specialized in power window repair: 5+ years of focused experience provides deeper expertise than generalists handling occasional window jobs. Manufacturer certifications from brands like GM, Ford, or Toyota indicate factory training for specific vehicle systems, valuable when repairing those brands.
Upfront quotes and transparency separate honest businesses from those hiding costs. Reputable shops provide detailed written estimates listing parts costs, labor hours, shop supplies, and total charges before starting work. They explain exactly what components failed, why replacement is necessary, and what happens if you decline recommended repairs. Transparent shops welcome questions, allow you to keep replaced parts for inspection, and never surprise customers with unexpected charges. Avoid services demanding diagnostic fees before providing estimates, as quality shops include basic diagnosis in quoted prices or waive fees when authorizing repairs.
Specialization in power window systems versus general auto glass installation signals focused expertise. Dedicated power window repair shops complete 20-50 window mechanism repairs weekly, developing deep knowledge of common failure patterns across vehicle makes. General auto glass shops primarily replace windshields and side glass, handling occasional power window repairs as secondary services. Specialists stock broader parts inventories, invest in specialized tools, and possess greater diagnostic accuracy. However, quality general shops with experienced technicians often deliver equivalent results at competitive prices, so evaluate overall competency rather than focusing solely on specialization claims.

How Can You Prevent Power Window Failures and Extend Component Life?
You can prevent power window failures and extend component life by cleaning window tracks quarterly, lubricating regulator mechanisms biannually with silicone spray, avoiding operating frozen windows in winter, parking in shade to reduce heat exposure, and addressing slow operation immediately before complete failure occurs. Regular maintenance extends motor and regulator lifespans by 30-50%, delaying typical 8-10 year replacement cycles to 12-15 years in temperate climates. Preventive care costs minimal time and money—$20 annually for cleaning supplies and lubricants—while avoiding $300-$800 repair expenses through early problem detection.
Proactive maintenance proves far more cost-effective than reactive repairs. Let’s explore specific preventive measures that protect power window systems.
What Regular Maintenance Tasks Keep Power Windows Working Smoothly?
Cleaning window tracks and removing debris requires accessing channels along window edges every 3-6 months. Lower windows fully, spray track interiors with aerosol glass cleaner or degreaser, and wipe thoroughly with clean microfiber cloths wrapped around flathead screwdrivers or plastic trim tools. Focus on accumulation points where vertical tracks meet horizontal door base channels, where dirt packs densely. Remove visible debris like leaves, seed pods, and dead insects using shop vacuums with crevice tools. Clean weatherstripping simultaneously, wiping rubber seals with protectant spray that prevents cracking and maintains flexibility.
Lubricating moving parts quarterly extends component life by reducing friction and wear. Apply silicone-based spray lubricant to window tracks, avoiding petroleum-based products that attract dirt and gum up mechanisms. Spray tracks lightly while operating windows up and down, distributing lubricant across entire travel ranges. For external access to regulator mechanisms, remove door panels annually and spray moving pivot points, cable guides, and motor gears with white lithium grease or silicone lubricant. Wipe excess lubricant to prevent dripping onto interior trim. Proper lubrication reduces motor current draw by 15-25%, decreasing heat generation and extending motor brush life.
Testing switches and motors periodically identifies problems before complete failure. Operate all windows weekly, listening for unusual sounds and noting speed changes. Test auto-up features monthly to verify proper function, as these systems often fail first when control modules develop issues. Check for intermittent operation by cycling windows 10-20 times, catching connection problems that only appear occasionally. Address slow window movement immediately: windows taking 5+ seconds to travel fully indicate failing motors or binding mechanisms requiring attention before catastrophic failure leaves windows stuck.
Protecting from extreme weather exposure includes simple habits preventing accelerated wear. Avoid operating windows when temperatures drop below 25°F, allowing ice to melt before attempting movement. Park in shaded areas during summer to reduce interior temperatures, protecting plastic regulator components from heat damage. Clear drain holes at door bottoms annually to prevent water accumulation causing corrosion. Apply weatherstripping protectant twice yearly to maintain door seals that prevent moisture and dust intrusion.
Scheduling preventive inspections during routine oil changes or annual services allows technicians to identify early warning signs. Mechanics can listen to window operation, checking for abnormal sounds indicating wear. They test electrical systems with multimeters, measuring voltage drops that predict switch or wiring failures. Preventive window regulator failure strategies include replacing components showing early wear before they damage connected parts: worn cables can scratch glass when they fray, failed motors overheat and melt plastic regulator components, and binding mechanisms stress door panels until mounting points crack.
How Do Extreme Climates Affect Power Window Longevity?
Desert heat degrading plastic components faster creates power window repair hotspots in southwestern states and other arid regions. When door panels reach 140-160°F during summer parking, plastic regulator gears soften and deform, losing dimensional precision required for smooth operation. Repeated heating and cooling cycles cause molecular changes making plastics brittle, leading to sudden breakage under normal operating stress. According to automotive reliability data from CarMD analyzing 2015-2022 model years across US metropolitan areas, Phoenix, Las Vegas, and Tucson residents experience power window failures at 2.1-2.5 times the national average rate.
Cold weather ice buildup and prevention require strategic approaches in northern climates. Ice forms in window channels when moisture from rain, snow, or car washes freezes overnight, creating barriers preventing window movement. Forcing frozen windows damages regulators and burns out motors, yet drivers need window access in emergencies. Prevention strategies include parking in garages when possible, covering windows with protective tarps during ice storms, and using de-icer sprays designed for automotive glass. Never operate visibly frozen windows; instead, run vehicle heat for 10-15 minutes allowing interior warmth to melt ice naturally before attempting window movement.
Humidity and rust concerns affect coastal regions and humid continental climates where moisture infiltrates door cavities year-round. Salt air accelerates corrosion of metal regulator components, wiring terminals, and motor housings. Moisture entering through degraded door seals pools in cavity bottoms when drain holes clog, creating corrosion that eventually causes electrical shorts and mechanical binding. Coastal vehicle owners should flush drain holes twice yearly using compressed air or thin wire, apply dielectric grease to electrical connections during inspections, and consider aftermarket door panel sealants reducing moisture intrusion.
Climate-appropriate parts selection matters when replacing components in extreme environments. Standard plastic regulators designed for temperate climates fail prematurely in Phoenix summer heat or Minneapolis winter cold. Upgraded metal regulators withstand temperature extremes better than plastic equivalents, justifying 20-40% cost premiums through extended service life. Some aftermarket suppliers offer climate-specific designs: heat-resistant plastics for desert use, corrosion-resistant coatings for coastal environments, and cold-weather seals for northern applications. Discuss climate considerations with repair shops when selecting replacement parts, investing in appropriate components rather than replacing failing budget parts repeatedly.
Are Upgraded Metal Regulators Better Than Standard Plastic Parts?
OEM plastic versus aftermarket metal durability comparisons reveal significant longevity differences in harsh operating conditions. Factory plastic regulators feature injection-molded gears and structural components designed for 80,000-120,000 miles or 8-10 years in average conditions, balancing cost, weight, and acceptable service life. Aftermarket upgraded regulators replace critical plastic gears with machined steel or brass components, cable guides with metal instead of plastic, and structural frames with heavier-gauge steel. These upgrades increase weight by 1-2 pounds per regulator but extend service life to 150,000-200,000 miles or 15+ years, particularly benefiting vehicles operated in temperature extremes.
Cost difference and ROI analysis shows upgraded regulators costing $150-$300 compared to standard aftermarket plastic units at $80-$150. The $70-$150 premium represents 60-100% cost increase initially, but eliminates future replacement expenses when standard regulators fail again in 5-8 years. Return on investment calculations: standard regulator replacement costs $250-$400 total (parts plus labor) every 8 years, while upgraded regulators costing $350-$550 installed last 15+ years, saving $200-$350 over vehicle ownership. ROI improves dramatically in extreme climates where standard plastic fails in 4-6 years, requiring multiple replacements versus single upgraded installation.
Best applications for upgraded parts include high-mileage vehicles kept long-term (200,000+ mile targets), vehicles operated in desert heat or arctic cold, and models with known plastic regulator weak points. Certain vehicles experienced widespread power window failures due to poor OEM design: early-2000s Nissan Altimas, 2004-2008 Ford F-150s, and 2006-2011 Honda Civics suffered epidemic regulator failures, making upgraded replacements wise investments. Upgraded regulators also suit commercial vehicles experiencing heavy use: delivery vans, taxis, and service vehicles operating windows hundreds of times daily benefit from enhanced durability.
Warranty implications of using aftermarket upgraded parts generally don’t void manufacturer warranties under Magnuson-Moss Warranty Act provisions, though dealerships sometimes claim otherwise. Federal law prohibits manufacturers from denying warranty claims solely because owners used aftermarket parts unless manufacturers prove those parts caused failures. However, using upgraded regulators might affect specific component warranties: installing metal regulators could void OEM coverage for door panel cracks if heavier components stress mounting points. Document part quality and proper installation to support warranty claims if manufacturers challenge coverage.
What Is the Difference Between Power Window Repair and Manual Window Conversion?
Manual window conversion makes sense for older vehicles worth under $5,000 suffering repeated power window failures where ongoing repair costs exceed conversion expenses. Converting power windows to manual cranks costs $200-$400 per window including crank mechanisms, regulator assemblies, and installation labor. This one-time investment eliminates future motor and electrical failures, reducing maintenance costs to near-zero for window systems. Conversion suits classic cars, work trucks, and off-road vehicles where reliability outweighs convenience, and vehicles operated in extreme climates where power systems fail frequently.
Cost comparison between ongoing repairs and one-time conversion reveals break-even points that guide decisions. If power windows fail every 3-4 years costing $300-$400 each repair, spending $1,200-$1,600 converting all four windows to manual operation breaks even after 9-16 years. However, this calculation ignores inconvenience factors and resale considerations. Vehicles kept 15+ years by owners prioritizing reliability favor conversion, while vehicles turned over every 5-8 years rarely benefit financially. Factor in your actual vehicle retention plans and failure frequency when evaluating conversion economics.
Pros and cons for resale value generally disfavor conversion in modern vehicles where power windows represent standard features. Converting power to manual reduces resale values by $500-$1,500 on vehicles where buyers expect power amenities, particularly sedans, SUVs, and family vehicles. However, conversion might improve marketability for certain niches: off-road enthusiasts value manual windows for reliability when traversing remote areas, classic car buyers accept manual operation as period-appropriate, and budget-conscious buyers seeking cheap reliable transportation appreciate simplified systems. Disclose conversions honestly when selling to avoid buyer disputes over features.
Installation complexity of manual conversion requires routing crank mechanisms through door panels, installing regulator assemblies compatible with manual operation, and removing electrical components including motors, switches, and wiring. Professional installation takes 2-3 hours per window, while DIY attempts require 3-5 hours for inexperienced mechanics. Some door panels lack provisions for crank mechanisms, requiring cutting and fabricating mounting holes that risk cosmetic damage. Additionally, disconnecting power window wiring might trigger body control module faults on some vehicles, requiring professional programming to prevent persistent warning lights. Evaluate total conversion costs realistically before committing to this irreversible modification.