

Fix-First Belt Squeal Diagnosis for Drivers: Slip vs Bearing Noise
Belt squeal diagnosis is a process of elimination: confirm the noise source, identify the condition that triggers it, then prove whether you’re dealing with belt slip or a pulley bearing problem.
Next, you’ll narrow the cause by listening for patterns under load (A/C on, steering at full lock, cold start) and by inspecting belt surface, pulley condition, and tensioner motion—this is the backbone of car noise diagnosis when the sound lives at the front of the engine.
After that, you’ll verify the “why” (contamination, glazing, misalignment, weak tension, rough bearings) so you don’t waste money on parts that won’t stop the squeal for long.
Giới thiệu ý mới: Below is a step-by-step method you can use in the driveway, plus decision points that help you avoid misdiagnosing a squeaky belt as a deeper engine issue.
Is it really the belt making the squeal?
Yes—often—but not always; true belt squeal is usually a high-pitched, smooth “eeee” that changes with engine speed, while a failing bearing often adds a dry, gritty, or growling overtone and may persist even after the belt is removed. Next, you’ll confirm the sound’s origin before you chase the wrong component.
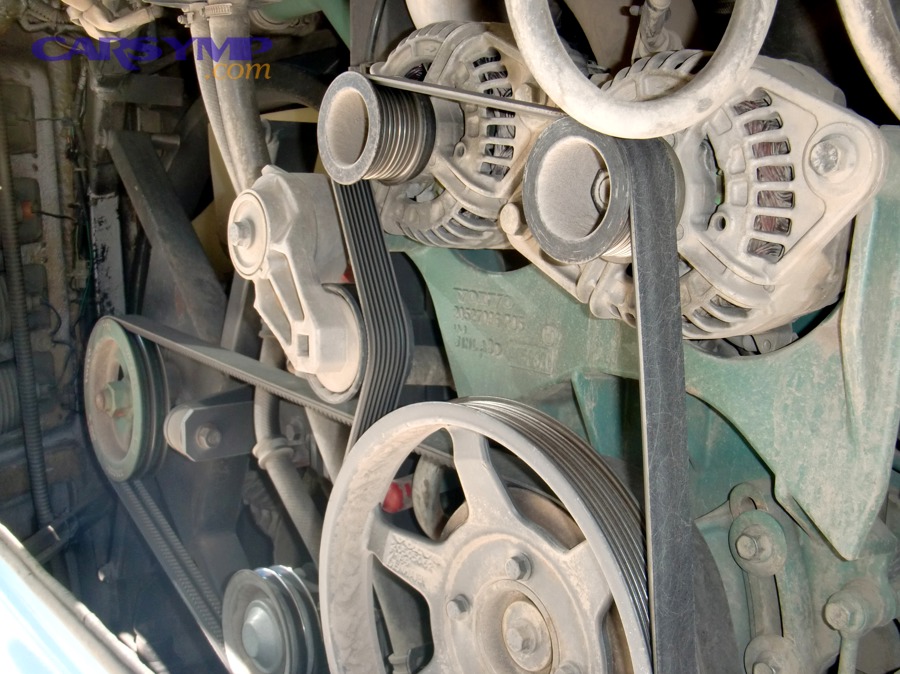
Listen for location, not just pitch
Stand near the passenger side fender (or wherever your accessory drive sits) with the hood open. Cụ thể: a belt squeal is usually loudest right at the belt path, while a bearing noise can “beam” from a single pulley housing (idler, tensioner, alternator, A/C clutch).
To keep the test safe, avoid leaning over spinning components; treat the belt path like an exposed fan. Then, move to a second listening position—front of the car and the opposite fender—to see if one pulley “wins” consistently.
Use a tool to focus the sound without guessing
If you have an automotive stethoscope, place the probe on stationary brackets near each accessory (never on the spinning pulley face). This can reveal a rough bearing that “sings” even when the belt squeal masks it. As part of car noise diagnosis, this step helps you localize the vibration source instead of reacting to the loudest echo.

A quick “remove-the-belt” confirmation (advanced DIY)
If the noise is severe and you’re comfortable with basic wrenching, you can briefly run the engine with the serpentine belt removed for 10–20 seconds max (no A/C, no charging, and many engines will overheat quickly). If the squeal disappears entirely, you’ve proven the noise is in the belt-driven accessory system, not inside the engine. After that, you’ll move on to trigger-based clues.
What does the timing of the squeal tell you?
The timing is your best clue: squeal on cold start points to slip from stiffness or weak tension, squeal when turning points to load spikes from the power steering system, and squeal when A/C kicks on points to a sudden torque demand or a dragging clutch. Next, you’ll map the sound to the condition that creates it.

Cold start squeal: stiffness + moisture + marginal grip
In the first 30–90 seconds, belts can be less flexible and less “grippy,” especially if they’re glazed or contaminated. Cụ thể hơn: a brief squeal that fades as the engine warms may indicate the belt is near its traction limit—often due to belt wear, tensioner weakness, or pulley surface issues.
However, if it squeals every single start and lasts longer over time, treat it as a developing fault, not a harmless quirk.
Squeal under steering load: sudden demand and belt traction
When you turn at low speed or full lock, steering load rises sharply. This is where Squeal on startup vs when turning clues become practical: if the squeal is strongest while steering, your belt is slipping under peak torque, or the pump/pulley is resisting rotation more than normal.
Next, confirm whether it happens only at full lock (normal load spike) or also during mild turns (more suspicious).
Squeal when A/C engages: intermittent load events
An A/C compressor clutch can snap on and add a step-change in load. If squeal happens exactly at engagement, suspect marginal belt grip or a clutch/compressor drag event. If it squeals continuously with A/C on, you may have a chronic slip situation or an accessory that’s binding.
How do you do a safe under-hood check before testing?
Start with safety: shut the engine off, keep hands and clothing away from the belt path, and only test with the hood securely supported; the goal is to inspect and plan tests without creating new risks. Next, you’ll do a controlled inspection that prevents accidental contact with moving parts.

Set up your inspection like a checklist
- Lighting: Use a bright flashlight so you can see rib surfaces and pulley grooves clearly.
- Clothing: No loose sleeves, jewelry, lanyards, or long hair near rotating parts.
- Engine state: Begin with the engine off and cool; only run it later for short, purposeful listening checks.
- Emergency plan: Know exactly where the key/stop button is; don’t “test and hope.”
Know what “normal” looks like before you chase “abnormal” sounds
Identify the belt route and the number of pulleys involved. If your car has a belt routing diagram under the hood, read it. If not, take a clear photo before removing anything. This prevents the common DIY mistake of a misrouted belt that causes immediate squeal after reassembly.
How can you spot belt wear, glazing, and contamination fast?
You can diagnose many squeals in minutes by inspecting the belt’s ribs, edges, and sheen: cracks, missing rib chunks, shiny glazing, and fluid contamination all reduce traction and trigger squeal. Next, you’ll use a simple visual-and-touch method to make the belt tell its story.
Glazing: the “polished” look that acts like a slip layer
A healthy serpentine belt usually has a matte rubber look on the ribbed side. If it’s shiny like it’s been waxed, that’s glazing—often caused by repeated slipping and heat. In How to inspect belt wear and glazing terms, glazing is the “burn mark” of belt traction failure.
To confirm, run a clean rag along the ribbed side (engine off). If you see hard, glassy texture and a squeal history, glazing is a prime suspect.
Cracks and missing ribs: not all cracks are equal
Small surface cracks across ribs can appear with age, but deeper cracks, missing chunks, or rib separation is a replace-now sign. Also inspect the belt edges: fraying or a “chewed” edge often points to pulley misalignment rather than simple belt aging.
Contamination: oil, coolant, and power steering fluid are squeal multipliers
Any fluid on the belt reduces friction. If the belt looks wet, swollen, or smells like oil, don’t just replace the belt—find the leak. Otherwise, you’ll repeat the problem quickly and conclude (incorrectly) that the new belt was “bad.”
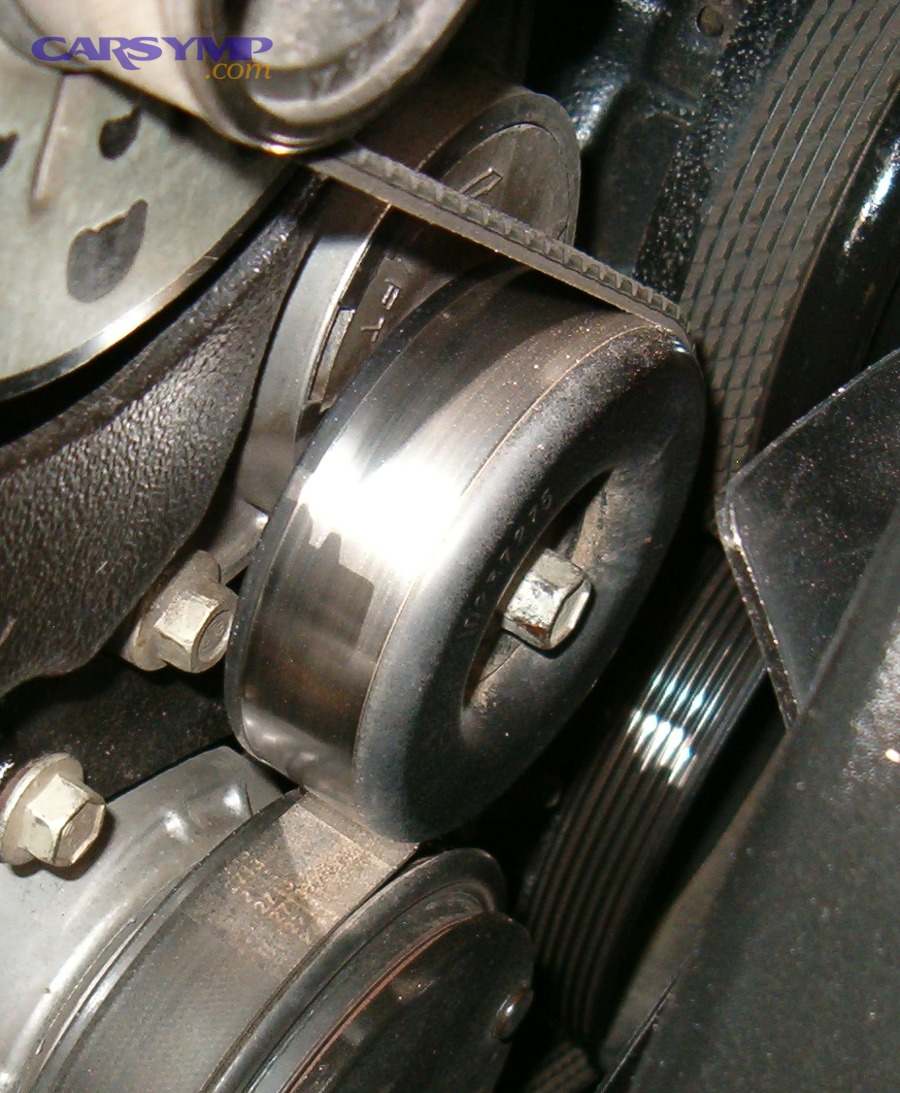
How do you check tensioner function without special tools?
A weak tensioner can allow slip even with a new belt, and you can often detect this by observing tensioner travel, spring response, and belt slack behavior during load changes. Next, you’ll separate belt condition from tension control—this is where many DIY diagnoses get corrected.
Watch tensioner movement with the engine idling
With the engine running, the tensioner should hold steady with only small, smooth movement. If it vibrates rapidly, “hunts,” or bounces hard, it may be reacting to a pulley bearing issue, belt slip, or a weak spring/damper.
Next, add load events (A/C on, headlights on, steering input) and watch whether the tensioner stabilizes or becomes erratic.
Check the tensioner’s range and spring feel (engine off)
Use the correct tool on the tensioner hex (or square drive) to rotate it through its travel. It should move smoothly and return firmly. If it feels notchy, binds, or returns sluggishly, it may be failing internally.
In Belt tensioner vs idler pulley diagnosis, this step matters because a bad idler bearing can mimic a weak tensioner by creating fluctuating resistance, while a weak tensioner can mimic a bad belt by allowing slip under load.
Inspect the tensioner pulley surface like it’s part of the belt
Look for wobble, uneven wear, missing flange (if applicable), or rubber dust buildup. A tensioner pulley that’s misaligned by even a small angle can cause edge wear and squeal patterns that return quickly.
How do you test pulleys for bearing noise?
You test pulley bearings by checking for roughness, wobble, and sound when spun by hand with the belt removed; a healthy pulley spins smoothly and quietly, while a failing bearing feels gritty or sounds like dry sand. Next, you’ll use repeatable checks so you don’t “hear what you want to hear.”
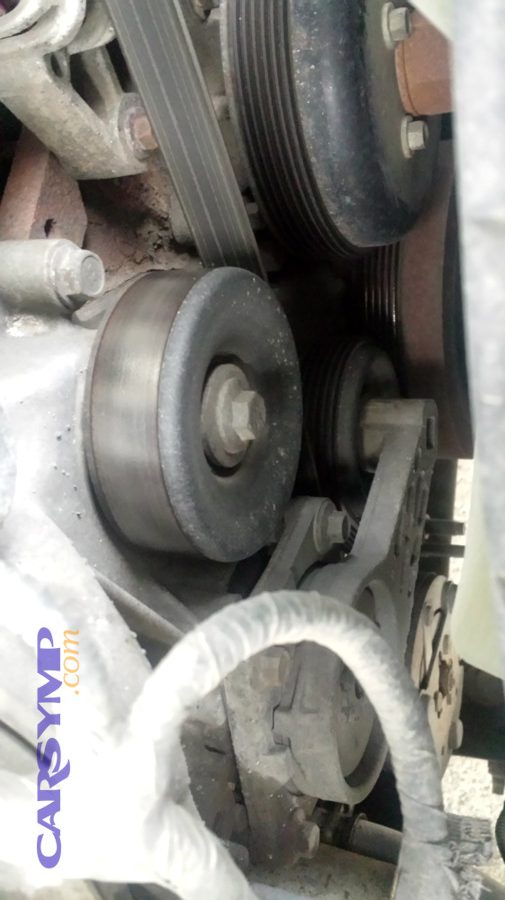
Spin-and-feel test (belt off) for roughness and drag
Remove the belt and spin each accessible pulley (idler, tensioner, alternator pulley if reachable, A/C pulley face). The key is feel: a bad bearing often has uneven resistance, a gritty sensation, or stops abruptly. This is the heart of How to test pulleys for bearing noise when you don’t have lab instruments.
Then, compare pulleys: one will usually feel noticeably different. That “one different pulley” is often the culprit even if the belt squeal is loud.
Check wobble and play the right way
Try to rock the pulley in and out and side-to-side (gently). Any play suggests bearing or mounting issues. Cụ thể: slight movement in some components can be normal, but visible wobble while spinning is not.
Use listening tools without touching spinning parts
If the belt must stay on for diagnosis, use an automotive stethoscope on stationary housings near each accessory, or use a long screwdriver as a “sound probe” (handle to your ear, tip on bracket). Don’t place tools on the pulley face or belt itself. This keeps the method safe and consistent.
Why does belt noise get worse in wet weather?
Wet weather often makes belt noise louder because water changes friction at the belt-pulley interface, briefly reducing grip and promoting slip—especially if the belt is glazed, aged, or the pulleys are polished. Next, you’ll distinguish “normal wet squeak” from a sign that failure is close.

Water as a traction disruptor, not a root cause
In Wet weather belt noise diagnosis, think of water as a stress test: it reveals marginal traction you already had. A healthy belt system may squeak briefly in heavy splash conditions, but it shouldn’t squeal persistently every damp morning.
Next, ask: does it squeal only after driving through puddles (external water) or also after overnight rain (humidity)? The second pattern points more strongly to glazing or tension weakness.
What a “water mist test” can (and can’t) tell you
Some techs lightly mist water near the belt (never directly into electrical connectors) to see whether the sound changes. If a small mist makes the squeal change rapidly, you’ve strengthened the case for slip. But this is not a cure and must be done carefully—over-wetting can create misleading results and risks.
Which DIY fixes actually help, and which make it worse?
Real DIY fixes focus on restoring correct friction and tension—cleaning contamination, correcting alignment, replacing worn parts—while “quick sprays” may quiet the noise temporarily but can attract dirt and mask the true failure. Next, you’ll choose actions that solve the cause, not just the symptom.
Cleaning and decontamination (often the fastest true win)
If the belt has light contamination, clean the pulleys with a lint-free rag and a safe degreaser (engine off, cool), then replace the belt if it’s swollen or glazed. This is one of the few DIY fixes that actually work because it removes the friction-killing film instead of coating over it.
Then, fix the leak—valve cover seep, power steering drip, coolant splash—otherwise the squeal returns.
Belt dressing: when it’s a bandage, and when it’s a mistake
Belt dressing pros/cons are simple: it can temporarily increase tackiness and reduce noise, but it can also trap dust, create uneven friction, and hide a failing pulley bearing until it becomes severe. If you use it at all, treat it as a short-term diagnostic aid—not a repair—and plan a real fix quickly.
Re-tensioning myths (and the reality on modern cars)
Most modern serpentine systems are automatic tensioner systems—there is no “tighten the belt” adjustment. If someone suggests “just tighten it,” what they often mean is: replace a weak tensioner, replace an incorrect belt length, or correct a misrouted belt.
What not to do if you want the squeal gone for good
- Don’t sand the belt ribs as a “renewal” method—this can worsen glazing and change belt profile.
- Don’t spray oils or lubricants—these reduce friction and can degrade rubber.
- Don’t ignore a squeal that’s getting louder—bearings can seize, belts can shred, and you can lose charging or steering assist at the worst moment.
When should you replace the belt, the tensioner, or both?
You should replace the belt when it’s cracked, glazed, contaminated, or aged, replace the tensioner when its spring/damper is weak or its pulley bearing is rough, and replace both together when wear patterns suggest the system has aged as a unit. Next, you’ll apply a decision rule that prevents repeat repairs.
Replace the belt if the surface is telling you it’s done
Replace if you see rib chunking, deep cracks, severe glazing, or fluid soak. If the belt has been squealing for a long time, assume its friction surface is heat-damaged even if cracks aren’t dramatic. This is especially true in systems with high electrical loads or frequent A/C use.
Replace the tensioner if it can’t control tension dynamically
If you observe bouncing, low return force, binding travel, or a noisy tensioner pulley, replacement is justified. In practice, a marginal tensioner can make a brand-new belt squeal under load and make you think you “bought a bad belt.”
When to replace belt and tensioner together
In When to replace belt and tensioner together terms, do it when the belt is clearly worn and the tensioner shows any weakness, or when mileage/age suggests the system has lived its service life. This approach reduces the chance of paying labor twice and prevents the “new belt + old tensioner” mismatch that often squeals again.
Don’t forget idlers and other driven pulleys
An idler pulley bearing can fail quietly for a while, then suddenly scream. If you’ve removed the belt for testing and any idler feels rough or wobbly, replace it while you’re there. This is the practical side of Belt tensioner vs idler pulley diagnosis: you’re not guessing—you’re comparing bearing feel directly.
What should you expect to pay and how to avoid repeat squeal?
Cost depends on access and parts quality: belts are usually affordable, but labor rises when packaging is tight or multiple pulleys are replaced; avoiding repeat squeal means fixing leaks, verifying alignment, and confirming pulley health, not just swapping the belt. Next, you’ll plan the repair like a system reset.
Understand what you’re really paying for
Labor cost to fix belt squeal is mostly about time and access: removing covers, moving components for clearance, and verifying the fix. If a shop quotes higher labor, ask what access steps are required and whether they’re also checking pulleys and tensioner function (not just installing a belt).
Use a “recheck after repair” routine
After installing parts, confirm the belt rides centered on every pulley, the ribs sit cleanly in grooves, and the tensioner is within its normal operating range. Then, re-test your trigger condition: cold start, A/C engagement, and steering load. If the squeal is gone in the exact condition that used to trigger it, you’ve closed the loop in your diagnosis.
Keep the fix durable, not just quiet
Choose a correct-spec belt length and profile, avoid cheap pulleys with questionable bearings, and correct any fluid leak. If the belt area stays dry and aligned, the system usually stays quiet for a long time.
Contextual border: Up to this point, you’ve diagnosed the most common belt squeal pathways (slip, tension control, wear, contamination, and bearings). Next, we’ll cover less common—but highly diagnostic—edge cases that can fool even experienced DIYers.
Less-common causes that mimic belt squeal
Some squeals persist even after “all the obvious parts” are replaced because the true issue is alignment, a one-way clutch pulley, or a pulley surface/geometry mismatch rather than the belt itself. Next, you’ll use targeted checks to catch these rare-but-real scenarios.
Misalignment from a bent bracket or wrong pulley offset
If the belt walks toward an edge, frays, or makes a chirp/squeal that comes and goes, suspect alignment. A slightly bent accessory bracket, a missing spacer, or the wrong idler pulley offset can tilt the belt path just enough to create noise under load.
Overrunning alternator pulley (OAP) issues
Some alternators use a one-way clutch pulley to smooth belt dynamics. If it fails, you can get belt flutter, tensioner bounce, and squeal-like sounds that don’t respond to a simple belt swap. A clue is strong tensioner oscillation at idle and during decel events.
Harmonic balancer separation (crank pulley wobble)
On some engines, the crank pulley/harmonic balancer can delaminate and wobble. That wobble can throw the belt off-plane, causing repeat squeal and abnormal wear. Look for visible wobble, rubber deterioration, or belt dust localized near the crank pulley.
Incorrect belt routing after a DIY repair
A misrouted belt can “work” but operate at the wrong wrap angle on key pulleys, reducing grip and causing squeal under load. If your squeal started immediately after service, re-check routing against the under-hood diagram or a verified reference for your exact engine.
FAQ
These quick answers address the most common follow-up questions people ask during belt squeal diagnosis, especially when symptoms are intermittent or return after parts replacement.
Can a brand-new belt still squeal?
Yes—if the tensioner is weak, a pulley bearing is rough, a pulley surface is polished/contaminated, or the belt is the wrong length/profile. In that case, the new belt is exposing a system problem rather than solving it.
Is squeal always a sign the belt will break soon?
No, but a squeal that is getting louder, longer, or more frequent is a sign the system is losing margin. Belts can shred when a bearing seizes or when misalignment chews an edge, so don’t ignore worsening symptoms.
Why does the squeal disappear when I rev the engine?
Sometimes increased speed stabilizes belt dynamics or reduces time spent in a slip zone, especially if the squeal is tied to idle-load events. However, the underlying issue (marginal grip, weak tensioner, contamination, bearing drag) may still be present and can return under other loads.
Should I replace every pulley at once?
Not automatically. A smart approach is to test bearings with the belt off and replace only rough/wobbly pulleys, while strongly considering a tensioner replacement if it shows weak control or abnormal movement—especially if the system has significant age.
What’s the fastest “proof” test for slip vs bearing noise?
Removing the belt briefly and re-checking whether the noise disappears is the clearest split. If the noise persists with the belt removed, it’s not belt-driven. If it disappears, focus on belt condition, tension control, and pulley bearings—then use spin-and-feel tests to find the rough component.


