

How to Replace an Engine Coolant Temperature (ECT) Sensor: DIY Guide for Car Owners (Symptoms & Cost)
Replacing an Engine Coolant Temperature (ECT) sensor is a straightforward DIY repair when you follow the right safety steps, control coolant loss, and confirm the fix with live temperature data—so your engine management stops “guessing” and starts using accurate temperature input again.
If you’re here because your car is acting up, the fastest way to justify the repair is to connect the most common Bad coolant temp sensor symptoms—like hard starts, rough running, fan behavior, or a strange gauge reading—to what the ECT signal actually controls inside the ECU.
If you’re deciding between DIY and a shop, the total cost usually comes down to access, coolant handling, and how much diagnostic time is needed—because Coolant temp sensor replacement cost estimate numbers vary widely by vehicle and labor time.
Introduce a new idea: once you understand what the ECT sensor does and how to replace it, you’ll avoid the most common trap—confusing an Overheating reading vs actual temp mismatch caused by a sensor/circuit problem with true overheating caused by the cooling system itself.
What is an Engine Coolant Temperature (ECT) sensor and what does it do?
An Engine Coolant Temperature (ECT) sensor is an electronic temperature sensor (typically a thermistor-based sensor) that converts coolant temperature into a signal the ECU uses to control fueling, ignition strategy, radiator fan operation, and emissions behavior.
To better understand why replacing it matters, focus on what the ECU does with temperature: when the engine is cold, it enriches fueling and changes idle strategy; as the engine warms, it leans out and enters stable closed-loop operation. That means a bad ECT input can create Effects on fuel economy and starting that feel like several different problems at once.
Is the ECT sensor the same as the coolant temperature sender/switch?
The ECT sensor used by the ECU is usually different from a gauge sender or a simple temperature switch, even though people casually call all of them a “coolant temp sensor.”
Specifically, an ECU ECT sensor typically provides a variable signal across a temperature range, while a sender may primarily drive the dashboard gauge, and a switch may only trigger an on/off event (like a warning light or fan relay) at a set threshold. This distinction matters because replacing the wrong component can leave the problem unchanged—and you’ll still be chasing Wiring and connector issues vs sensor failure when the real fault is elsewhere.
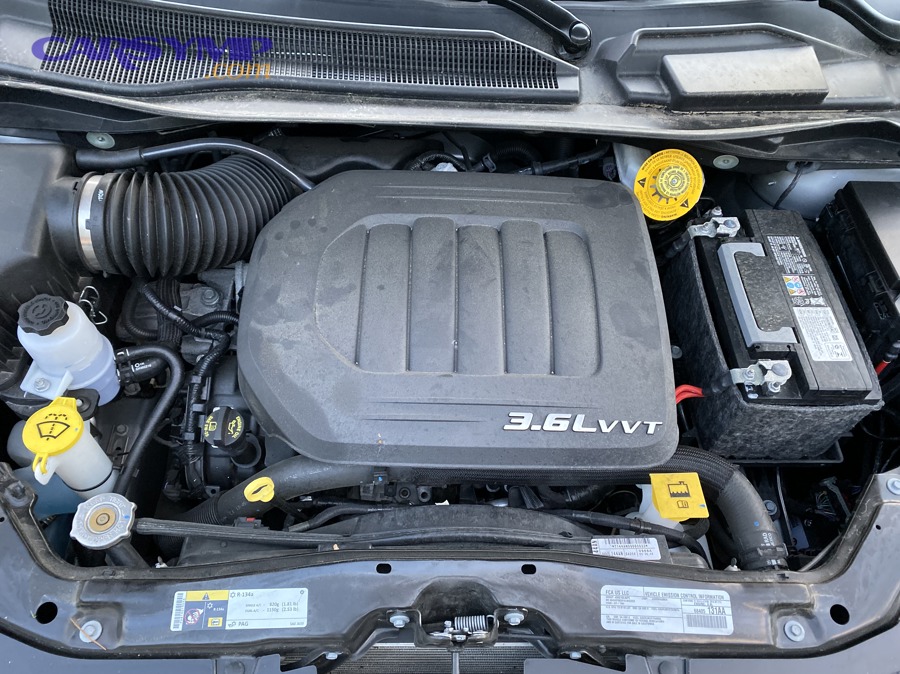
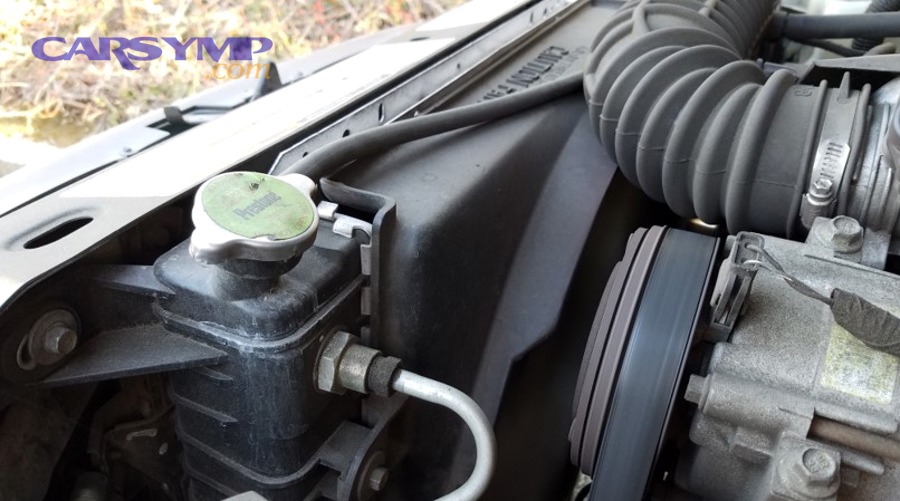
Where is the ECT sensor located on most engines?
There are three common location patterns for the ECT sensor: near the thermostat housing, threaded into the cylinder head, or mounted in a coolant outlet/water neck—chosen to represent “real” coolant temperature where the ECU needs it.
Next, treat Sensor location and access by engine layout as part of the diagnosis: inline engines often place sensors at accessible coolant outlets, while some V-engines tuck them under intake plumbing or near a valley cover. If you can’t see it immediately, follow the upper radiator hose to the thermostat area and look for a sensor with a 2–4 wire connector.
What are the symptoms of a bad ECT sensor that point to replacement?
There are 8 common bad coolant temp sensor symptoms that strongly suggest replacement is reasonable: hard cold starts, rough idle when cold, rich smell/black smoke, poor fuel economy, cooling fan running at the wrong time, temperature gauge behaving erratically, check engine light with ECT-related codes, and inconsistent temperature readings on a scan tool.
Then, remember the key hook: ECT issues often “masquerade” as fueling or cooling problems because temperature is a foundational input. A sensor that reads too cold can make the ECU add fuel like it’s winter every day; a sensor that reads too hot can trigger fan logic or limp strategies even when the engine is fine.
Can a bad ECT sensor cause rough idle, hard starts, or poor fuel economy?
Yes—an ECT sensor fault can cause rough idle, hard starts, and poor fuel economy for at least three reasons: it can force an overly rich mixture during warm operation, it can prevent proper cold-start enrichment timing, and it can keep the ECU from transitioning cleanly into stable closed-loop fueling.
Specifically, when the ECU believes the engine is colder than it really is, it will hold onto cold-engine strategies longer than needed—extra fuel, higher idle targets, and different spark behavior—so the engine may load up, idle unevenly, and burn more fuel than it should. That’s why many drivers report obvious effects on fuel economy and starting even without true overheating.
Can a failing ECT sensor cause overheating or the radiator fan to run constantly?
Yes—a failing ECT sensor can make the fan run constantly or at odd times, and it can also create an overheating warning even when the engine isn’t overheating for at least three reasons: the ECU may enter a failsafe fan mode, it may interpret an implausible temperature signal as a risk, and the cluster may display a value based on bad input.
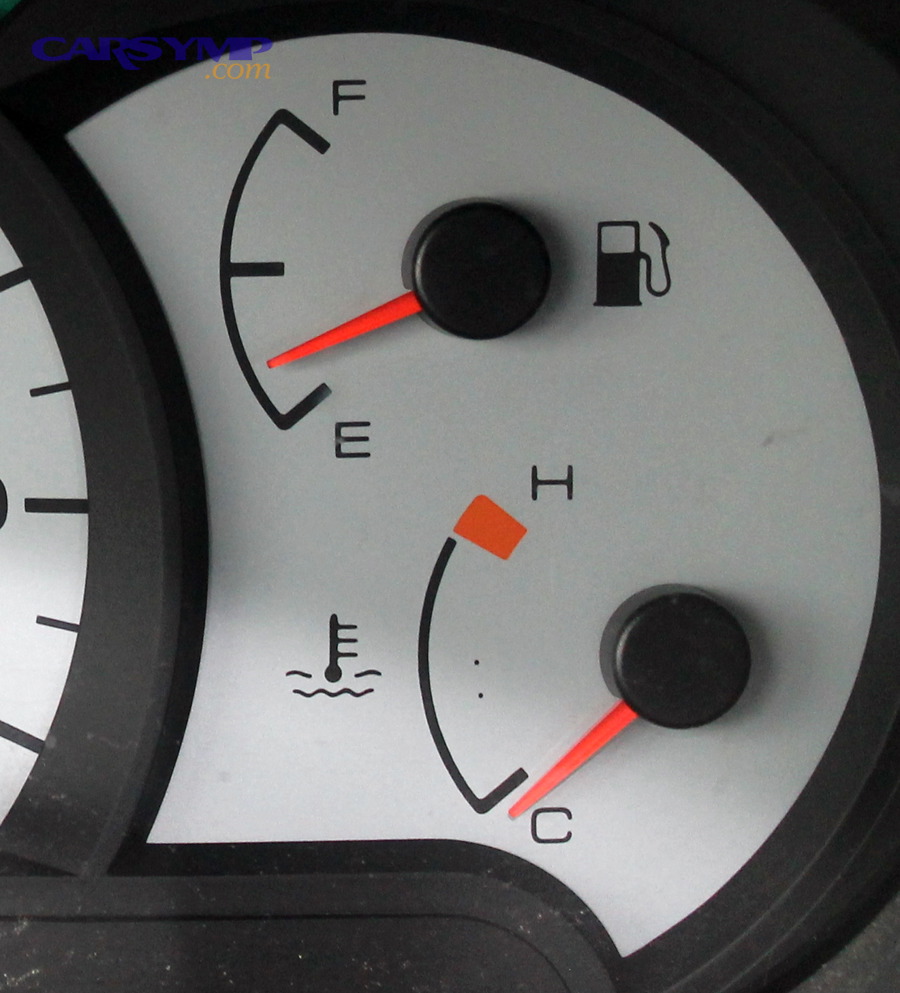
However, this is where the overheating reading vs actual temp mismatch matters. If your scan tool shows a wildly unrealistic ECT value (like -40°F/-40°C or a sudden jump), that’s often a sensor circuit default or signal dropout—not proof that the engine is physically overheating.
Which OBD-II codes are commonly associated with ECT sensor problems?
There are 5 common ECT-related code families—often discussed as P0115–P0119 code diagnosis basics—and they generally map to “circuit” issues, “range/performance,” and “high/low input” faults rather than a single guaranteed bad sensor.
More specifically:
- Range/performance often points to a signal that doesn’t behave logically during warm-up (temperature doesn’t rise smoothly, or it rises too fast/slow).
- High/low input often points to electrical faults (open circuit defaults, short to ground/voltage).
- Circuit descriptions often indicate the ECU is seeing an issue in the sensor’s signal path, which includes the connector and wiring.
As a practical reminder, code text is a starting point, not a verdict. A well-known diagnostic description of ECT range/performance issues emphasizes multiple possible causes, not just the sensor itself. (yourmechanic.com)
Do you need to test the ECT sensor before replacing it?
Yes—you should test before replacing the ECT sensor for at least three reasons: it prevents unnecessary parts swaps, it helps you detect circuit faults that a new sensor won’t fix, and it confirms the repair later with a clear before/after comparison.
Next, treat testing like “cheap insurance”: many ECT failures are not a dead sensor but a poor connector fit, corrosion, broken locking tabs, or a wiring rub-through—exactly the kind of wiring and connector issues vs sensor failure that can mimic a bad sensor perfectly.
How can you check an ECT sensor with a scan tool or multimeter?
You can check an ECT sensor using two simple methods—(1) scan-tool plausibility checks and (2) a multimeter-based circuit check—to confirm whether the signal behaves like real temperature and whether the circuit is intact.
Then, start with the scan tool because it’s faster and more “real world”:
Scan tool plausibility checks (fastest)
- Cold engine check: after the car sits overnight, ECT should be close to ambient temperature. If ECT is dramatically different from intake air temperature (IAT) and ambient, suspect sensor/circuit.
- Warm-up smoothness: as the engine warms, ECT should rise smoothly without spikes, dropouts, or sudden unrealistic jumps.
- Fan behavior correlation: if fans run full blast while ECT reads implausibly, it can indicate ECU failsafe behavior rather than true overheating.
Multimeter checks (good for circuit confirmation)
- Verify the connector is seated and pins are not spread.
- Check for reference voltage and ground integrity (vehicle-specific wiring diagrams help).
- If you remove the sensor, measure resistance changes with temperature (the trend matters more than a universal number).
This approach lines up with the broader idea that the ECU uses ECT to manage multiple outputs (fueling, fan operation, timing). (carparts.com)
Is it more common for the sensor to fail or the wiring/connector to fail?
Wiring/connector problems are often as common as sensor failure, and sometimes more common on older vehicles, because heat cycling, coolant exposure, oil contamination, and vibration all target the connector area first.
However, a simple decision rule keeps you from guessing:
- If the connector is damaged, loose, green with corrosion, or the locking tab is broken, fix that first.
- If the connector is clean but live ECT data is implausible or unstable, suspect the sensor.
- If codes return immediately after clearing and the value is pegged (e.g., extreme cold/hot), suspect an electrical open/short.
If you want a quick “real-world reality check,” you’ll often see technicians explain that ECT trouble codes can be caused by either the sensor or wiring faults—not just one. (youtube.com)
How do you replace an ECT sensor safely and correctly?
ECT sensor replacement is best done with a simple 6-step method—cool engine, relieve pressure, access and unplug, remove the sensor, install the new sensor with the correct seal, and top off coolant—so you avoid leaks, stripped threads, and air pockets.
Next, treat safety as part of the procedure, not a footnote: hot coolant can spray under pressure, and many sensors are mounted in plastic housings that crack if over-tightened. This repair can be part of routine maintenance, but it also overlaps with cooling system repair practices—because once you open the cooling circuit, you must manage coolant and trapped air correctly.
What tools and supplies do you need for ECT sensor replacement?
There are 10 common essentials for ECT sensor replacement: safety gloves, eye protection, drain pan, correct socket/deep socket, ratchet and extension, shop towels, a small pick for connector clips, fresh coolant (correct type), a funnel, and the correct replacement seal (O-ring or washer) for your sensor style.
Then, add two “situational” items depending on access:
- Hose clamp pliers or regular pliers if you must move hoses for sensor location and access by engine layout.
- A torque wrench if your sensor threads into a delicate housing or if specs are easy to overdo by feel.
Do you have to drain coolant to replace the ECT sensor?
Yes—sometimes you must drain coolant, sometimes you don’t, and the correct answer depends on at least three factors: whether the sensor sits below the coolant level, how much coolant would spill when removed, and whether the sensor is installed in a pressurized section that can’t be isolated.
Specifically, use this decision rule:
- If the sensor is high on the engine and above coolant level when cold, you may only lose a small amount.
- If it is low on the block or in a lower outlet, plan a partial drain to keep coolant off belts and electrical connectors.
- If coolant is old/contaminated, it’s smarter to plan a controlled drain and refill rather than making a mess.
How do you remove the old ECT sensor without damaging threads or the housing?
You remove the old ECT sensor safely by cooling the engine fully, relieving pressure, disconnecting the connector cleanly, and unscrewing the sensor with the correct socket while keeping side-load off the housing—so you don’t crack plastic components or strip threads.
Then, follow these steps:
- Cool the engine completely (warm-to-hot is not “cool enough”).
- Relieve pressure by slowly loosening the reservoir cap when the engine is cold.
- Disconnect the battery negative if your access route risks shorting a tool against a live terminal.
- Unplug the connector by releasing the tab (don’t yank the wires).
- Position a drain pan under the area.
- Remove the sensor with a steady pull—avoid rocking the socket sideways.
If the sensor is seized, stop before you force it. A cracked thermostat housing turns a small job into a bigger cooling system repair job.
How do you reinstall the sensor and prevent leaks?
You prevent leaks by matching the sealing method to the sensor design (O-ring vs crush washer vs thread sealant where specified), installing by hand first to avoid cross-threading, and tightening to the correct snugness/torque so the seal compresses without cracking the housing.
Then apply these practical rules:
- O-ring style: ensure the O-ring is present, lightly lubricated with coolant, and not pinched.
- Washer style: use a new washer if required; old washers often seep.
- Thread sealant: only use it if the manufacturer specifies it; otherwise it can interfere with grounding or torque feel on some designs.
To anchor the procedure to a widely used step-by-step approach, common DIY instructions emphasize cooling the engine, catching coolant, removing the old sensor, and installing the new sensor carefully.
What should you do after replacing the ECT sensor to confirm the fix?
After replacing the ECT sensor, you confirm the fix with a 5-part checklist—check for leaks, restore coolant level, perform Refill and bleed after sensor replacement, clear any stored codes, and verify live ECT data during warm-up—so the repair is proven, not assumed.
Next, connect this to the most common comeback issue: a car that still “acts weird” after a new sensor often has air trapped in the system or an unresolved circuit problem. That’s why Clearing codes and verifying repair belongs in the procedure, not at the end as an optional step.

How do you bleed air from the cooling system after ECT sensor replacement?
You bleed air by refilling the system correctly, using the vehicle’s bleed points (if equipped), warming the engine while monitoring temperature and heater output, and topping off as trapped air purges—so the coolant level stabilizes and the ECT reading reflects real coolant contact.
Then follow a safe general process (vehicle-specific procedures may add bleed screws or special fill tools):
- Refill slowly to reduce trapped air.
- Set the heater to hot (on many vehicles, this encourages coolant circulation through the heater core).
- Start and warm the engine while monitoring ECT on a scan tool if possible.
- Watch for bubbles in the reservoir (if applicable) and top off as needed.
- Verify the upper hose warms as the thermostat opens (a sign coolant is circulating).
- Shut down, cool fully, recheck level—because cooling contracts coolant and reveals the true level.
This is the practical heart of refill and bleed after sensor replacement: a sensor can’t read accurately if it’s surrounded by steam/air instead of liquid coolant.
Should you clear codes and perform a test drive after replacement?
Yes—you should clear codes and test drive after replacement for at least three reasons: it confirms whether the ECU accepts the new signal, it ensures the fault doesn’t immediately return, and it validates that fan behavior, warm-up behavior, and drivability have normalized.
Then use a “proof-based” drive:
- Confirm ECT rises smoothly from cold to operating temperature.
- Confirm no sudden drops/spikes that suggest a connector dropout.
- Confirm the fan cycles normally.
- Confirm drivability improvements that match your original complaint (starting, idle, economy).
A cost guide and how-to source notes that labor can vary by access and that replacement is often quick, which makes post-repair verification even more important—because the fix should be obvious in live data. (familyhandyman.com)
What signs mean the problem isn’t the sensor and you should stop driving?
Yes—there are clear signs you should stop driving because they indicate real overheating risk rather than a sensor-only problem: visible steam, coolant loss, a rapidly climbing temperature gauge paired with boiling sounds, repeated overheating warnings with poor cabin heat, or coolant spraying/leaking under pressure.
Then apply this rule: if the engine is truly overheating, the goal is not “finish the trip,” it’s “prevent engine damage.” Safely pull over, shut down, and let the engine cool before checking levels. A sensor issue can lie to you; real overheating can warp components quickly.
How much does ECT sensor replacement cost and what affects the price?
ECT sensor replacement cost is driven by three main levers—part price, ECT sensor replacement labor time, and coolant/diagnostic add-ons—so the same repair can be inexpensive on an easy-access engine and surprisingly expensive on a buried sensor with brittle plastic housings.
Next, use a simple breakdown mindset: (1) the sensor itself, (2) the labor to reach it, and (3) the “coolant consequences” of opening the system. To make this easier to compare, the table below summarizes typical cost factors and what they usually mean for your total.
What the cost table contains: common pricing components (parts, labor, coolant service, diagnostics) and the real-world reasons each line item changes from one vehicle to another.
| Cost component | What it covers | Why it varies |
|---|---|---|
| Sensor/part | ECT sensor, seal/O-ring | OEM vs aftermarket, integrated housing designs |
| Labor time | Access, removal, install, leak check | Sensor location and access by engine layout, seized threads, intake removal |
| Coolant | Top-off or drain/refill | How much coolant is lost; coolant type/quantity |
| Diagnostics | Scan time, pinpoint tests | Whether codes are clear-cut or intermittent |
| Related repairs | Connector/harness or housing | Broken clips, cracked housings, corrosion |
A widely used estimator reports an average range for ECT sensor replacement that includes both parts and labor, underscoring how much the “parts” line can vary by vehicle design. (repairpal.com)
Is DIY replacement worth it compared to paying a shop?
DIY replacement is worth it when (1) access is straightforward, (2) you can manage coolant safely, and (3) you can verify the fix with live data—while a shop is the better choice when access is difficult, plastic housings are fragile, or you suspect broader wiring and connector issues vs sensor failure.
Then use these decision cues:
DIY usually makes sense when:
- The sensor is visible near the thermostat housing.
- You can remove it without pulling major components.
- You’re comfortable doing refill and bleed after sensor replacement and confirming temps.
A shop is often smarter when:
- The sensor is buried under intake plumbing.
- You see coolant leaks, cracked housings, or corroded connectors that may require extra parts.
- You already tried replacing it and still have faults—meaning your problem may be electrical or system-level.
A mainstream DIY guide notes typical parts pricing and that labor can take 1 to 2.5 hours, reinforcing why access drives cost and why ECT sensor replacement labor time is not the same on every car. (familyhandyman.com)
What factors make an ECT sensor replacement quote unusually expensive?
There are 6 common reasons an ECT sensor quote becomes unusually expensive: difficult access, added diagnostic time, coolant drain/refill or flush recommendations, seized sensor threads, broken connector repairs, and replacing an integrated thermostat housing/sensor assembly instead of a standalone sensor.
Then focus on the quote language:
- If the estimate includes intake removal, that’s a labor multiplier.
- If it includes coolant service, ask whether it’s a top-off, a drain/refill, or a full flush.
- If it includes harness repair, the issue may not be the sensor alone.
If you’re comparing what you see on forums or sites like carsymp.com, keep the context: people often share totals without separating labor, coolant handling, and diagnostics—so two “same repair” stories can be completely different jobs in practice.
What else can mimic a bad ECT sensor ?
The biggest ECT trap is that ECT symptoms overlap with thermostat faults, low coolant, air pockets, and electrical faults, so the fastest way to tell the difference is to compare live data behavior (plausibility + smooth warm-up) with physical signs (coolant level, leaks, hose temperature, heater output).
Next, think in opposites (micro semantic “antonyms”): a sensor problem can create a reading problem even when the engine is fine, while a cooling system problem creates a heat management problem even when the sensor is fine. That contrast is how you avoid swapping parts blindly.
Is it the thermostat or the ECT sensor causing temperature problems?
The ECT sensor wins as the likely cause when the temperature signal is implausible, jumpy, or pegged, while the thermostat is the more likely culprit when warm-up behavior and hose temperature patterns match stuck-open or stuck-closed mechanical behavior.
Then use these comparisons:
More consistent with ECT sensor/circuit
- ECT reads -40°F/-40°C or an extreme value.
- ECT jumps suddenly without a physical reason.
- Fan runs in failsafe with implausible ECT.
More consistent with thermostat
- Stuck open: long warm-up, weak cabin heat, cooler running at speed.
- Stuck closed: rapid overheating, upper hose staying cooler longer, pressure rise.
If you want a research-based anchor that coolant temperature affects performance and emissions (making thermostat behavior meaningful), studies investigating coolant temperature show measurable impacts on engine operation. (mdpi.com)
Can low coolant, air pockets, or a bad radiator cap cause false ECT readings?
Yes—low coolant, air pockets, or a bad radiator cap can cause misleading ECT behavior for at least three reasons: the sensor may not be submerged in liquid coolant, steam pockets can insulate the sensor tip, and poor pressure control changes boiling behavior and circulation stability.
Then connect it to the real-world symptom: you may see fluctuating readings and inconsistent cabin heat because coolant isn’t circulating properly. This is why refill and bleed after sensor replacement is not optional—air pockets can make a brand-new sensor look “wrong.”
OEM vs aftermarket ECT sensors: does brand or fitment matter?
OEM wins for calibration confidence and connector fit, aftermarket can be best for budget and availability, and premium aftermarket is often optimal when it matches OEM spec and includes correct seals—so “best” depends on accuracy risk versus cost.
Then apply these practical criteria:
- Connector matches perfectly and locks securely.
- Seal type is correct (O-ring vs washer).
- Sensor threads and length match the original.
- Return policy exists in case the part is wrong.
If your original issue was intermittent, prioritize connector integrity and harness condition before blaming the sensor brand—because wiring and connector issues vs sensor failure can persist with any new sensor.
Why does the temperature gauge still act weird after replacing the ECT sensor?
A weird gauge after replacement usually happens because the gauge uses a different sender than the ECU, air is still trapped in the system, the connector/wiring fault remains, or the ECU still has stored faults that require clearing codes and verifying repair steps.
Then troubleshoot in this order:
- Recheck coolant level after a full cool-down.
- Reconfirm the connector is locked and pins are clean.
- Pull live ECT data and compare it to ambient when cold.
- Look for returning DTCs and correlate them with behavior.
- If the gauge is still strange but live ECT is normal, investigate the gauge sender or cluster logic.
Evidence (if any): According to a study by Hanyang University from the Department of Mechanical Engineering, in 2013, researchers reported that changes in engine coolant temperature were associated with measurable differences in fuel economy and exhaust emissions under test conditions—highlighting why accurate temperature inputs and stable coolant behavior matter. (researchgate.net)
 OBD-II Trouble Codes and Verify the Repair: Drive-Cycle & Readiness Monitor Checklist for DIY Car Owners 1")
 Sensor Effects Explained for Car Owners 2")
 the Cooling System After Coolant Temp Sensor Replacement — Step-by-Step Guide for DIY Drivers 3")
 for DIY Car Owners 4")
 Sensor Replacement Cost: Parts & Labor Breakdown for Car Owners 5")
 6")
 for Car Owners & DIYers 7")
: Gauge vs Live Data vs Sensor Faults 8")
 9")
 for Drivers: Signs, Causes, and Cooling-System Clues 10")