

How to Build a Basic Car Maintenance Checklist for Drivers: Fluids & Tires
A basic car maintenance checklist is a simple, repeatable set of checks that keeps your vehicle safe, dependable, and less likely to surprise you with a breakdown. If you follow it consistently, you’ll catch low fluids, worn tires, weak batteries, and brake issues before they turn into expensive repairs or unsafe driving.
To make the checklist actually usable, you need two layers: quick checks you can do in minutes, and deeper checks you do on a schedule. That way, you’re not guessing what to inspect, and you’re not relying on memory.
You’ll also want a “before you travel” version and a seasonal version, because heat, cold, and long highway miles stress different parts of the car. The checklist below shows what to check, what “normal” looks like, and which findings should push you to book service.
To begin, the key is to think in systems—not random tasks—so each check naturally leads to the next. Below are the steps and checklists that build that flow.
What belongs on a basic car maintenance checklist for most drivers?
A complete checklist includes safety essentials (tires, brakes, lights), reliability essentials (battery, fluids, belts/hoses), and “visibility + control” items (wipers, washer fluid, steering feel) so you can prevent both breakdowns and near-misses. Next, you’ll group them by how often you should inspect them for real-world driving.
Which checks give the biggest safety return in the least time?
Start with tires, brakes, and lights because they directly affect stopping distance, grip, and whether other drivers can see you. After that, check fluids and battery condition because those are the most common “car won’t start / car can’t continue” triggers. According to AAA’s newsroom summary of 2024 roadside calls, towing and battery-related incidents represented a large share of total emergency service volume, making basic checks a practical way to reduce interruptions.
- Tires: pressure, tread depth, uneven wear, visible damage
- Brakes: pad thickness (visual), noises, pedal feel, brake fluid level
- Lights: headlights, brake lights, turn signals, hazards
- Fluids: engine oil, coolant (when cold), washer fluid, brake fluid; plus power steering / transmission where applicable
- Battery: corrosion, loose terminals, slow cranking signs
- Wipers: streaking, torn rubber, washer spray pattern
How do you keep the checklist consistent across different cars?
Use the owner’s manual as the “spec layer” (fluid type, service intervals, tire pressure label, warning lights) and the checklist as the “habit layer” (the same inspection sequence every time). After that, your checklist becomes portable: even if you switch vehicles, the logic stays the same.
What’s the fastest way to avoid missing a step?
Use a set route: walk-around → under-hood → driver seat. Then close the loop with a short test drive (even one block) if you changed anything. This flow prevents the most common mistake: checking one item, then forgetting to re-check or to tighten/close a cap.
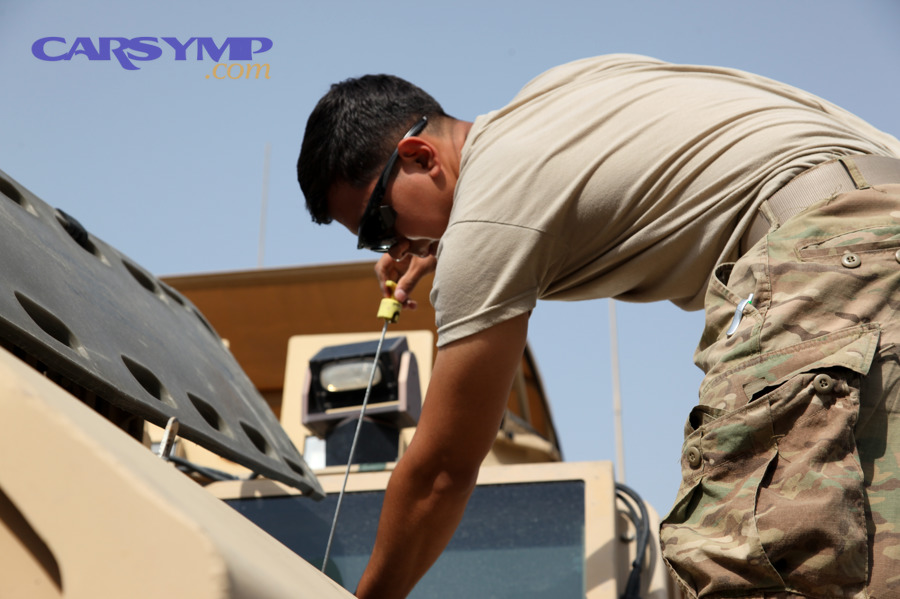
How do you do a quick under-hood inspection without tools?
You can inspect key reliability items by looking for leaks, cracked rubber, loose caps, and abnormal smells—no tools required. Next, you’ll add a quick battery and belt scan so you catch the issues most likely to strand you.

What should you look for first when the hood is open?
Scan for anything that looks “wet where it shouldn’t”: oily shine near valve covers, coolant residue (often white/green/pink crust), or damp spots below hoses. Next, check rubber parts—hoses and belts—because cracks, glazing, or swelling often appear before the part fails.
- Leaks: fresh drips, puddles under the car, residue around hose connections
- Belts: cracking, missing ribs, shiny/glazed surface
- Hoses: cracks, bulges, soft spots, dried coolant stains at clamps
- Caps: oil cap and coolant reservoir cap seated fully
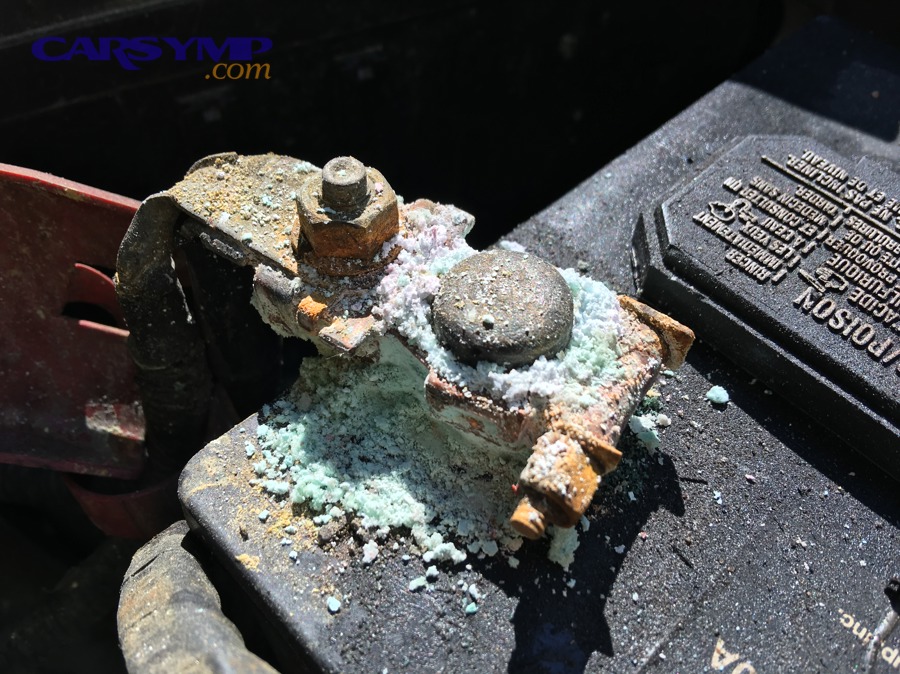
How do you do basic battery checks safely?
Focus on “Battery and electrical quick checks”: look for corrosion (white/blue buildup), check that terminals don’t wiggle by hand, and notice if the engine cranks slower than usual. After that, verify cables aren’t frayed and that the battery is secured, because vibration can damage internal plates over time.
Which smell or sound should immediately change your plan?
A sharp fuel smell, burning plastic smell, or hissing from the cooling system should end the inspection and trigger service, because those can indicate leaks or overheating risk. Next, if you hear loud belt squeal or grinding right after startup, don’t “hope it goes away”—those are early failure signals.
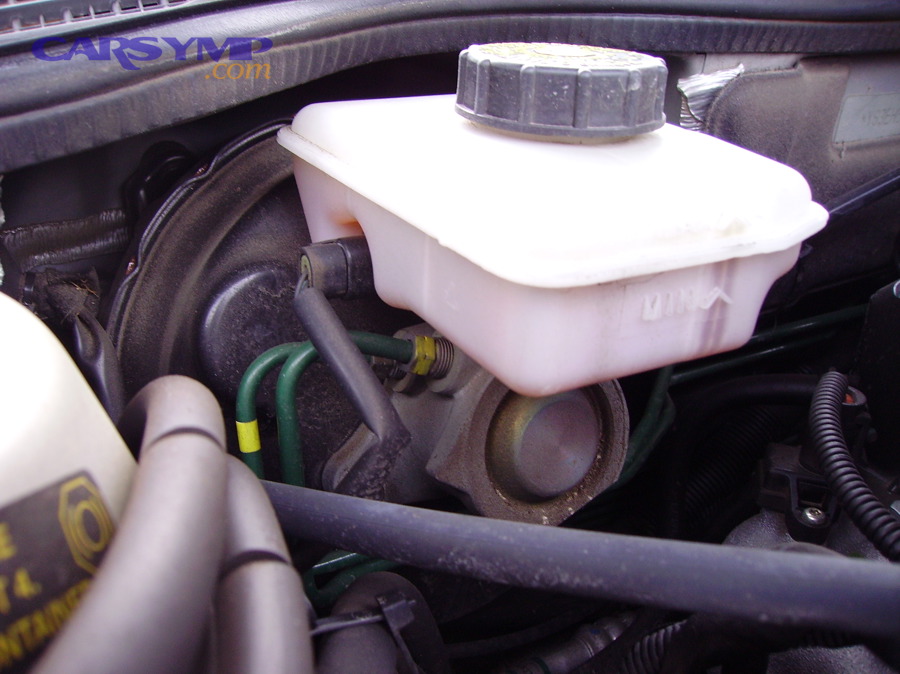
How can you check vital fluids safely and know what “normal” looks like?
You can check fluids by using the correct temperature rule (some hot, some cold) and by comparing level and color to what’s typical for that fluid. Next, you’ll use a simple beginner-friendly sequence so you don’t mix up reservoirs.
What is the safe order for fluid checks?
Start with washer fluid (safe anytime), then engine oil (best on level ground, engine off), then brake fluid (visual level), and only check coolant level when the engine is cold. Next, add power steering and transmission only if your vehicle has dipsticks or clearly marked reservoirs. If you want a “Fluid check checklist for beginners,” this order keeps you away from the most common hazard: opening a hot cooling system.
How do you check engine oil correctly?
Park level, shut off the engine, wait a few minutes, pull the dipstick, wipe, reinsert fully, then read the level between the markings. Next, look at oil color and texture: very gritty or milky oil can signal contamination, while extremely low oil suggests leakage or consumption that needs diagnosis.
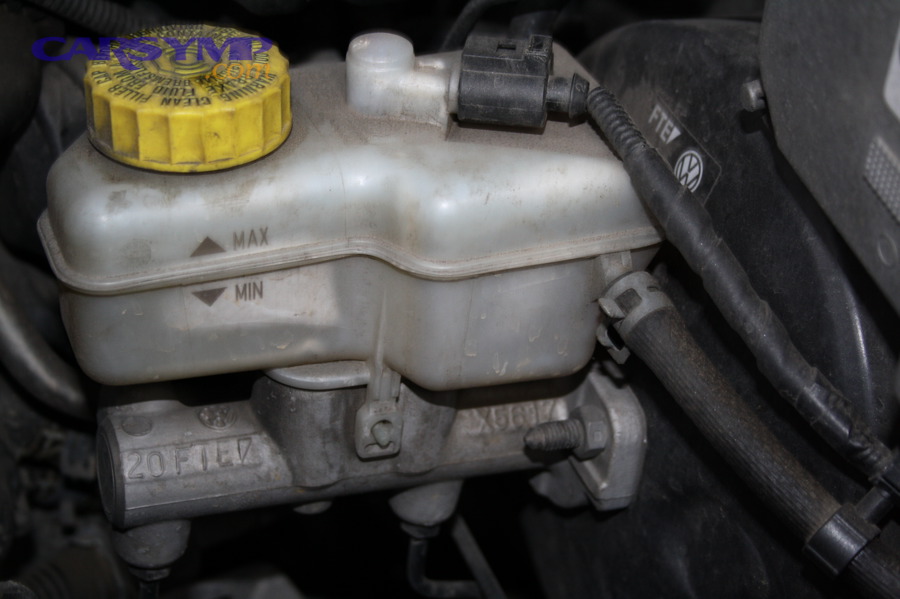
How do you interpret coolant and brake fluid levels?
Coolant should be checked at the reservoir (not the radiator cap) when cold; aim for the “MIN/MAX” band. Brake fluid should also be within its marked band; low brake fluid can correlate with pad wear or leaks, so don’t just top off without understanding why it dropped. Next, treat repeated drops as a reason to book service rather than a “normal refill.”
What quick evidence suggests your fluid issue is urgent?
Active dripping, visible steam, a sweet coolant smell, or a brake pedal that feels spongy after fluid appears low are urgent. Next, if the temperature gauge climbs above normal or a red warning light appears, stop driving and get help rather than “limping it home.”
What tire checks prevent blowouts, poor handling, and wasted fuel?
The most effective tire checks are pressure (cold), tread depth, wear pattern, and sidewall condition because those predict grip and failure risk. Next, you’ll turn these checks into a habit you can complete in under five minutes.

How often should you check tire pressure, and what number do you trust?
Check at least monthly and before long drives, using the vehicle placard (door jamb) rather than the tire sidewall. Next, check when tires are cold, because heat raises pressure and can hide an underinflation problem.
According to the U.S. Department of Energy’s Fuel Economy guidance, keeping tires properly inflated can improve gas mileage by up to about 3%, which is a practical reason to treat tire pressure as a routine check—not a crisis response.
What tread and wear patterns should you treat as signals?
Uneven wear points to alignment or suspension issues; feathering can suggest toe misalignment; cupping can signal worn shocks/struts. Next, use a simple tread-depth gauge or a coin method as a quick screen, but plan a professional assessment if wear looks irregular across the tread.
What should a simple tire-care routine include?
A practical “Tire care checklist” includes pressure checks, rotating on schedule, looking for nails/cuts, and monitoring vibration changes at highway speed. Next, add torque checks after any wheel removal (like seasonal swaps), because loose lugs can mimic wheel balance problems until they become dangerous.
How can you spot brake wear at home before it becomes dangerous?
You can screen brake health by listening for noises, checking pad thickness visually where possible, and noticing pedal feel changes. Next, you’ll pair that with a quick brake-fluid level check to catch patterns that point to wear or leaks.

What are the most reliable at-home brake indicators?
Squealing, scraping/grinding, steering pull while braking, vibration in the pedal, or a longer stopping distance are strong indicators. Next, if the brake pedal feels spongy or sinks, treat it as urgent—brake hydraulics are not a “wait and see” system.
How do you do a quick visual brake check?
If your wheel design allows it, look through the wheel spokes at the outer pad; you’re checking whether there’s still a visible layer of friction material. Next, if you can’t see the pad clearly or wear seems uneven, schedule an inspection rather than guessing.
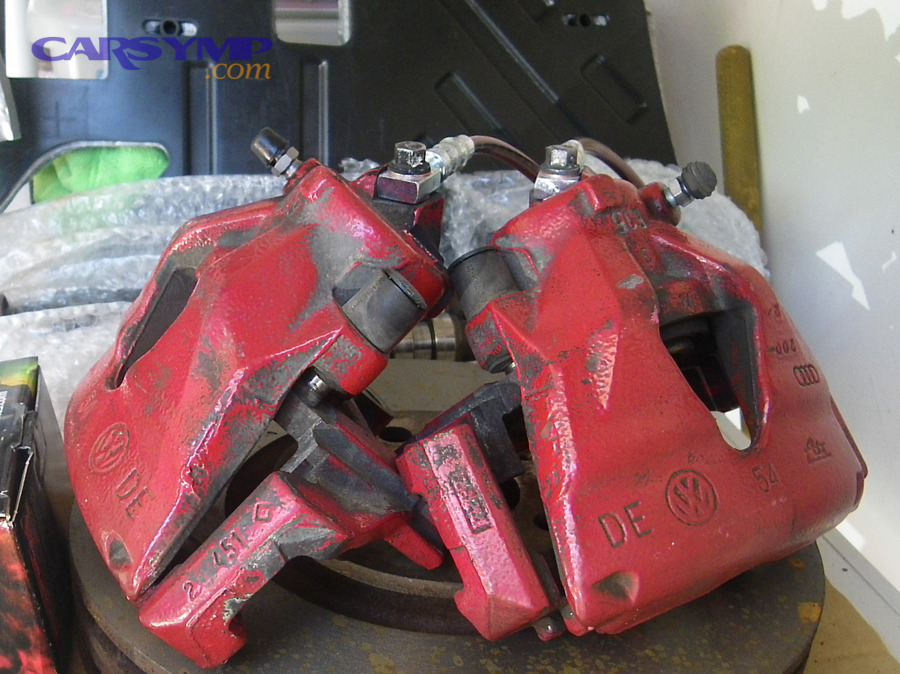
What’s a simple at-home brake checklist without removing wheels?
A “Brake inspection checklist at home” can be: confirm brake light works, listen for squeal during low-speed stops, confirm straight-line braking on a quiet road, check fluid level, and note any burning smell after a short drive. Next, if you notice any combination of noise + vibration + pull, prioritize service because problems often compound quickly once pads are thin.
Which lights, wipers, and visibility items should you verify every time?
Visibility checks focus on lights, wipers, washer fluid, and windshield clarity because they determine whether you can see—and be seen—during rain, fog, and night driving. Next, you’ll build a quick “two-minute routine” you can do before leaving.

What light check catches the most common “invisible to others” problem?
Test brake lights and turn signals, because you often can’t see them from the driver seat. Next, turn on hazards and walk around the vehicle—this also catches intermittent bulbs and lens damage.
How do you know it’s time to replace wipers?
Replace when they streak, chatter, skip, or leave unwiped bands, because that reduces contrast and reaction time in rain. Next, confirm washer spray hits the windshield evenly; poor spray can look like “bad wipers” when it’s actually a clogged nozzle or low washer fluid.

What small visibility fixes prevent big frustration later?
Keep a microfiber cloth for interior glass haze, clean headlight lenses if they’re cloudy, and replace burnt bulbs promptly. Next, if your headlights look dim, check for oxidation and consider a restoration kit—better light output is a safety upgrade, not just cosmetic.
What should you listen and feel for on a short test drive after checking the car?
A short test drive validates your inspection by confirming steering, braking, and drivetrain feel under real load. Next, you’ll use a simple “sense checklist” so you don’t ignore subtle warnings.
What noises should you treat as meaningful signals?
Clunks over bumps can suggest suspension looseness; high-pitched squeal can suggest belts or brakes; rhythmic thumping can indicate tire damage or flat-spotting. Next, note whether the noise changes with speed, braking, or turning—those patterns help a shop diagnose faster.
What “feel” problems should you not normalize?
Steering that suddenly feels heavier, a brake pedal that changes travel, or a vibration that appears at a specific speed is not “just how the car is now.” Next, if the car pulls during cruising or braking, treat it as a safety issue (alignment, tire, or brake imbalance) rather than a comfort issue.
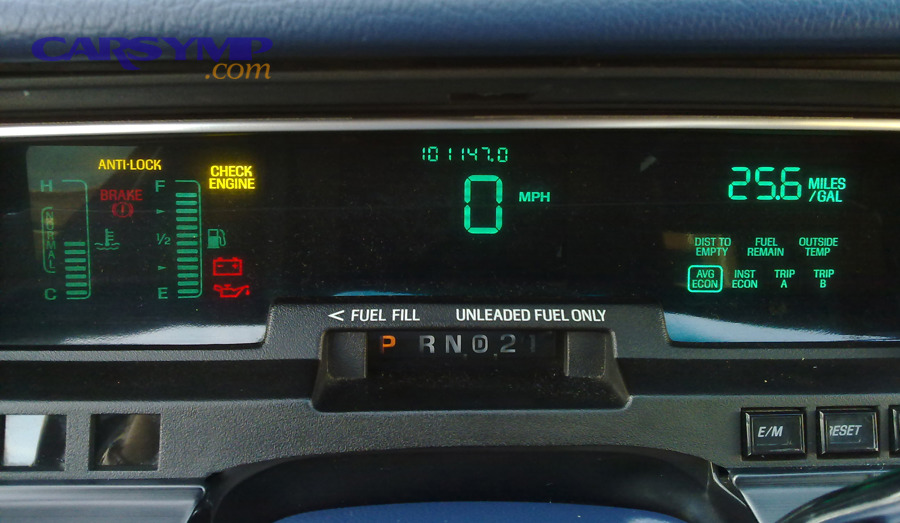
Which dashboard warnings change your priorities?
Red warnings (oil pressure, charging system, overheating) demand immediate attention; amber warnings often allow cautious driving but should be diagnosed soon. Next, don’t assume a warning is “just a sensor” unless it’s confirmed—modern systems often warn when damage is still preventable.
How do you turn the checklist into a repeatable schedule by time and mileage?
The best schedule combines time-based habits (monthly checks) with mileage-based service milestones (oil, filters, rotations) so you don’t miss tasks when you drive more—or less—than average. Next, you’ll convert your checks into a simple calendar-and-odometer system.
How do you build a practical routine you’ll actually follow?
Create one short routine (walk-around + under-hood) and one longer routine (deeper checks). Next, attach the short routine to an existing habit (first weekend of the month, or every time you buy gas) so it becomes automatic.
If you want a label for it in your notes, you can call it a “Monthly car maintenance checklist,” but the real goal is consistency: the same sequence, the same record, every time.
What should your time-and-mileage plan look like?
Use this Mileage-based service intervals guide as a starting point, then follow your owner’s manual for exact intervals and approved fluids. Next, if you drive in severe conditions (short trips, extreme heat/cold, towing, dusty roads), shorten intervals because the vehicle is working harder.
This table helps you map quick checks to common intervals so you can plan without guesswork.
| Interval | Quick Checks (Owner-Doable) | Service Items (Often Shop-Doable) |
|---|---|---|
| Every week / every fill-up | Walk-around; obvious leaks; tire visual scan; lights quick glance | — |
| Monthly | Tire pressures (cold); washer fluid; wiper condition; battery corrosion scan | — |
| Every 3,000–7,500 miles (varies) | Oil level between changes; inspect air filter visually | Oil & filter change (per manual); rotate tires (often every 5,000–7,500 miles) |
| Every 6 months | Cabin filter check; brake feel/noise review; tread depth measurement | Alignment check if wear is uneven; brake inspection if symptoms appear |
| Yearly | Full light check; windshield condition; hose/belt aging review | Coolant/brake fluid service per manual; battery test if older |
Why should you log what you did?
A quick log prevents duplicate work, helps you spot patterns (like recurring low coolant), and supports resale value. Next, even a simple note with date + mileage + what you checked is enough to make the checklist “stick.”
What warning signs mean you should stop driving and get service immediately?
Stop driving when you see red warnings, smell fuel or burning, lose braking confidence, or see overheating signs because continuing can turn a fixable issue into major damage. Next, use a short decision rule: safety first, then drivetrain protection.

Which signs indicate immediate risk?
“Warning signs that need immediate service” include: temperature gauge rising rapidly, steam from the hood, oil pressure warning, charging system warning with failing electrics, grinding brakes, sudden tire bulge or blowout symptoms, and strong fuel smell. Next, if you feel the car losing power while the engine shakes, pull over safely because misfires can damage catalytic components and create drivability hazards.
What should you do in the moment?
Turn on hazards, move to a safe location, shut off the engine if overheating is suspected, and call for help rather than risking engine damage. Next, don’t open a hot cooling system—let it cool fully, because pressurized coolant can cause serious burns.
What evidence should you record to help diagnosis?
Note the warning light color, any messages, the conditions when it happened (speed, hills, rain), and any new sounds or smells. Next, take a photo of the dash message if it’s safe; that single detail often saves time at the shop.
How can you expand the checklist for seasons and long trips without making it overwhelming?
Use one core checklist year-round, then add small “modules” for weather and travel so you stay consistent without turning maintenance into a project. Next, you’ll create a one-page version you can print or save on your phone.
How do you make a one-page version that’s easy to use?
Write the checklist as short verbs in the order you’ll do them: Walk-around → Tires → Lights → Under-hood → Cabin → Test drive notes. Next, keep checkboxes and leave a small blank for date + mileage so it becomes a “Printable maintenance checklist for drivers” you can reuse without rewriting every time.
What should change for heat, cold, and rain seasons?
A “Seasonal maintenance checklist” focuses on battery strength in cold weather, cooling system confidence in heat, and visibility (wipers, washer fluid, defogging) in rain. Next, add tire tread and pressure attention when temperatures swing, because pressure changes with ambient conditions and traction needs rise in wet/cold months.
What should you add before a long drive or vacation?
A “Pre-road-trip inspection checklist” adds two things: deeper tire scrutiny (spare tire included) and fluid margin (top-off where appropriate) because highway speeds magnify small problems. Next, confirm you have basic supplies (tire inflator, flashlight, gloves, phone charger) so minor issues don’t become stranded situations.
How do you set boundaries if you want to do small tasks yourself?
Doing simple checks is great, but “DIY car repair” should stay within your tools, space, and safety knowledge: topping washer fluid, checking tire pressure, replacing wipers, and inspecting fluids are reasonable starts. Next, if a task requires lifting the vehicle, dealing with pressurized/hot coolant, or touching brake hydraulics, treat it as “inspect and schedule” unless you’re trained and equipped.
FAQ
Do I need to follow the same checklist if my car is new?
Yes, because new cars still get nails in tires, batteries can weaken, and fluids can leak due to loose clamps or early defects. Next, newer vehicles also have more electronics, so keeping the battery and charging system healthy supports reliability—AAA has highlighted battery issues as a major category of roadside calls across recent years.
How do I know the right tire pressure if my tires show a different number on the sidewall?
Use the door-jamb placard pressure, because it’s the vehicle manufacturer’s recommended operating pressure for load, handling, and safety. Next, the tire sidewall number is typically a maximum pressure rating, not the daily target.
If my tire pressure is low, should I just keep adding air?
You can add air to reach the target, but repeated low pressure means you should look for a slow leak, valve stem issue, or bead leak. Next, check tread and sidewalls for nails or damage; persistent underinflation wastes fuel and increases heat, which can accelerate failure.
Is it normal for brake fluid to drop over time?
It can drop slightly as pads wear, but noticeable drops should be treated as a sign to inspect brakes and check for leaks. Next, never ignore a low level paired with a soft pedal—brake performance is a safety critical system.
Where can I keep learning symptoms and what they mean?
If you want a structured way to connect what you observe to likely causes, you can use a symptom-first resource like Car Symp as a reference point, then confirm details with your owner’s manual and a qualified technician. Next, the best checklist is the one you actually use—so keep it short, repeatable, and focused on safety signals.


