

Replace Catalytic Converter Guide for Drivers: OEM vs Aftermarket Options
Catalytic converter replacement is the fix you consider when the exhaust system can’t clean emissions effectively anymore, causing a persistent check-engine light, failed inspections, or drivability issues. The goal is simple: restore proper exhaust flow and emissions control without creating new leaks, warning lights, or legality problems.
Beyond the part itself, the real challenge is diagnosis—making sure you’re not replacing a converter when the real cause is an exhaust leak, sensor issue, fuel-control problem, or misfire damage. After all, a new converter can be ruined quickly if the engine is still running rich or misfiring.
Cost and compliance also matter. The “right” replacement depends on your vehicle’s emissions certification, your location’s test rules, and the documentation you may need later for inspection or warranty.
To begin, the most helpful approach is to understand what the converter does, how it fails, and how to confirm the root cause before any money is spent.
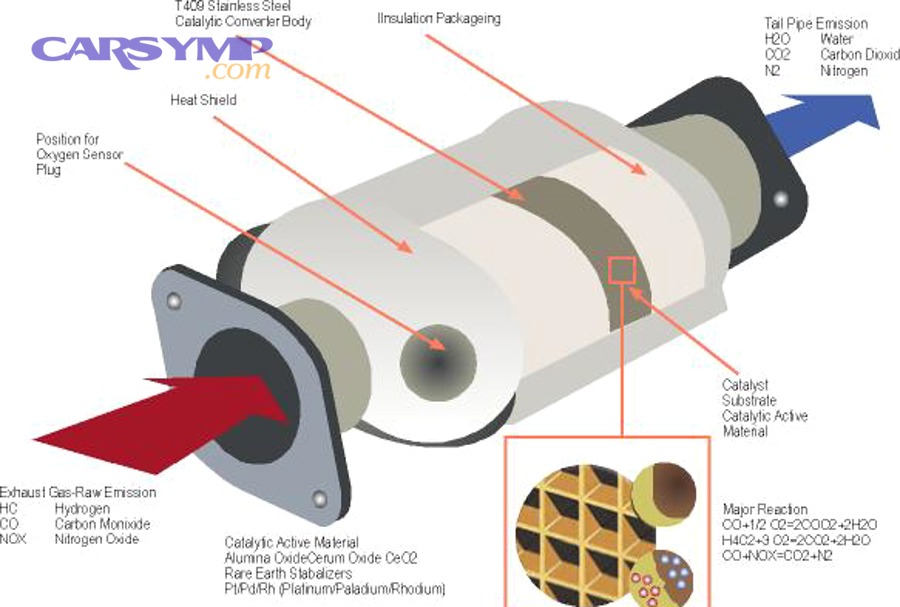
What is a catalytic converter, and when is replacement actually necessary?
A catalytic converter is an emissions-control device in the exhaust that chemically reduces harmful gases; replacement is necessary when it can’t meet efficiency requirements, is physically damaged, or becomes restricted. Next, you’ll want to connect function to failure patterns so your decision is evidence-based.
Replacement is usually justified when one or more of these conditions are true:
- Efficiency failure: the converter no longer stores and releases oxygen properly, so the ECU flags catalyst efficiency issues repeatedly.
- Restriction: the substrate melts or collapses, increasing backpressure and reducing power.
- Physical damage: impact dents, cracked welds, broken flanges, or theft-related cutting compromise sealing and structure.
- Contamination: long-term oil burning, coolant intrusion, or chronic rich running poisons the catalyst coating.
What replacement is not: a first-choice fix for any check-engine light. A converter is often the “victim,” not the root cause. So, the most important mindset is: replace the converter only after you confirm why it failed, or you risk repeating the same expensive outcome.
Practical replacement triggers include a confirmed efficiency code that returns after underlying issues are addressed, a failed emissions test with supporting scan data, audible internal rattling with verified substrate breakup, or proven restriction via temperature/backpressure tests. Next, let’s map symptoms to likely causes so you can separate converter failure from look-alikes.
How can you tell converter trouble from other exhaust or engine problems?
You can distinguish converter trouble by combining symptoms with basic tests: restriction signs point toward internal damage, while odor, noise, and scan patterns often indicate upstream causes. To connect the dots, start with symptoms but confirm with evidence before you commit.
Drivers often search for Catalytic converter failure symptoms and find overlapping lists that match many issues. The goal is to categorize symptoms by what they most strongly suggest.
Which symptoms most strongly suggest a restricted converter?
A restricted converter usually causes power loss under load, sluggish acceleration, and sometimes a sensation of “breathing through a straw,” especially at highway speeds. Next, confirm restriction with temperature or backpressure checks rather than guessing.
- Power falls off as RPM rises, but idle may seem normal.
- Engine runs hotter under load, with possible pinging due to heat.
- Transmission downshifts more often because the engine can’t produce expected torque.
- Exhaust note may become muted, or you may hear a hiss as pressure builds.
Which symptoms align with a chemically “worn” converter (efficiency loss)?
An efficiency-loss converter often shows few drivability symptoms; instead, it triggers a persistent catalyst efficiency code and may fail emissions testing. To move from “code” to “cause,” compare sensor patterns and check for fueling or misfire issues.
- Check-engine light with recurring catalyst efficiency fault after reset.
- Possible sulfur/rotten-egg odor after hard acceleration (not always present).
- Emissions test failure with elevated pollutants despite otherwise normal driving.
What signs point away from the converter as the primary issue?
If the engine misfires, burns oil, runs rich, or has coolant leaks into combustion, the converter may be damaged secondarily rather than being the original fault. Next, fix the upstream condition first, or the replacement converter is at risk.
- Misfire codes, rough idle, shaking, or strong fuel smell.
- Oil consumption with blue smoke; heavy oil ash can coat the substrate.
- Coolant loss with white smoke; coolant can poison catalyst surfaces.
- Exhaust leak ticking near the manifold area, especially cold start.
At this point, you’re ready for the “proof” stage: scan codes, sensor behavior, and targeted checks. That’s where most costly mistakes are avoided—so let’s go there next.
Which tests confirm the diagnosis before you replace the converter?
You confirm the diagnosis by combining OBD-II codes, live data, and physical checks for leaks and restriction; this prevents swapping an expensive part based on a guess. Next, follow a simple sequence so each test narrows the cause logically.
Start with the scan tool because it gives you a map of what the ECU thinks is happening. Then verify with reality checks.
How do catalyst efficiency codes fit into a real diagnostic plan?
Codes like catalyst efficiency faults are starting points, not verdicts; they tell you the ECU sees a pattern where the converter isn’t smoothing oxygen sensor signals as expected. Next, you’ll verify that pattern and eliminate leaks or sensor problems first.
In many cases, the key phrase you’ll encounter is P0420/P0430 code diagnosis. Treat it as a workflow: (1) check for other codes first, (2) confirm fuel trims and misfires are normal, (3) verify no exhaust leaks, (4) compare upstream/downstream sensor behavior, and only then consider the converter.
How do you separate converter failure from sensor or leak issues?
You separate them by inspecting the exhaust for leaks, confirming sensor operation, and looking for consistent patterns under steady cruise—not just at idle. To make that practical, use a “rule out” checklist before you buy parts.
This is where the phrase Converter vs O2 sensor vs exhaust leak diagnosis becomes useful. Here’s a grounded way to apply it:
- Check for exhaust leaks first: leaks upstream of the downstream sensor can introduce oxygen and mimic poor catalyst efficiency.
- Verify upstream O2/A/F sensor behavior: if the upstream sensor is lazy or biased, it can distort fueling and catalyst interpretation.
- Compare downstream sensor stability: a healthy converter often produces a steadier downstream pattern under cruise than the upstream.
- Review fuel trims: chronic rich/lean conditions can trigger efficiency faults and also damage the converter.
Which quick physical checks catch restriction and damage?
You can catch restriction by checking temperature differences across the converter, listening for internal rattle, or measuring backpressure when needed. Next, combine at least two indicators so you’re not fooled by one ambiguous clue.
- Rattle test: a broken substrate may rattle when tapped (cool exhaust only).
- Temperature check: under stable RPM, outlet temperature may be higher than inlet when the converter is active; abnormal patterns require context.
- Vacuum/backpressure clues: rising backpressure can reduce manifold vacuum at higher RPM.
- Visual inspection: dents, crushed sections, or cut pipes after theft attempts are immediate red flags.
Once your evidence points to replacement, the next step is to understand what the job actually involves—because fitment, sealing, and sensor handling are where many replacements fail.
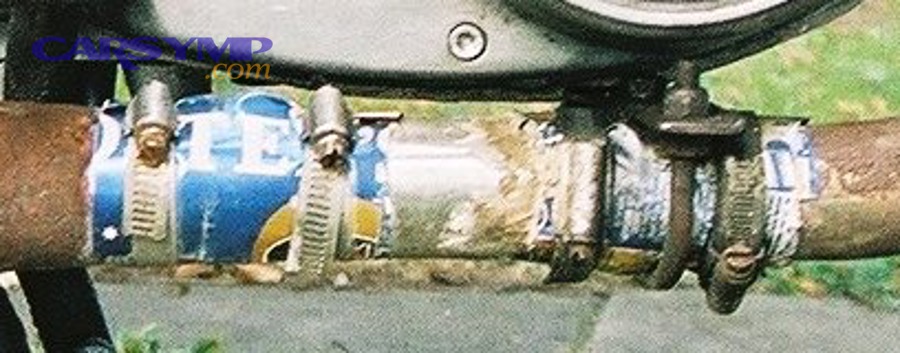
How is catalytic converter replacement done safely and correctly?
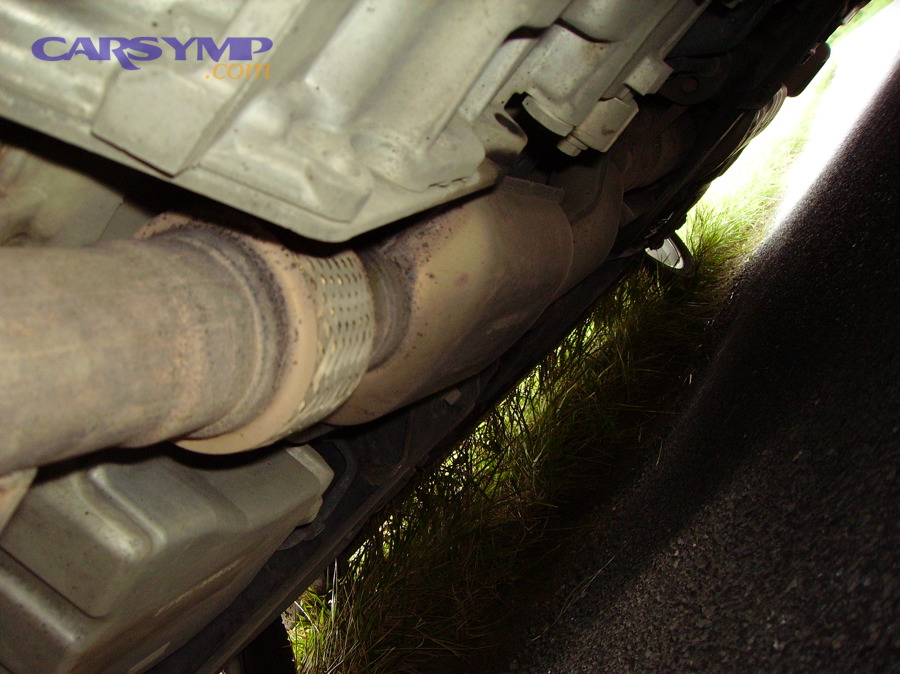
Catalytic converter replacement is typically a bolt-on or cut-and-weld job that requires safe lifting, rust management, proper gaskets, and careful sensor handling. Next, choose your path—shop or DIY—based on tools, safety, and local compliance needs.

In many markets, this falls under exhaust & emissions repair, meaning the shop may also check for leaks, sensor readiness, and inspection compliance. Even if you DIY, you should think like a shop: preparation, safe access, correct parts, correct torque, and verification.
What are the safe preparation steps before turning a wrench?
Preparation is mainly about safety and preventing broken fasteners: let the exhaust cool, secure the vehicle properly, and pre-treat bolts with penetrant. Next, plan for rust and tight access so you don’t get stuck mid-job.
- Cool-down time: converters get extremely hot; allow full cooling.
- Lift safety: use jack stands on solid points; never rely on a jack alone.
- Rust strategy: penetrant overnight helps; consider heat tools if experienced.
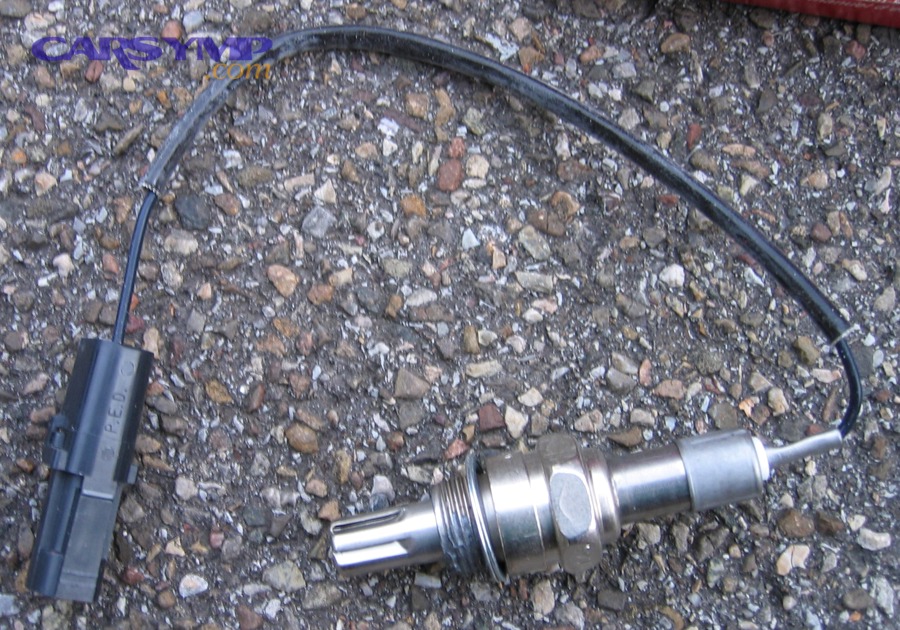
- Sensor care: unplug harnesses gently; use correct O2 sensor socket if removing sensors.
What is the typical step-by-step workflow for replacement?
The core workflow is remove, clean, seal, install, and verify: unbolt or cut the old unit, prep mating surfaces, install new gaskets/hardware, then confirm no leaks and correct sensor connections. Next, verification steps protect your investment.
- Identify converter location(s): some vehicles have multiple converters or integrated manifolds.
- Remove heat shields if needed: keep hardware organized.
- Disconnect sensors/harness brackets: avoid twisting wires.
- Remove fasteners or cut sections: follow your part type (direct-fit vs universal).
- Prep flanges: clean rust scale; ensure flat mating surfaces.
- Install new gaskets and hardware: many failures come from reused crushed gaskets.
- Torque evenly: tighten in stages to prevent flange warping.
- Leak check: listen/feel for pulses; look for soot marks after a short run.
Which common mistakes cause repeat check-engine lights or leaks?
The most common mistakes are ignoring root causes, installing the wrong spec converter, leaving exhaust leaks, and damaging sensors or wiring. Next, treat “post-install verification” as part of the replacement—not optional cleanup.
- Reusing old gaskets or skipping hardware upgrades on rusty systems.
- Installing a converter that doesn’t match emissions certification for the vehicle’s label requirements.
- Failing to fix upstream misfires or rich running that quickly overheats the new converter.
- Improper welding or clamping that creates small leaks near sensor locations.
Now that you understand the job, the next decision is the part itself—because “fit” and “legal” are just as important as “works today.”
Which replacement choice fits your car and your emissions rules?
The best choice matches your vehicle’s emissions certification, delivers correct fitment, and is accepted by local inspection standards; the wrong choice can cause repeat codes or failed testing. Next, compare options by legality, durability, and documentation.

Most drivers eventually face Replacement options: OEM vs aftermarket legality, even if they don’t phrase it that way. The core idea is that emissions parts aren’t just “parts”—they’re regulated components in many regions.
When does OEM make the most sense?
OEM is often the safest route for strict inspection areas, integrated manifold converters, and vehicles that repeatedly flag efficiency issues after non-OEM attempts. Next, weigh this against cost and availability rather than assuming OEM is always required.
- Best fit and calibration alignment for sensor placement and expected efficiency.
- Higher likelihood of long-term durability when engine controls are healthy.
- Fewer surprises on readiness and inspection in strict jurisdictions.
When can quality aftermarket be appropriate?
Quality aftermarket can be appropriate when it is certified for your application, installed leak-free, and paired with a healthy engine that won’t contaminate it. Next, focus on application-specific certification and documentation rather than brand marketing.
- Direct-fit designs reduce installation error compared with universal weld-in parts.
- Certified units are more likely to pass inspection where rules require approval markings.
- Cost-to-value balance can be strong on older vehicles when OEM is extremely expensive.
What should you verify before purchasing any converter?
You should verify emissions certification, converter location count, flange style, sensor bung placement, and whether new gaskets/hardware are included. Next, confirm that the part matches your VIN-based application data, not just engine size.
- Emissions label match: federal vs California-type certifications matter in some places.
- Sensor count and location: incorrect bung placement can trigger codes even if the converter is “good.”
- Heat shield clearance: rubbing shields become rattles that mimic substrate failure.
- Return policy and warranty terms: keep documentation from day one.
With the correct part strategy in mind, the next natural question is cost—because converter pricing varies wildly, and the “why” behind the number matters.
How much does catalytic converter replacement cost, and what drives the price?
Replacement cost depends on converter type, vehicle design, labor time, and compliance requirements; the same “converter job” can range from relatively manageable to very expensive. Next, break the total into parts, labor, and “extra” fixes that often come with it.
Many owners search Catalytic converter replacement cost estimate and get a single number, but the useful answer is a range with drivers. The table below lists the main cost factors and what they typically change.
This table explains what pushes the price up or down, so you can spot estimates that are missing important items like gaskets, sensors, or leak repairs.
| Cost driver | What it usually means | Why it changes the total |
|---|---|---|
| Converter type | Manifold-integrated, front, secondary, or multiple units | Integrated designs often cost more and take longer |
| Fitment style | Direct-fit vs universal weld-in | Weld-in may add fabrication labor and risk leaks if rushed |
| Rust level | Seized bolts, broken studs, corroded flanges | Extra time, extra hardware, and sometimes additional parts |
| Sensor condition | Old O2 sensors, damaged wiring, stuck threads | Replacing sensors can prevent repeat codes but increases cost |
| Compliance/documentation | Certification requirements, paperwork, markings | Certified parts and documentation can cost more but reduce inspection risk |
| Root-cause repairs | Misfires, rich running, oil/coolant consumption | Without these fixes, the new converter may fail prematurely |
How to read an estimate: a good estimate clarifies whether you’re replacing one converter or multiple, whether new gaskets/hardware are included, whether sensors are inspected or replaced, and whether leak checks are part of the job. Next, shift from “price” to “outcome”—because after the install, you still need the system to pass readiness and inspection.
What should you expect after installation: readiness, re-testing, and long-term results?
After installation, you should expect a verification period where the ECU runs readiness monitors, checks for leaks, and confirms catalyst efficiency; this is normal and required for inspections. Next, follow a structured post-repair routine so you don’t panic over temporary “not ready” statuses.
Many people overlook Break-in and readiness monitors after replacement. While a converter doesn’t “break in” like brake pads, the ECU does need to see stable operating conditions across drive cycles to mark catalyst-related monitors complete.
What are the must-do post-install checks in the first hour?
The must-do checks are leak inspection, sensor connection verification, and confirming fuel trims and misfire counters look normal. Next, you’ll drive in a way that allows the ECU to run its self-tests.
- Leak check at idle and light rev: listen for ticking, feel for pulses near joints (carefully).
- Confirm sensor wiring routing: avoid contact with hot exhaust or moving shafts.
- Scan for pending codes: don’t wait for the light to return if data already shows trouble.
How do you complete readiness monitors without guessing?
You complete readiness by performing steady cruising, gentle accelerations, and proper warm-up cycles that match typical drive-cycle logic. Next, aim for consistency rather than aggressive driving that can create new issues.
- Warm-up fully to normal operating temperature.
- Steady cruise at moderate speed for several minutes.
- Coast-down periods where safe, allowing decel fuel cut in many systems.
- Avoid short trips only if you need monitors ready for an upcoming inspection.
How does this affect emissions testing and failed results?
Emissions tests can fail if monitors are not ready, if a small leak exists, or if underlying fueling issues remain; passing requires both a functioning converter and healthy engine control. Next, treat inspection as a validation step, not a gamble.
In real-world terms, Emissions test implications and fixes often boil down to: confirm readiness status, confirm no pending codes, and ensure the exhaust is sealed. If you repeatedly fail after replacement, the most common reasons are an unnoticed exhaust leak, a fueling issue, or an incorrect converter specification for the vehicle’s certification.
Once the system is working, the next priority is preventing repeat damage—because converters usually fail from upstream problems or external events like theft.
How do you prevent repeat converter failure and reduce theft risk?
You prevent repeat failure by fixing upstream engine issues early and maintaining correct fueling, while theft risk is reduced through parking habits, shields, and identification methods. Next, separate “engine-protection” actions from “theft-prevention” actions so you cover both sides of the risk.
What maintenance habits protect the new converter?
The most protective habits are addressing misfires immediately, stopping oil or coolant burning, and avoiding prolonged rich running. Next, monitor small warning signs because converters often die from problems that were visible months earlier.
- Fix misfires fast: unburned fuel overheats and melts the substrate.
- Address oil consumption: oil ash coats catalyst surfaces and reduces efficiency.
- Repair coolant leaks: coolant contamination can permanently reduce catalyst activity.
- Keep oxygen sensors healthy: accurate feedback keeps fueling stable.
Why are converters stolen, and what actually helps prevent it?
Converters are stolen because their catalyst coatings contain valuable metals and theft can be fast on high-clearance vehicles. Next, combine deterrence layers rather than relying on one trick.
This is the practical meaning behind Why catalytic converters get stolen and prevention:
- Physical barriers: shields/cages increase time and noise required.
- Smarter parking: well-lit areas, garages, and close-to-wall parking reduce access.
- Marking and documentation: etching VIN and using visible identification can deter resale.
- Alarm strategy: tilt sensors or motion alerts can help on frequently targeted vehicles.
At this stage, you’ve covered the core replacement path. Next comes the contextual boundary: details that matter most in edge cases—legal paperwork, warranty disputes, and “what if” ownership decisions.
Contextual Border: The sections above focus on deciding, diagnosing, and completing catalytic converter replacement. The section below shifts into ownership-level considerations—compliance, warranty strategy, and decision trade-offs that become important after the repair.
Ownership decisions that shape legality, warranty, and long-term value
Ownership decisions matter because emissions components are regulated and expensive; the right records and choices can save you from failed inspections, denied warranty claims, or repeat costs. Next, use the following checkpoints to protect both compliance and budget.
When is it safe to keep driving, and when should you stop?
It depends: you can sometimes drive briefly with mild efficiency issues, but you should stop if you suspect restriction, severe overheating, or misfires that can destroy the new part. Next, treat risk as a spectrum rather than a yes/no argument.
The phrase Can you drive with a bad catalytic converter often hides three different scenarios:
- Efficiency-only issue: the car may drive normally, but emissions may be high and inspection may fail.
- Restriction developing: power loss, heat, and stress rise; prolonged driving can damage the engine.
- Upstream damage source present: misfires or rich running can rapidly overheat components and create fire risk.
How do warranties typically apply, and how do you avoid claim problems?
Warranty outcomes depend on documentation, correct application, and proof that the converter wasn’t damaged by an unresolved engine problem. Next, keep records like a careful mechanic would—because paperwork is often the deciding factor.
When you think about Warranty coverage for catalytic converters, focus on these practical items:
- Proof of correct part: keep the invoice, part number, and any certification labels.
- Evidence of root-cause repairs: if misfires or oil burning existed, fix and document them.
- Installation notes: shops should document leak checks and scan results; DIY owners should keep photos and scans.
How do you stay compliant with aftermarket parts and inspections?
Compliance is about matching the converter to the vehicle’s emissions certification and meeting local inspection expectations. Next, think of compliance as “part + paperwork + readiness,” not just “part installed.”
In daily language, this is still Replacement options: OEM vs aftermarket legality—and the safe path is to buy an application-correct, properly certified converter for your region, then keep documentation that supports it during inspections or resale.
What should a buyer or future mechanic be able to verify later?
Future verification should be easy: what was replaced, why it was replaced, and what was done to prevent repeat failure. Next, package your story into a simple repair record that holds up over time.
If you maintain a personal service history (or publish a repair explainer for readers), a “repair narrative” helps. For example, Car Symp style documentation might include: symptom timeline, scan screenshots, leak test notes, part numbers, and readiness completion proof after the repair.


