How to Fix a Tire Puncture the Right Way: DIY Methods vs. Professional Repair
Fixing a tire puncture correctly is not simply a matter of plugging a hole and driving away. The right repair requires sealing both the injury channel and the inner liner simultaneously — a process that, when done properly, can restore a tire to its full, safe service life. Whether you are stranded on the side of a highway or pulling into a tire & wheel service center, understanding what “correct” actually means makes the difference between a repair that holds for the life of the tire and one that quietly fails at highway speed.
Not every flat tire situation calls for the same response. Some punctures are straightforward tread-area fixes that a prepared driver can handle roadside with a quality DIY puncture repair kit. Others involve damage that only a trained technician can evaluate and resolve safely. Knowing which category your situation falls into before you act is one of the most important things this guide will help you determine.
Repairability is the first gating question in any tire puncture scenario. Tire puncture location rules established by the Tire Industry Association (TIA) and the National Highway Traffic Safety Administration (NHTSA) define clear boundaries: damage to the sidewall, shoulder zone, or any puncture exceeding ¼ inch in diameter on a passenger tire falls outside safe repair limits. Understanding these rules protects both your safety and your wallet.
Cost, tools, and timing are the practical dimensions that shape every repair decision. A professional shop repair is often surprisingly affordable — sometimes free — while a quality Plug vs patch repair comparison reveals significant differences in long-term durability. Below, this guide walks through every dimension of tire puncture repair in full, so you can act with confidence regardless of where or when a flat strikes.
What Is a Tire Puncture and Can It Always Be Repaired?
A tire puncture is a penetrating injury to the tire tread caused by a sharp foreign object — such as a nail, screw, or road debris — and it can be repaired only when the damage is confined to the tread area and measures no more than ¼ inch (6 mm) in diameter on passenger tires.
To better understand which repairs are viable and which are not, it helps to start with the tire itself. A modern pneumatic tire is a layered structure of rubber, steel belts, and textile cords. When a foreign object pierces the tread, it creates an injury channel through these layers. The fundamental challenge of any puncture repair is to seal both that channel and the airtight inner liner on the inside of the tire — which is why partial repairs so frequently fail.

What Are the Types of Tire Punctures?
There are three main ways to classify tire punctures — by location, by cause, and by size — and each classification criterion determines a different aspect of the repair decision.
By location:
- Tread puncture — The only type considered repairable under TIA and NHTSA industry standards. The tread is reinforced with steel belts and cord plies that allow a plug-patch to bond securely.
- Shoulder puncture — Falls in a transitional zone between tread and sidewall. Most reputable shops will refuse to repair a shoulder puncture due to the stress concentration in that area.
- Sidewall puncture — Never repairable. The sidewall flexes continuously while the tire rotates; there is no cord structure in that area to support a patch, and any sealant applied will fail under load.
By cause:
- Nail or screw — The most common cause; typically creates a clean, straight channel that enters at a perpendicular or slightly angled path.
- Road debris — Glass, metal shards, or sharp gravel; may create irregular entry channels that complicate repair.
- Blowout damage — Not a puncture in the traditional sense; indicates structural failure and requires full tire replacement.
By size:
- Repairable: ≤ ¼ inch (6 mm) diameter for passenger car tires; ≤ 3/8 inch for light truck tires.
- Non-repairable: Any breach exceeding these thresholds has compromised too much cord material to be safely sealed.
Is a Sidewall Tire Puncture Repairable?
No — a sidewall tire puncture is not repairable under any circumstances, and attempting to patch or plug it creates a dangerous risk of sudden tire failure while driving.
The reason is structural, not just procedural. Tire tread is reinforced with circumferential steel belts and layered cord plies that give a plug-patch combination a stable surface to bond against. The sidewall contains none of these reinforcing elements in the same configuration. It is engineered specifically to flex thousands of times per mile as the tire rotates under load. Any patch applied to the sidewall will be torn away by this repeated flexion within a short distance. Additionally, according to NHTSA guidelines, even if a patch were to temporarily hold, the underlying cord damage from the penetrating object means the tire can no longer contain inflation pressure safely. When a puncture is not repairable — as is always the case with sidewall damage — the only correct course of action is tire replacement.
What Are the Methods Used to Fix a Tire Puncture?
There are three methods used to fix a tire puncture — plug-only, patch-only, and the plug-patch combination — classified by how completely they seal the injury, with the plug-patch combination being the only method endorsed by NHTSA and TIA as a permanent, safe repair.
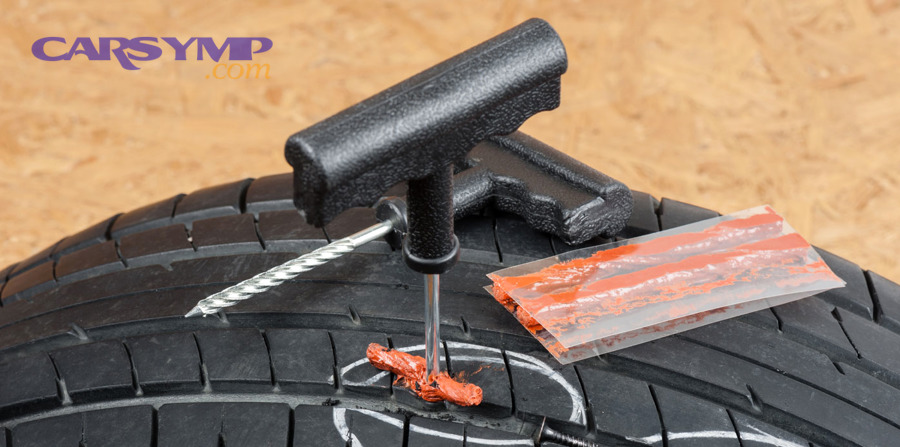
Understanding the distinctions between these methods matters because the wrong choice does not simply mean a slightly inferior repair — it can mean a repair that appears functional but allows air and moisture to infiltrate the tire’s internal structure over time, accelerating cord corrosion and increasing blowout risk.
What Is the Difference Between a Tire Plug and a Tire Patch?
A tire plug wins on speed and accessibility, while a tire patch is superior for sealing the inner liner — but neither alone achieves a complete, permanent repair, which is why the plug vs patch repair comparison always concludes in favor of using both together.
Tire Plug:
- A rubber stem inserted through the injury channel from the outside of the tire.
- Fills the hole in the tread and stops air from escaping through the channel.
- Does not address the inner liner, leaving a potential pathway for moisture to enter the tire body.
- Can be applied without removing the tire from the wheel — making it a viable emergency roadside measure.
- However, a plug-only repair is explicitly classified as temporary by both TIA and NHTSA.
Tire Patch:
- A rubber and fabric disc applied to the inner liner of the tire from inside, after the tire has been removed from the rim.
- Seals the inner liner effectively but does not fill the physical injury channel through the tread.
- Air and contaminants can still enter through the open channel even with a patch covering the interior.
Why neither alone is sufficient:
The injury channel is a full-thickness penetration. A plug seals the channel but leaves the liner unsealed. A patch seals the liner but leaves the channel open. Only a combination closes both pathways simultaneously.
Why Is the Plug-Patch Combination the Correct Repair Method?
Yes — the plug-patch combination is definitively the correct repair method because it simultaneously fills the injury channel with a rubber stem and seals the inner liner with a bonded patch, creating a complete barrier that is permanent for the life of the tire.
The combination unit is typically a single pre-vulcanized piece: a rubber plug stem attached to a patch base. During a professional repair, the technician inserts the stem through the prepared injury channel while the patch base adheres to the buffed and cemented inner liner surface. This integration is achieved through a cold vulcanizing chemical process that bonds the rubber of the repair unit molecularly to the tire’s inner liner. The result is a seal that does not degrade under normal service conditions. According to the Tire Industry Association’s Puncture Repair Procedures for Passenger and Light Truck Tires, this method — and only this method — meets the standard for a permanent repair. Shops performing plug-only repairs are not following industry guidelines, regardless of how routine the practice may seem.
How Do You Fix a Tire Puncture Yourself (DIY Method)?
You can fix a tire puncture yourself in 6 steps using a plug-patch combo kit, and when performed correctly on a qualifying tread-area puncture, the result is a safe and durable repair — though permanent sealing of the inner liner still requires removing the tire from the rim.

DIY repair is a genuinely viable option in the right circumstances. The key constraint is honest assessment: if you cannot confirm the puncture is in the tread area, within size limits, and that the inner liner shows no damage, the repair should be deferred to a professional. With those conditions confirmed, a quality kit and careful execution can produce a repair that matches shop standards.
What Tools and Materials Do You Need for a DIY Tire Puncture Repair?
There are 6 essential tools and materials needed for a proper DIY tire puncture repair: a plug-patch combo kit, a tire reamer/rasp tool, an insertion needle tool, rubber vulcanizing cement, a tire pressure gauge, and an air compressor or CO₂ inflator.
The table below compares each tool by its function and includes notes relevant to selecting or using it correctly.
| Tool / Material | Purpose | Notes |
|---|---|---|
| Plug-patch combo kit | Fills channel + seals liner | Choose mushroom plug style for best results |
| Tire reamer / rasp tool | Cleans and shapes the injury channel | Ensures proper bonding surface |
| Insertion needle tool | Pulls plug stem through the channel | Included in most kits |
| Rubber vulcanizing cement | Chemically bonds patch to liner | Must be compatible with tire rubber |
| Tire pressure gauge | Verifies correct inflation after repair | Digital gauges are most accurate |
| Air compressor / CO₂ inflator | Re-inflates tire to spec | Check vehicle door placard for target PSI |
Basic roadside plug kits available at auto parts stores are typically plug-only and should be considered emergency measures only. For a complete DIY fix that meets industry intent, a dedicated mushroom plug-patch kit — such as those sold by TECH or similar professional suppliers — is the appropriate choice. DIY puncture repair kit safety and limits are real: the kit fills the hole, but only a technician can confirm the tire is structurally sound.
What Are the Step-by-Step Instructions to Repair a Tire Puncture at Home?
The proper DIY tire puncture repair process involves 6 ordered steps following the R.E.P.A.I.R. framework, and completing all steps correctly produces a repair that can last for the remaining service life of the tire.
Step 1 — Remove the object. Use pliers to extract the nail, screw, or debris from the tread. Note the angle of entry — if the object entered at greater than 35 degrees from vertical, a two-piece repair may be required, and professional service is recommended.
Step 2 — Evaluate the damage. Inspect the puncture visually. Confirm it is in the tread area, within ¼ inch in diameter, and shows no sidewall bulging, cord exposure, or secondary damage. If the inner liner is not accessible (tire still on rim), this step is limited — which is a key limitation of on-rim DIY repairs.
Step 3 — Prepare the injury channel. Insert the reamer/rasp tool into the puncture and work it in and out to clean debris and roughen the channel walls. This creates the surface texture required for cement adhesion.
Step 4 — Apply cement and insert the plug-patch. Coat the plug stem with vulcanizing cement. Thread the stem into the insertion needle tool, then push it firmly through the injury channel from the outside until the patch base seats flat against the inner liner. Pull the needle tool free, leaving the stem in place.
Step 5 — Trim the excess stem. Cut the protruding portion of the rubber stem flush with the tread surface. Do not pull the stem tight — this can disturb the patch bond.
Step 6 — Inflate and inspect. Re-inflate the tire to the manufacturer’s specification (found on the door placard, not the tire sidewall). Apply soapy water around the repair site and check for bubbles indicating residual air loss. This is a critical step in After repair: checking for slow leaks.
According to Tech Tire Repairs, an improper preparation of the injury channel — particularly skipping the reaming step — is the leading cause of DIY repair failures, as it prevents the vulcanizing cement from bonding properly.
How Does a Professional Tire Puncture Repair Work?
A professional tire puncture repair follows a structured Tire puncture repair steps at a shop process involving tire removal, full internal and external inspection, channel preparation, plug-patch application via cold vulcanization, and TPMS reset — all of which typically take 15 to 45 minutes and result in a permanently repaired tire.

The distinction between a professional repair and a DIY on-rim plug is significant: a shop technician removes the tire from the wheel entirely before making any repair decision. This single step allows a complete visual inspection of the inner liner — the most critical diagnostic action in any puncture repair — and is the reason professional repairs meet the permanent repair standard that roadside DIY fixes cannot.
What Does Tire Puncture Repair Cost at a Shop?
A Tire puncture repair cost estimate at most shops ranges from free to $30, depending on the service provider, the complexity of the repair, and whether TPMS service or wheel balancing is included.
The table below outlines typical cost scenarios across common service providers to help you benchmark what to expect before visiting a shop.
| Service Provider | Typical Repair Cost | Notes |
|---|---|---|
| Les Schwab | Free | For tires purchased there; walk-ins often free too |
| Discount Tire / America’s Tire | Free | Well-known for complimentary flat repairs |
| Jiffy Lube | $15–$25 | Includes TPMS considerations after puncture repair |
| Independent tire shop | $10–$30 | Varies by location and labor rate |
| Dealership service center | $20–$40 | Often includes balancing and TPMS recalibration |
TPMS considerations after puncture repair are an often-overlooked cost factor: when a tire is removed and remounted, the TPMS sensor battery and signal must be re-synced to the vehicle’s monitoring system, which some shops charge separately for. Always ask upfront whether the quoted price includes TPMS reset and post-repair balancing.
How Long Does a Professional Tire Puncture Repair Take?
A standard professional tire puncture repair takes between 15 and 45 minutes at a tire & wheel service shop, with the primary variable being shop volume, the need for wheel balancing, and whether TPMS recalibration is required.
For a straightforward tread puncture with no inner liner damage, an experienced technician can complete the removal, inspection, plug-patch application, and reinstallation in approximately 20 minutes. What extends repair time is not the complexity of the patch itself but rather the ancillary services. Re-balancing the wheel after remounting — which is best practice and sometimes required — adds 10 to 15 minutes. TPMS recalibration, depending on the vehicle’s system, can add another 5 to 10 minutes. If the technician discovers that the original puncture was accompanied by inner liner damage not visible from outside, they may need additional time to properly assess whether repair remains viable or whether the tire must be replaced entirely.
DIY Tire Puncture Repair vs. Professional Repair — Which Is Right for You?
DIY repair wins in speed and accessibility for emergency roadside situations, while professional repair is best for safety and permanence, making professional service the correct long-term choice for any puncture repaired outside of a true emergency.

This comparison is not about which option is “better” in an absolute sense — it is about which option is appropriate for your specific circumstances. The following breakdown maps those circumstances clearly.
When Should You Repair a Tire Puncture Yourself?
Yes — you should repair a tire puncture yourself when three conditions are simultaneously true: the puncture is visibly in the tread area, the object entered at a perpendicular or near-perpendicular angle, and you have access to a quality plug-patch combo kit with the proper tools.
Beyond these three conditions, DIY repair is appropriate when:
- You are in a location where professional tire service is not accessible within a reasonable distance.
- The puncture is actively losing air and driving on the rim would cause rim and tire damage.
- You have confirmed the puncture diameter does not exceed ¼ inch.
- You are able to safely jack the vehicle and work on a stable, level surface.
Critical limitation to understand: A DIY repair performed with the tire still on the rim — which describes almost every roadside scenario — cannot include inner liner inspection. This means the repair addresses the channel and exterior but cannot confirm inner liner integrity. For this reason, a roadside plug-patch repair should always be followed up with a professional inspection and formal shop repair at the next available opportunity. DIY puncture repair kit safety and limits are real: the kit fills the hole; only a technician can confirm the tire is structurally sound.
When Should You Take a Tire Puncture to a Professional?
Yes — you should take a tire puncture to a professional whenever the damage involves the shoulder or sidewall, the puncture angle exceeds 35 degrees, the tire has been driven flat, a previous repair overlaps the new damage, or the TPMS warning light remains on after inflation.
Specific conditions that require professional service include:
- Shoulder or sidewall location — As established earlier, these zones are outside safe repair boundaries. A professional confirms this with certainty; visual assessment alone can be misleading on a mounted tire.
- Angle of entry exceeds 35° — At steeper angles, the injury channel is elongated through the tire body and requires a two-piece combination repair that cannot be performed on-rim.
- Tire was driven flat — Even briefly driving on a flat tire can cause heat damage and internal cord separation that is invisible from the exterior. Professional inspection of the inner liner is mandatory.
- Overlapping prior repairs — Industry standards prohibit repair areas from overlapping. A technician can determine this during the internal inspection; a DIY repair cannot.
- TPMS warning persists — A sensor that continues to read low after proper inflation may indicate either a slow leak remaining from an incomplete seal or a sensor malfunction — both require professional diagnosis.
- Uncertainty about inner liner damage — When in doubt, defer to a professional. The cost of a shop repair is always lower than the cost of a blowout.
According to the U.S. Tire Manufacturers Association (USTMA), a significant percentage of tires brought to shops for repair are found to have inner liner damage that was not apparent from outside the tire — underscoring why professional inspection remains the gold standard even after a seemingly successful DIY plug.
The sections above have fully addressed the core topic: how to fix a tire puncture using both DIY and professional methods, including when each is appropriate. The following supplementary section expands into specialized cases where standard repair rules change — including electric vehicles, run-flat tires, temporary sealants, and tubeless vs. tube-type tire differences.
Are There Special Cases Where Standard Tire Puncture Repair Rules Don’t Apply?
Yes — there are four specialized scenarios where standard tire puncture repair rules do not apply: run-flat tires, electric vehicle (EV) tires with acoustic foam, tires treated with temporary liquid sealants, and tube-type tires, each of which requires a modified repair approach or complete tire replacement.

These cases represent the micro-niche edge of tire puncture repair knowledge. Most drivers will never encounter all four, but encountering even one without awareness of its specific rules can result in a failed repair, wasted money, or — in the case of run-flat tires — a dangerous false sense of security. More importantly, these scenarios are precisely where a standard DIY puncture repair kit will be inadequate and professional evaluation becomes non-negotiable.
Can You Repair a Run-Flat Tire After a Puncture?
No — in most cases, a run-flat tire cannot be safely repaired after a puncture, particularly if the tire has been driven on while deflated, because the internal reinforced sidewall structure may have sustained invisible heat and compression damage that compromises the tire’s ability to contain pressure.
Run-flat tires are engineered with reinforced sidewall inserts that allow a vehicle to continue traveling at reduced speed (typically up to 50 mph for up to 50 miles) after a complete loss of inflation pressure. This capability is precisely what makes post-puncture run-flat repair so complicated. When a conventional tire goes flat, the driver stops immediately — the inner liner is inspected before any heat or compression damage accumulates. With a run-flat, the driver may continue driving for miles, and the self-supporting sidewall undergoes significant stress during that time. The resulting damage is often not visible even to a professional technician during internal inspection. Many vehicle manufacturers — including BMW and Mercedes-Benz — explicitly state in their owner’s manuals that run-flat tires should not be repaired after being driven flat and must be replaced. Some tire manufacturers do permit repair under strict conditions (zero miles driven on flat, damage within tread area, no structural deformation), but this determination must always be made by a professional technician using a full dismounted inspection.
Does a Tire Puncture Repair Work on Electric Vehicle (EV) Tires?
Yes — a tire puncture repair can work on EV tires under standard tread-area conditions, but a significant complication arises when the tire contains acoustic foam lining, which absorbs liquid sealants and makes both professional plug-patch repair and post-repair balancing extremely difficult.
Many EV tires — particularly those designed for vehicles like the Tesla Model 3, Audi e-tron, and BMW iX — feature a layer of polyurethane acoustic foam bonded to the inner liner. This foam acts as a sound dampener, reducing the road noise amplification that is more perceptible in quiet electric drivetrains. The problem: if a driver uses a liquid tire sealant product (Fix-a-Flat, Slime, or a built-in sealant kit like those found in some EVs that have no spare tire) before bringing the tire to a shop, the sealant saturates the acoustic foam. Once saturated, the foam cannot be adequately cleaned, the inner liner surface cannot be properly prepared for a patch, and the foam itself becomes an uneven mass that throws off wheel balance. The practical result is that a tire which could have been conventionally repaired becomes irreparable. For EV owners, the correct protocol after discovering a tread puncture is to proceed directly to a tire & wheel service center without using any liquid sealant.
Can a Temporary Tire Sealant (Like Slime or Fix-a-Flat) Replace a Proper Puncture Repair?
No — a temporary tire sealant cannot replace a proper tire puncture repair because it does not physically seal the injury channel or bond to the inner liner, meaning it provides only a short-term pressure retention solution that degrades rapidly and can actively prevent a permanent repair from being performed later.
This is one of the most important distinctions in all of tire puncture repair. Liquid sealants work by circulating inside the tire and coagulating at the puncture site as air escapes, creating a soft, temporary plug. They are designed specifically for emergency situations — getting a driver off a highway or out of a parking lot safely — not for extended driving. The limitations are significant and cumulative:
- Durability: Sealant plugs are not bonded to the tire. Vibration, temperature cycling, and continued driving gradually dislodge them, allowing slow air loss to resume.
- Coverage: Sealants are generally ineffective for punctures larger than ¼ inch and do not work at all on sidewall damage or bead leaks.
- Downstream repair complications: Sealant residue coats the inner liner, making it impossible to prep the surface for a patch without extensive cleaning — a process many shops charge extra for or decline to perform at all.
- EV-specific risk: As described above, sealant saturates acoustic foam and renders the tire irreparable.
When using a sealant as an emergency measure, always inform the shop technician before they begin working on the tire. Transparency allows them to assess whether a proper repair remains viable or whether replacement is the only option. How long a repaired tire lasts after a proper plug-patch job can be the remaining life of the tire — but a sealant-treated tire’s repairability window closes quickly.
What Is the Difference Between Tubeless and Tube-Type Tire Puncture Repair?
Tubeless tire repair wins on simplicity and is applicable to nearly all modern passenger vehicles, while tube-type tire repair requires additional steps — specifically inner tube removal and separate patching — making it more time-consuming and applicable primarily to older vehicles, motorcycles, and bicycles.
Tubeless tires (standard on all modern passenger cars and most motorcycles manufactured after the 1990s):
- The tire itself forms the airtight seal against the wheel rim.
- A puncture is repaired by sealing the tread and inner liner of the tire itself using the plug-patch combo method.
- No inner tube is present — the repair is applied directly to the tire structure.
- The wheel does not need to be split to access the repair area.
Tube-type tires (found on older vehicles, classic motorcycles, bicycles, and some agricultural/industrial equipment):
- An inflatable rubber inner tube sits inside the tire and provides the airtight chamber.
- A puncture in the tread of a tube-type tire inevitably punctures the inner tube as well.
- Repair requires: removing the tire from the rim, extracting the inner tube, locating the tube puncture (often using a water submersion test), roughing the tube surface, applying a tube patch with vulcanizing cement, allowing it to cure, and then reassembling.
- The tire itself may also require a patch if the penetrating object created a structural injury, though tube-type tire casings are often more tolerant of minor tread damage than tubeless casings.
The practical implication for most passenger vehicle drivers is that tubeless repair applies to them universally. However, drivers of vintage vehicles or motorcycles with tube-type tires — or anyone who encounters a flat on a bicycle or ATV — should understand that the repair process is fundamentally different and that a tubeless plug-patch kit will not work on an inner tube.
Preventing future punctures remains the final layer of responsible tire ownership. Maintaining proper inflation pressure — checked monthly and before long trips — significantly reduces the risk of tire damage from road hazards, as underinflated tires are more prone to impact damage and sidewall flex failures. Tire rotation on schedule ensures even tread wear, which extends the service life of all four tires and reduces the chance of a worn-tread blowout. For drivers in high-debris environments, puncture-resistant tire technology — available from manufacturers such as Michelin and Continental — offers measurably improved resistance to nail and screw penetrations without the run-flat trade-offs. The safest tire is the one that never needs repair.