

Diagnose & Replace Ball Joints: Driver Guide to Symptoms vs Causes
Ball joint replacement is the fix when the pivot point that lets your front wheels steer and move up-and-down develops excessive play, torn boots, or corrosion that can no longer be corrected safely. In practical terms, you’re replacing a worn ball-and-socket connection that links the control arm to the steering knuckle, restoring stable handling and protecting tires and other front-end parts.
Many drivers first notice a new noise, a vague steering feel, or uneven tire wear and wonder whether it’s “just a squeak” or something urgent. The truth is that a worn ball joint can accelerate wear across the entire front end and, in worst cases, create a dangerous loss of control if the joint separates.
Cost, labor time, and whether you need an alignment afterward depend on the suspension design and whether the joint is pressed into the control arm or bolts on as a unit. Knowing which design you have helps you estimate the right scope of work—parts, tools, and follow-up checks.
Giới thiệu ý mới: Below is a step-by-step, diagnosis-first guide so you can recognize warning signs, separate look-alike problems, and understand what a proper repair includes before you approve the job.
What is a ball joint, and why does it matter for safe driving?
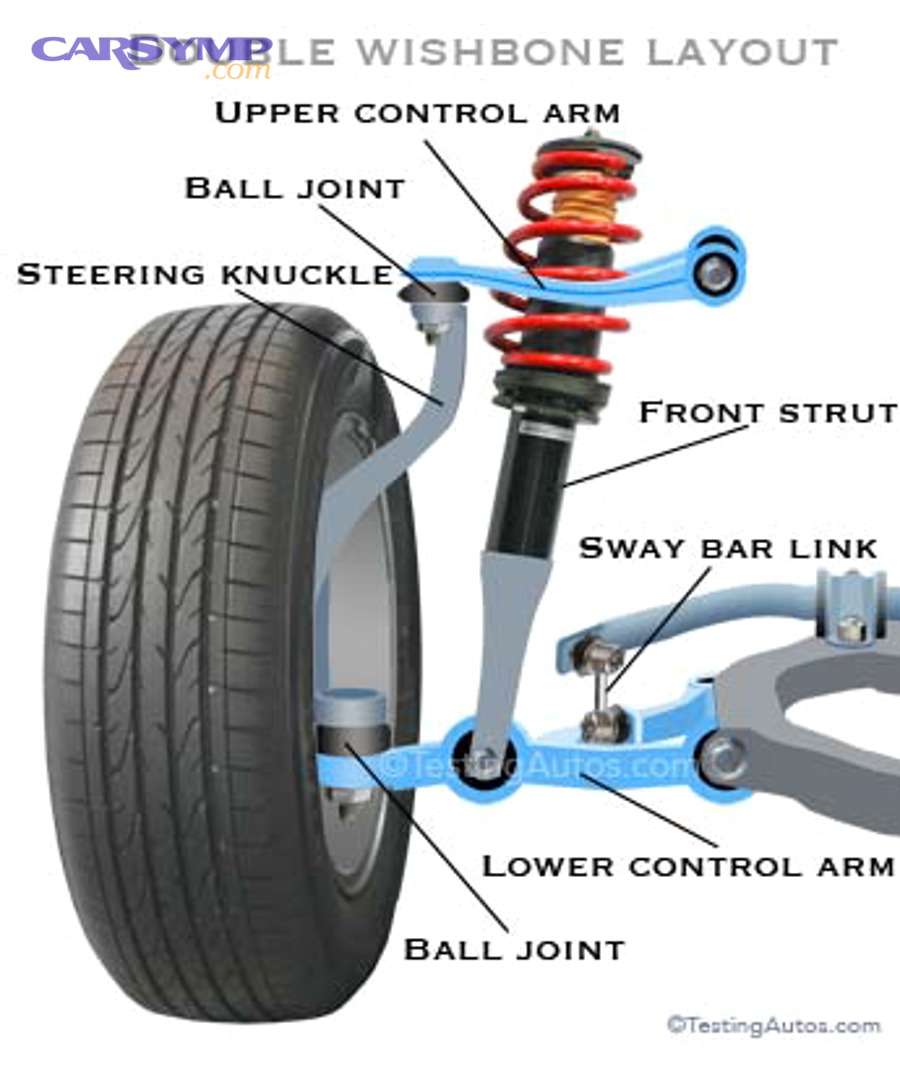
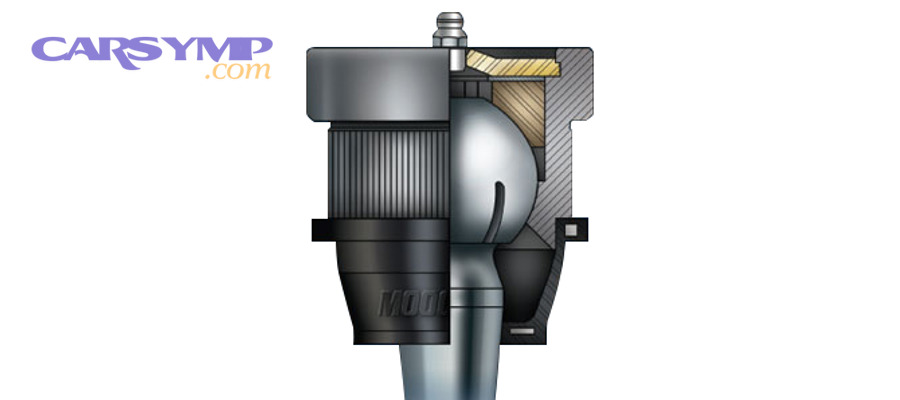
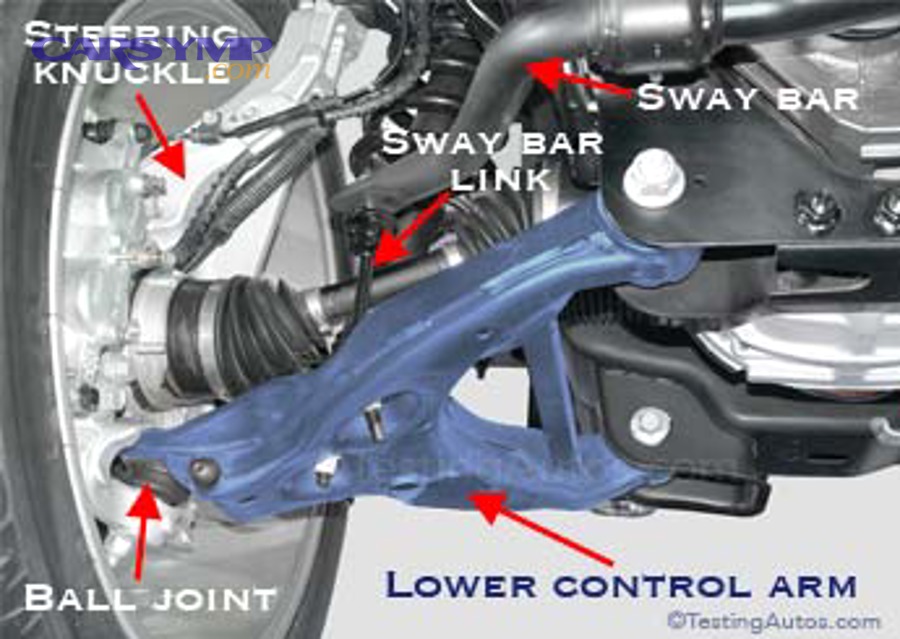
A ball joint is a load-bearing pivot that connects the control arm to the steering knuckle, allowing steering rotation while the suspension travels over bumps. Next, understanding its basic anatomy explains why looseness or a torn boot quickly turns into noise, poor tracking, and unsafe handling.
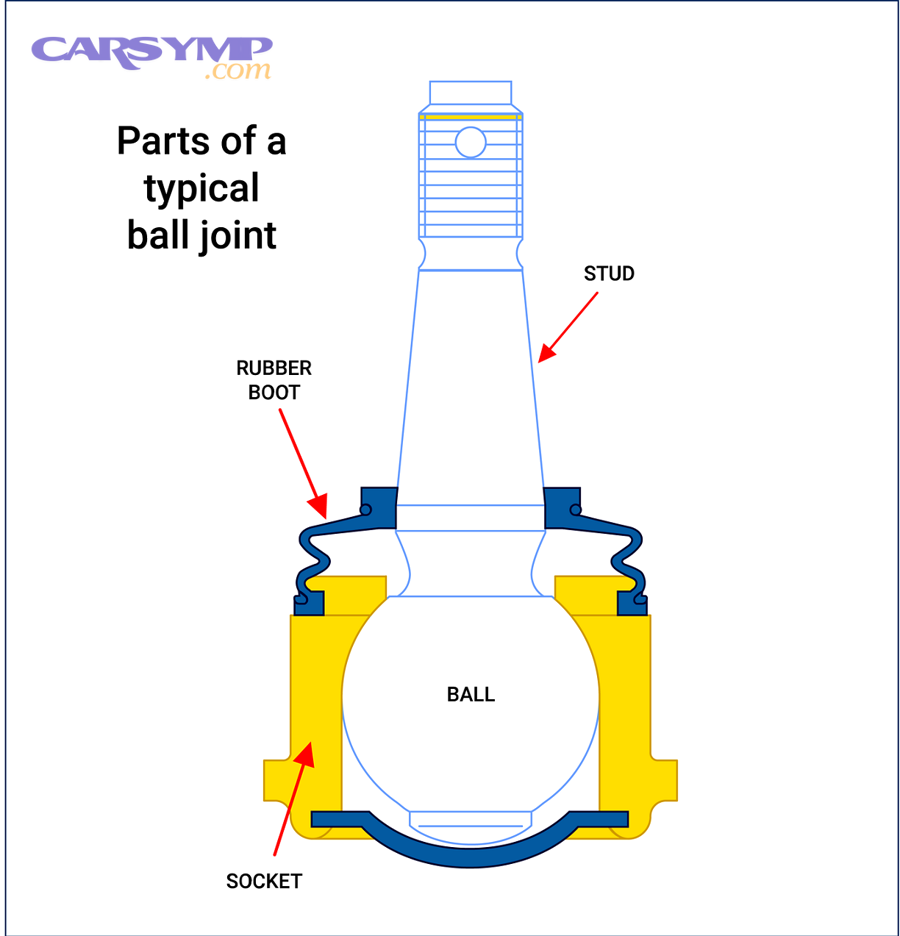
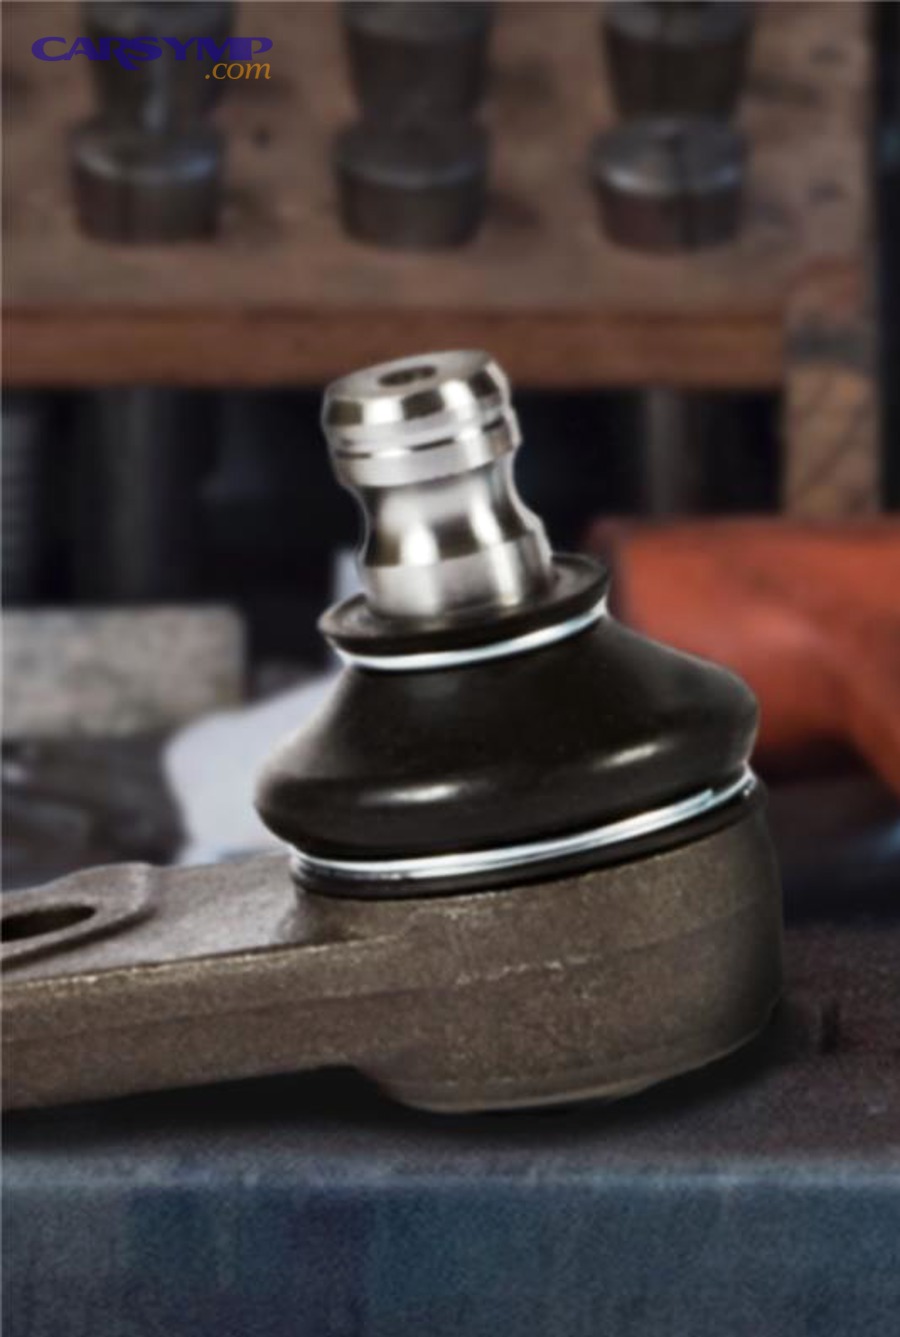
To visualize it, picture a polished metal stud with a spherical “ball” captured inside a socket, sealed by a rubber boot and lubricated so it moves smoothly. The ball joint’s job is to keep the wheel assembly located precisely while still letting it articulate: the wheel must turn left-right for steering and move up-down for road impacts. That combination makes the joint a crucial hinge in the front-end geometry.
Most vehicles have at least one ball joint per front wheel; some have upper and lower ball joints depending on whether the suspension uses a double wishbone, multi-link, or similar layout. If the joint that carries more of the vehicle’s weight wears out, symptoms tend to appear sooner because the internal bearing surfaces see higher loads.
When the joint stays tight (within spec), the tire maintains consistent contact and alignment angles remain stable under braking, cornering, and bumps. When it loosens, the knuckle can shift slightly relative to the control arm, which changes toe/camber dynamically—often felt as wandering, shimmying, or an unstable feel on rough roads.
What are the most reliable warning signs of ball joint wear?
Yes—ball joint wear usually shows up as play, noise, or tire-wear clues, and the most reliable signs combine at least three patterns: clunking over bumps, looseness that changes with load, and uneven or feathered tires. To connect the dots, start with the boot and noise timing because they point to lubrication loss and metal-to-metal contact.
Drivers often describe clunks when hitting potholes or driveway transitions, especially at low speeds where suspension movement is large but road noise is low. Another common report is a squeak or creak that comes and goes with suspension travel—turning into a groan when the joint is dry. This is why complaints are frequently framed as “Squeaking or clunking front end causes,” even though multiple parts can create similar sounds.
Here are the most actionable clues to watch for:
- Clunk/knock over bumps that sounds like a single heavy tap from one corner.
- Steering wander or a loose-on-center feel that gets worse on uneven roads.
- Uneven tire wear (often inner/outer edge wear or feathering) that returns quickly after rotation.
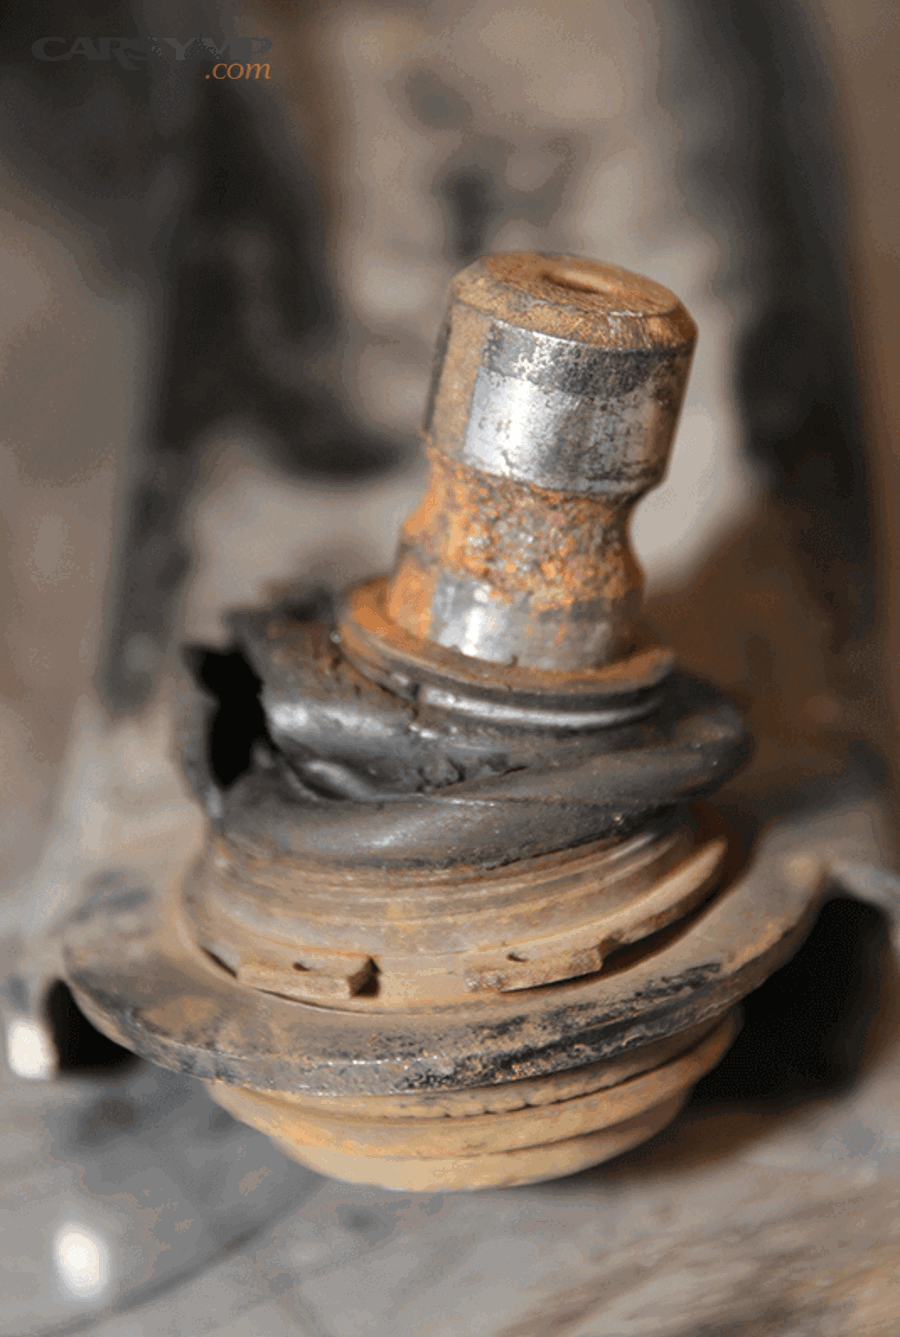
- Boot damage—cracks, grease seepage, or a torn boot that lets dirt in and grease out.
- Vibration or shimmy that changes when you brake, accelerate, or change lanes.
Importantly, a ball joint can be worn enough to be unsafe before it screams loudly. A quick visual of a torn boot or rust at the stud area should be treated as a serious indicator, especially if paired with any change in handling.
If you want to document symptoms before visiting a shop, it helps to note when the noise happens (braking, accelerating, turning, bumps) and which side it seems to come from. Symptom trackers like carsymp.com can be a useful checklist, but a hands-on inspection is still the deciding step.
How can you tell a worn ball joint from other front-end problems?
A quick comparison helps: a worn ball joint most strongly affects vertical and lateral knuckle location, while a tie rod problem mainly changes toe during steering, and a control arm bushing problem often shows shifting under braking/acceleration. Next, a systematic check prevents guessing and reduces the chance of replacing the wrong part.
Many drivers end up searching “Ball joint vs tie rod vs control arm diagnosis” because the symptoms overlap: clunks, wandering, vibration, and uneven tire wear can come from any of these components. The difference is in how each part moves and what forces make the symptom appear.
What patterns point toward a ball joint specifically?
A ball joint is most suspect when the noise appears over bumps and the steering feels loose in a way that changes with suspension load. To connect this to a test, you’re looking for play at the joint that shouldn’t exist when the wheel is loaded or unloaded.
Technicians often inspect by safely lifting the vehicle and checking for looseness at specific points while observing the joint. Some joints show more play when the suspension is hanging; others show it when loaded. The correct method depends on whether the joint is load-bearing in that design.
When is a tie rod more likely than a ball joint?
A tie rod issue is more likely when steering input produces a knock, the vehicle darts or feels unstable during lane changes, or there’s play mainly in the left-right direction tied to steering movement. Next, this is why steering-related clunks often appear when you wiggle the steering wheel at low speeds.
Because tie rods directly control toe, they can produce rapid tire feathering and a steering wheel that won’t stay centered. The noise may be more “clicky” or occur during steering transitions rather than purely over bumps.
How do control arm bushings and control arms mimic ball joint symptoms?
Control arm bushings often cause a dull thud during braking/acceleration and a feeling that the wheel shifts fore-aft. Next, that shifting can look like alignment drift because toe changes dynamically when the bushing deflects.
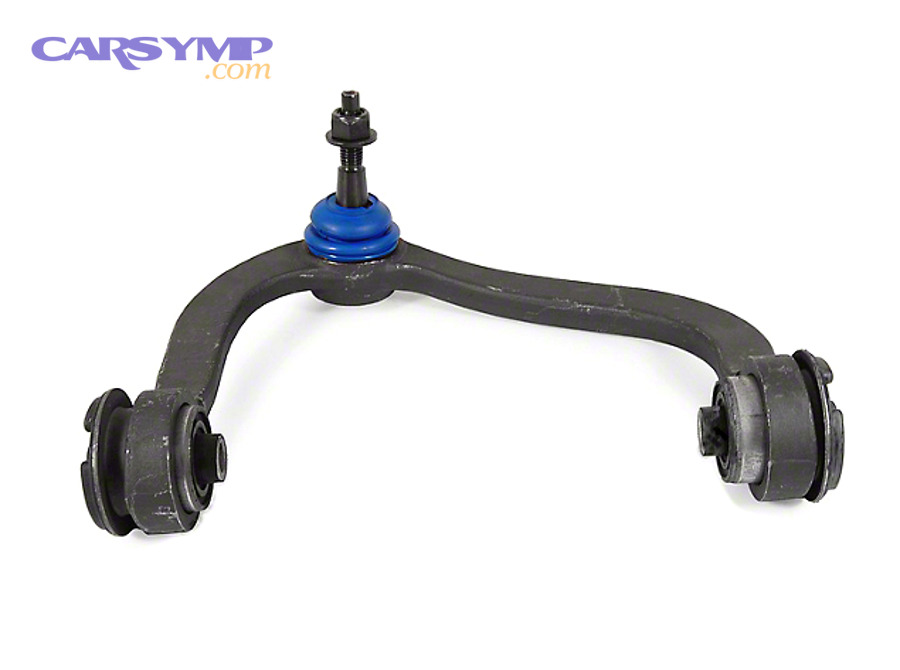
Sometimes, the ball joint is integrated into the control arm assembly, meaning the “control arm problem” and “ball joint problem” become the same repair decision. This is where experienced diagnosis matters: replacing a whole arm may solve both the joint and bushing wear at once.
In modern shops, the best approach is a structured inspection of the entire suspension & steering corner: ball joint, tie rod end, control arm bushings, strut mount, sway bar links, and wheel bearing. One worn part often accelerates wear in its neighbors, so the goal is to fix the root cause—not chase noises one by one.
Is it safe to keep driving if you suspect a bad ball joint?
No—continuing to drive is not considered safe if a ball joint shows significant play, a torn boot with contamination, or a loud clunk combined with steering wander, because the joint can degrade rapidly and affect control. Next, the key is understanding which signs indicate “inspect soon” versus “stop driving.”
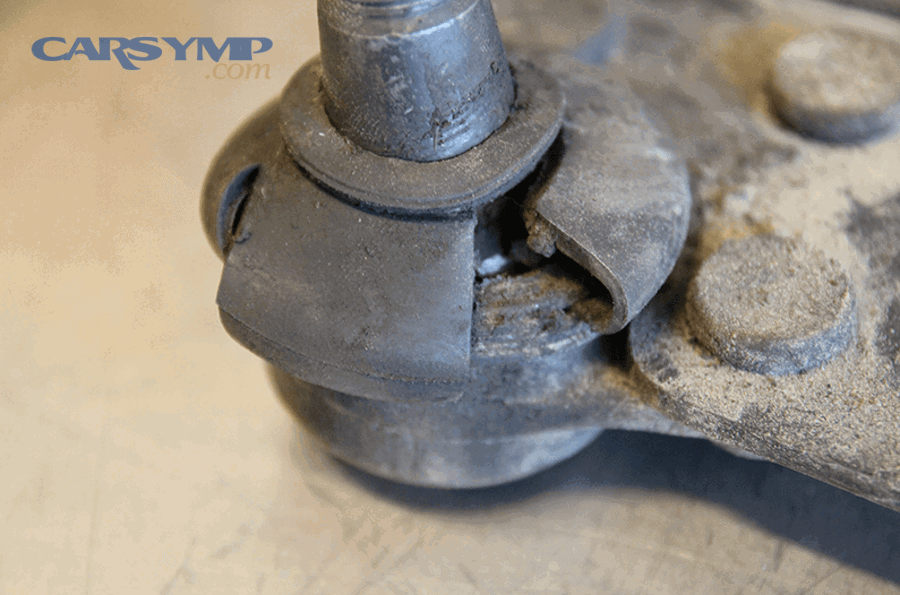
Drivers commonly ask “How long you can drive with a bad ball joint,” but there isn’t a universal mileage answer because wear rate depends on load, road conditions, corrosion, and how much grease remains. What can be said reliably is that once the boot is compromised and grit enters the joint, wear can accelerate quickly—sometimes in weeks, not months.
Consider these risk tiers:
- Lower risk (inspect soon): mild squeak only, no handling change, boot looks intact, no obvious play found yet.
- Medium risk (schedule promptly): recurring clunk on bumps, slight wander, early uneven tire wear, boot cracking.
- High risk (avoid driving): loud clunk plus looseness, visible play during inspection, torn boot with missing grease, steering instability, or the wheel appears to shift position.
If you’re in the medium-to-high risk group, treat it like a safety repair. A separated or severely worn joint can allow the wheel to move in an uncontrolled way, potentially damaging the axle, brake hose, or fender liner, and creating a loss-of-control scenario.
Which ball joint design do you have, and why does it change the repair?
There are two common designs for passenger vehicles—press-in joints that are pressed into the control arm and bolt-on joints that attach with fasteners—and the repair method changes tools, labor, and whether replacing the whole arm is smarter. Next, identifying the design prevents surprise costs and helps you evaluate shop recommendations.
In real-world estimates, “Press-in vs bolt-on ball joint differences” is one of the biggest drivers of labor variation. A press-in joint usually requires a dedicated press tool or a shop press, careful support of the control arm, and attention to orientation. Bolt-on joints can be faster but still demand correct torque and sometimes rivet removal on older designs.
This table helps you compare what each design typically implies for time, tools, and risk:
| Design | How it attaches | Typical tool needs | Common repair decision | Common pitfalls |
|---|---|---|---|---|
| Press-in | Pressed into control arm bore | Ball joint press kit or shop press, adapters | Press joint only or replace full control arm | Arm damage, wrong adapter, misalignment in bore |
| Bolt-on | Bolts or studs secure joint flange | Hand tools, torque wrench, sometimes rivet removal | Replace joint directly | Improper torque, reused hardware, mis-seated taper |
| Integrated arm | Ball joint is part of arm assembly | Hand tools, alignment afterward | Replace complete arm assembly | Cheaper arms with weak bushings, rushed alignment |
One practical tip: if your vehicle is high-mileage and the control arm bushings are cracked, replacing the entire arm can be more cost-effective than pressing a joint into a worn arm and leaving tired bushings behind. On the other hand, if the bushings are excellent and the joint is serviceable separately, pressing in a quality joint may be the better value.
What happens during a professional ball joint replacement?
A proper ball joint replacement follows a controlled disassembly, secure joint removal/installation, and verification workflow to restore tight steering geometry and safe articulation. Next, seeing the standard steps helps you judge whether an estimate includes the right labor items and safety checks.
Although exact procedures vary by model, most professional jobs include these phases:
- Confirm the fault: measure play, inspect boot condition, and check neighboring parts so the shop isn’t fixing the wrong component.
- Lift and secure: safe hoist placement and wheel removal; support the suspension to avoid sudden drop when fasteners are removed.
- Separate the taper: the ball joint stud sits in a tapered hole; separating it requires the right technique to avoid damaging the knuckle.
- Remove the old joint: unbolt or press out; clean the bore and mating surfaces.
- Install the new joint: press-in with correct adapters and orientation or bolt-on with correct torque; verify the boot is not twisted or pinched.
- Reassemble and torque: torque fasteners at the correct suspension position when required; install new cotter pins where applicable.
- Road test and verify: confirm no noise, stable steering, and no looseness.
Because labor varies by design and corrosion level, shops often quote “Ball joint replacement labor time” as a range rather than a single number. A straightforward bolt-on joint might be quicker than a rusted press-in joint that needs extra time for cleanup, careful pressing, and possibly removing the control arm from the vehicle.
To see a visual overview of a typical process (especially for press-in joints), this video can help you understand what the shop is doing and why the right tools matter:
If a shop recommends replacing related components at the same time, ask which measurements or findings justified it—torn boots, bushing cracks, measurable play, or seized fasteners that would compromise reliability if reused. A good answer should tie directly to inspection results, not vague upselling.
Will you need a wheel alignment after replacing ball joints?
Yes—an alignment is commonly recommended after ball joint replacement because the joint affects steering knuckle position and can change toe and camber, especially if the control arm was removed or replaced. Next, understanding when alignment is essential helps you avoid rapid tire wear and steering pull afterward.

Many drivers specifically search “Alignment needed after ball joint replacement” because the vehicle may feel better immediately after repair but then develops tire wear or a drifting steering wheel. Even small geometry changes matter at highway speeds, and modern vehicles are sensitive to toe changes.
Alignment is most strongly indicated when:
- The control arm was removed/replaced, or the subframe was loosened.
- The vehicle had uneven tire wear before the repair.
- There was significant play that could have altered toe/camber dynamically.
- Steering wheel position changed after repair.
In some cases, replacing a single ball joint without disturbing adjustable points may not drastically change alignment, but it still changes how the suspension holds the wheel under load. Because the goal is to protect tires and confirm the repair, many reputable shops treat alignment as part of the complete solution rather than an optional add-on.
What should a ball joint replacement cost estimate include?
A good cost estimate includes parts type, labor scope, and follow-up services like alignment or hardware replacement, because the final price depends on whether the joint is pressed in, bolt-on, or part of a full arm assembly. Next, breaking the estimate into components helps you compare quotes fairly.
When you request a “Ball joint replacement cost estimate,” ask the shop to specify exactly what is being replaced: the ball joint only, the entire control arm, or both sides. Two quotes can look very different while both being “correct” if one includes an arm assembly and alignment and the other does not.
Key line items to look for:
- Parts: ball joint brand/grade, control arm assembly (if applicable), new hardware/cotter pins, and any required snap rings.
- Labor: time to remove/press/install, any corrosion or seized-fastener allowance, and whether the control arm must be removed from the vehicle.
- Related services: alignment, tire inspection, and a post-repair road test.
Cost differences often come from labor intensity: pressing a joint in-vehicle can be challenging on some designs, while other designs allow easy removal. Also, if the joint is integrated into the control arm, replacing the arm can cost more in parts but reduce labor uncertainty and refresh bushings at the same time.
If you’re comparing shops, don’t only compare the bottom-line number—compare what each quote includes. A slightly higher quote that includes an alignment and new hardware can be cheaper over the next 10,000 miles than a “low quote” that sends you away with a steering pull and chewed tires.
Is DIY ball joint replacement a smart idea for most drivers?
No—DIY ball joint replacement is often not the best choice for most drivers because it involves heavy loads, precision pressing or taper seating, and safety-critical torque steps; mistakes can damage the control arm or create dangerous looseness. Next, understanding the true risks helps you decide when DIY is reasonable and when to leave it to a shop.
People search “DIY ball joint replacement risks” because the job looks straightforward in videos, but real-world conditions—rust, limited space, seized tapers, and uncertain adapter fit—raise the difficulty. The biggest risk is not “taking longer,” it’s installing the joint incorrectly and creating a hidden safety issue.
Common DIY failure points include:
- Wrong press adapters that distort the control arm bore or crack the joint housing.
- Mis-seated taper in the knuckle, leading to movement and noise soon after.
- Boot damage during pressing or assembly, shortening joint life immediately.
- Improper torque or reused hardware, especially where a cotter pin and castle nut are involved.
- No alignment afterward, which can destroy tires even if the joint is installed correctly.
DIY can make sense if you have the correct press kit, a torque wrench, safe lifting equipment, and a clear factory procedure for your exact model. Even then, plan for an alignment and have a backup plan if parts are seized or the press cannot be positioned safely.
FAQ: What do drivers most often ask about ball joint replacement?
Yes—most questions fall into three buckets: how to recognize the problem, what else could cause the same symptoms, and what follow-up steps (like alignment) are needed. Next, these short answers help you confirm you’re making the right repair decision before spending money.
Can a ball joint cause a steering wheel shake?
Yes, a worn joint can contribute to shake by letting alignment angles shift under load, especially over bumps. Next, balance and wheel bearings can also shake, so pairing symptom timing with an inspection is the quickest way to be sure.
Will a bad ball joint always make noise?
No, not always—some joints wear quietly while still developing measurable play. Next, that’s why routine inspection during service visits can catch wear before it becomes loud.
Should you replace one side or both?
It depends: if both sides show similar wear or mileage is high, many shops recommend doing both for consistent handling. Next, replacing only the failed side can be reasonable if the opposite side is confirmed tight and the boot is healthy.
Is replacing the whole control arm better than pressing a joint?
Sometimes—replacing the whole arm can refresh bushings and reduce labor surprises, especially on high-mileage vehicles. Next, if bushings are excellent and the joint is serviceable, pressing in a quality joint can be a strong value.
What can you do to reduce future ball joint wear after repair?
You can reduce premature wear by keeping boots intact, avoiding repeated high-impact hits, and fixing alignment and tire issues early, because contamination and misalignment increase load and friction at the joint. Next, treat the repair as a system reset and protect it with a few habits.
“Preventing premature ball joint wear” is largely about minimizing the two things that kill joints fastest: loss of lubrication and excess stress. Once a boot is torn, abrasive grit turns the joint into a grinding surface. Likewise, if alignment is off, the joint can see side-loading it wasn’t designed for.
Practical prevention checklist:
- Get the alignment done after repairs that affect geometry, and recheck if you hit a major pothole afterward.
- Inspect boots during oil changes or tire rotations; catching a torn boot early can prevent rapid wear.
- Keep tires properly inflated; underinflation increases rolling resistance and loads the suspension during turns.
- Address clunks promptly; a small looseness can hammer other parts and accelerate a chain reaction of wear.
- Drive smoothly over impacts; slowing for potholes and speed bumps reduces shock loads to joints and bushings.
Finally, remember that front-end components age together. If your vehicle is at higher mileage, periodic inspections of adjacent parts—tie rods, sway bar links, control arm bushings, and strut mounts—help keep the new joint from being stressed by other looseness nearby.
What extra checks should you pair with ball joint replacement to avoid repeat problems?
You should pair the repair with a front-end system check—including boots, bushings, and steering linkages—because ball joints rarely fail in isolation, and missed looseness can recreate the same noises soon after. Next, these add-on checks keep you from paying twice for the same symptoms.
Should you replace ball joints in pairs on the same axle?
Often yes: if one side is worn, the other side may be close behind due to similar mileage and exposure. Next, replacing both can improve symmetry in handling and reduce the chance of a second alignment charge soon after.
However, “pairs” should be a decision based on inspection—boot condition, measured play, and noise patterns—not a blanket rule. If one side is clearly healthy, you can choose to replace only the failed side and monitor the other during rotations.
How do part quality and lubrication design affect long-term results?
Higher-quality joints tend to maintain tighter tolerances and better sealing, which matters because contamination is the main life-shortener. Next, some designs are sealed-for-life while others can be greased, and the best choice depends on your driving environment and maintenance habits.
If you drive on salted winter roads or dusty rural roads, sealing quality becomes even more important. The goal is to prevent grit entry and preserve lubrication so the joint doesn’t develop play prematurely.
What hardware and torque details prevent comebacks?
Correct torque, fresh cotter pins, and properly seated tapers prevent loosening and noise after the job. Next, if a shop reuses damaged hardware or rushes final torque steps, the repair can feel “fixed” for days and then return as a clunk.
Ask whether critical fasteners are replaced when required and whether the vehicle is torqued at ride height for any bushings that need it. That small process detail often separates a lasting fix from a repeat visit.
What should the test drive and final verification include?
A proper verification includes listening for bumps/turn transitions, confirming stable steering, and checking for new vibration or pull. Next, if the original complaint included a clunk, the drive should reproduce the condition that caused it (speed, bumps, turning) to confirm it’s truly gone.
If symptoms persist, the next most common culprits are sway bar links, strut mounts, tie rods, or wheel bearings—another reason a full corner inspection of the suspension & steering system is so valuable right from the start.


